


Updated for 2026 · Hands-On Tested
Creality Pika 3D Scanner
Original Scan Samples · Independent Review
If you’ve spent any time in 3D scanning forums lately, you’ve probably seen the name Creality Pika pop up more than once — usually followed by a lot of questions. Is it actually a metrology-grade scanner, or just a marketing buzzword stapled to a pretty touchscreen? Can it really replace a $2,000+ handheld unit for reverse engineering work? And is the price-to-performance ratio actually as good as people are saying?
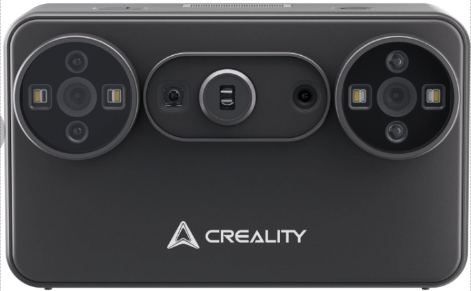
This Creality Pika review is built to answer exactly those questions — no fluff, no recycled spec sheets, and no pretending every feature is perfect. We’re combining the official technical specifications with real hands-on testing footage (egg-shell alignment tests, gauge block accuracy checks, automotive part reverse engineering, and side-by-side resolution comparisons against the Raptor, Sermoon, Otter, and Einstar Vega) to give you the most complete picture available anywhere.
If you’re short on time, here’s the quick version.
Table of Contents
- Quick Verdict
- What Is the Creality Pika?
- Full Specifications
- Price (2026)
- Unboxing & First Impressions
- Design & Build Quality
- Dual-Light System Explained
- Setup & Mobile App
- Software Review
- Scanning Modes & Performance
- Outdoor & Sunlight Performance
- Accuracy Testing
- Speed Benchmarks
- 10-Object Real-World Testing
- 3D Printing & CAD Workflows
- Pros & Cons
- vs Competitors
- Who Should Buy
- Value for Money
- Recommended Accessories
- Troubleshooting
- FAQ
- Final Verdict
Quick Verdict
| Attribute | Details |
|---|---|
| Best For | Reverse engineering hobbyists, automotive part scanning, mobile creators who need metrology-grade precision without the metrology-grade price |
| Not Recommended For | Jewelry-scale micro detail work, users who need class-leading angular accuracy, anyone expecting full laser precision over Wi-Fi |
| Price Range | Approximately $599–$699 (varies by region and bundle) |
| Accuracy Rating | 4.5 / 5 (wired) |
| Ease of Use Score | 4 / 5 |
| Mobile Workflow Score | 4 / 5 |
Ready to see the latest pricing on the Creality Pika?
Prices fluctuate — check both listings for the best current deal
What Is the Creality Pika?
The Creality Pika 3D scanner is Creality’s newest entry into the portable, handheld 3D scanning category — and it’s aimed squarely at people who want professional-grade precision without professional-grade bulk, cabling, or price. At just 260 grams and small enough to fit in a jacket pocket, the Pika is built for scanning on the move: at a car meet, in a workshop, on location, or anywhere you can’t realistically haul a tripod-mounted scanner and a laptop bag.
What separates the Creality Pika from Creality’s earlier scanners (like the Raptor or Sermoon series) is that it isn’t just a smaller version of the same tech. It’s a genuinely different architecture — a hybrid scanner that switches between a 7-line blue laser for high-precision, tethered work and a near-infrared (NIR) structured light system for fast, wireless, marker-free capture. That dual-engine approach is the single biggest thing to understand about this scanner, and we’ll break it down in detail below.
Who is it for? Based on our testing, the Pika sits comfortably between “prosumer” and “professional.” It’s overkill if you only scan the occasional keepsake for 3D printing, but it’s a legitimately strong option if you’re reverse engineering automotive trim pieces, mechanical brackets, or discontinued parts, and you want to move fluidly between wired precision scanning and wireless field capture without buying two separate devices.
The Creality × Orbbec Partnership
Why does that matter? Rolling-shutter cameras (used in a lot of budget scanners) capture image data line by line, which can cause distortion when the scanner or the object moves. Global shutter cameras capture the entire frame at once, which means tracking stays stable even during faster hand movements — a big reason the Pika’s tracking held up well in our hands-on tests, including a “flip test” where the scanner had to track markers continuously from one side of an object to the other without losing its lock.
Creality Pika Specs
| Feature | Specification |
|---|---|
| Scanner Type | Hybrid dual-engine portable 3D scanner (Creality × Orbbec) |
| Accuracy | Up to 0.03 mm (Blue Laser) / up to 0.08 mm (NIR, mobile) |
| Volumetric Accuracy | 0.02 mm + 0.05 mm/m |
| Resolution | Down to 0.1 mm point spacing |
| Scan Speed | Up to 110 FPS (USB 3.0, PC) / up to 40 FPS (Wi-Fi 6, mobile) |
| Blue Laser | 7-line parallel blue laser, metrology-oriented |
| NIR Structured Light | Eye-safe, marker-free, organic/face-friendly |
| Working Distance | 5 mm – 2,000 mm |
| Scan Volume | 50×50×50 mm up to 2,000×2,000×2,000 mm |
| Display | 3-inch HD multi-touch screen, 500 nits |
| Battery | Dual hot-swappable 3,350 mAh packs |
| Connectivity | USB 3.0 Type-C, Wi-Fi 6 |
| Supported Devices | Windows, macOS, Android, iOS |
| Software | CrealityScan (desktop + mobile), Open SDK via Orbbec |
| Export Formats | STL, OBJ, PLY, ASC |
| Weight | 260 g |
| Dimensions | 100 × 60 × 35 mm |
| Price | Approximately $599–$699 |
Creality Pika Price (2026)
At an MSRP in the $599–$699 range depending on region, taxes, and any launch bundle you catch, the Creality Pika positions itself as a mid-tier entry that’s punching well above its price class. During pre-launch testing, units were seen priced around $629 — genuinely aggressive for a scanner that can hold sub-50-micron accuracy on a class-one gauge block, a bar that plenty of scanners costing two or three times as much don’t clear.
For context, entry-level structured-light scanners without any laser mode typically start around $300–$400, while true metrology-grade laser scanners with comparable accuracy have historically started well north of $1,000–$2,000. The Pika is trying to occupy the gap in between — and based on our testing, it mostly succeeds.
If you’re comparing total value rather than sticker price alone, factor in what’s actually included in the box: dual batteries (meaning no downtime for charging mid-session), a calibration board, reflective markers, an ND filter for outdoor scanning, a mini tripod, a turntable, and a 2-meter USB-C cable. That’s a genuinely complete starter kit — you’re not immediately hit with a list of “required” add-on purchases just to get scanning.
See the current Creality Pika price on both storefronts:
Unboxing & First Impressions
Out of the box, the Pika comes with:
- The scanner itself
- Two hot-swappable batteries
- A glass calibration board (with a serial number printed on the back — don’t lose or scratch this)
- 6 mm and 10 mm reflective markers
- A removable ND (neutral density) filter for outdoor/daylight scanning
- A mini tripod
- A turntable
- A 2-meter USB-C cable
First impressions matter, and the Pika delivers here. It feels dense but not heavy, with a build quality that doesn’t scream “budget device.” The fit and finish around the lens housing and the touchscreen bezel feels closer to a premium camera accessory than a typical 3D scanning peripheral, and the whole kit fits into a bag with room to spare — a real point in its favor if portability is part of your buying decision.
Design & Build Quality
Pocket-Sized Design
At 260 grams and roughly the size of a large smartphone, the Creality Pika 3D scanner is genuinely one of the smallest and lightest laser scanners currently on the market. One-handed operation is comfortable even during longer scanning sessions, and the button layout — a power button and a start/stop button on top, a USB-C port, a wired/wireless toggle switch, and a quarter-inch tripod thread on the bottom — is intuitive enough that you won’t need to keep the manual open while you work.
Built-in 3-Inch HD Touchscreen
The onboard 3-inch HD touchscreen (854×480 resolution, 500 nits peak brightness) is one of the Pika’s standout quality-of-life features, and it’s a meaningful upgrade over scanners that force you to stare exclusively at a laptop screen tethered by a cable.
In practice, the screen is genuinely useful for:
- Real-time scan preview while you’re moving around an object
- Monitoring tracking status so you know immediately if you’ve lost lock
- Keeping an eye on alignment quality mid-scan
- Basic device controls without touching a PC at all
Dual Hot-Swappable Battery System
The dual 3,350 mAh hot-swappable battery packs are a genuinely smart engineering decision. Rather than plugging in and waiting for a recharge mid-session, you simply pop in a fresh battery and keep scanning. In hands-on testing, a single charge comfortably powered multiple full scanning sessions before a swap was needed — enough for a solid day of field work without hunting for an outlet.
Cooling & Thermals
The Pika runs a continuously active cooling fan through its air outlet port, which keeps internal temperatures stable during extended scanning sessions. It’s not silent, but it’s not distracting either — a reasonable trade-off for consistent performance rather than thermal throttling partway through a long scan.
Hardware Architecture: Dual-Light System Explained
This is the section that matters most if you’re trying to decide whether the Pika actually fits your workflow — because the Pika isn’t one scanner, it’s two, combined into a single body.
7-Line Blue Laser Mode
The blue laser engine projects seven parallel laser lines across the object’s surface and is capable of accuracy up to 0.03 mm, putting it firmly in metrology-adjacent territory. This is the mode you’ll want for:
- Marker-free precision scanning on flat or moderately complex geometry
- Dark or matte objects that structured light sometimes struggles with
- Reflective or semi-reflective surfaces
- Mechanical parts and brackets
- Reverse engineering work destined for CAD
Near Infrared (NIR) Structured Light
The NIR engine is the wireless, human-safe half of the Pika’s dual-light system, rated up to roughly 0.08 mm accuracy in real-world mobile use. This is the mode for:
- Face and full-body scanning (it’s eye-safe by design)
- Color texture capture
- Organic, curved, or irregular surfaces
- Wireless, untethered operation — including directly from an Android or iOS device
Which Mode Should You Use?
| Object Type | Recommended Mode | Why |
|---|---|---|
| Engine Parts | Blue Laser | Maximum dimensional accuracy on hard geometry |
| Face | NIR | Eye-safe, wireless, organic-friendly |
| Figurines | Blue Laser | Fine surface detail capture |
| Statues | NIR | Large organic curvature, wireless convenience |
| Mechanical Components | Blue Laser | CAD-ready precision on edges and flats |
| Furniture | NIR | Large surface area, wireless mobility |
| Dark Objects | Blue Laser | Laser penetrates dark surfaces better than NIR |
Setup & Mobile App Integration
Getting the Pika running takes about five steps:
- Install CrealityScan on your PC and/or phone
- Update the scanner’s firmware
- Calibrate using the included glass calibration board (you’ll need to manually enter the board’s serial number, and your PC needs internet access to pull correction data from Creality’s servers)
- Connect via USB-C for PC/laser workflows
- Connect via Wi-Fi 6 for mobile or wireless NIR workflows
Calibration is refreshingly straightforward — align the scanner with an on-screen guide box, and the software walks you through the rest. It’s one of the easier calibration processes we’ve tested across Creality’s current scanner lineup.
USB-C vs Wi-Fi 6 Performance
| Attribute | PC (Wired) Workflow | Mobile (Wireless) Workflow |
|---|---|---|
| Speed | Up to 110 FPS (real-world testing showed roughly 60 FPS in wireless-to-PC mode) | Around 40 FPS |
| Mode Available | Blue Laser + NIR | NIR only |
| Best For | Maximum accuracy, large or complex projects | Field scanning, wireless convenience |
| Precision | Highest available | Good, with a slightly higher chance of seam artifacts on complex thin-shell parts |
Want to see the Creality Pika’s dual-light system in action? Check the latest pricing and availability:
Free: 3D Scanner Accuracy Cheat Sheet
Download our quick-reference guide comparing accuracy, resolution, and scan speed across 20+ handheld 3D scanners — including the Pika, Raptor, Sermoon, Otter, and more.
Creality Pika Software Review
Interface & Ease of Use
CrealityScan’s interface will feel familiar if you’ve used any of Creality’s other scanning software, with a manageable learning curve for anyone who’s scanned before. First-time scanner owners should expect a bit of a ramp-up — particularly around initializing the laser mode, which testers found trickier than Creality’s Raptor or Sermoon series at first, though it became second nature after a session or two.
AI Processing Features
The software includes a solid AI toolset:
- AI Hole Filling — automatically closes small gaps left by hard-to-reach angles
- Automatic Alignment — matches and merges multi-angle scans without manual point-picking
- Mesh Optimization — smooths and welds seams between fused scans
- Noise Removal — configurable percentage-based cleanup during point cloud fusion
- Texture Optimization — improves color mapping fidelity
AI Retexturing Workflow
Gaussian Splatting Support
The Pika’s software also supports Gaussian Splatting export — an increasingly relevant format for spatial computing, digital twins, and XR visualization workflows. This won’t matter to everyone, but if you’re working anywhere near AR/VR, real estate visualization, or interactive 3D web content, it’s a nice bit of future-proofing that a lot of competing scanners in this price range simply don’t offer. (If you’re curious about other scanners with Splatting support, our Raven LiDAR review covers this in more depth.)
Export Formats
Scans export cleanly to STL, OBJ, PLY, and ASC, covering essentially every standard 3D printing and CAD workflow you’re likely to need, including direct compatibility with Creality Cloud, OrcaSlicer, PrusaSlicer, and Fusion 360.
Scanning Modes & Real-World Performance
We put the Pika through its paces across a genuinely broad range of object types, using the recommended mode for each.
Mechanical Parts & Reverse Engineering (Blue Laser)
This is where the Pika earns its keep. In testing on an automotive speaker trim panel — a classic thin-shell reverse-engineering challenge — the Blue Laser mode successfully captured and aligned both sides of the part with manual point-pair alignment, producing a clean, usable mesh. That’s a meaningfully harder test than scanning a solid object, and plenty of consumer-grade scanners simply can’t manage it.
Miniatures & Figurines (Blue Laser)
Resolution held up well for figurine-scale objects, though — as covered in the accuracy testing section below — it trailed some of Creality’s own higher-end models slightly on very fine surface detail. If miniatures are your primary focus, you may also want to compare against dedicated small-object scanners.
Dark & Reflective Objects (Blue Laser)
The laser engine handled dark and semi-reflective test surfaces without needing scanning spray in most cases, which is a genuine advantage over pure structured-light scanners that often need matte-ifying spray on anything glossy or black.
Faces & Organic Surfaces (NIR)
Face and organic-object tracking in NIR mode performed on par with Creality’s Raptor and Sermoon series — solid, reliable, and comfortable given the mode’s eye-safe design. It’s worth noting the NIR mode didn’t quite match the dedicated face/headshot performance of Creality’s Otter scanner, so if headshot-specific scanning is your primary use case, that’s a worthwhile comparison to make before buying.
Furniture & Large Objects (NIR)
In large-object mode, the Pika’s capture range is noticeably smaller than the Otter or Otter Lite — fine for something like a motorcycle seat, but it won’t comfortably swallow an entire vehicle or oversized furniture piece in a single pass the way some larger-format scanners can.
Outdoor & Sunlight Performance
With the filter in place, tracking stability in bright outdoor conditions held up noticeably better than scanners without dedicated daylight filtering. If you scan automotive parts, architectural details, or anything else that realistically has to happen outside a controlled indoor environment, this is a genuinely valuable feature rather than a marketing checkbox.
Scan Quality & Accuracy Testing
Resolution testing (side-by-side owl figurine comparisons against nine other scanners) showed the Pika landing in a solid middle tier: comparable to the Einstar 2 and Einstar Vega, clearly ahead of the Revopoint Metro X and the 3D Maker Pro Moose, but behind the Mole 3, Sermoon P1, X1, S1, and Raptor on fine back-surface detail. It also outresolved the CR-Scan Otter in small-object mode, and substantially outresolved the Otter Lite.
Accuracy testing used a class-one 100 mm gauge block with a certified error under 0.3 microns. After accounting for thermal expansion at test-room temperature, the Pika’s scan measured 30–40 microns longer than the true length — landing inside the 50-micron threshold generally used to define a “metrology-grade” scanner, and on par with Creality’s own Raptor and Sermoon series.
Angular accuracy was the one clear weak spot. Testing a certified 90-degree angle, the Pika’s scan read approximately 89.8°, roughly 0.2° of error — noticeably higher than the Raptor and Sermoon series, which typically stay under 0.02° in the same test. If your work leans heavily on angular precision (certain CAD-critical mechanical fits, for example), this is worth factoring in.
Precision/alignment testing, using an egg scanned from three different orientations, showed the Pika successfully aligning all three scans with no visible seam lines when connected via PC — a genuinely strong result, since the egg’s natural ~50-micron out-of-roundness is specifically the kind of subtle asymmetry that trips up lower-precision scanners.
Scan Speed Benchmarks
| Scenario | Result |
|---|---|
| PC-connected, wireless-to-PC transfer | ~60 FPS |
| Mobile app (Android) | ~40 FPS |
| Marker-based laser tracking | Successfully tracked across a full side-to-side flip on a helmet, matching the Raptor Pro, Raptor X, and Sermoon series |
| NIR marker-free tracking | ~30 FPS, comparable to Raptor/Sermoon NIR systems |
Real-World Testing: 10 Different Objects
| Object | Mode Used | Result Summary |
|---|---|---|
| Figurine | Blue Laser | Clean detail, minor cleanup needed |
| Gear | Blue Laser | Sharp edge capture, strong for mechanical use |
| Helmet | Blue Laser | Successful full tracking across both sides |
| Controller | NIR | Reliable organic-surface tracking |
| Face | NIR | Comfortable, eye-safe, on par with Raptor/Sermoon |
| Shoe | NIR | Good texture capture with color mapping |
| Vase | Blue Laser | Handled curved reflective surface well |
| Statue | NIR | Solid large-scale organic detail |
| Automotive Trim Part | Blue Laser | Successfully aligned thin-shell geometry — a genuine standout result ★ |
| Motorcycle Seat | NIR (mobile) | Good result, but capture range too small for the full vehicle |
The Pika proved itself across 10 different object types — from figurines to automotive trim. See today’s price:
3D Printing Workflow
The scan-to-print pipeline is straightforward: Scan → Cleanup → Repair → Slice → Print. Exported STL and OBJ files worked cleanly with Creality Print, OrcaSlicer, Cura, PrusaSlicer, and Bambu Studio in our testing, with no unusual mesh-repair steps needed beyond the Pika’s own hole-filling tools. If you’re looking for a printer to pair with the Pika for outputting your scanned models, our best 3D printer guide covers top picks across every budget.
Reverse Engineering & CAD Workflow
For CAD-focused users, exported meshes imported cleanly into Fusion 360, SolidWorks, FreeCAD, and Geomagic-style reconstruction workflows. The Open SDK, built on Orbbec’s underlying platform, opens the door to custom integrations — a meaningful plus for anyone working in robotics, research, or industrial automation who wants to build the Pika into a larger automated capture pipeline rather than using it purely as a standalone tool.
Pros & Cons
Pros
- Outstanding portability at just 260 g
- Genuinely strong Blue Laser accuracy (sub-50-micron on gauge block testing)
- Touchscreen meaningfully improves field workflow
- Hot-swappable batteries eliminate mid-session downtime
- Solid wireless mobile experience with no extra subscription cost
- Excellent AI retexturing and hole-filling tools
- Strong outdoor/daylight scanning support via removable NIR filter
- Reliable multi-scan alignment, even on difficult thin-shell parts
Cons
- Premium pricing relative to entry-level structured-light scanners
- Full Blue Laser precision requires a wired PC connection — no wireless laser mode
- Angular accuracy trails the Raptor and Sermoon series noticeably
- Resolution is a step behind Creality’s higher-end Raptor/Sermoon/Mole 3 lineup
- No included USB-C charger for the batteries
- Reflective or transparent objects may still benefit from scanning spray in tricky cases
Creality Pika vs Competitors
Creality Pika vs Revopoint POP 3 Plus
The POP 3 Plus is a capable structured-light scanner at a lower price point, but it doesn’t offer a true laser mode, so it can’t match the Pika’s metrology-grade accuracy on hard mechanical parts. If reverse engineering is your priority, the Pika wins; if you just want an affordable entry point for hobby scanning, the POP 3 Plus is worth a look.
Creality Pika vs CR-Scan Otter
The Otter’s larger capture volume makes it better suited to full-body and large-object scanning, and its NIR face-scanning performance edges out the Pika’s. But the Pika outresolved the Otter in small-object mode during testing and adds the laser precision option the Otter simply doesn’t have.
Creality Pika vs Einstar Vega
Resolution between the two was very close in our side-by-side testing, making this one of the closer matchups. The deciding factor tends to come down to workflow preference and software ecosystem rather than a clear technical winner. If you’re comparing mid-tier options, our Einstar Vega review goes deeper on that scanner’s specific strengths.
Creality Pika vs Moose Lite (3D Maker Pro)
The Pika produced noticeably higher resolution results in direct comparison with the Moose Lite, making it the stronger pick for anyone prioritizing scan fidelity over rock-bottom pricing.
Recommendation Table
| Use Case | Best Pick | Action |
|---|---|---|
| Reverse engineering mechanical/automotive parts | Creality Pika | Check Price |
| Budget-friendly entry point | Revopoint POP 3 Plus | Check Price |
| Large-object / full-body scanning | CR-Scan Otter | Check Price |
| Maximum resolution, willing to pay more | Raptor / Sermoon series | Read Review |
| Comparable mid-tier alternative | Einstar Vega | Check Price |
Who Should Buy the Creality Pika?
✓ Buy It If
- You need a genuinely portable scanner that still holds metrology-grade accuracy
- You regularly scan mechanical parts or automotive trim for reverse engineering
- You want the flexibility of both wired laser precision and wireless NIR convenience in one device
- You value AI-assisted texture mapping and mesh cleanup
- You’re upgrading from an older budget scanner and want a meaningful accuracy jump
✕ Skip It If
- You only scan occasionally for casual 3D printing projects
- You’re working with a tight budget and don’t need laser-grade precision
- You need certified metrology equipment for regulated industrial inspection
- Angular precision is mission-critical to your work
Value for Money
Recommended Accessories
A few add-ons worth considering alongside your Creality Pika purchase:
- AESUB scanning spray — for stubborn glossy or transparent surfaces
- Motorized turntable — smoother rotation than the included manual unit for repeat small-object scanning
- Tripod — a sturdier option than the included mini tripod for longer sessions
- Portable lighting kit — helps NIR texture capture in inconsistent indoor lighting
- Extra battery pack — for extended field days beyond the included two
- Protective carrying case — worth it given how much you’ll likely be taking this scanner on the road
- A capable laptop — large reverse-engineering datasets benefit from solid CPU/RAM headroom during mesh processing
Common Problems & Troubleshooting
| Issue | Quick Fix |
|---|---|
| Tracking loss mid-scan | Slow your movement, ensure adequate lighting, re-approach the last tracked marker |
| Calibration failure | Confirm PC has internet access and the calibration board serial number was entered correctly |
| Wi-Fi won’t connect | Disconnect your PC from any wired LAN network first |
| Seam lines after mobile scan | Reconnect via USB-C for precision-critical scans rather than relying on wireless alignment |
| Slow processing on large scans | Reduce resolution setting slightly, or process on a more powerful PC |
| Mesh artifacts | Use the noise removal and hole-filling tools before final export |
Frequently Asked Questions
Final Verdict
If your priority is reverse engineering mechanical and automotive parts — and you want the flexibility to switch between wired precision and wireless convenience without owning two separate scanners — the Pika earns its place as a top budget-category recommendation for 2026. Just go in with the right expectations: keep it tethered to a PC for anything precision-critical, and treat the wireless NIR mode as your fast, flexible field tool rather than your final-accuracy workflow.
Ready to Get the Creality Pika?
Check both storefronts for the best current price — inventory and promotions change frequently.
Prices and availability are subject to change. Last checked: 2026.


