

🛑 Stop Wasting Filament — Get the Free Troubleshooting Cheat Sheet
Before diving in, grab the free printable troubleshooting cheat sheet — a workbench reference you can hang right next to your printer.
What’s inside:
- 25+ failure types with visual descriptions and quick fixes
- Fast-lookup table for PLA, PETG, ABS, and Resin
- Includes a QR code linking to advanced fix tutorials
Quick Navigation
- Troubleshooting System
- Failure Types
- Warping
- Stringing
- Under-Extrusion
- Over-Extrusion
- Layer Shifting
- Ghosting / Ringing
- Z-Banding
- Top Layer Not Solid
- Elephant’s Foot
- Quality Issues
- First Layer Issues
- Quick-Fix Table
- Resin Problems
- Advanced Troubleshooting
- Filament-Specific Issues
- 30-Second Checklist
- FAQ
Most 3D printing failures come down to three things: bed adhesion, temperature, and print speed. Before you throw your filament across the room, know this — almost every failure has a fix, and with the right approach, you can diagnose the problem visually, trace it to its root cause, and get back to printing in minutes. This guide walks you through every major failure type, with pictures-based descriptions, quick-fix tables, filament-specific advice, and advanced techniques for high-speed printing setups.
How to Troubleshoot 3D Printing Problems (Step-by-Step System)
Here’s the thing about troubleshooting 3D printing problems: most people go straight to the forums, get 12 conflicting answers, and change five settings at once. That’s the wrong approach. A structured system saves you hours.
Step 1 – Identify the Failure Type
Always start with your eyes. Is the failure happening at the first layer? Mid-print? Does the surface look rough, stringy, or blobby? Visual diagnosis narrows down your suspects immediately. Don’t guess — look.
Ask yourself:
- Where is the failure occurring? (bottom, sides, top, everywhere)
- When did it start? (from the beginning, or mid-print)
- What changed before it started? (new filament, new profile, different model)
This alone eliminates 60–70% of possible causes before you even touch a setting.
Step 2 – Check the 3 Core Variables
Once you’ve identified the failure type, run through the “Big Three” before changing anything else:
Temperature — Is your nozzle temp right for the filament? Is your bed temp correct? Are you getting heat creep? A temperature that’s even 5–10°C off from ideal can cascade into stringing, under-extrusion, warping, or poor layer adhesion.
Speed — Speed is the most commonly overlooked culprit. Your hotend can only melt so much plastic per second. Printing faster than your volumetric flow rate allows causes under-extrusion — even if everything else is perfect.
Adhesion — Is your bed level? Is your Z-offset dialed in? Is your build surface clean? Cold, dirty, or mis-leveled beds are the #1 reason for first layer failures in troubleshooting 3D printing.
Step 3 – Apply Targeted Fixes
Once you know your failure type and you’ve checked the Big Three, apply the most targeted fix first — not a shotgun approach. Change one variable at a time, run a test print (a small calibration cube or a first-layer patch), and evaluate. This is how the pros do it.
Keep a print log. Note the filament brand, profile settings, ambient temperature, and any issues. You’ll thank yourself later.
3D Print Failure Types (With Pictures & Fixes)
This is the core of troubleshooting 3D printing problems — a visual reference to the most common failure types, what causes them, and how to fix them.
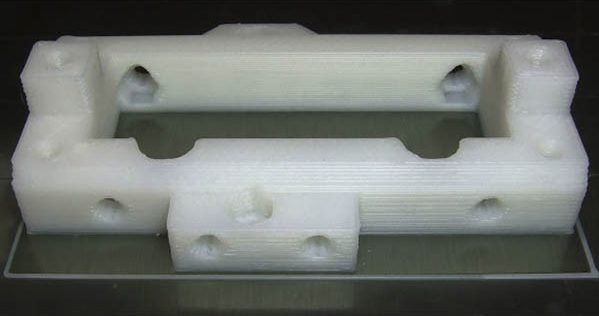
Warping
What it looks like: The corners or edges of your print lift off the bed during or after printing. The base of the print curves upward, sometimes causing the print to detach mid-job.

The filament detaches from edges
Causes: Rapid cooling of the material, insufficient bed adhesion, printing ABS or ASA without an enclosure, bed temperature too low.
How to fix:
- Increase bed temperature (PLA: 60°C, PETG: 70–80°C, ABS: 90–110°C)
- Use a brim (3–8mm) to extend the surface area in contact with the bed
- Disable part cooling fan for the first 3–5 layers
- Switch to a PEI spring steel sheet — this is genuinely a game-changer for adhesion. Many printers now come with PEI sheets, but the aftermarket textured PEI plates offer grip that’s noticeably better than smooth glass
- For ABS/ASA: use an enclosure or draft shield
A quality textured PEI build plate runs $20–$40 and eliminates warping issues for most users permanently. If you’re fighting warping regularly, it’s one of the best-value upgrades out there.
Stringing
What it looks like: Thin strands of filament stretch between parts of the print like spider webs. Common across open areas, bridges, and between separate print towers.

Stringing issue during 3D printing
Causes: Print temperature too high, retraction too low or too slow, filament has absorbed moisture.
How to fix:
- Lower print temperature by 5°C increments (test with a stringing tower)
- Increase retraction distance (Direct drive: 0.5–2mm; Bowden: 4–7mm)
- Increase retraction speed
- Enable “Combing mode” or “avoid crossing perimeters” in your slicer
- Dry your filament — this is often overlooked. Wet filament strings badly at any temperature setting
🔥 Real talk: If you’ve been fighting stringing and haven’t checked your filament’s moisture content, start there. A good filament dryer can transform your results overnight — especially for hygroscopic materials like PETG and Nylon. Surface quality problems that took days to “tune out” simply disappear.
Under-Extrusion
What it looks like: Gaps in layers, thin walls, missing infill, weak layer bonding. The print looks “hungry” — like there wasn’t enough plastic coming out.
Causes: Nozzle partially clogged, temperature too low, print speed too high for your hotend’s flow capacity, filament grinding in the extruder, Bowden tube gap.
How to fix:
- Perform a cold pull to clear partial clogs
- Increase nozzle temperature by 5–10°C
- Reduce print speed
- Check for filament grinding (extruder spring tension, worn gears)
- Check Bowden tube seating (PTFE gap = partial clog zone)
- Increase flow rate multiplier by 1–2%
- Nozzle contamination from mixed filaments: If you regularly switch between filament types or brands without replacing the nozzle, residue from previous materials can partially obstruct the bore. This is especially common when going from a filled or composite filament (like carbon fiber or glow-in-the-dark) back to a standard PLA. When in doubt, replace the nozzle — they’re cheap and often the invisible culprit behind persistent under-extrusion.
Over-Extrusion
What it looks like: Blobby surfaces, rounded edges, excess material on perimeters, drooping overhangs. Parts may also come out slightly oversized or too thick overall.
3D Printed parts come out too thick
Causes: Flow rate too high, temperature too high, incorrect filament diameter in slicer settings, or perimeter/extrusion width set too high in the slicer.
How to fix:
- Verify filament diameter with calipers (measure 5–10 spots, average them) — an incorrect diameter setting in the slicer is a common and easy-to-miss culprit
- Reduce flow rate multiplier by 1–2%
- Lower print temperature slightly
- Run an extrusion multiplier calibration
- Check perimeter width in your slicer’s extrusion settings — if parts are consistently coming out slightly too thick even after flow calibration, the perimeter (extrusion) width setting may be set higher than your actual nozzle diameter warrants. Adjust it to match your nozzle size
Layer Shifting
What it looks like: The print looks like it’s been “slid” sideways partway through — layers above a certain point are offset from layers below.
Causes: Belt too loose, motor skipping steps (too much speed/acceleration for the motor current), print head collision with the model, power fluctuation.
How to fix:
- Check and tighten belts (should be taut but not guitar-string tight)
- Reduce print speed and acceleration
- Check motor driver current (if you have Trinamic drivers, they often have auto-tuning)
- Enable “crash detection” if your printer supports it
- Check for physical obstructions in the gantry path
Ghosting / Ringing
What it looks like: Wavy ripple patterns in the walls of your print around sharp corners or features — like an echo of the corner repeated in the surface.
Causes: Vibration in the printer frame, excessive print speed, acceleration too high, loose belts, resonance frequency of the frame.
How to fix:
- Tighten belts and check frame rigidity
- Reduce acceleration and jerk values
- Enable Input Shaping / Resonance Compensation (available on Klipper, Bambu, newer Creality printers)
- Print on a surface-damping pad or rubber feet
RECOMMENDED: Causes & Fixes of Ringing (Ghosting)
Z-Banding
What it looks like: Horizontal lines or bands that repeat at regular intervals throughout the print, creating a “banded” texture on the walls.
Causes: Z-axis lead screw wobble or binding, inconsistent Z-axis motor movement, layer height coinciding with screw pitch artifacts.
How to fix:
- Clean and lightly lubricate the Z-axis lead screw
- Check for screw wobble (loose coupling between motor and screw)
- Try a different layer height that doesn’t align with the screw pitch
- Check Z-axis eccentric nuts for binding
Top Layer Not Solid
What it looks like: The top surface of the print looks incomplete — small holes, gaps, or a mesh-like texture instead of a solid, closed surface.
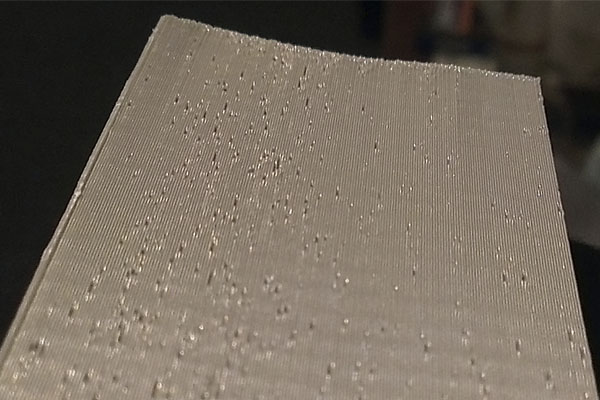
Small holes on top of the layer
Causes: Too few top layers, infill density too low to support the top surface, cooling too aggressive on the final layers, or print speed too high for top layers.
How to fix:
- Increase the number of top solid layers (minimum 4–5 is a good starting point; increase for large flat surfaces)
- Increase infill density — the top surface needs infill below it to bridge onto
- Reduce print speed for solid top layers specifically (many slicers let you set a separate top layer speed)
- Ensure your flow rate is calibrated — under-extrusion affects top layers especially visibly
Elephant’s Foot
What it looks like: The bottom layers of the print bulge outward, like the print has “fat” feet. Dimensions at the base are wider than they should be.
Causes: Bed temperature too high for the first layers, first layer over-squished (Z-offset too close), insufficient cooling for bottom layers.
How to fix:
- Reduce bed temperature slightly
- Increase Z-offset (raise nozzle slightly from the bed)
- Add a negative first-layer horizontal expansion in your slicer (−0.1 to −0.3mm)
- Enable cooling fan from layer 1
Troubleshooting 3D Print Quality Issues
Surface Quality Problems
Blobs & Zits appear as small bumps on otherwise smooth walls. They’re usually caused by pressure buildup in the nozzle during travel moves. Fix: enable “Wipe before retract” and adjust retraction settings. Seam placement matters too — move the seam to a back corner where it’s hidden.
Rough or Inconsistent Surfaces are often the first visible symptom of wet filament. Moisture turns to steam inside the hotend, causing micro-bursts that disrupt flow consistency. The surface looks almost like orange peel.
Dry your filament. Period. Wet filament is behind more “mysterious” surface quality problems than almost any other variable. A quality filament dryer — the kind that maintains temperature consistently over hours — is one of the highest-impact accessories you can add to your setup. It’s not just for Nylon. PLA and PETG both absorb moisture and print noticeably worse for it. Once you try printing with properly dried filament, you won’t go back.
Popping or Crackling Sounds from the Nozzle are another early warning sign. If you hear a popping or crackling sound — like popcorn — during printing, moisture in the filament is vaporizing inside the hotend. The water turns to steam and bursts through the melt zone, creating audible pops and visual disruption in the extrusion. This is most common with hygroscopic filaments like Nylon, PETG, and ABS. PLA is less susceptible but not immune. Fix: dry the filament immediately. If sounds persist after drying, the filament may have air bubbles from manufacturing — switch to a higher-quality brand.
Filament Breaking Off the Spool before it even reaches the extruder is a sign of either a manufacturing defect or moisture damage. Moisture-degraded filament becomes brittle and snaps easily when bent. PLA is particularly prone to becoming brittle over time if stored improperly, even if it doesn’t appear visibly wet. Fix: store filament in sealed containers with desiccant, dry before use, and choose reputable brands with consistent manufacturing quality.
Print Quality Degrading Over Time — if a printer that used to produce clean results has slowly gotten worse without any obvious changes, accumulated debris inside the nozzle is a likely culprit. Over many print hours, small particles from filament (especially if you’ve switched between brands or materials without changing the nozzle) can partially obstruct the nozzle bore, reducing effective diameter and causing inconsistent extrusion. Fix: measure the diameter of the nozzle outlet and compare to when it was new, or simply replace the nozzle — they’re inexpensive and often overlooked as a wear item.
Dimensional Accuracy Issues
If your prints are slightly too large or small, check:
- Flow rate calibration (extrusion multiplier)
- Horizontal expansion settings in slicer
- Temperature (too hot = slight material expansion)
- Whether your steps-per-mm are calibrated (especially after major hardware changes)
Aim for ±0.1–0.2mm accuracy for functional parts. For anything requiring tight tolerances, print test pieces and measure before committing to the full model.
Structural Failures
Prints that snap easily often have weak layer adhesion. Causes: print temperature too low, speed too high (not enough time for layers to bond), incorrect orientation (print parts standing up for higher Z-strength, or flat for XY strength depending on stress direction).
3D Printing Troubleshooting: First Layer Issues
The first layer is everything. It’s the foundation your entire print rests on, and troubleshooting 3D printing first layer issues is arguably the most important skill to develop.
First Layer Not Sticking
This is the most searched 3D printing troubleshooting issue, and it comes in multiple forms:
Bed Leveling: Uneven leveling means some areas of the bed are too far from the nozzle (under-squish = won’t stick) or too close (nozzle scrapes = inconsistent lines). Use your printer’s mesh bed leveling if available, and run it regularly — especially after moving the printer or swapping the build plate.
Z-Offset: Your Z-offset determines how close the nozzle is to the bed on the first layer. Too far = filament doesn’t bond to the bed. Too close = nozzle drags through material and scrapes. The goal is a first layer that’s slightly squished — you should see the lines blend together slightly rather than sit separate and round.
Bed Temperature: Cold beds are unfriendly to adhesion. Make sure the bed is fully heat-soaked before starting (allow 3–5 minutes after reaching temperature). Check actual bed surface temperature with an IR thermometer — the displayed value and actual surface temp can differ.
Build Surface: PEI sheets, glass with glue stick, garolite, or textured plates all have different adhesion properties. Match your surface to your material:
- PLA: Textured PEI (excellent), smooth PEI (good), glass with hairspray (good)
- PETG: Textured PEI (good), smooth PEI with release agent (use sparingly — PETG can pull up PEI!)
- ABS/ASA: Smooth PEI, Garolite, ABS slurry
Upgrade worth noting: If you’re still printing on the stock smooth surface that came with an entry-level printer, a textured PEI spring steel sheet is a $20–$40 upgrade that fundamentally changes the printing experience. Prints pop off easily when cool, adhere reliably when hot, and the texture disguises first layer imperfections beautifully. It’s the single most recommended accessory in the 3D printing community — for good reason.
First Layer Too Squished
Signs: the first layer lines smear together, the surface looks glossy and overworked, or the nozzle drags through the bead.
Fix: Raise your Z-offset in small increments (0.05mm at a time). Re-run a first layer test after each adjustment.
Print Stuck to the Build Plate
The opposite problem — prints that won’t release after cooling — is just as frustrating. This usually comes down to using the wrong adhesion surface or adhesion aid for your filament type.
Causes: Adhesion surface incompatible with the filament (e.g., PETG on smooth PEI), bed temperature still too high when trying to remove the print, or adhesion promoter applied too heavily.
How to fix:
- Let the print fully cool before attempting removal — many surfaces release automatically when cold (especially spring steel PEI sheets)
- Check that your build surface matches your filament. PETG is known for bonding too aggressively to smooth PEI surfaces — use a release agent (thin layer of glue stick or hairspray as a release barrier), or switch to textured PEI
- If using glass or mirror beds, ensure the correct adhesion aid is matched to your filament
- Never force a print off a hot bed — damage to the print surface or the build plate is likely
Uneven First Layer
Symptoms: some areas of the first layer look great while others are too far or too close.
Fix: Re-run mesh bed leveling. If your printer doesn’t have ABL (Automatic Bed Leveling), a BLTouch or CR Touch sensor is a worthwhile upgrade — it maps the bed surface and compensates for any warp or unevenness automatically.
Auto-leveling sensors like the BLTouch, CR Touch, or Beacon (inductive) are a particularly good investment for printers without built-in ABL. They reduce the time spent tramming the bed to near zero and make the whole printing experience significantly less frustrating. If you’re spending more than 10 minutes leveling your bed per print session, this upgrade pays for itself in saved time within weeks.
Common 3D Printing Problems and Solutions (Quick-Fix Table)
| Problem | Most Likely Cause | Quick Fix |
|---|---|---|
| Print won’t stick to bed | Z-offset too high, bed not hot enough, dirty surface | Re-level, increase bed temp, clean with IPA |
| Stringing | Temp too high, retraction too low, wet filament | Dry filament, lower temp, increase retraction |
| Under-extrusion | Partial clog, speed too high, temp too low | Cold pull, reduce speed, raise temp |
| Warping | Cooling too fast, no brim, temp too low | Add brim, raise bed temp, use enclosure |
| Layer shifting | Loose belts, skipping motors, collision | Tighten belts, reduce speed/acceleration |
| Ghosting / Ringing | Vibration, high speed, loose frame | Enable input shaping, reduce acceleration |
| Z-Banding | Lead screw issues | Lubricate, check coupler, change layer height |
| Elephant’s foot | Z too low, bed too hot | Raise Z-offset, reduce bed temp |
| Blobs & Zits | Retraction/pressure issues | Enable wipe, adjust retraction, use seam settings |
| Poor surface quality | Wet filament, temp, speed | Dry filament, tune temp and speed |
| Weak prints | Low temp, too fast, wrong orientation | Raise temp, slow down, reorient print |
| Top layer not solid | Too few top layers, low infill, under-extrusion | Add top layers, increase infill, reduce top layer speed |
| Popping sounds from nozzle | Wet filament, manufacturing air bubbles | Dry filament, try a quality brand |
| Filament breaking off spool | Moisture, brittle filament | Dry filament, store with desiccant |
| Print stuck to build plate | Wrong surface/adhesion aid for filament | Use release agent, match surface to material, cool fully |
| Quality worsening over time | Nozzle bore narrowed by particle buildup | Clean or replace nozzle |
| Parts consistently oversized | Perimeter width too high in slicer | Adjust extrusion/perimeter width to match nozzle |
| Pinholes in print walls | Moisture in filament (esp. ABS) | Dry filament, store away from humidity |
Resin 3D Printing Problems and Solutions
Resin (MSLA/SLA) printing introduces a different set of challenges compared to FDM. The core variables are exposure time, support strategy, and resin handling.
Prints Not Sticking to the Build Plate
The most common resin failure. Causes: exposure time too low for the bottom layers, build plate not leveled or too far from the FEP, incorrect bottom layer count, resin too cold.
Fix:
- Re-level the build plate (paper method or manufacturer procedure)
- Increase bottom exposure time (start at 2–3x your normal layer exposure)
- Increase bottom layer count (6–10 layers is a common starting point)
- Warm your resin to 20–25°C — cold resin doesn’t cure or flow consistently
- Clean the FEP film and check for scratches or cloudiness
Layer Separation
Prints that look like layers didn’t bond together or delaminated. Causes: normal exposure time too low, resin not shaken before use, UV light path obstructed (dirty FEP or screen).
Fix:
- Increase normal exposure time
- Shake or stir resin thoroughly before printing
- Clean the FEP film and the LCD screen (check for dust)
Failed Supports
Supports that break mid-print or don’t adhere to the model properly are a nightmare. This is a combination of slicer settings and model orientation.
Fix:
- Increase support tip diameter and penetration depth
- Use medium or heavy supports for large flat surfaces
- Tilt the model 30–45° to reduce suction forces and large flat areas
- Reduce lift speed on the FEP — slower lifts prevent support failures caused by suction
Sticky or Uncured Prints
If your finished prints are soft, sticky, or flexible when they shouldn’t be: under-curing during printing, or under-curing during post-processing wash and cure steps.
Fix:
- Increase exposure time (run a resin exposure calibration print like the “Ameralabs town”)
- Ensure your wash station is removing all uncured resin (IPA or resin-specific wash solution, 2–5 minutes)
- Check your UV curing station — ensure 360° exposure and adequate cure time (typically 2–5 minutes per side)
For resin printing, the accessories that matter most are a quality wash and cure station, nitrile gloves, and proper resin storage. If you’re washing prints in a tub of IPA with no heating, you’re leaving performance on the table. Dedicated wash and cure stations give consistent results every time.
Advanced Troubleshooting: 2026 High-Speed Printing
If you’re running a Bambu, a high-speed Creality (K1 series), a CoreXY build, or a tuned Voron/RatRig, standard troubleshooting advice only gets you so far. High-speed printing introduces its own failure modes that require understanding some underlying physics.
The Volumetric Flow Rate Limit (The “Flow Rate Wall”)
This is the single most important concept for troubleshooting 3D printing at speed — and most guides skip it entirely.
Volumetric flow rate is measured in mm³/s. It represents how much melted plastic your hotend can push through the nozzle per second. Every hotend has a ceiling. Exceed it and you get under-extrusion — not because your extruder is weak, but because the filament literally cannot be melted fast enough.
Here’s how it works in practice:
- A standard brass nozzle hotend (V6-style) typically maxes out around 8–12 mm³/s
- High-flow hotends (Volcano, Dragon Highflow, Bambu hardened steel) can handle 20–30+ mm³/s
- Print speed × layer height × line width = volumetric flow rate
So if you set your print speed to 300 mm/s with a 0.4mm nozzle at 0.2mm layer height and 0.45mm line width, you’re demanding 300 × 0.2 × 0.45 = 27 mm³/s. If your hotend maxes out at 12 mm³/s, you’ll get severe under-extrusion every time — and tweaking retraction or temperature won’t fix it.
The fix: Know your hotend’s flow limit. Set a maximum volumetric flow rate in your slicer (OrcaSlicer, Bambu Studio, PrusaSlicer all support this). Let the slicer calculate the actual achievable speed, rather than guessing.
If you’re pushing high-speed printing seriously, a hotend upgrade is often the bottleneck you’re not seeing. The difference between a standard V6 clone and a high-flow hotend like a Bambu hardened steel nozzle or a Revo Voron can be 2–3× the printable flow rate — meaning 2–3× faster prints at the same quality level.
Input Shaping & Vibration Compensation
At high speeds, the printer frame vibrates. These vibrations propagate into the print as ghosting/ringing artifacts. Input Shaping (also called Resonance Compensation or Pressure Advance) is a firmware feature that actively cancels these vibrations by modifying the motion profile.
ADXL345 calibration: Many modern printers (Bambu, Creality K1, Klipper-based machines) come with built-in accelerometers for auto-tuning input shaping. If yours doesn’t:
- An ADXL345 sensor module costs around $5
- Klipper supports it natively with a `SHAPER_CALIBRATE` command
- Marlin has experimental support
What to watch for: Input shaping isn’t magic. If your frame is fundamentally flimsy, you’ll reduce ringing but not eliminate it. Adding weight dampers to the frame, using larger stepper motors, or upgrading to a CoreXY design all help.
High-Speed Printing Failures
At high speeds, several failure modes become more common:
Under-extrusion at speed: As covered above — check volumetric flow limits. Also check extruder grip (a textured or dual-drive extruder like a BMG or Orbiter maintains grip at high speeds better than a single-drive MK8 style).
Cooling limits: Print fast enough and the layer below hasn’t solidified before the next layer lands on it. This causes droopy overhangs, layer blending, and poor bridging. High-speed printers need aggressive cooling — dual 5015 blower fans or equivalent. If you’re running a single 4010 fan at 300mm/s, you’ll hit cooling limits well before speed limits.
Stringing at speed: High-speed extrusion means more pressure in the nozzle — which means you need more aggressive retraction or pressure advance calibration to prevent stringing.
HF Filaments vs. Standard Filaments
“High-Flow” (HF) variants of standard filaments like PETG HF, PLA HF, or ASA HF are specifically formulated to work at higher volumetric flow rates with lower viscosity at printing temperatures.
Why profiles matter: HF filaments often require different temperatures, retraction, and fan settings than standard versions. Don’t assume your standard PETG profile will work for PETG HF. Most major slicer profiles in OrcaSlicer or Bambu Studio have dedicated HF profiles — use them.
Troubleshooting 3D Printing by Filament Type
Different filaments fail in different ways. Here’s what to watch for with each:
PLA
The most forgiving filament. Common issues: stringing (usually temperature or moisture), poor bed adhesion in cold rooms, brittleness over time (especially if stored improperly or if moisture-degraded).
- Print temp: 190–220°C
- Bed temp: 50–65°C
- Common fix: Dry filament before use, use PEI sheet, ensure 30–100% part cooling
PETG
Stronger and more flexible than PLA, but more demanding. Known for stringing, bed adhesion issues (especially to PEI), and hygroscopic nature.
- Print temp: 230–250°C
- Bed temp: 70–85°C
- Common fixes: Dry thoroughly before and during printing, use textured PEI (not smooth — PETG can bond too aggressively to smooth PEI), enable Z-hop, reduce retraction slightly
If you’re using a high-flow PETG variant, dial back temperature by 5–10°C compared to standard PETG. It flows much more freely at the same temps, which can cause stringing if not adjusted.
ABS
Functional material with high-temperature resistance, but challenging without an enclosure.
- Print temp: 230–250°C
- Bed temp: 100–110°C
- Common fixes: Enclose the printer (cardboard works in a pinch), use ABS slurry or Garolite sheet, disable part cooling fan, use a brim or raft
- Key failure: Warping and layer delamination from thermal stress. Without an enclosure, ABS printing is fighting the ambient temperature constantly.
TPU (Flexible)
The most fun filament to print and the most annoying to tune. TPU won’t pull-compress through a Bowden tube reliably at speed.
- Print temp: 220–240°C
- Bed temp: 30–60°C (often no heat needed)
- Key issues: Under-extrusion (TPU compresses in the extruder), stringing (TPU is gooey)
- Common fixes: Direct drive extruder is essentially required, slow down (20–30mm/s for most grades), disable retraction or use minimal retraction (0.5–1mm), ensure extruder path is clear of sharp edges
Nylon
High-performance filament with excellent layer bonding and flexibility, but extremely hygroscopic.
- Print temp: 240–270°C (PA6), 220–250°C (PA12)
- Bed temp: 70–90°C
- Enclosure: Required or strongly recommended
- Critical: Nylon must be dry. If it’s been open for more than a few hours in humid conditions, it needs drying. Wet Nylon doesn’t just string — it foams, produces poor layer adhesion, and prints with visible surface bubbles.
- Bed surface: Garolite (FR4) is the gold standard for Nylon adhesion. PEI can work with the right adhesion promoter.
For Nylon and any advanced material printing, a quality filament dryer that maintains a set temperature consistently is not optional — it’s the prerequisite for success. The cheap food dehydrators work but fluctuate in temperature and don’t seal well. A purpose-built filament dryer with accurate temperature control and humidity display makes a real difference.
The 30-Second Troubleshooting Checklist
Before you change a single setting, run through this checklist. Most common 3D printing failures are caught right here:
Download the Complete 3D Printing Troubleshooting Guide (PDF)
We’ve compiled everything in this guide — plus additional calibration workflows, advanced resin charts, and the filament drying protocol — into a single printer-room poster and workbench reference.
What you get:
- The complete failure type visual reference (25+ types)
- Quick-fix lookup table for FDM and Resin
- The 30-Second Checklist (print-ready)
- Filament drying guide with temperatures for each material
- QR codes linking to advanced fix video walkthroughs
- Works for PLA, PETG, ABS, TPU, Nylon, and Resin
This is the reference you’ll actually use. Not a PDF you download and forget — one you’ll reference at the printer.
FAQ: 3D Printing Troubleshooting
Why do my 3D prints keep failing?
The most common reasons 3D prints fail are bed adhesion issues, incorrect temperature settings, and speed exceeding your hotend’s volumetric flow capacity. Start by checking your Z-offset and bed level, verify your filament is dry, and make sure your print temperature is correct for your specific material. About 80% of print failures trace back to one of these three causes.
What is the most common 3D printing problem?
First layer adhesion issues are the most common 3D printing problem across all experience levels. Whether it’s warping, failure to stick, or an uneven first layer, the foundation of your print is the highest-leverage point to optimize. Invest in a quality build surface, dial in your Z-offset, and enable mesh bed leveling if your printer supports it.
Why does my 3D printer stop mid-print?
Mid-print stops usually come from one of these causes: heat creep (heat traveling up the hotend and causing a jam above the melt zone — usually from inadequate hotend cooling fan), power interruptions (use a UPS if this happens repeatedly — many printers now support power-loss recovery), thermal runaway (safety feature that kills the print if temperature drops unexpectedly — check thermistor connections), or firmware issues (particularly if using custom G-code or a print recovery macro). Heat creep is the most common culprit in longer prints and is often accompanied by a gradual increase in extrusion resistance before the print stops completely.
How do I fix poor print quality?
Poor print quality is usually a combination of calibration and material issues. Start with the basics: dry your filament, level the bed, and verify temperature and speed settings. Then move to calibration: run a flow rate calibration, a temperature tower, and a retraction test. For specific surface quality issues like ghosting, enable input shaping if available. For stringing, a combination of temperature, retraction, and travel speed settings typically resolves it within 2–3 test prints.
What is volumetric flow rate and why does it matter for troubleshooting 3D printing?
Volumetric flow rate (mm³/s) is the maximum amount of melted filament your hotend can output per second. It’s the hidden ceiling that causes under-extrusion at high speeds. Many users tune retraction and temperature endlessly without realizing their printer simply can’t push that much plastic that fast. Check your hotend’s rated flow limit, calculate your current flow demand (speed × layer height × line width), and set a max volumetric flow rate in your slicer to prevent the printer from exceeding its physical limits.
Is a filament dryer really necessary?
For PLA and PETG in low-humidity environments, you might get away without one — for a while. But for Nylon, TPU, ABS, and most engineering filaments, a filament dryer is effectively mandatory for consistent results. Even PLA and PETG degrade measurably in humid climates after 24–48 hours of exposure. If you’re in a coastal, tropical, or high-humidity region, a filament dryer isn’t an optional accessory — it’s foundational equipment.
Final Thoughts: The Most Important Troubleshooting Habit
The best troubleshooters in 3D printing share one trait: they change one variable at a time. It’s tempting to tweak temperature, speed, and retraction simultaneously, but doing so makes it impossible to know what actually fixed the problem — or caused a new one.
Build a process. Use the 30-second checklist before every print. Keep a simple log. Treat your printer like a precision tool, not a slot machine.
And invest in the right accessories. The difference between fighting your printer every session and having it reliably produce quality prints often comes down to a few targeted upgrades: a quality build surface, a filament dryer, and — if you’re pushing high speeds — a proper hotend that can keep up with your ambitions.
The printer is rarely the problem. The process usually is.
Ready to Fix Your 3D Printing Issues?
Download our complete troubleshooting guide with visual references, quick-fix tables, and filament-specific advice to get back to successful printing faster.
Have a failure type that’s not covered here? Drop it in the comments and we’ll add it to the guide.
This guide is updated regularly. Last update: 2026.
