

Thinking of buying a modular 3D printer? Read our Snapmaker A350 review to find out what this printer has to offer in terms of features, specs, quality of print and price.
Recently, we got the Snapmaker A350 in our lab, and we have been testing it for a couple of weeks. This is going to be a firsthand overview of our experience with this modular printer. We’ll follow in the future with more in-depth walkthroughs as well as reviews.
First off, the Snapmaker 2.0 A350 is a 3-in-1 FFF 3D printer that has both laser engraving/cutting and CNC machining capabilities. The 2.0 version is an upgrade of the original Snapmaker 1.0, which had a great fundraising stint at Kickstarter.

AVAILABLE ON SNAPMAKER
Overview of the Snapmaker 2.0
The Snapmaker 2.0 comes in three different models, i.e., the A150, the A250 and the A350. The A150 is the smallest model, and it’s followed by the medium model, the A250, and finally, the A350, which is the largest Snapmaker 2.0 model.
This review will focus on the largest model, the Snapmaker A350. However, you can expect to have a similar experience with the other two models as well. The only difference between the Snapmaker 2.0 models is their build volume as well as heated bed temperature.
Snapmaker A350 Bed Size
Check the table below that shows how the three Snapmaker machines compare to each other:
[su_table responsive=”yes”]
| Snapmaker Model | Bed Size (Volume) | Printbed Temp | Price |
| Snapmaker A150 | 160 x 160 x 145 mm | 110°C | CHECK PRICE |
| Snapmaker A250 | 230 x 250 x 235 mm | 100°C | CHECK PRICE |
| Snapmaker A350 | 320 x 350 x 330 mm | 80°C | CHECK PRICE |
[/su_table]
Snapmaker A350 Review
The Snapmaker 2.0 is the ultimate machine for a DIY enthusiast. With this unit in your workshop, your imagination will be the only limit to your creativity.
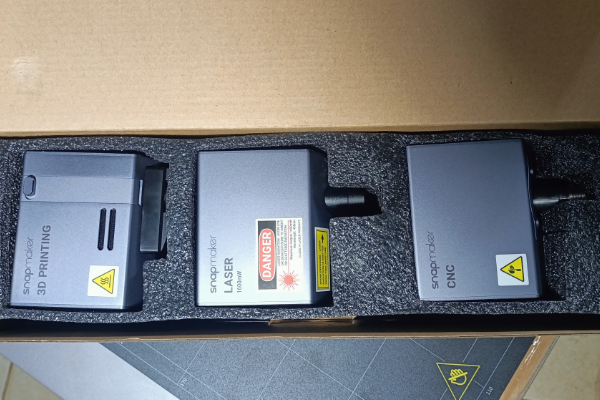
You can easily switch the machine from being a 3D printer to a laser cutter or a CNC tool. This is done by swapping out the single 3D printing head and replacing it with either the laser diode or the CNC tool, depending on what you want to do.
If you have tinkered with 3D printers in the past, you won’t have a difficult time assembling the machine. The unit comes with a comprehensive installation manual that is easy to follow. Moreover, your shipped box will come with all the handy tools and accessories you need to get the machine working immediately after assembly.
Snapmaker 2.0 also comes with a number of add-ons that will make your manufacturing easier and more efficient.
Snapmaker A350 Design
Like is the case with most 3D printers, the Snapmaker A350 comes with a comprehensive installation manual. However, the printer is not ready to use out of the box; you need to assemble it.
The assembly process is easy, thanks to the clear manual. We took about one hour to assemble the machine. Check the video below for an overview of the assembly process:
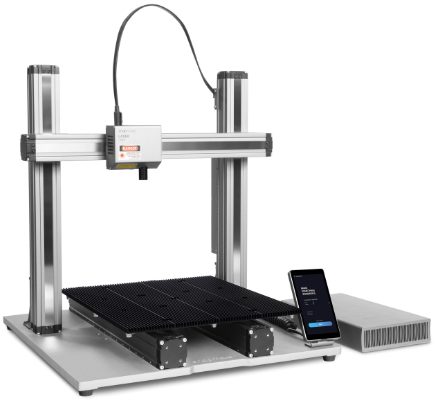
When assembled, you will notice the large and solid H frame that gives the machine its overall shape. The metal columns house the electronics and moveable parts and the finishing makes the unit a sight to behold. We love the excellent craftsmanship that is evident on the columns.
The printer’s build platform is on the bottom while the toolhead is held on the cross beam.
If you’d like to change the 3D printer to either a CNC machine or laser engraver, you need to unbolt the toolhead and build platform, and replace it with the toolhead and corresponding plate that you want to use.
On the base, there is a sturdy frame where everything is bolted in.

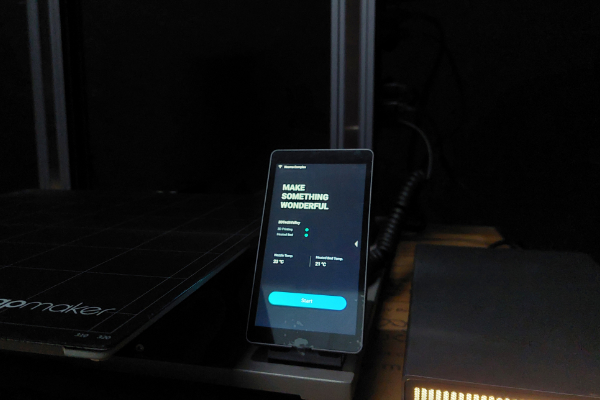
The Snapmaker 2.0 has a control box comprising of a touchscreen. This box runs on Snapmaker Luban software.

The control box keeps tabs of what the machine is doing at any particular time. For example, when you switch it on, it will instantly pick up the toolhead as well as platform that is currently in use.
However, swapping from one toolhead to another is not instantaneous. We spent about 10 to 15 minutes to switch. Moreover, after switching the toolhead, you have to calibrate the machine once again.
The good news is that the calibration is relatively easy and straightforward; simply follow the prompts on the touchscreen.
The downside is that the calibration of both the CNC and laser toolheads takes quite some time.
Snapmaker A350 Specs
Here are the specs of the Snapmaker A350:
General Specs
[su_table responsive=”yes”]
| Frame | Aluminum alloys |
| Connectivity | WiFi, USB |
| Touchscreen | 5-inch TFT LCD |
| Software | Snapmaker Luban, third-party slicers |
| Supported OS | MacOS, Windows, Linux |
| Rated Power | 320W |
[/su_table]
3D Printing Specs
[su_table responsive=”yes”]
| Build Volume | 320 x 350 x 330 mm |
| Heated Bed | 80 °C |
| Layer Resolution | 50 – 300 microns |
| Nozzle Temperature | Up to 275 °C |
| Nozzle Diameter | 0.4 mm |
| Supported Materials | PLA, ABS, flexible filament, etc. |
| Supported File Types | STL, OBJ |
[/su_table]
Laser Engraving Specs
[su_table responsive=”yes”]
| Work Area | 320 x 350 mm |
| Laser Power | 1.6W |
| Wavelength | 450 nm |
| Safety Class | Class 4 |
| Supported Materials | Wood, leather, plastic, fabric, paper, non-transparent acrylic, etc. |
| Supported File Types | SVG, JPEG, PNG, etc. |
[/su_table]
CNC Specs
[su_table responsive=”yes”]
| Work Area | 320 x 350 x 275 mm |
| Shank Diameter | 0.5mm-6.35 mm (0.02-0.25 inches) |
| Spindle Speed | 6000-12,000 RPM |
| Supported Materials | Wood, acrylic, PCB, carbon fiber sheet, jade, etc. |
| Supported File Types | .CNC/.NC |
[/su_table]
Snapmaker A350 Features
Since the Snapmaker 2.0 A350 is a 3-in-1 modular printer, it has features for 3D printing, laser cutting and CNC. We’ll look at all these three features.
But before we go to the features, let’s look at the construction.
Construction
After assembling the machine, you will have a sturdy full metal build unit to start your work with. The machine is robust and more stable than most modular 3D printers we’ve tested in the past.
After swapping the toolheads and calibrating them a couple of times, the process will be easier. Moreover, Snapmaker has comprehensive video tutorials on toolhead replacement as well as calibration. Therefore, you shouldn’t really worry about getting stuck.
The Snapmaker slicer software, Luban, runs on PC, Mac and Linux machines. The software ensures everything is connected and runs smoothly.

The interface of the software is well-thought out and consistent across the three different tooling options.
You can connect to the Snapmaker A350 through Wi-Fi or USB. The wireless connection is solid and is picked up by the Luban software.
Wi-Fi Connectivity is Available through the Control Box
You’ll be controlling the machine through a 5-inch (720 x 1280 px) touchscreen. On the touchscreen, you can do a couple of things related to your build. For example, you can preview models, calibrate and open stored files, and so on.
The touchscreen runs on Android OS and is powered by a Quad-Core A7 CPU @1.1GHz.
The Snapmaker A350 also has a power loss recovery feature, which comes in handy in case of a power outage. The feature allows the printing, laser cutting or CNCing to continue when power resumes after an outage.
3D Printing Features
The Snapmaker 2.0 A350 has a build area of 320 x 350 x 330mm. As you can tell, this is plenty of space for you to print many large items.
The printer’s layer resolution is between 50-300. Of course, this is not exceptional but is still good. The heated hotend reaches temperatures of up to 275ºC, which is high enough to print different types of materials, including ABS.
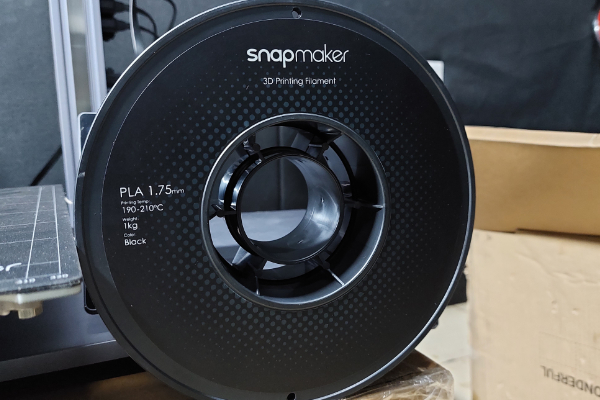
Inside the Box is One Reel of Snapmaker Filament
The heated nozzle is 0.44mm, which is suitable for various standard materials such as PLA, ABS, Wooded PLA, TPU, among others.
Coming to file formats, the Luban software accepts OBJ and STL files.
Laser Cutter Features
The Snapmaker A350 laser cutter has a 1600mW 450nm laser Diode, which is classified as a Class 4 safety device.
The laser can cut through a wide range of materials, including paper, fabric, plastic, leather, wood and non-transparent acrylic.
The Snapmaker Luban software handles all the files for your laser work. Supported file types include DXF, BMP, JPG, PNG, JOEG, and SVG.
CNC Features
The CNC toolhead holds the drill bits, which fit into a 0.5-6.35mm shank tank that revolves at 6000-12000 RPM. The drill bits can drill into various materials, including wood, jade, carbon fiber sheet, acrylic, and more.
The files supported by the CNC module are .cnc and .nc. In case you don’t have these file types, you can use various software applications to convert your current file types to the supported options. You can also load other file formats and adjust the parameters within Luban.
Assembling the Snapmaker 2.0
We took quite some time to assemble the Snapmaker. However, this is not to mean that the assembly process is difficult. The instructions are clear and all the accessories you need for the assembly are included in the box.
However, there is a lot of screwing work to be done. So, spare at least an hour to two for the initial assembly.
Calibrating the Snapmaker A350
Calibrating the Snapmaker toolhead takes a couple of minutes. However, the process is easy since the software is there to guide you. In about 10 minutes, your machine will be ready for use.
To use the machine as either a laser engraver or CNC cutter, simply swap the toolhead. This involves unbolting and unplugging the hardware and then replacing it with the relevant toolhead. After that, you’ll have to calibrate the newly-installed toolhead.
The amount of time it takes to calibrate the Laser and CNC toolheads is longer than the 3D printer toolhead. This is understandable since these two processes are more complicated. For example, during CNC calibration, the machine has to factor in various processes since the materials to be used have different heights, densities, and sizes.
However, don’t let the Laser and CNC toolhead calibration steps scare you. The calibration is similar to that of other machines.
During our tests, we found that we were taking about 30 minutes to set up and switch the toolheads. The process is straightforward but time-consuming since you have to ensure the toolhead you are swapping is correctly setup and calibrated.
3D Printing Performance
The robust construction and thick towers that make the H frame design of the Snapmaker A350 make it relatively heavy. However, this is also a good thing as there is little movement during your working processes. As a result, our prints were of good quality and accuracy.
After loading the print models in the Luban software, you can adjust the usual parameters and preview them before sending the file for printing.
The Snapmaker 2.0 is relatively fast compared to other mid to high-end 3D printers. And we love that the printer produces accurate models.
Of course, the layer height is not the finest we have seen in our tests. However, this does not in any way compromise the quality of the prints. The quality settings are accurate and precise. The only error we experienced with our test prints is the occasional stringing that appeared on models with finer points.
But there is one problem, which we hope can be addressed soon: the Snapmaker is quite a noisy machine.
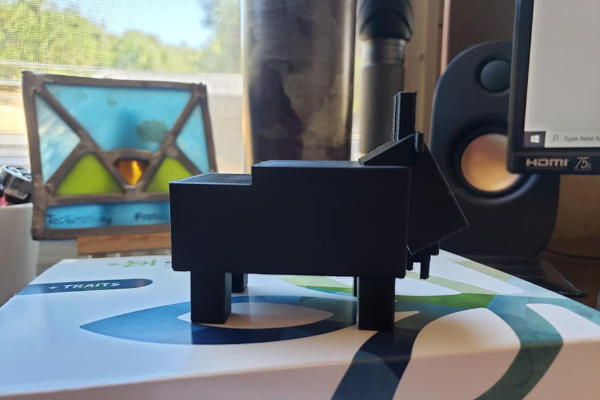
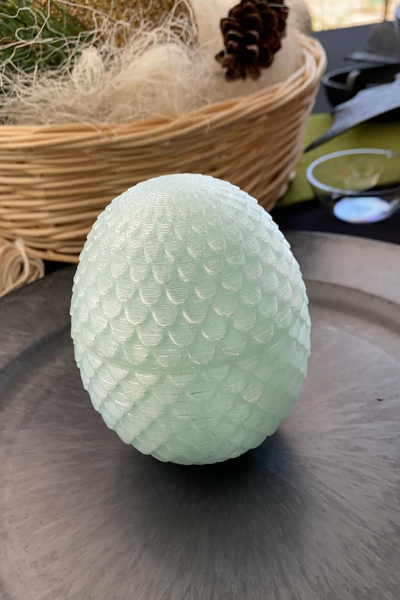
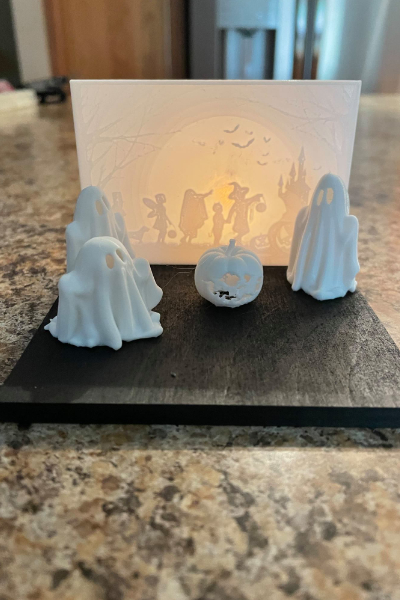
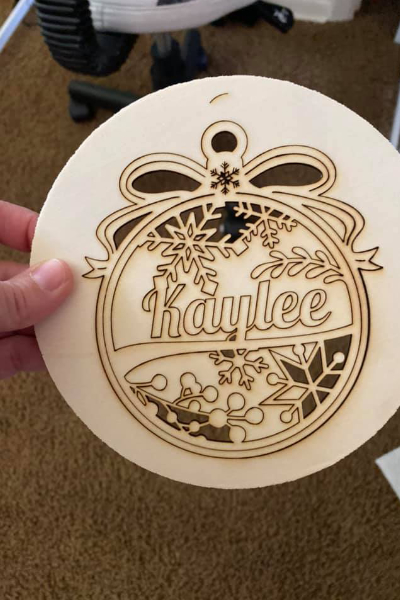
3D Printing Quality
Here are some models printed using the Snapmaker A350.


Laser Performance
After screwing down the metal bed and placing the laser head, you’ll be ready to start the calibration process. The process is quite fast and involves setting the laser focus height.
After calibration, you can load the material. There is a small camera next to the laser that makes it easy to accurately position your material on the work area.
There is also a run boundary option that runs the toolhead over the working area. You can use this feature to check whether the laser will fall within the material area.
Before you start any laser cutting work, make sure you wear the laser safety goggles that come in the box.
The Snapmaker A350 cuts and engraves fast, producing beautiful and accurate creations.
If you will be doing a lot of laser cutting work, it would be best to use the unit in an enclosure. Snapmaker has an enclosure designed for the A350 and the other machines. Of course, you can also make a DIY enclosure at home.

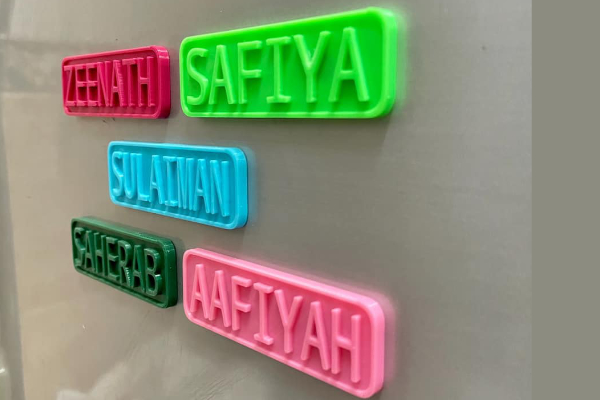
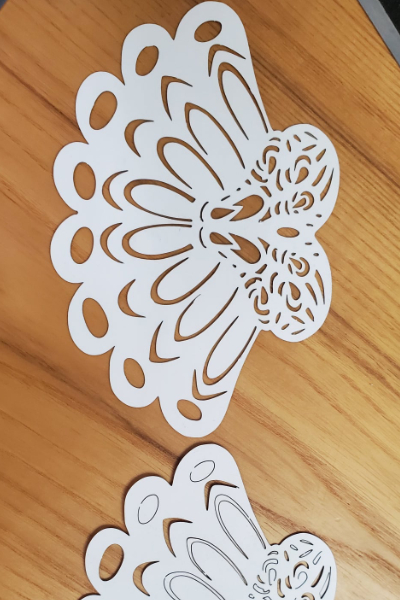
Check the capability of the Snapmaker A350 laser engraver below:


CNC Performance
Setting up the Snapmaker for CNC took us some time. The instructions are clear and we did not have any problems knowing what next steps to take.
CNC is a little different from 3D printing because you have to input the material type as well as size. Apart from that, you need to tweak your designs to set the depths and tabs.
The tabs prevent cut out parts from getting separated from the rest of the material during the machining process. In a nutshell, they help things to stay in place during the cutting process.
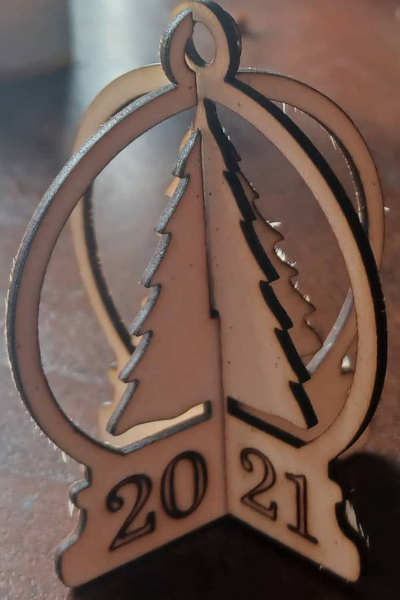
We found the Luban software very helpful in the CNC process. Here are some beautiful CNC creations made using the Snapmaker A350.

Snapmaker A350 Price
The Snapmaker 2.0 was originally available on Kickstarter. However, today, the printer is now available on multiple online stores. You can purchase the printer from Snapmaker official website.
The Snapmaker price varies depending on the model. For the Snapmaker A150, the price is around $1250. The A250 goes for about $1550 while the A350 goes for about $1799.
Who Should Buy the Snapmaker 2.0?
Since the Snapmaker comes in three models, there is something for everyone who’s interested in bringing advanced manufacturing capabilities to their workshop. For example, the smallest model, the A150 is available at just over $1000. This is quite affordable for most people.
Whether you are a professional designer, engineer, education institution or even a prosumer, the Snapmaker is a great addition to the fleet of 3D printers in your print farm.
Snapmaker A350 Review: Conclusion
We’ve been playing around with the Snapmaker 2.0 A350 for about a month now and have had nothing but good experience with it. We were especially surprised at how good all the three modules work.
In the past, we’ve tested some modular printers which tended to have quality issues on the parts. But this is not the case with the Snapmaker.
As you can see from the video review we’ve done, all the parts are well machined and made from high quality materials.
Moreover, since the Snapmaker is available in three sizes, you can choose the one that will be perfect for you. If you will be printing large items, go for the A350. On the other hand, if you will mostly be printing small items, go for the A150.
We love the quality of prints that the Snapmaker 2.0 produces. For our test, we printed the Mandolorian helmet as well as a small Wonder Woman statue.
The Snapmaker slicer software, Luban, is easy to use. But in case you prefer a third party slicer, the modular machine is also compatible with other slicers.
As a 3D printer, we are thoroughly impressed with the Snapmaker 2.0 A350. However, how does the unit fare when it comes to its other capabilities or laser engraving and CNC machining?
The laser module works flawlessly, allowing you to laser-burn designs on different materials including plastic, leather, wood among others. The designs created by the laser-burn module are incredibly detailed.
The Luban software makes it easy to do the laser burn or cut work, even if you are not an advanced user. You can import the image you want to laser cut into Luban, tweak the brightness and then it will be ready for laser cutting. From there, the Snapmaker will do its thing.
Finally, we have the CNC mill module, which is, in our opinion, the most complicated part of the Snapmaker 2.0. We haven’t had enough time to test the CNC mill module but this is in the works. We’ll post a detailed review of the CNC module later on.
Overall, the three modules are a great upgrade of the Snapmaker. The three models have some upgrades that make them more efficient than what was available in the Original Snapmaker. For example, for the 3D printing module, we now have a new fan and an improved hotend that can handle more materials than just PLA.
On the laser module, the Snapmaker 2.0 has 1600 mW instead of the 200nW that was fitted in the original Snapmaker.
The Snapmaker 2.0 A350 is one of the best 3-in-1 3D printer.
RELATED: Snapmaker Artisan 3-in-1 3D Printer
