

In this Picaso 3D Designer X 3D printer review, we’ll cover the features, specs and performance of the unit. Find out whether the printer is right for amateur or professional work.
Picaso 3D Designer X 3D Printer Review
The Picaso 3D Designer X is a professional, high-performance 3D printer from the new X series by PICASO 3D, which is designed high quality production. Read on to find out how to assemble and configure the printer, its technical features and areas of application!

AVAILABLE ON TOP3DSHOP
Equipment
The Designer X is delivered in a box measuring 500 x 540 x 700 mm. Inside the box, you will find the printer, a filament spool, two boxes with accessories and a booklet with a brief instruction on preparing the device for use.

The manufacturer also offers a 750g Picaso 3D PLA red plastic spool for testing.

Another item offered is a smaller box containing a 1.8m power cord and a 250ml bottle of glue. The glue comes in handy when you want to increase the adhesion of the table surface when printing with refractory plastics.

Inside a second box, there is a warranty card for maintenance and a a tool case. The tool case contains a spare nozzle with a diameter of 0.3 mm and a 16GB USB flash drive.

The printer door is covered with plastic wrap and all moving parts in the printing chamber are securely fixed with plastic ties.


Specifications
The Designer X measures 490 x 430 x 390mm and weighs 17kg. The printer body is made of composite aluminum, while the door is made of translucent heat-resistant plastic.

The electronics are located at the base of the printer under the bottom panel. Like all Picaso X series printers, the Designer X is installed with the reliable Mean Well 350W/24V power supply.

The Designer X’s motherboard is based on the 32-bit ARM CORTEX M4 processor. The board is powerful enough to solve the problems experienced with the functionality of the Designer Classic. Moreover, it also ensures the software extensions of the new Designer X firmware work properly.
The 3D printer also has a 100mm turbine type cooler.
All cables are neatly tucked in; there are no dangling wires.
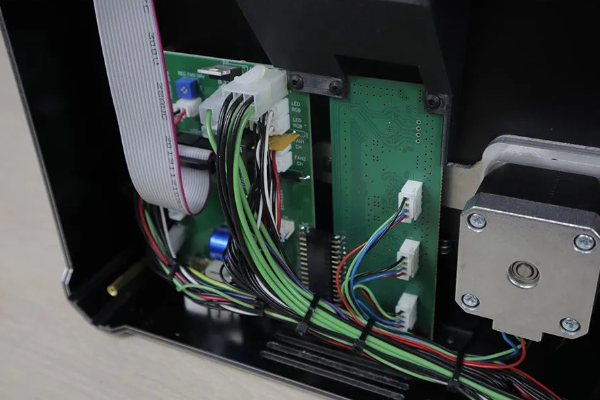
The printer uses the H-bot kinematics, which uses one belt on two motors.
With this system, the movement of the print head along the X axis occurs when both motors rotate in the same direction. When the motors rotate in different directions, the head moves only along the Y axis. Finally, when only one motor rotates, the head moves diagonally.
With H-bot systems, there is no motor on the X-axis. Therefore, the system allows printing at high speeds due to its lightweight design.
However, with this system, the quality of the belt and the tension force are very important. This is because using a long belt at high speeds can make it stretch, and this will affect the print quality. Therefore, it is important to achieve maximum rigidity in this design. The good news is that the Designer X belt is initially tensioned quite tightly.
Also, there are no limit switches on the XY axes. Instead, the extruder bounces at the corners and the printer determines the coordinates with help of the feedback drivers,

The Designer X printhead is rather big and moves along two cylindrical 8mm shafts.

Designer X 3D printer uses a Direct extruder. With this extruder, a feeder motor is installed in the print head, which allows for fast retract printing. The feeder has two gears that ensure flexible materials, such as Flex and TPU, are fed evenly.
Also, a double blowing system is built into the print head. The two coolers are installed opposite each other. An air duct is direct to the first cooler, and the second cooler picks up the air flow from the first. This ensures the hot end cools more efficiently.
The built-in encoder of the Flow Control system allows you to monitor several types of possible malfunctions at once. For example, you can monitor clogging of the nozzle, tangled material, uneven diameter and bar breakage. In the event of a blockage, the system will automatically start the extruder cleaning algorithm, after which printing will resume.
The Designer X 3D printer comes with a 0.3mm nozzle. However, if required, you can replace it with a 0.2-0.8mm nozzle.

The maximum temperature of the heating block is 410°C. The temperature is high enough to print not only common materials like ABS, PLA, PVA, and HIPS, but also super-melting engineering plastics such as SBS, AEROTEX, ULTRAN and PEEK.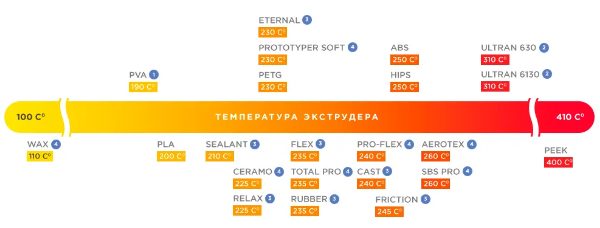
Build Volume
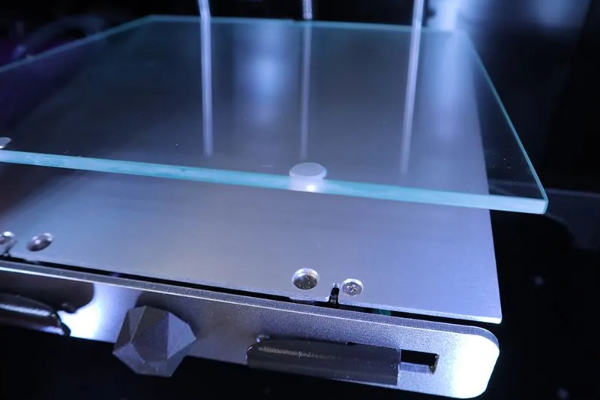
The printer’s build volume is 200 x 200 x 210 mm. The printbed is moved along the Z axis by a 12mm screw and two 12mm cylindrical shafts. The bed also handles engineering plastics and can reach temperatures of up to 150°C.
The closed printer case limits the ability to separate the model from the printbed, which is especially important when working with large models. Therefore, the printer has a magnetic mount on the glass plate of the printbed. This allows you to remove the printed model along with the plate, and then separate them.
The side panels of the printer have filament holder doors that also use magnetic mounts.
The dimensions of the printbed allow you to freely put in 2kg coils of plastic. Therefore, you can easily replace the material during printing or install another plastic for the next printing.


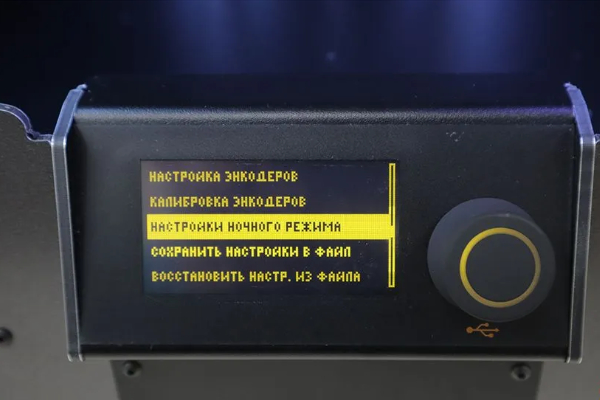
The Designer X has a monochrome display with an encoder.

The printer menu is divided into familiar tabs: printing, filament loading/unloading, table and nozzle heating, calibration and other settings. All menu commands are written in Russian.

The Picaso 3D Designer X also has a couple of upgrades. These include a mode for cleaning the print head, a function for drying a filament spool on the table, a night mode of printing with a slowdown, and treble. Most of the functions have descriptive animations.


There is also a “Nozzle cleaner” function in a separate menu. This function controls an additional device in the printer body, i.e., a washer with a soft rubber hole. When the function is activated, the nozzle is calibrated against the hole in the washer. The degree of nozzle cleaning is controlled by passing the filament through the washer.


However, looking at the washer holder, we cannot but wonder why it is printed from ABS plastic. Against the background of a high-quality all-metal body and general technical performance, the use of ABS parts instead of casting seems unreasonable.


Slicer Polygon X
Designer X works with the proprietary Polygon X slicer. The slicer comes with the printer on a USB stick.
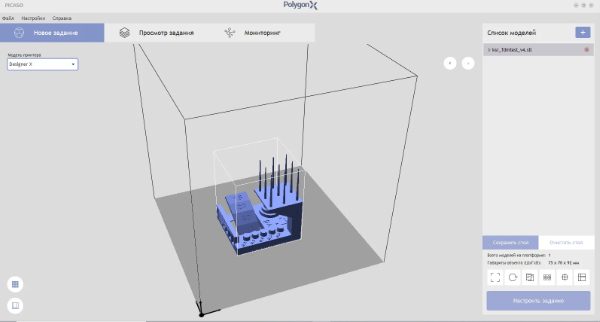
Polygon X has a simple design. The slicer is divided into 3 conditional tabs: New Job, View Job and Monitoring.
In the “New Job” tab, you can place, rotate and scale the model using the toolbar on the right.

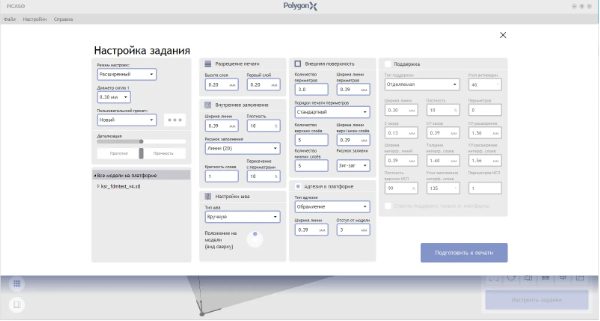

After installing the model, click on “Job settings”. After that, a menu with 3 settings modes will appear: Basic, Advanced and Professional. These modes are aimed at users with different levels of training. The Basic mode has tips and a minimum set of controllers, while the Advanced and Professional modes have a more complex system of settings.

After confirming the slicing settings, the Job Preview window opens. Here, the print settings are displayed and the model is divided into layers. In this window, the slicer offers to save the sliced model in .plgx format to a USB flash drive or add it to the Polygon X database, from where you can send a task to Polygon X via a LAN connection.
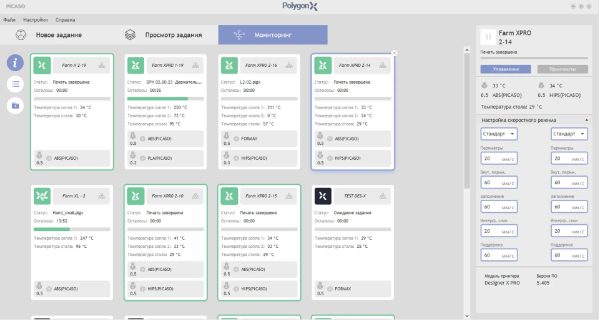
The third tab, “Monitoring”, displays information about the status of the printer and print readiness. The Polygon X ecosystem supports multiple concurrent network connections. This makes it easy to monitor production operations of multiple printers.
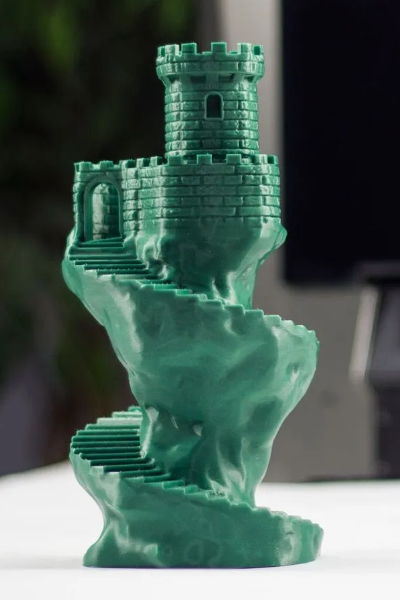
Print Examples
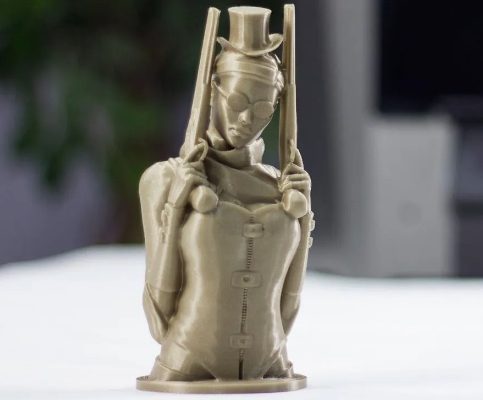
Here are examples of models printed using the Picaso 3D Designer X 3D printer.

Material: PLA; Layer thickness: 200 microns
Material: PLA; Layer thickness: 100 microns
Material: PLA; Layer thickness: 200 microns

Material: Ultran; Layer thickness: 100 microns
Summary
The main advantage of the Picaso Designer X 3D printer is its versatility that is made possible by the high operating temperatures. Most printers capable of handling material such as PEEK are priced 3-5 times that of Designer X. Therefore, the Designer X makes it more accessible to work with refractory engineering plastics.
There is also the convenient and easy-to-learn Polygon X slicer that allows you to use the printer in different industries, including: aircraft construction, instrumentation, robotics, medicine, architecture, design, education, and so on.
The only disadvantage of this printer is that some parts are made of ABS plastic of questionable quality.
BUY ON TOP3DSHOP
RECOMMENDED: Picaso 3D Designer X vs. Designer Classic
[su_spoiler title=”Application Categories” style=”glass-gold” icon=”caret-square”][/su_spoiler][su_spoiler title=”Brand Series” style=”glass-gold” icon=”caret-square”] Picaso 3D Designer Classic | Picaso 3D Designer X | Picaso 3D Designer X Pro | Picaso 3D Designer XL | Picaso 3D Designer XL Pro [/su_spoiler][su_spoiler title=”Manufacturer’s Printers” style=”glass-gold” icon=”caret-square”][/su_spoiler]
