

Knowing the temperature of the filament you want to use is critical in 3D printing. Read on to find the melting points of various filaments. Also, download our handy 3D printing filament chart that you can use for reference in your workshop.
In the world of 3D printing, there are various plastics with different characteristics, including temperatures. It is important to choose the correct temperature when printing. A change of even 1°C can completely change the quality of the model it terms of appearance and strength.
3D Printing Temperature
The most important thing is the nozzle temperature. This temperature will determine how the filament will be squeezed out and adhered to the previous layers.
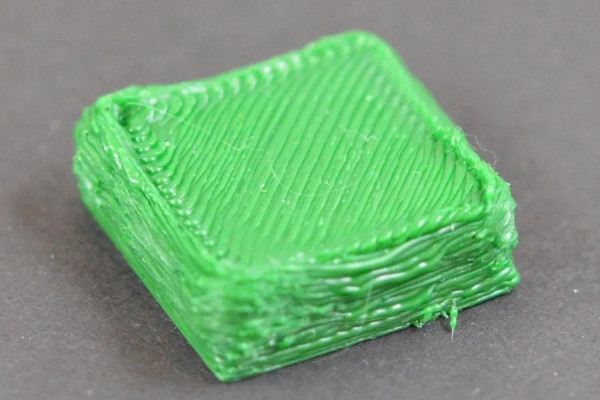
If the temperature is too high, it will cause the model to be out of shape, create cavities or even damage the printer. The model will also be affected as the plastic will not have time to solidify in the place where the printer squeezed it out. It will move a little.
If the temperature is too low, the plastic may not be extruded in sufficient volume. This will impair the strength and appearance of the model. If the plastic is too hard, then the printer will not be able to extrude the required volume.
The temperature of the printbed is important for the adhesion of the first layer. Thermal chamber technology allows you to prevent cracks if the plastic shrinkage (i.e., the decrease in volume with a drop in temperature) is too high. However, this technology is rarely found in budget 3D printers.
Let’s look at the most popular 3D printer filaments, their printing temperatures and features.
3D Printer Filament Temperatures
1. PLA
PLA is an abbreviation for polylactide. The material is made from corn and sugarcane, and is one of the safest plastics for household use.
Due to its ease of 3D printing and low toxicity, this filament is highly recommended for newbie 3D printing enthusiasts.
Temperature Settings:
- Nozzle temperature: 190-210°C
- Printbed temperature: 60-70°C
- Fan speed: 100%
The printing temperature of PLA filament is one of the lowest among all the 3D printing materials. However, you should pay attention to the fan speed of the model as this plastic remains flexible over a wide temperature range. If the airflow is insufficient, the edges and corners of the model may be bent.
For the model to stick better to the table, set the nozzle temperature to about 210°C and the printbed temperature to about 70°C. On the second and subsequent layers, reduce the temperature so as to prevent the edges from creasing.
2. ABS
Despite the difficulties in 3D printing with ABS, it is the second most popular material as it combines cheapness and versatility. This filament is more flexible than PLA, and allows you to print springs and bendable parts.
Due to its lower strength, it is easier to process ABS models mechanically with files and sandpaper. However, the filament releases toxins when heated. Therefore, it is not recommended for use in printing kitchen utensils.
Temperature Settings:
- Nozzle temperature: 230-250°C
- Printbed temperature: 90-100°C
- Fan speed: 50-75%
ABS plastic has a large shrinkage. Therefore, avoid increasing the fan speed above 40-60%. However, if there are small parts or printing bridges, you can increase the speed to 75-80%.
Cooling down too quickly can cause the part to crack during printing.

The strength of ABS filament highly depends on the temperature set. So, if accuracy is not so important, then it is better to increase the temperature up to 250°C. If you print at the lowest temperature, then the strength of the part can be reduced by 2 times than if it were printed at the maximum allowable temperature.
[su_note]Be careful: When printing with ABS plastic indoors, you may experience dizziness or headaches! Make sure you 3D print in a well-ventilated area. Also, use an enclosure to prevent the fumes from the plastic from harming you.[/su_note]
3. PETG
This plastic has great chemical resistance. It’s property combines the strength of PLA with the flexibility of ABS. Therefore it is used in the manufacture of dishes.
However, with the filament, it takes a long time to adjust the correct temperatures specifically for your printer in order to remove all printing defects.
Temperature Settings
- Nozzle temperature: 230-260°C
- Printbed temperature: 60-90°C
- Fan speed: 25-50%
When printing with PETG, there is often a problem with “hairs” on some parts of the model. To prevent such cases, you can increase the retract distance. Changing the temperature will hardly change the situation.
Because of the low adhesion of the plastic to itself, the fan speed should not be set higher than 50%. Otherwise, the model will easily break between layers.
4. HIPS
This plastic is used as a support material when printing on printers with multiple extruders. Usually, the main plastic is ABS or PLA, since they are neutral to D-limonene, and HIPS is soluble in it. This allows for nearly perfect overhangs.
Temperature Settings
- Nozzle temperature: 230-240°C
- Printbed temperature: 90-100°C
- Fan speed: 0%
Since the strength and hardness of this plastic is extremely low (sometimes it can be pushed through with a fingernail), it should not be used as the main material of the model. No blowing is needed because even when using HIPS for the entire model, it hardens during the printing of the layer.
5. SBS
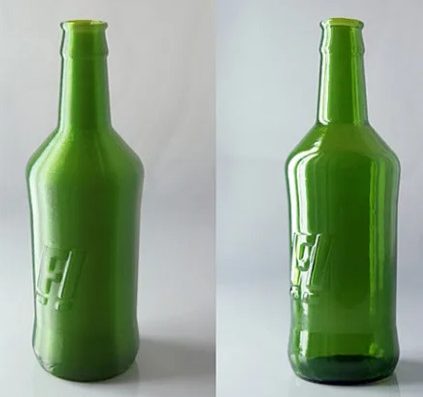
The main properties of this plastic are transparency and flexibility. With this filament, you can make bending parts, such as hinges, fasteners, clamps, and other. When the model is processed with a solvent, it becomes almost completely transparent as in the photo below.
However, when working with SBS, two rules must be followed:
- The walls should be thin walls
- The space between the walls should be completely filled
Temperature Settings
- Nozzle temperature: 220-230°C
- Printbed temperature: 60-80°C
- Fan speed: 50-100%
[su_note]Tip: If you need to print a sealed part, then the flow should be increased by 1-2%. This will increase the size discrepancy relative to the model but make the model completely sealed.[/su_note]
6. Nylon
This filament is familiar to many in everyday life, thanks to nylon clothing. The material is used in the manufacture of gears and other moving elements due to its flexibility, strength and low coefficient of friction.
Temperature Settings
- Nozzle temperature: 240-260°C
- Printbed temperature: 70-90°C
- Fan speed: 0-25%
This filament requires a long selection of the right temperatures as it has many problems, including poor sintering capacity between layers, low adhesion, hygroscopicity (the ability to absorb moisture from the air), among otheers.
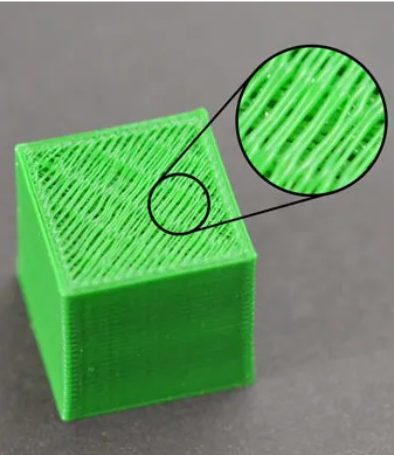
The latter characteristic is especially important since it radically changes the behavior of the plastic. Due to the presence of water particles in the plastic, the model becomes very fragile and the surface becomes rough, such as in the photo below.

Therefore, it is imperative to keep the plastic dry.
If you do not know whether the filamnet has absorbed moisture, dry it using special devices or in the oven at a temperature of 60-70°C for 2-5 hours.
7. TPU
Some people call this plastic “rubber” because it is the most flexible material for 3D printing. The filament can stretch up to 4 times its initial size. At the same time, over time, it returns to its original form.
Temperature Settings
- Nozzle temperature: 210-240°C
- Printbed temperature: 50-70°C
- Fan speed: 50-100%
Due to its flexibility, printing problems can occur. The most common problem is the filament chewing in the feeder. Printing with this plastic is recommended only in direct extruders at low speeds not exceeding 40 mm/s.
You can try to print them in bowdens, but then the speed should be no more than 20-30 mm/s. Otherwise, the filament will curl up in the tube and print will stop.

This problem is caused by the gap between the hole where the filament exits the extruder and the feed gear. To solve this problem, you can use special spacers to reduce this gap.
8. PVA
PVA is a water soluble filament used for printing supports. It has low strength, which makes it impossible to use as the main material of model.
Unlike HIPS, which has similar properties and applications, PVA is much easier to remove from the part because, even when heated and dissolved in water, it is completely harmless.
Temperature Settings
- Nozzle temperature: 220-230°C
- Printbed temperature: 65-75°C
- Fan speed: 0-50%
Since this plastic is only needed to create supports, avoid using blowing. If you need a high-quality part made entirely of PVA plastic (for example, a soluble cork or fastener), then the blowing speed should be below 50% since the adhesion of the layers of this filamnet is extremely low.
You can increase the strength of a PVA plastic model with water. To do this, carefully moisten the part, wait 5-7 minutes and dry the surface. This way, the outer walls of the part will “stick” to each other much more, thereby increasing the overall strength of the part.
9. PC
PC stands for polycarbonate. This 3D printing filament has more strength but relatively little flexibility than PLA. Also, when lit, it tends to self-extinguish. Therefore, it is a good material to use for parts for fire safety.
Temperature Settings
- Nozzle temperature: 290-310°C
- Printbed temperature: 90-120°C
- Fan speed: 0-25%
Like PETG, this plastic is very hygroscopic. Therefore, it should be stored in a dry space or in a bag with silica gel. Due to the need to maintain high temperatures and storage characteristics, polycarbonate is not widely used in 3D printing.
10. PEEK
This plastic is difficult to 3D print but has outstanding mechanical properties. Therefore, parts are made from it are designed to work with high loads and friction. The filament is also neutral to various chemicals.
Temperature Settings
- Nozzle temperature: 350-410°C
- Printbed temperature: 120-150°C
- Fan speed: 0-25%
To print PEEK, you must use professional 3D printers. If you use a 3D printer intended for home use, there is a possibility of burning the extruder and the heating element in it.
A heated heat chamber is also required.
Composite Plastics
This category includes filaments containing particles of any material. This material consists of two parts: the base (usually PLA, ABS or other plastic) and the added component (wood, metal, ceramic or carbon fibers).
These plastics differ not only by the type of added component, but also by the percentage. Typically, the higher the content of the additional component, the more the properties of the plastic differ from those of the base.
The temperature depends on the base of the filament. All temperature settings must be obtained from the manufacturer.
A common feature of all filaments in this category is the need to use a nozzle with a large outlet diameter (from 0.5mm). Otherwise, the nozzle will quickly become clogged with the added component.
The material of the nozzle is also important as normal brass nozzles will wear off quickly. Hardened steel nozzles are usually sufficient.
Setting the Printer Temperature
Ensure that the printer is heating the nozzle to the correct temperature before printing, and that it does so without jumps. To do this, confirm that the printer’s firmware is configured and that the thermocouple is installed correctly.
Correct Installation of the Thermocouple in the Hotend
The printer receives data on the temperature of the hotend using a thermocouple installed in the hotend. Usually, there is a special hole for this. You need to insert the thermocouple into it as deep as possible and secure its wire.
Most printers have a hole in the hotend where the screw is screwed in. Run two wires on opposite sides of the center of the screw to securely fix the thermocouple in the hotend. If no thermocouple attachment is provided, fix the thermocouple wire to the heating element wire. See the photo below for an example on how to do it.

[su_note]Attention: a loose thermocouple can fall out of the hotend, thereby creating a fire hazard![/su_note]
Configuring the Firmware
If the printer is going to be assembled on its own, select the type of thermocouple in the firmware. If you are going to use the Marlin firmware, go to the Configuration.h file, and find the line:
#define TEMP_SENSOR_0 0
In place of the last digit, there may not be a zero but another digit. In most cases, if your printer has a thermistor in the form of a “droplet”, then instead of the last digit, put 1. As a result, you should have the line:
#define TEMP_SENSOR_0 1
If the printer detects the temperature incorrectly, trying changing the last digit to a different one. A list of numbers and the thermocouples they represent is written above this setting.
The table has the same setting, it can be found by the line:
#define TEMP_SENSOR_BED 0
Here you should also change 0 to 1.
PID setting
This abbreviation hides a complex name: proportional-integral-differential regulator. In simple terms, this is a function that allows you to more accurately keep the temperature within the specified limits.
Since the printer can only turn on and off the heating element, the only way to control the temperature is to turn off the heating element when the required temperature is reached, and turn it on if the temperature has dropped below the set value. But in this case, the temperature will “jump” strongly due to the inertness of the heater. This is precisely why the PID function exists – to compensate for the inertness of the heater.
However, each printer needs its own PID setting since the inertia can vary greatly depending on many parameters.
The PID setting requires a wired connection to the printer. The best way to send commands is to use Repetier-Host . As soon as you connect to the printer, send this command to it:
M303 C3 S210
Here, the number after C is responsible for the number of heating-cooling cycles the printer will go through. The number after S defines the temperature for which the PID is adjusted. Although the printer will be set at a certain temperature, these settings will work for higher temperatures as well.
After some time, the printer will send the values of three PID parameters to the console: Kp, Ki and Kd. These parameters are responsible for setting the PID. To enter these numbers in the printer settings, you need to send the command:
M301 P14.82 I0.8 D68.25
Here, the letters P, I, and D are followed by the corresponding Kp, Ki, and Kd values from the previous step. If you enter this command, the PID setting will only be saved until you turn off the printer.
You can add this command to the starting GCODE for each model you will be printing. In some printers, you can change these settings through the menu on the printer itself.
Softening Point and Post-processing
After 3D printing, you can process the part using heat to increase its strength or even change its geometry. At home, you can use the oven for these purposes.
However, be careful: some plastics emit hazardous substances when heated. Therefore, it is better to use other methods. For example, a steam bath, hot water, or hair dryer can be an alternative.
The main parameter of such processing is temperature. You need a sufficiently high temperature for the material of the model to begin to pass from a solid state to a sluggish-flowing one, but not exceed a certain temperature threshold, after which the part can change its geometry uncontrollably.
Here is a list of filaments and their softening points:
- PLA – 70°C
- ABS – 105°C
- PETG – 80°C
- HIPS – 85°C
- Nylon – 125°C
- TPU – 95°C
- PC – 145°C
- PEEK – 255°C
The data is relatively inaccurate, since filaments do not have a specific temperature when they completely go from one state to another.
3D Printer Filament Temperature Chart
If you often use different filaments, we have prepared a chart with all the information you need to set the temperature of your 3D printer on the fly.
[su_table]
| Plastic | Nozzle temperature (° C) | Printbed temperature (°C) | Blowing speed (%) | Peculiarities |
| PLA | 190 – 210 | 60 – 70 | 100 | Security
Strength |
| ABS | 230 – 250 | 90 – 100 | 50 – 75 | Flexibility |
| PETG | 230 – 260 | 60 – 90 | 25 – 50 | Chemically neutral
Abrasion resistant |
| HIPS | 230 – 240 | 90 – 100 | 0 | Soluble support |
| SBS | 220 – 230 | 60 – 80 | 50 – 100 | Transparency, great flexibility |
| Nylon | 240 – 260 | 70 – 90 | 0 – 25 | Chemically neutral
Heat resistance |
| TPU | 210 – 240 | 50 – 70 | 50 – 100 | Great flexibility Frost resistance |
| PVA | 220 – 230 | 65 – 75 | 0 – 50 | Water solubility |
| PC | 290 – 310 | 90 – 120 | 0 – 25 | Strength
Heat resistance |
| PEEK | 350 – 410 | 120 – 150 | 0 – 25 | Durability Heat / frost resistance |
[/su_table]
