

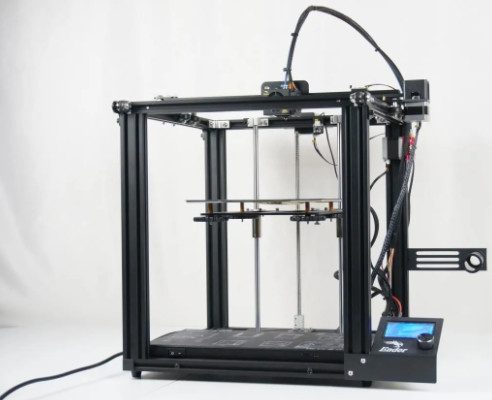
In this Creality Ender 5 Pro review, we look at an overview of the printer and take it for a test drive. Read on to find out the features, specs and quality of print to expect.
For some years now, Creality has been the leader in the production of budget FDM 3D printers for home use. In particular, their most popular printer is the Creality Ender-3 .

AVAILABLE ON CREALITY
The Ender 3 has already received several upgrades, such as the Creatlity Ender 3 V2, Ender 3 Pro, and so on. But in parallel with them, there is another line of printers – Ender-5.
In this review, we’ll look at the Creality Ender-5 Pro .
Creality Ender 5 Pro Specifications
[su_table]
| Molding Technology | FDM |
| Printing Size | 220*220*300mm |
| Machine size | 552*485*510mm |
| N.W. of machine | 11.8KG |
| Number of nozzle | 1 |
| Slice thickness | 0.1mm-0.4mm |
| Printing method | Online or TF Card Offline |
| File format | STL/OBJ/AMF |
| Filament diameter | 1.75mm |
| Printing Precision | ±0.1mm |
| Rated power | 270W |
| Nozzle diameter | Standard 0.4mm, optional 0.2/0.3mm |
| Power supply | Rated voltage 115V/230V, output 24V |
| Operating system | Win XP/Vista/7/10/Mac/Linux |
| Slicing Software | Cura/Repetier-Host/Simplify3d |
[/su_table]
Let’s start with unpacking and assembling.
Creality Ender 5 Pro Review
What’s in the Box?
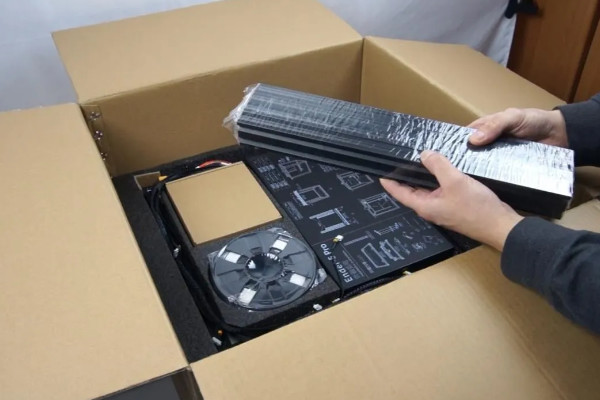
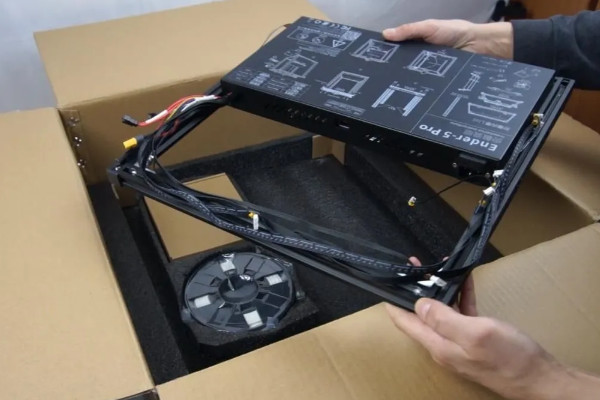
The printer is delivered in a fairly large box in a semi-disassembled state. Here are the items found in the box:
i) Above is a detailed assembly manual and some papers

ii) Then we get the screen with a mount

iii) An extruder motor with feeder

iv) A Z-axis mechanism assembly
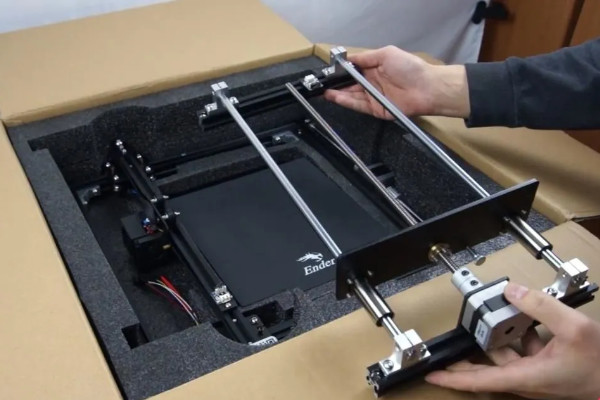
v) A portal with X and Y axes, also completely finished, with hotend and all belts.

vi) A table with an elastic magnetic backing already glued on, and a wire at the end of which the XT60 connector is installed.

vii) And at the very bottom of the box, there are 4 vertical profiles 200 x 400 mm.
viii) The lower part of the case with the control unit and all the wires.
ix) A 250g spool of white PLA

x) A box of tools and hardware
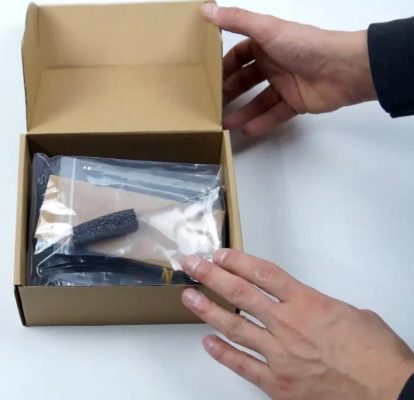
In addition to the assembly screws, the filament spool holder, and the power cable, the box contains:
- A bundle of ties
- A needle for cleaning a nozzle
- A set of hexagons
- A wrench
- A small screwdriver
- The most common side cutters with soft blue handles
- A spare nozzle
- A fitting for a Teflon tube
- Several clips for fittings
- 8GB microSD card with card reader
- A simple metal spatula.
The tool set is quite standard. Only tweezers are missing.
Control Unit
Before we assemble the printer, let’s take a look at the control unit. The unit opens from the bottom and the lid is held by 4 screws. The unit holds both the power supply and the control board.
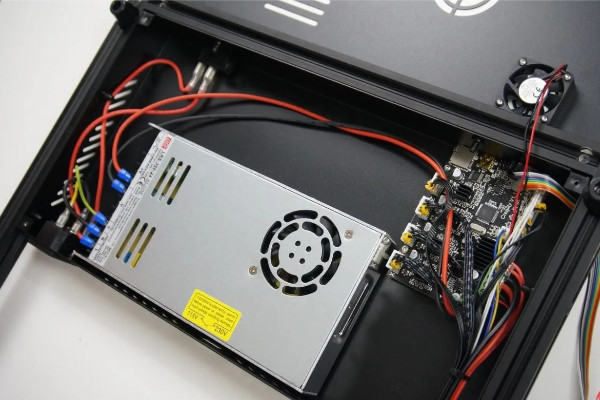
The power supply is a 24V 350W unit in a low profile case. This is quite standard for printers with this printable area.
However, unlike Ender-3 Pro printers that have Mean Well power supplies, the Ender 5 Pro’s power supply is from Lian Lida.

We were not impressed with the control board. While Creality already has 32-bit boards based on STM32 microcontrollers, which are installed on the Ender-3, the Ender 5 Pro has an outdated 8-bit board.

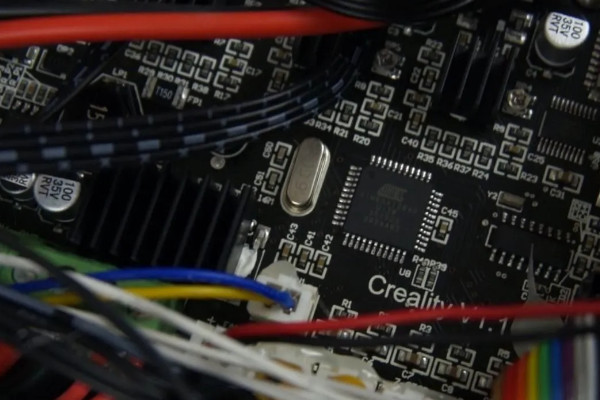
I am glad that the drivers soldered on the board are not noisy A4988, but already quiet TMC2208. However, they are also not the most modern ones. Moreover, they are connected in the so-called Standalone mode. This means that there is no way to fully use their functionality.
Assembly
The assembly process is not difficult, especially if you follow the step-by-step instructions.
First, fasten 4 vertical posts to the bottom.
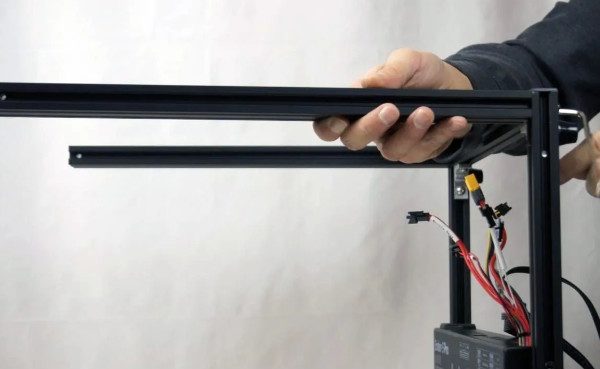
Next, install the portal from above and fix it with screws.
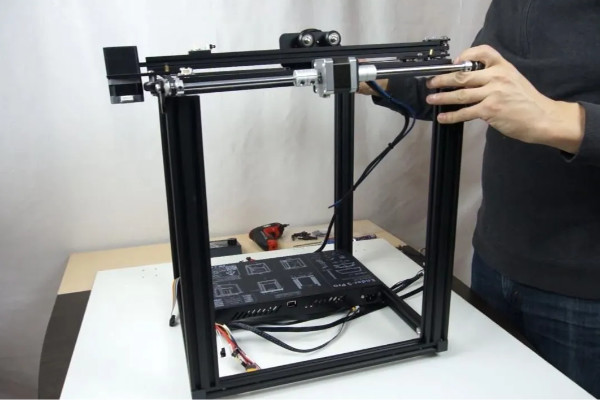
Fasten the Z-axis mechanism to the rear wall of the printer with 4 screws.

Attach the table with the frame to this mechanism.

On one of the vertical profiles, fix the extruder motor with the feeder to the screws with T-nuts.

Insert a Teflon tube into it and fix the fitting with a plastic bracket from the kit.

Install the filament spool holder under the feeder

Install the screen on the front of the printer.

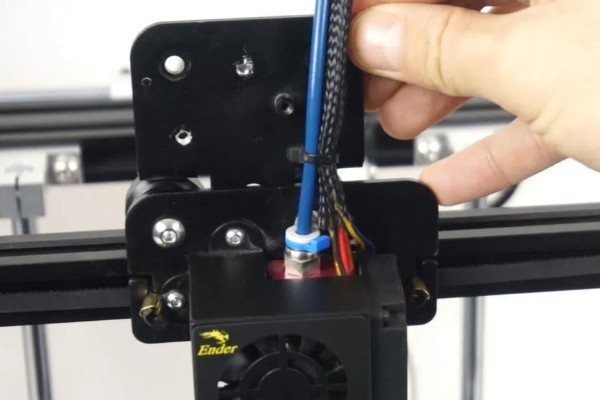
After that, you only need to connect and conduct all the wires so that they do not interfere with the movement of the printer components.
All wires are marked. Therefore, there should be no difficulties in connecting them.


Mechanics
The printer is now assembled. Let’s take a closer look at it.
We have already seen the electronics. Let’s move on to mechanics.
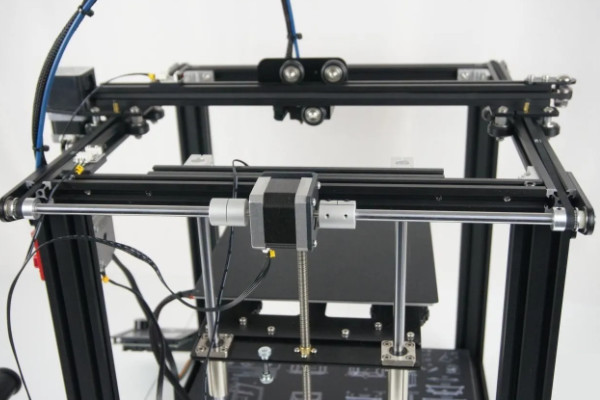
The print area is 220 x 220 x 300 mm.

The printer uses Cartesian kinematics, which is commonly referred to as MakerBot after the company that first started using it.

The kinematics are simple and quite reliable. However, they far from the fastest since when the Y axis is moved, the X axis motor moves along with the extruder and the beam.

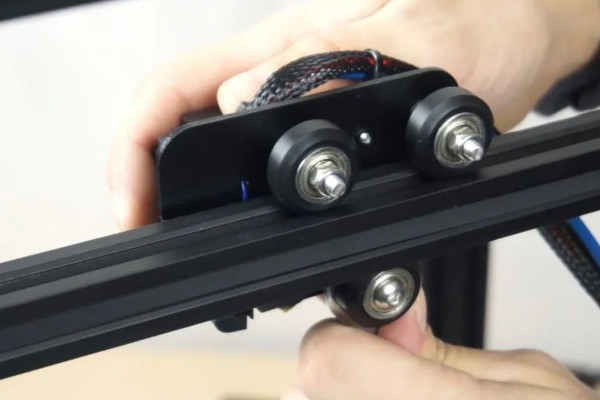
The OpenBuilds system is used to move the X and Y axes, i.e., rollers that roll on aluminum V-shaped profiles.
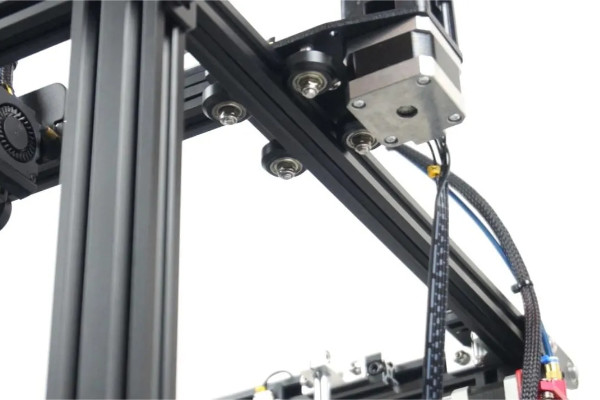
There are 4 rollers on two Y-axis carriages and 3 rollers on an X-axis carriage.
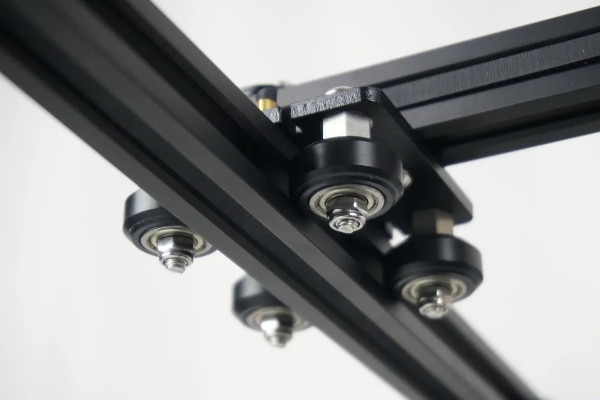
On all carriages, eccentrics are provided on one side, allowing you to adjust the pressure of the rollers.

On any printers with such a transfer system, before the first start, you need to check if the rollers are properly aligned. If necessary, adjust them.
The rollers should be pressed so that nothing dangles, but at the same time does not pinch. After all, this will directly affect the print quality and the durability of the rollers.
In our case, we only had to slightly loosen the rollers of the X-axis carriage.
Also, check the belt tension. On the X axis, there is one belt. Its tension is carried out by displacement of the counter roller on a small platform.
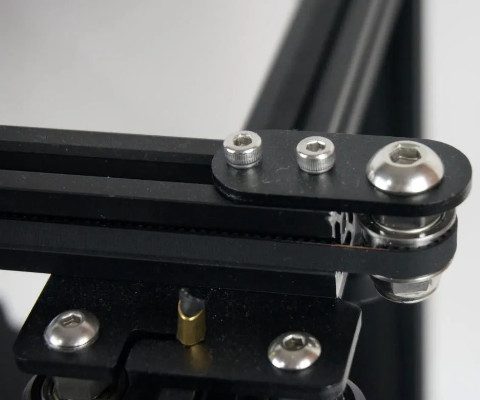
The Y-axis has two belts, which are also tensioned. However, keep in mind that their tension should be as equal as possible.


Both axles are driven by NEMA17 motors. On the X axis, the motor is normal.

On the Y axis with a through shaft, the motor is fixed in the center.
The decision is quite logical.
The Z-axis is implemented differently. It runs on two 10mm linear bearing shafts and is driven by a NEMA17 motor through an 8mm 2-lead screw.

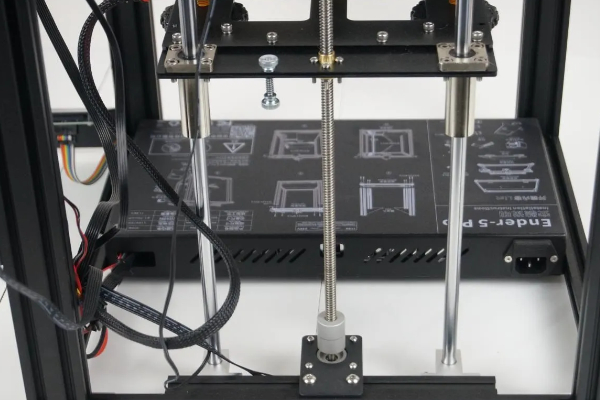
The coupling connecting the motor to the screw is rigid split.

The brass nut is normal and is fixed on the table platform.

The platform is made of 4mm aluminum sheet.

There are no stiffeners. The platform is absolutely flat. At first glance, it doesn’t look very reliable.

But looking ahead, we can say that this does not affect the quality of printing and stacking of layers. However, it will not be superfluous to strengthen it.
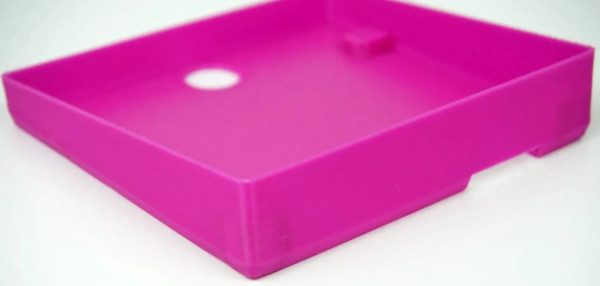
The heated table is made in the same way as the Ender-3 Pro. There is 3mm aluminum sheet with a magnetic surface glued on. From above, a flexible substrate with an adhesive coating is “magnetised” to it.

The wires leading from the table are not secured in any way.

Of course, with such kinematics, the table does not make constant fast movements. However, this is still not safe.
Calibrating the Printer
There is no auto-calibration of the printbed.
You have to manually move the carriage in the corners and in the center of the table, place a piece of paper under the nozzle, and twist the large convenient adjusting knobs until we achieve the same pressure over the entire surface. The paper should move with little resistance.

Generally, this is a standard procedure.
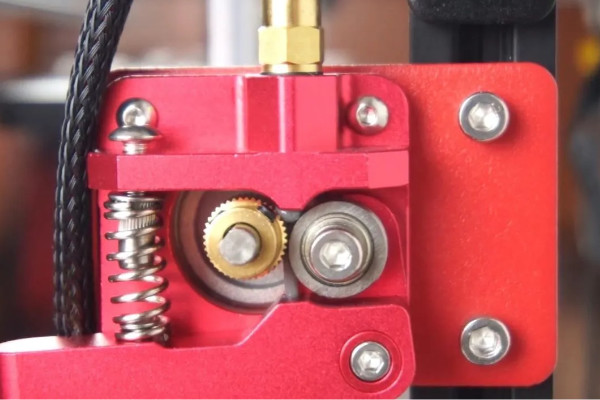
Design
A bowden extruder is installed on the printer. The feed mechanism is placed on the printer body, and the filament is fed to the hot end via a rather long Teflon tube.
The feeder is an aluminum MK8. However, most manufacturers are trying not to use them and have long since switched to geared feeders like Titan or BMG, as well as other modern solutions.

The MK8, of course, also works and fulfills its tasks. However, it has problems when printing with soft flex plastics.
You can adjust the pressure of the feed gear to the counter roller.
The hotend is the same as that of the Ender-3, i.e., the CR10.
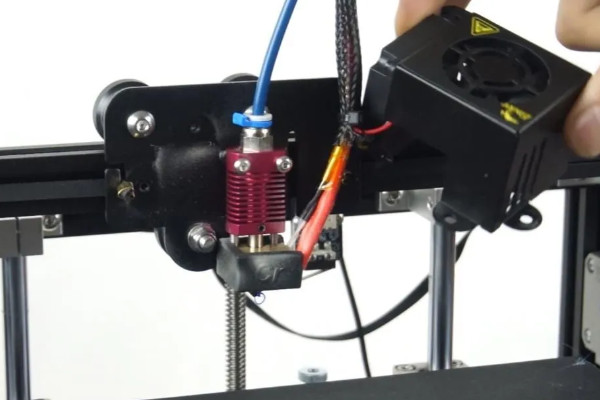
While also not the most modern solution, this hotend works normally on other models. If used correctly, it does not cause significant problems. The Teflon tube goes straight to the nozzle.
By the way, on such hotends, before the first seal, it is advisable to get a Teflon tube and check how it was cut. The cut should be as flat as possible. Otherwise, the tube will not be able to fit snugly against the nozzle and plugs will appear.

Our pipe was quite straight. However, just in case, we even trimmed it.
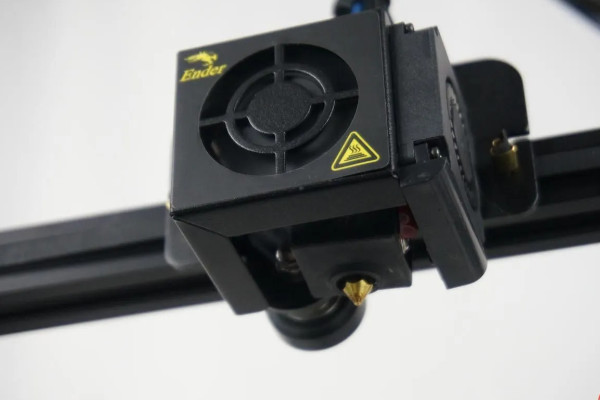
The top of the hotend is covered with a metal casing.

A conventional 4010 axial fan is used to cool the hotend radiator.
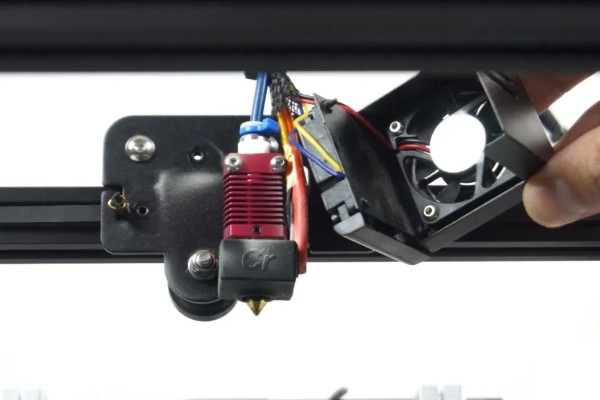
A 4010 turbine fan blows the model.
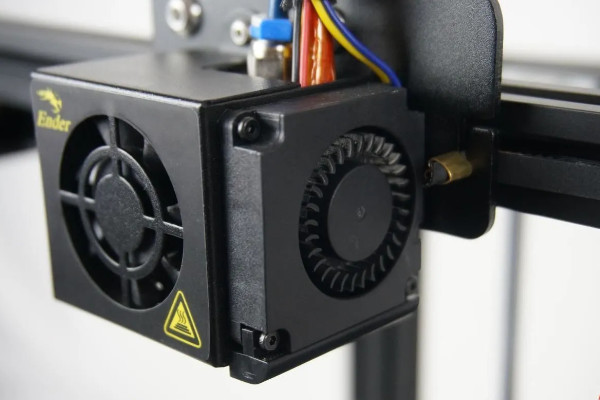
The shroud is exactly the same as on the Ender-3. The shroud has a long-known drawback: the radiator cooling fan blows down on the model and can cause difficulties when printing with plastics that are prone to shrinkage and do not require blowing.
On the other hand, there are many alternative airflows for the Ender on the internet. The only thing to consider is that the bottom bracket on the Ender-5 is longer than on the Ender-3, and many airflow models are attached to the bottom bracket on the right.

You need to choose the model that is suitable for this particular printer.

As far as the frame strength of the entire printer is concerned, everything is fine. Thanks to the 20 x 40 mm profile used as uprights, the entire frame is strong and does not wobble at all.
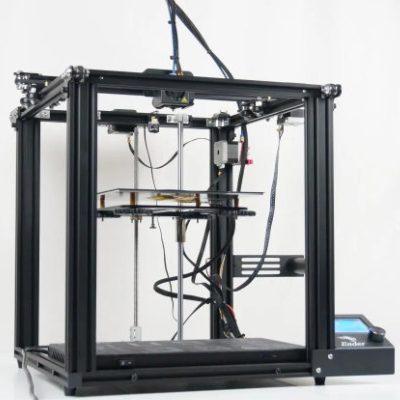
The printer is controlled using a simple non-touch screen 12864 with an encoder.
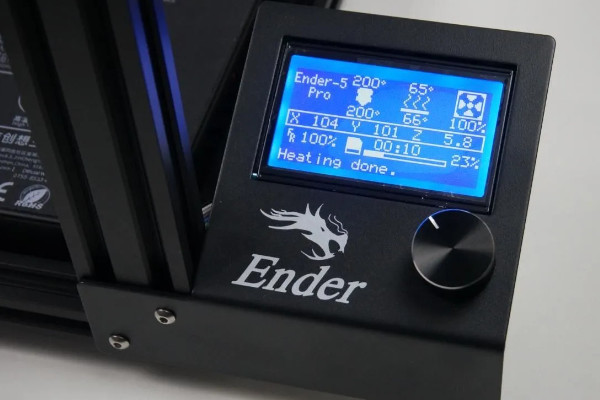
To some, this may seem a minus. However, practice shows that such screens work stably, do not affect printing in any way and, have a fairly large functionality.
Seal
Let’s turn on the printer and try to print.
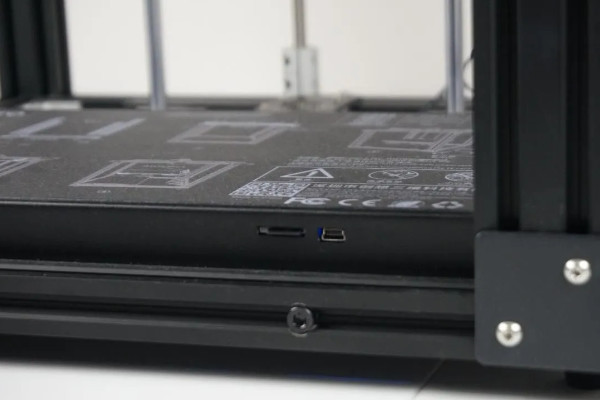
The power button, a slot for a MicroSD card and a MiniUSB port for connecting to a computer are conveniently located on the front side of the control unit.

We sent all the axes home and we faced the first issue: the ends of the X and Y axes are on the right and back, respectively.

In this case, clicking on them assigns zero coordinates to the axes. Usually, the zero points are located on the left front and all slicers are designed for this location. As a result, setting the models in the default slicer will print them back and forth.
Solution?
It was not possible to install the limit switches in another place. Therefore, we configured the firmware so that when you clicked on them, the final coordinates rather than the initial ones were assigned. This is not very convenient, but it also isn’t critical.
Quality of Print
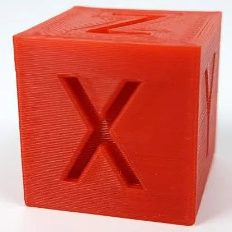
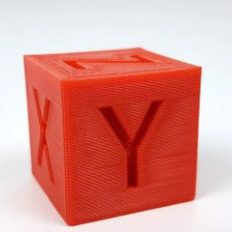
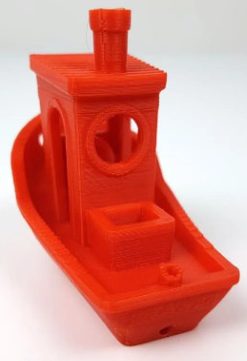
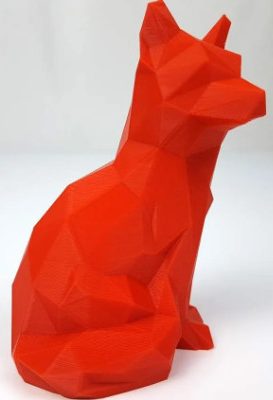
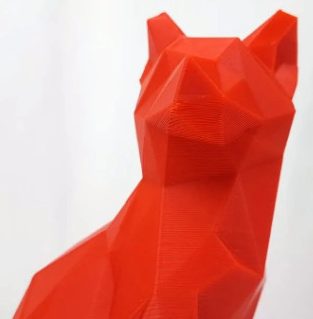
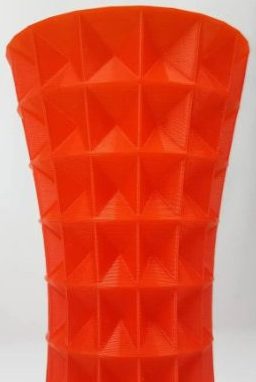
We calibrated the printbed, loaded Eryone red PLA and printed some routine tests. We printed an XYZ cube, a Benchy boat, a low poly fox, and a small vase in spiral mode. The models are standard but they can show how well the printer can print.
The speed was set to an average of 30 mm/s for the outer contours and 60 mm/s for everything else.
The result was very decent.
The cube is even, the corners do not stick out, the layers are laid quite evenly and there is no echo. The deviations in size are insignificant within one tenth.


With the Benchy boat, everything was fine too.
There are no strings at all. Even the airflow was enough on a strong slope from the front. However, keep in mind that this side of the boat was turned directly to the fan. The windows also turned out well. There is no hint of sagging.


Finally, we printed the fox with its muzzle turned towards the blower. It turned out great. Everything is smooth. The seam of the transitions between the layers is almost invisible.


And there are no complaints about the vase. The layers are laid evenly and there is not a single flaw on all surfaces.


Printing Models
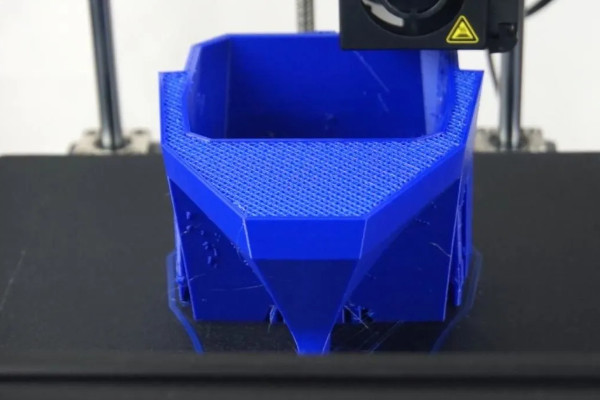
We loaded Esun gray PLA + and tried to print a more interesting model; the Easter egg by Makers Muse.
The model consists of three parts, which are printed in each other and do not touch each other. After printing, these parts should be able to rotate.
We increased the model to 200%. Therefore, the gaps between the parts also increased. However, this is a rather complex model.
Most models printed without any problems. From above, where strong slopes begin, difficulties appeared. The edges bent up, the nozzle touched them and the thin high parts swayed a little. Because of this, protruding layers are visible in some places.
However, the model was printed to the end and immediately started working when removed from the table. All parts can move freely.


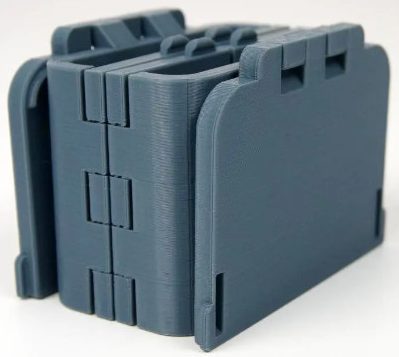
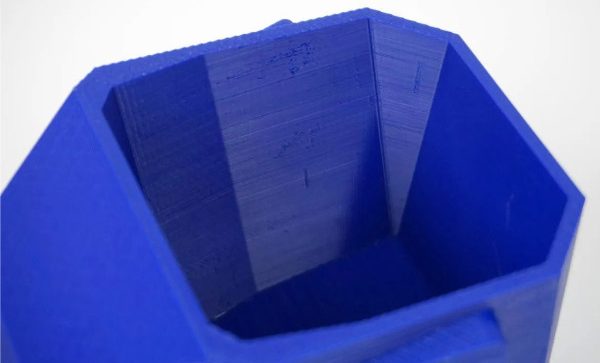
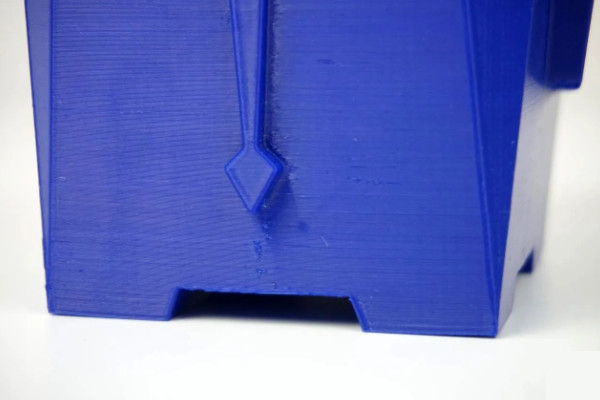
The next model is also printed assembled. It is a foldable box with many movable joints. All parts are connected with each other by small jumpers so that nothing falls during printing. Then they are removed from the printed model.
There were no problems printing this model. Some layers, which were in difficult areas, bulge a little. But all the mechanisms work. Nothing stuck together. The box unfolds and assembles as it should.


We also tried to print with ESUN blue PETG. And here, we faced the first difficulties began. No matter how hard we tried, the filament was constantly leaking from the nozzle during transfers. Neither different retraction settings, nor temperature, nor combining, nor even changing the print speed helped.
The walls of the models turned out well. However, under-extrusion appeared on the lids all the time and strings formed in the holes.


Having somehow chosen the settings, we risked printing a larger model.
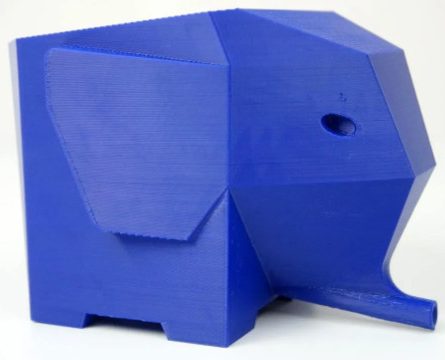
Here’s the elephant.

This is not just a figurine, it can be used to store cutlery.

Its trunk is designed to hang over the sink, and water flows through it from wet forks and spoons.

The elephant is printed with supports on the bottom and under the ears. By mistake, we left the supports inside the trunk.
During the printing process, it was already clear that it won’t turn out perfect. During transfers, small incisions of plastic remained everywhere, especially inside. However, we managed to get rid of underextrusion on the lids.
The supports from the bottom and from the ears detached without problems.
The supports on the trunk was more difficult to remove. From the bottom, the supports were pretty stuck, and they had to be removed with side cutters. And it turned out to be very difficult to get supports from the trunk in general. As a result, the elephant’s trunk was accidentally broken and it had to be glued back with super-glue.
I also had to remove the accumulations of plastic from the walls. However, this was not difficult.

In the end, here is the elephant model. If you don’t look closely, everything is fine. But upon closer inspection, there are many minor flaws. For example, there are traces of sagging and the surfaces above the supports leave much to be desired.
The model can perform its tasks, but it doesn’t really look fine.


Next, we wanted to test flex-plastic printing. We already know that the the feeder and the long Teflon tube are not very suitable for this.
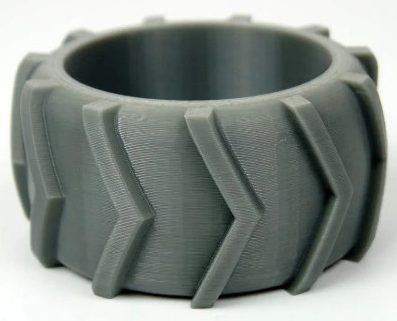
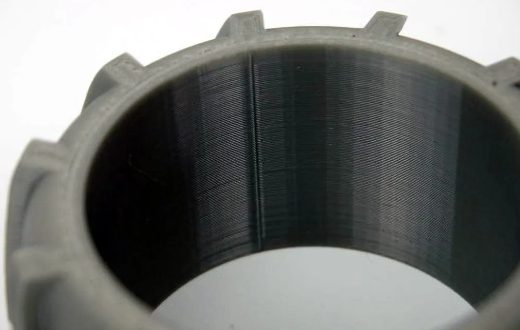
We chose Esun eTPU 95A . This is not the softest material and there was a hope that the printer would cope with it. We put a tire on the seal for a small typewriter.
The original model is very small. So, we doubled its size. We also reduced the speed to 10 mm/s for the outer contours and 20 mm/s for everything else. The combination was set up everywhere to avoid unnecessary transfers.
The printer coped with this task well. The tire is of high quality and there is no single pass. The layers were laid flat and the lids closed normally. Even the seam is almost invisible.


We decided to doubled the printing speed. When we did this, the printer could no longer cope. At first everything went fine. However, soon the plastic jammed in the feeder and the print ended there.

This was expected.
Next, we loaded pink MatterHackers ABS . Keep in mind that on an open printer, and even with a through thermal barrier with a Teflon tube, it is not desirable to print with ABS plastic. But we decided to try. Besides, ABS from MatterHackers has a rather low print temperature of 235°C, just like PETG.
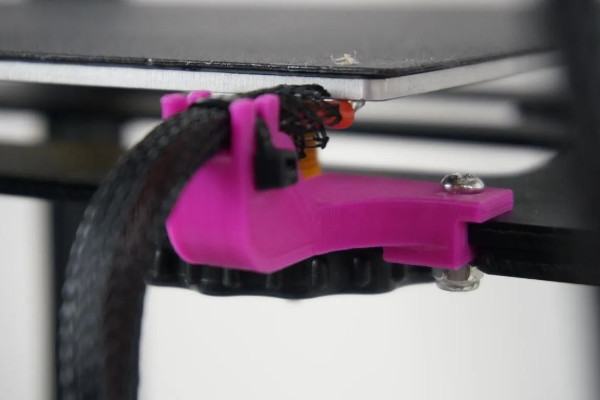
We decided to print a few small modifications for the printer. The color is not very suitable but this is not important. The first is a mount for the wires of the printbed.

For every fireman, we printed on a raft and with supports. The airflow was turned off.
The model turned out well. The supports and the raft were separated without any problems. However, the surface above the raft was not beautiful.

The mount fits and holds the wires in place.

The second model is a screen cover. The modification is purely decorative. It was printed without raft on a clean table.
The lid adhered well. Even the corners did not bend during printing.
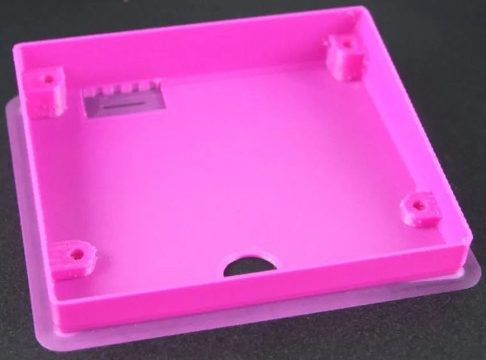
The overall quality is decent. While there were small smudges of plastic during transfers in some places, they turned out to be easy to clean.
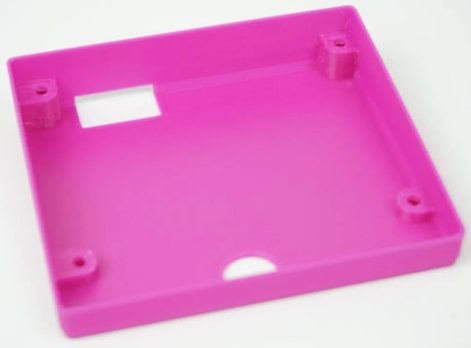


The lid is for the Ender-3 printer. Therefore, as expected, it doesn’t quite fit the Ender-5 Pro. Moreover, it protrudes slightly.


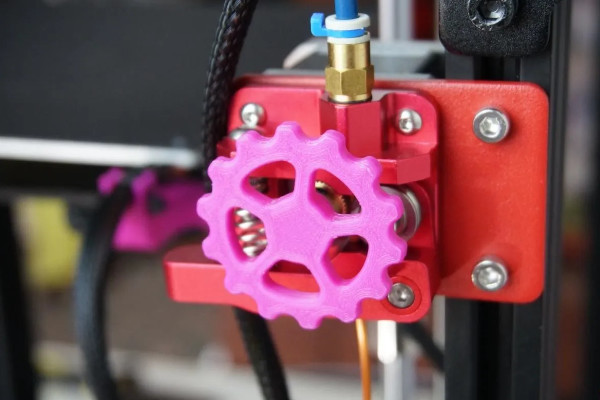
The third model is a wheel for the feed mechanism. The wheel allows you to manually push the plastic more conveniently. During printing, you can see how the feed occurs.
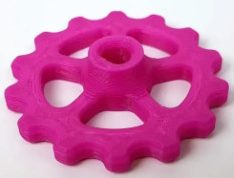

The wheel printed well. It fits fine and works as it should.
And the latest model is a slightly improved airflow.


The model printed well. However, during installation, it turned out that it was short and pressed against the heating block. This means that it will work for a while but will most likely melt quickly, especially if you print with airflow off.


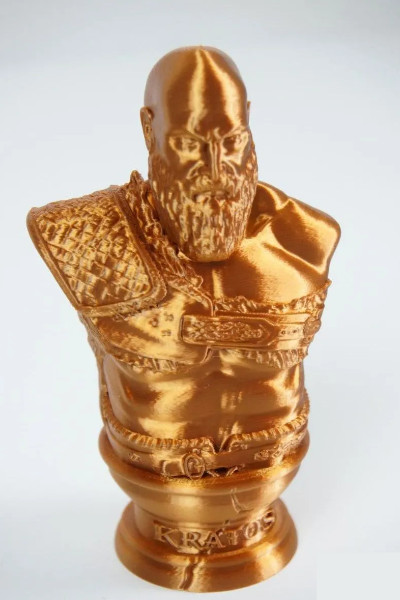
Kratos turned out just fine. On this plastic, in general, even the slightest flaws are visible due to the fact that it reflects light. And any protruding layer or pass immediately catches the eye.
From the model printed, everything was smooth. The layers are almost invisible and the model appears to be highly polished. The seam stands out a little. However, you can’t get away from it, especially with such a long Teflon tube.


Conclusion
Okay, let’s summarize.
The printer is not perfect. Some solutions are heavily outdated and the Creality Ender-5 Pro begs to be modified. The community of this printer is quite large and there will definitely be no shortage of ready-made models.
Some of the parts for modifications are found in the Ender-3. For example, the control board of the printer has something to change. Almost all companies that produce control boards have already released versions specifically for Enders. You just need to switch all the wires, install the new board in the old place and you’re done.
Despite the unpretentious extruder and feeder, the Ender-5 Pro does the job well. We only had difficulties with PETG plastic. Even with flex material of medium hardness at low speeds, the printer can print normally.
The body of the printer is durable and reliable. Any plastic is easily glued to the magnetic substrate and removing the models is easy. The substrate does not peel off the table, even when printing with ABS plastic and a temperature of 100°C. The printer is quite thanks to the TMC2208 drivers.
In general, the Creality Ender-5 Pro was not impressive nor disappointing. It simply prints well, though not fast.
AVAILABLE ON CREALITY
