
If you’ve been shopping for a fast, modern 3D printer lately, you’ve probably noticed something: nearly every high-speed machine on the market right now is built on a CoreXY motion system. From Bambu Lab to Voron to QIDI, the CoreXY 3D Printer design has quietly taken over — and for very good reasons.
A few years ago, CoreXY was mostly the territory of hardcore hobbyists and builders who liked tuning their machines as much as printing with them. Today? It’s the default layout for most of the best printers you can buy out of the box. Whether you’re eyeing the Bambu Lab X1 Carbon, considering a QIDI Plus 4, or thinking about building your own Voron from scratch, understanding how CoreXY works will help you buy smarter and print better.
This guide covers everything — from what CoreXY actually means, to how the belt system works, to which printers are worth your money in 2026. Let’s get into it.
📄 Table of Contents
- What Does “CoreXY” Actually Mean?
- How Does a CoreXY 3D Printer Work?
- Why CoreXY Is Faster Than Other Printers
- CoreXY vs Cartesian: Which Is Better?
- Enclosed CoreXY Printers in 2026
- How Much Do CoreXY Printers Cost?
- Best CoreXY Brands & Examples
- DIY & Kit Builds
- Belt Path & Frame Setup Tips
- STL Files & Mods
- Open-Source CoreXY Printers
- Are CoreXY Printers Worth It?
- Top CoreXY Printers at a Glance
- Frequently Asked Questions
📥 Free CoreXY Buyer’s Cheat Sheet
Get our 1-page comparison of every CoreXY printer worth buying in 2026 — speeds, build volumes, prices, and our verdict — delivered free.
CoreXY 3D Printer Meaning: What Does “CoreXY” Actually Mean?
A CoreXY 3D Printer is a type of FDM printer that uses two stationary motors and a crossed belt system to move the print head along the X and Y axes. Because the motors stay fixed and only the lightweight toolhead moves, CoreXY printers can print faster and more accurately than traditional bed-slinger designs.
That’s the short version. Now let’s unpack what that actually means in practice.
The Origin of the CoreXY Motion System
CoreXY is a kinematic system — a specific way of designing how a machine moves — not a brand name or a product category. It was created to solve a very specific engineering problem: how do you move a print head quickly and accurately without dragging heavy motors around with it?
The CoreXY design evolved from an earlier system called H-Bot, which used a similar crossed belt idea. H-Bot worked reasonably well, but it had a frustrating flaw: the belt tension created a twisting force (called “racking”) on the gantry, which introduced inaccuracy. CoreXY was specifically designed to fix this by routing the two belts differently, so that the forces they exert cancel each other out rather than fighting against the frame.
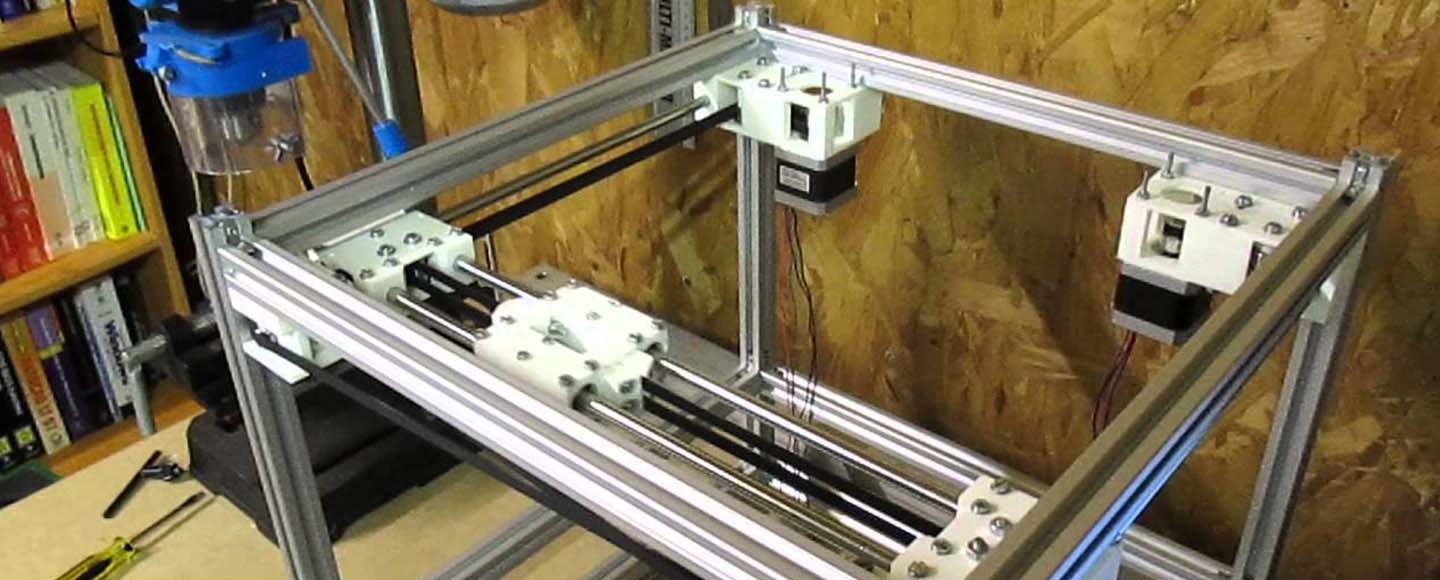
The result is a motion system where two motors sit completely still, connected to a single toolhead via a pair of crossed belts and a series of pulleys. The toolhead is the only thing that moves in X and Y — and because it’s light, it can move very, very fast.
How CoreXY Differs From Cartesian, Bed Slinger, and Delta Printers
If you’re new to 3D printing terminology, here’s a quick orientation. The words “Cartesian,” “bed slinger,” “Delta,” and “CoreXY” all describe how the printer moves its components. The comparison below covers what you need to know for the CoreXY vs Cartesian and CoreXY vs Bed Slinger decisions that matter most for most buyers.
| Printer Type | How It Moves | Speed | Accuracy | Best For |
|---|---|---|---|---|
| Cartesian (Bed Slinger) | Entire bed moves in Y, toolhead in X | Moderate | Good | Budget beginners |
| CoreXY | Toolhead moves via crossed belts in X and Y | Fast | Excellent | High-speed printing |
| Delta | Three arms move the head in a triangular pattern | Very Fast | Moderate | Tall, cylindrical prints |
| Cartesian (moving toolhead) | Toolhead in X and Y, bed in Z only | Moderate | Good | Mid-range printers |
The fundamental difference is what moves. In a bed slinger, the heavy print bed swings back and forth. In a CoreXY printer, only the lightweight toolhead moves — and that single mechanical difference is what unlocks dramatically higher speeds and better print quality.
How Does a CoreXY 3D Printer Work?
The CoreXY Belt Path Explained
Here’s where things get interesting — and where a lot of DIY builders get themselves into trouble.
A CoreXY system uses two separate belts, driven by two separate stepper motors (often called Motor A and Motor B). Each belt wraps around a series of pulleys arranged at the corners and sides of the frame, and both belts connect to the same print head (toolhead). The belts cross each other — hence “CoreXY” — and this is what gives the system its clever properties.
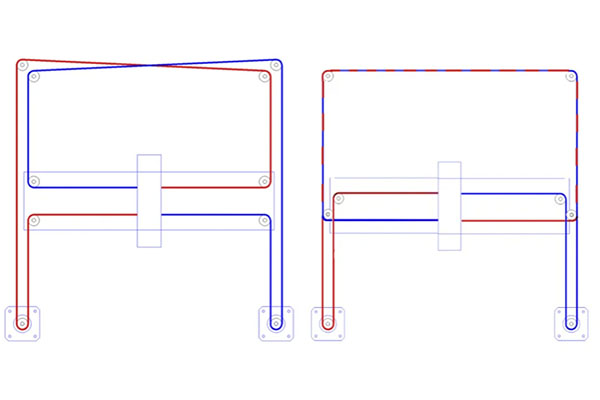
The belts travel on two different planes within the frame. This is called the belt plane, and it’s critically important. In a correctly built CoreXY printer, Belt A and Belt B must each travel parallel to their respective axes within their own plane — they should never twist, skip a plane, or interfere with each other.
If the belt routing is wrong — even subtly — you’ll get problems like axes that move in the wrong direction, diagonal tension that makes the toolhead bind up, or prints that come out skewed or ghosted. Poor belt routing is, without question, one of the most common mistakes made in DIY CoreXY 3D Printer builds. It’s not complicated once you understand it, but it requires careful attention when you’re assembling or rebuilding a machine.
Why CoreXY Uses Two Motors Instead of One
This is the elegant part of the design. Because both motors are connected to the same toolhead through that crossed belt path, you can produce movement in any direction by simply changing which direction each motor turns.
- When both motors turn in the same direction, the toolhead moves along the X-axis
- When both motors turn in opposite directions, the toolhead moves along the Y-axis
- Any diagonal movement is a blend of both
The firmware calculates this using a pair of simple formulas: ΔX = ½(ΔA + ΔB) and ΔY = ½(ΔA − ΔB), where ΔA and ΔB are the movements of Motor A and Motor B respectively. In plain English: the printer’s firmware is constantly calculating the right combination of Motor A and Motor B movement to send the toolhead exactly where it needs to go. This happens thousands of times per second, and it’s why these machines feel so precise.
The formulas ΔX = ½(ΔA + ΔB) and ΔY = ½(ΔA − ΔB) mean that every single movement the toolhead makes is actually the result of two motors working together simultaneously. Neither motor alone controls a single axis — it’s the combination of both that produces clean X, Y, and diagonal motion.
Why the Print Bed Usually Only Moves on the Z-Axis
In a CoreXY printer, the print bed typically only moves up and down — along the Z-axis — as the print grows layer by layer. This is a huge deal for print quality and is one of the main reasons people upgrade from bed slingers.
Think about what happens in a bed slinger: the entire print bed, including the model you’re building, moves backward and forward thousands of times during a print. The bigger and taller your model, the worse this gets. The print wobbles, layers shift, and quality degrades. In a CoreXY design:
- The moving mass is dramatically lower — only the lightweight toolhead travels in X and Y
- Print quality at high speeds is far better — less vibration, less wobble
- Tall prints are more stable — the bed doesn’t shake the model
- The enclosure is easy to seal — because nothing is swinging outside the frame
Input Shaping, Klipper, and Why CoreXY Printers Are So Fast in 2026
Here’s something that often surprises new buyers: hardware alone isn’t why modern CoreXY 3D Printers are so fast. The firmware matters just as much.
Most high-performance CoreXY machines in 2026 run Klipper firmware, or a proprietary variant inspired by it (Bambu Lab uses their own software, but the principles are the same). Klipper offloads the motion calculations from the printer’s main board to a more powerful computer — and this enables a feature called Input Shaping.
Input Shaping (resonance compensation) works like this: every printer frame vibrates at certain frequencies when the toolhead accelerates. Those vibrations show up in prints as ringing or ghosting — those faint ripple patterns you sometimes see around sharp corners. Input Shaping uses an accelerometer to measure the exact frequencies at which your specific printer vibrates, then pre-calculates movements that cancel those vibrations out before they occur.
The result? CoreXY printers with Input Shaping can reach 300–600 mm/s print speeds and 10,000–20,000 mm/s² acceleration — without any meaningful degradation in print quality. A rigid CoreXY frame is ideal for this because the stiffer the machine, the more predictable its vibration frequencies, and the more precisely Input Shaping can cancel them.
Without Input Shaping, pushing a printer past 150–200 mm/s typically produces visible ringing and ghosting on every sharp corner. With Input Shaping on a properly rigid CoreXY frame, you can run at 500+ mm/s and get prints that look like they were printed at 50 mm/s. This is the single biggest reason CoreXY printers feel like a generational leap.
Common CoreXY Components
If you’re shopping for a CoreXY kit, building your own, or just trying to understand what’s inside the box, these are the key components:
- Stepper motors (two for X/Y movement; one for Z; one for the extruder)
- GT2 timing belts (the crossed belt path)
- Pulleys and idlers (guide and route the belts)
- Linear rails (MGN12 or MGN9 — for smooth and accurate toolhead movement)
- Gantry (the frame structure the toolhead rides on)
- CoreXY Frame (typically aluminum extrusion — 2020 or 3030)
- Enclosure (panels, usually acrylic or metal)
- Filtration system (HEPA and activated carbon filters for enclosed models)
CoreXY 3D Printer Design: Why It Is Faster Than Other Printers
Reduced Moving Mass
Here’s the core mechanical advantage of the CoreXY 3D Printer design: the motors never move. In a bed slinger, you have a motor driving the bed back and forth in Y — and that bed, plus your print, can weigh 1–2 kg or more. In a CoreXY design, the only thing moving in X and Y is the toolhead, which typically weighs between 150–400 grams depending on the extruder design.
Less moving mass means the motors have to work less to accelerate and decelerate. That means you can push acceleration much higher before the system starts to struggle. Higher acceleration means faster prints without sacrificing quality.
Better Acceleration and Print Speed
The relationship between moving mass, acceleration, and print speed is essentially why the entire 3D printing industry shifted toward CoreXY over the last five years. A typical bed slinger might max out at 150–200 mm/s before print quality starts suffering noticeably. A well-tuned CoreXY printer like the Bambu Lab P1S or QIDI Plus 4 can run at 300–500 mm/s routinely — and some Voron builds push 600+ mm/s with Input Shaping dialed in.
One important note: high speed only works well when the frame, belts, and firmware are all properly tuned. A poorly assembled CoreXY with loose belts or a wobbly frame won’t magically be fast.
Buying a CoreXY printer does not automatically mean you’ll get fast, high-quality prints. The speed advantage only materializes when the machine is properly assembled, the belts are correctly tensioned and routed, the frame is rigid, and the firmware is correctly configured. A badly built CoreXY can print worse than a well-tuned bed slinger.
Why CoreXY Printers Are Better for Large Prints
A CoreXY 3D Printer with a 300×300 build plate keeps the heavy bed mostly stationary. Scaling to a 500×500 CoreXY 3D Printer is perfectly achievable without the structural nightmares that come with scaling a bed slinger. Large bed slingers become increasingly unstable as you push bed size — a 400×400 bed slinger swings enormous mass back and forth, leading to layer shifts, resonance, and poor quality. For large-format printing, CoreXY simply wins.
The 500×500 CoreXY Reality Check
A CoreXY 3D Printer with a 500×500 build volume sounds incredible — and for the right user, it genuinely is. But there’s something you should know before you drop $1,500+ on one.
A large-format CoreXY printer without an actively heated chamber is very difficult to use for high-temperature materials like ABS, ASA, Nylon, or Polycarbonate. At this scale, heat distribution across the bed becomes uneven, drafts wreak havoc, and warping becomes a constant frustration. Active chamber heating — where the printer heats the entire interior to 50–70°C — is the solution, but not every large-format printer includes it.
Without chamber heat, a 500×500 CoreXY printer is essentially just a giant PLA printer. That’s not necessarily bad — if you print PLA or PETG and need the volume, it’s great. But if you need engineering materials, make sure the machine you’re buying has proper thermal management at scale.
🎯 Looking for a large-format CoreXY? The Creality K2 Plus offers 350×350×350mm with enclosed multicolor support.
The Importance of a Rigid CoreXY Frame
Speed and accuracy both depend heavily on frame rigidity. A soft or wobbly frame defeats the purpose of CoreXY entirely. The most common materials are 2020 aluminum extrusion (20mm×20mm profile) and the heavier 3030 extrusion (30mm×30mm). For smaller printers up to about 250mm, 2020 is usually fine. For anything larger, 3030 is strongly preferred — it’s stiffer and significantly reduces frame flex under high-speed movement.
Linear rails — particularly MGN12H rails — are far superior to the V-wheel systems used in older printer designs. They’re smoother, more accurate, and don’t wear down over time the way plastic wheels do. A rigid CoreXY frame is especially important if you’re running Klipper with Input Shaping, because the algorithm assumes your machine vibrates consistently and predictably.
CoreXY vs Cartesian: Which Is Better?
| Feature | CoreXY | Cartesian / Bed Slinger |
|---|---|---|
| Print Speed | Significantly faster | Moderate |
| Large Build Volume | Much better | Increasingly difficult to scale |
| Noise | Usually quieter | Louder (especially at speed) |
| Mechanical Complexity | Higher | Lower |
| Maintenance | Moderate — belt care needed | Easier |
| Cost | Higher starting price | More affordable |
| Enclosure Suitability | Excellent | Difficult |
| Best For | Speed, enclosed printing, advanced materials | Budget buyers, casual use |
When You Should Buy a CoreXY Printer
CoreXY is the right choice if you:
- Want to print faster — significantly faster, not just slightly
- Print large models that would stress a bed slinger’s gantry
- Want an enclosed machine for better print quality and quieter operation
- Print ABS, ASA, Nylon, Carbon Fiber, or PC filaments
- Plan to use a multicolor or multi-material system
- Run a small production environment where print time is money
🔎 Ready to upgrade? Check out our picks for the best CoreXY 3D printers across every budget — from beginner-friendly enclosed machines to professional large-format workhorses.
When a Bed Slinger Still Makes More Sense
To be fair: a CoreXY isn’t always the right tool. If your budget is under $300, a bed slinger still gives you excellent results for beginner use. If you’re printing occasionally, mainly in PLA, and don’t care much about speed — a simpler machine is easier to live with. And if you’re new to 3D printing and don’t want to deal with belt tensioning or more complex maintenance, starting with a straightforward Cartesian machine is perfectly reasonable.
Enclosed CoreXY 3D Printers: Why They Dominate in 2026
Why Most Modern CoreXY Printers Are Enclosed
Walk through any list of the best 3D printers for 2026, and the majority of the CoreXY options will be enclosed. This isn’t a coincidence. The CoreXY design lends itself perfectly to enclosure because the toolhead and gantry are entirely self-contained within the frame. There’s no bed swinging out the front or back. The machine fits neatly in a box — and that box does a lot of useful work.
Benefits of an Enclosed CoreXY 3D Printer
- Reduced warping — stable air temperature prevents corners from lifting
- More consistent layer adhesion — even temperature means uniform material flow
- Better reliability with engineering materials — ABS, ASA, and Nylon all require warm ambient temperatures to print reliably
- Quieter operation — the enclosure acts as a sound barrier
- Safer around children and pets — hot end, heated bed, and moving parts are sealed away
HEPA + Carbon Filtration in 2026
ABS, ASA, and some resins emit Volatile Organic Compounds (VOCs) during printing. These aren’t just unpleasant-smelling — some of them are genuinely harmful with prolonged exposure, particularly in enclosed spaces. High-temperature PLA also emits ultrafine particles (UFPs) during printing.
Many modern enclosed CoreXY printers now include integrated filtration systems with HEPA filters (which capture ultrafine particles), activated carbon filters (which absorb VOCs and odors), and active air recirculation (keeping the chamber warm while filtering). The Bambu Lab X1 Carbon and P1S both include filtration as standard. If you’re planning to print in ABS or ASA regularly — especially indoors — built-in filtration isn’t a luxury, it’s a health consideration.
Printing ABS or ASA without proper filtration in an enclosed space exposes you to VOCs and ultrafine particles. If your CoreXY printer doesn’t include built-in HEPA + carbon filtration, consider adding an aftermarket filter or placing the printer in a well-ventilated area. This is not optional for regular ABS/ASA printing indoors.
CoreXY 3D Printer Price: How Much Do They Cost?
| Price Range | What You Get |
|---|---|
| Under $500 | DIY CoreXY kits and smaller open-frame printers. Expect to spend time on assembly and tuning. |
| $500–$1,000 | Entry-level enclosed CoreXY printers — the sweet spot for most buyers. QIDI Q1 Pro, Bambu Lab P1P. |
| $1,000–$2,000 | Faster multicolor CoreXY machines with better build quality and full enclosures. Bambu Lab X1 Carbon, P1S. |
| $2,000+ | Large-format, professional, or industrial CoreXY printers. Premium Voron builds, Creality K2 Plus. |
Cheapest CoreXY Printers Worth Buying
- Bambu Lab A1 / A1 Mini — Beginner-friendly CoreXY variant, AMS-compatible, excellent value
- QIDI Q1 Pro — Enclosed, heated chamber, priced around $450–$600, one of the best value machines available
- Creality K1 / K1C — Fast, enclosed, affordable, though some users report mixed experiences with customer support
- Tronxy large-format kits — Budget 300×300 and larger options for buyers comfortable with assembly
Premium CoreXY Printers
- Bambu Lab X1 Carbon — The benchmark. Multi-material via AMS, LiDAR calibration, 20,000 mm/s² acceleration
- Bambu Lab P1S — Fully enclosed X1C alternative at lower cost with similar performance for most use cases
- QIDI Plus 4 — Exceptional value, excellent heated chamber, strong community following
- Creality K2 Plus — Large-format enclosed CoreXY with multi-material support
- Voron 2.4 / Trident — Open-source, fully customizable, the choice for enthusiasts who want complete control
🔎 Comparing features across these machines? See our side-by-side CoreXY printer comparison for speed, build volume, multicolor support, and value.
Best CoreXY 3D Printer Brands and Examples
Best Beginner CoreXY Printers
For beginners, the priority is a mostly-assembled machine with straightforward software and an enclosure. The Bambu Lab ecosystem is the dominant choice here — the P1S in particular offers a near-turnkey experience. Unbox, do a quick calibration, and you’re printing at 300 mm/s within an hour. QIDI is another strong brand for beginners who want an enclosed machine with a heated chamber and straightforward setup.
1
Bambu Lab P1S
Best for Beginners
Fully enclosed, 256×256×256mm build volume, 500 mm/s max speed, AMS-compatible, HEPA filtration included. The closest thing to “plug and play” in the CoreXY world.
2
QIDI Q1 Pro
Best Budget Value
Enclosed with heated chamber, 245×245×245mm, 600 mm/s max speed. One of the most affordable ways to get into enclosed CoreXY printing with real chamber heating.
3
Bambu Lab A1 Mini
Best Compact Starter
Smallest and most affordable Bambu CoreXY option. AMS-compatible, surprisingly capable for its size, perfect for desks and small spaces.
Best CoreXY 3D Printer for Large Prints
For a CoreXY 3D Printer with a 300×300 build volume, the Creality K1 Max, QIDI Plus 4, and Bambu Lab X1 Carbon are popular choices. The K1 Max specifically offers a 300x300x300mm build space at a competitive price. For a CoreXY 3D Printer with a 500×500 build volume, the Creality K2 Plus and Voron 2.4 builds at 350mm+ offer large-format capability. Just remember the chamber heating caveat — at this scale, proper thermal management matters enormously.
1
QIDI Plus 4
Best 300mm Value
305×305×305mm build volume, 600 mm/s, enclosed with proper heated chamber. Extraordinary value for the build size. Strong community following and regular firmware updates.
2
Creality K2 Plus
Best Large Format
350×350×350mm build volume, 600 mm/s, enclosed, CFS multi-color compatible. The most accessible way to get genuine large-format CoreXY performance.
Best Open-Source CoreXY Printers
- Voron 2.4 — The flagship community-designed enclosed CoreXY printer. Fully open-source, highly customizable, and extraordinarily capable when built well.
- Voron Trident — Similar to the 2.4 but uses a triple-leadscrew Z-axis. Often considered slightly easier to build and calibrate.
- Rat Rig V-Core 4 — Semi-open-source design bridging DIY and commercial, with excellent community support and premium components.
- VzBot — An extremely fast CoreXY design focused on pushing print speeds to the limit. Not for beginners.
CoreXY 3D Printer Elegoo: Does Elegoo Make One?
This is a question that comes up frequently. Elegoo is best known for its resin printers (the Mars and Saturn series) and its Neptune FDM line. As of early 2026, Elegoo does not have a mainstream CoreXY FDM printer in their current lineup — their Neptune series uses a bed-slinger Cartesian design. Elegoo has been expanding aggressively, and this is a space worth watching. For now, if you’re specifically looking for an Elegoo CoreXY printer, you’ll be waiting.
If you’re an Elegoo fan waiting for a CoreXY machine: keep an eye on their product announcements throughout 2026. Given their aggressive expansion strategy and the market shift toward CoreXY, it would be surprising if they didn’t enter this space eventually. In the meantime, the Neptune 4 Pro remains their strongest FDM offering.
Best CoreXY Printer for Multicolor Printing
This deserves a detailed discussion, because multicolor printing is one of the biggest reasons people choose CoreXY in 2026. There are two fundamentally different approaches:
1. Single-Nozzle Filament Swappers
These systems use a single nozzle but swap filaments mid-print to change colors:
- Bambu Lab AMS (Automatic Material System) — Holds up to 4 spools, switches filaments during printing. Incredibly convenient.
- Creality CFS (Color Filament System) — Bambu’s main competitor, used with Creality K-series printers
- Prusa MMU3 — Prusa’s multi-material unit, compatible with Prusa MK4 and similar designs
- Voron/ERCF-style systems — Community-designed filament switching for open-source machines
The tradeoff: every color change requires a “purge” — the old filament is extruded into a waste tower to clear the nozzle. This takes time and material.
2. True Toolchanger CoreXY Printers
A toolchanger physically swaps between multiple independent toolheads — each with its own nozzle and extruder — during printing:
- Prusa XL — The most commercially accessible toolchanger, supports up to 5 toolheads, handles filament swaps with virtually no purging or waste
- Voron Toolchanger mods — Community designs that convert Voron printers to toolchanger configurations
- ToolchangerOS-based custom builds — Open-source firmware enabling custom multi-toolhead setups
Advantages of toolchangers: faster color changes, dramatically less waste, ability to run different nozzle sizes or materials simultaneously. The CoreXY motion system is one of the very few designs capable of handling a toolchanger well — the rigidity and speed of CoreXY are exactly what makes this possible.
🎨 Planning a multicolor setup? See our top CoreXY printers with AMS support and toolchanger capabilities — and find out which system makes sense for your workflow.
CoreXY 3D Printer DIY and Kit Builds
Should You Buy a CoreXY Kit or Prebuilt Printer?
| Option | Pros | Cons |
|---|---|---|
| Kit (DIY) | Cheaper; deeply customizable; you understand every part of your machine | Time-consuming (20–80+ hours); requires mechanical skill and patience; more troubleshooting |
| Prebuilt | Ready to print quickly; no assembly required; manufacturer support | Higher price; less customizable; you may not fully understand the internals |
Best CoreXY 3D Printer Kit Options
- Voron 2.4 kit (LDO, Formbot, or TriZero) — The gold standard of CoreXY DIY. LDO kits are widely regarded as the best quality.
- Voron Trident kit — Slightly more approachable build than the 2.4, particularly for first-time Voron builders
- Rat Rig V-Core 4 kit — Officially supported kits with excellent documentation and community support
- Tronxy large-format kits — Budget large-format CoreXY options (300×300 to 500×500)
CoreXY 3D Printer DIY: Who Should Build One?
- Advanced users who have experience with at least one FDM printer already
- Makers and engineers who enjoy the build process as much as the end result
- Tinkerers who want to customize every aspect of their machine
- Budget-conscious enthusiasts who can invest time in exchange for cost savings
Common Mistakes When Building a CoreXY Printer
- Incorrect belt routing — The single most common mistake. Double and triple check your belt path before tensioning
- Belts not on the same plane — Each belt must travel on its correct plane. Cross-plane routing causes binding and poor accuracy
- Weak or poorly squared frame — A frame that isn’t square will produce skewed prints. Take time to square every joint before tightening
- Cheap or wrong pulleys — Low-quality pulleys develop wobble and introduce inconsistency into every movement
- Incorrect belt tension — Too loose means skipped steps; too tight means binding and motor strain
Tuning a CoreXY belt system can sometimes feel like tuning a grand piano — it takes patience, a careful ear, and multiple small adjustments before everything sings. But when you get it right, the results are genuinely impressive.
🔧 Building a CoreXY? Get quality linear rails, GT2 belts, and genuine Voron-compatible components to give your build the best possible foundation.
CoreXY 3D Printer Belt Path and Frame Setup Tips
How To Route a CoreXY Belt Path Correctly
The best advice here is to use the official build guides — Voron and Rat Rig both have excellent documentation with detailed diagrams. The key principles:
- Each belt should form a mirror image of the other
- Belts should only contact pulleys that are on the same horizontal plane
- No belt should cross from one plane to another except at the designed crossing point
- Verify that moving the toolhead left/right moves only in X, and forward/back moves only in Y — if you get diagonal movement or reversed axes, the belt routing is wrong
How Tight Should CoreXY Belts Be?
Belt tension is often described in terms of resonant frequency — how fast the belt vibrates when plucked, measured in Hz. Most CoreXY designs target a belt tension that produces a resonant frequency of around 110–140 Hz, though this varies by printer and belt length. Use a smartphone app like Gates Carbon Drive or a dedicated belt tension app to measure the frequency of each belt, and aim for both belts to be as close to equal tension as possible.
Think of belt tension like guitar strings. You don’t want them floppy (skipped steps, poor accuracy) and you don’t want them dangerously tight (binding, premature bearing wear, motor strain). Use a frequency measurement app and aim for the range specified in your printer’s build guide. Both belts should match within 5–10 Hz of each other.
Best Materials for a CoreXY 3D Printer Frame
- 2020 aluminum extrusion — Good for printers up to ~250mm build volume
- 3030 aluminum extrusion — Preferred for larger machines; stiffer and more vibration-resistant
- Steel corner brackets — Properly torqued steel brackets dramatically improve frame rigidity
- Linear rails (MGN12H) — Smoother, more accurate, and longer-lasting than V-wheel systems
CoreXY 3D Printer STL Files and Mods
Where To Download CoreXY STL Files
- Printables.com — The largest repository of 3D printer STL files, including a huge library of CoreXY mods
- Makerworld (Bambu Lab) — Specifically optimized for Bambu printers, but many files work on other CoreXY machines
- Thingiverse — Older but still large collection, particularly for Voron parts
- GitHub (official Voron/Rat Rig repositories) — The official source for structural Voron parts. Always use these for anything load-bearing.
Most Popular CoreXY Mods in 2026
- Better part cooling — Upgraded fan ducts and higher-flow fans, particularly for machines with mediocre stock cooling
- AI print monitoring — Camera mounts paired with Obico (formerly The Spaghetti Detective) or Bambu’s built-in monitoring for failure detection
- Filtration upgrades — Better HEPA and carbon filters for machines that shipped with basic filtration
- Toolchanger conversions — Community kits for converting Voron 2.4 and similar machines to multi-toolhead configurations
- Beacon and Cartographer probe mounts — Eddy-current bed leveling probes for more accurate first layers
Should You Print Your Own CoreXY Parts?
Important: if your CoreXY machine is enclosed, the chamber temperature during printing can reach 50–70°C. At these temperatures, PLA becomes dangerously soft — it deforms, creeps, and fails. For any parts that will be inside an enclosed printer’s environment, use ABS, ASA, or PC.
The Voron community specifically recommends ABS or ASA for all structural printed parts. Don’t cut corners here — a PLA belt tensioner that fails at speed can damage your printer.
Never use PLA for structural parts inside an enclosed CoreXY printer. At 60°C chamber temperature, PLA loses over 50% of its rigidity. A belt tensioner, idler mount, or gantry part made from PLA can deform mid-print, causing belt derailment, crashes, or damage to your machine. Always use ABS, ASA, PETG, or PC for enclosed-chamber components.
Open-Source CoreXY Printers: Why Enthusiasts Love Them
What Makes a CoreXY Printer Open Source?
A CoreXY 3D Printer open source project is one where the design files — including the 3D printable part files, electrical schematics, firmware configuration, and build documentation — are freely available for anyone to download, modify, and use. You can print the parts, source the hardware yourself, and build an equivalent machine for less than a commercial equivalent costs.
Best Open-Source CoreXY Projects
- Voron 2.4 — The definitive open-source enclosed CoreXY printer. Community-designed, extensively documented, and supported by a global community of builders.
- Voron Trident — Uses a triple-leadscrew Z-axis. Many builders find it slightly easier to calibrate than the 2.4.
- Rat Rig V-Core 4 — Semi-open-source with officially sourced kits and exceptional documentation.
- Annex Engineering — Innovative designs focused on extreme speed and engineering precision.
Open-Source vs Commercial CoreXY Printers
| Feature | Open Source | Commercial |
|---|---|---|
| Cost | Lower hardware cost | Higher total cost |
| Setup Time | 20–80+ hours to build | 30 minutes to 2 hours |
| Customization | Virtually unlimited | Limited to official mods |
| Support | Community forums and Discord | Manufacturer support |
| Updates | Community-driven, rapid | Manufacturer update schedule |
| Best For | Enthusiasts, tinkerers | People who want to print, not build |
Are CoreXY 3D Printers Worth It?
✅ Pros of CoreXY Printers
- Significantly faster than any equivalently priced bed slinger
- Better print quality at high speeds due to reduced moving mass
- Scalable to large build volumes without the structural problems of large bed slingers
- Enclosed designs available at every price point above $500
- Best platform for engineering materials — ABS, ASA, Nylon, PC all print better in a heated enclosure
- Multicolor printing is more capable and better supported than on any other design
- Investment in the future — the CoreXY ecosystem is growing rapidly
❌ Cons of CoreXY Printers
- More expensive to start — truly capable machines start around $450–$500
- More mechanically complex — belt tension, belt routing, and frame squaring all matter more
- Belt maintenance — belts stretch slightly over time and need periodic checking
- Steeper learning curve for DIY builds — there’s more to get right
- Overkill for casual PLA printing — a $200 bed slinger will serve you fine if you print occasionally in PLA
Final Verdict: Who Should Buy a CoreXY Printer in 2026?
- Beginner who wants quality: Bambu Lab P1S or QIDI Q1 Pro. Enclosed, fast, and beginner-friendly.
- Hobbyist printing enthusiast: Bambu Lab X1 Carbon or Rat Rig V-Core 4 kit. You’ll appreciate the performance.
- Large-format user: Creality K2 Plus or custom Voron 2.4 350. Make sure your machine has proper thermal management.
- Professional / production user: Multi-machine Bambu setup with AMS, or a Voron 2.4 with a custom toolchanger.
- Multicolor enthusiast: Bambu Lab AMS for convenience, or Prusa XL for the toolchanger experience and lower waste.
- DIY builder/tinkerer: Voron 2.4 or Trident. The community, documentation, and capability are unmatched.
The honest answer to “are CoreXY printers worth it?” in 2026 is: for most buyers who care about print quality and speed, yes — and the price gap with bed slingers is shrinking every year. You don’t have to spend $1,500 to get a genuinely capable enclosed CoreXY machine anymore.
🔎 Still comparing your options? See our full side-by-side comparison of the top-rated CoreXY 3D printers — including speed benchmarks, build volumes, multicolor support, and real-world value ratings.
Top CoreXY Printers at a Glance: 2026 Comparison
| Printer | Build Volume | Max Speed | Enclosure | Multicolor | Price Range |
|---|---|---|---|---|---|
| Bambu Lab X1 Carbon Top Pick | 256×256×256mm | 500 mm/s | Yes + Filter | AMS (4 colors) | ~$1,199 |
| Bambu Lab P1S | 256×256×256mm | 500 mm/s | Yes + Filter | AMS Compatible | ~$699 |
| QIDI Plus 4 | 305×305×305mm | 600 mm/s | Yes + Chamber Heat | Limited | ~$600–$700 |
| QIDI Q1 Pro Best Value | 245×245×245mm | 600 mm/s | Yes + Chamber Heat | No | ~$450–$550 |
| Creality K2 Plus | 350×350×350mm | 600 mm/s | Yes | CFS Compatible | ~$1,200 |
| Voron 2.4 (350mm) | 350×350×350mm | 500+ mm/s | Yes | Via community mods | $800–$1,500 (kit) |
| Prusa XL (5-tool) | 360×360×360mm | 200 mm/s | No | 5 toolheads | ~$2,299 |
1
Bambu Lab X1 Carbon
🏆 Best Overall
The benchmark CoreXY printer in 2026. LiDAR first-layer calibration, AMS multi-material, HEPA filtration, 20,000 mm/s² acceleration. If budget allows, this is the one to get.
2
Bambu Lab P1S
Best Performance/Price
90% of the X1C experience at nearly half the price. Fully enclosed, AMS-compatible, 500 mm/s. The smartest buy for most people in 2026.
3
QIDI Plus 4
Best Heated Chamber
Larger 305mm build volume with genuine heated chamber — rare at this price. 600 mm/s capable. The top pick for ABS/ASA/PC printing on a budget.
4
QIDI Q1 Pro
Best Under $500
The most affordable way into enclosed CoreXY with a real heated chamber. 600 mm/s capable, compact footprint, excellent for beginners on a budget.
5
Creality K2 Plus
Best Large Format
350×350×350mm in an enclosed CoreXY with CFS multi-color support. The only affordable large-format enclosed CoreXY worth recommending in 2026.
📥 Can’t Decide? Save This Comparison
Bookmark this page or screenshot the comparison table above — it’s updated regularly as new CoreXY printers hit the market throughout 2026.
Frequently Asked Questions
What is the difference between CoreXY and Cartesian?
In a Cartesian printer (including most bed slingers), the toolhead moves in one axis and the bed moves in another. In a CoreXY printer, two motors work together to move a lightweight toolhead in both X and Y, while the bed only moves in Z. This results in less moving mass, higher possible speeds, and better suitability for enclosures.
Why are CoreXY printers faster?
Because only the lightweight toolhead moves in X and Y, CoreXY printers can accelerate much more aggressively than designs where a heavier bed or gantry moves. Combined with modern firmware like Klipper and Input Shaping (resonance compensation), CoreXY printers can reach 300–600 mm/s without significant quality loss.
Is CoreXY better than a bed slinger?
For most enthusiasts and serious users in 2026, yes. CoreXY offers faster speeds, better large-format capability, easier enclosure, and better performance with engineering materials. For budget beginners who print occasionally, a bed slinger is still a perfectly valid and affordable choice.
What is Input Shaping in a CoreXY printer?
Input Shaping is a firmware feature (most commonly implemented in Klipper) that measures the natural vibration frequencies of your printer using an accelerometer, then calculates movements that pre-cancel those vibrations. It allows CoreXY printers to accelerate extremely fast without the ghosting or ringing artifacts that would otherwise appear in prints.
What is Klipper and why do CoreXY printers use it?
Klipper is an open-source 3D printer firmware that offloads motion calculations from the printer’s main board to a more powerful computer (typically a Raspberry Pi). This enables advanced features like Input Shaping, pressure advance, and highly customizable macros. It’s the firmware of choice for Voron and many DIY CoreXY builds, and it has heavily influenced the proprietary firmware used by commercial CoreXY printers.
What is the best CoreXY 3D printer?
For most buyers in 2026, the Bambu Lab X1 Carbon remains the benchmark for all-around capability. The P1S offers similar performance at a lower price. For large-format printing, the Creality K2 Plus and QIDI Plus 4 are strong contenders. For the ultimate DIY enthusiast experience, the Voron 2.4 remains unmatched.
Are all enclosed 3D printers CoreXY?
No, but most modern enclosed printers are CoreXY. Some enclosed printers use modified Cartesian designs, but the CoreXY layout lends itself much more naturally to a tight enclosed form factor, which is why it dominates the category.
Can you build a DIY CoreXY printer?
Absolutely. The Voron 2.4 and Trident are the most popular DIY CoreXY projects, with detailed documentation and active community support. Expect to spend 30–80 hours on a full build. Some mechanical aptitude and patience with belt routing and calibration is required, but the experience is rewarding and educational.
How much does a CoreXY 3D printer cost?
Entry-level enclosed CoreXY printers (like the QIDI Q1 Pro) start around $450–$550. Mid-range machines like the Bambu Lab P1S run around $699. Premium machines like the Bambu X1 Carbon are approximately $1,199. Large-format and professional machines start at $1,200–$1,500 and can go well beyond $2,000. DIY kits can undercut these prices significantly if you provide the labor.
What is the best CoreXY 3D printer kit?
The LDO Voron 2.4 kit is widely regarded as the best quality CoreXY kit on the market. Formbot and TriZero also offer competitive Voron kits at lower price points. For large-format buyers, Rat Rig V-Core kits are excellent. Tronxy offers the most affordable large-format options for budget builders.
Is a 500×500 CoreXY printer worth it?
It depends on what you need to print. A 500×500 build volume is enormous and genuinely useful for large props, industrial parts, or production batch prints. However, at that scale, active chamber heating is essentially required for engineering materials. Without it, you’re mostly limited to PLA and PETG. If you have specific large-format needs and budget for a properly equipped machine, yes — it’s worth it.
Does Elegoo make a CoreXY 3D printer?
As of early 2026, Elegoo does not produce a CoreXY FDM printer. Their Neptune series uses a Cartesian/bed-slinger design. Elegoo has been expanding aggressively and is worth watching for future product launches, but currently their lineup does not include a CoreXY option.
What is the difference between AMS and a toolchanger?
An AMS (Automatic Material System, like Bambu Lab’s) uses a single nozzle and swaps filament during printing. It’s convenient but requires purging between colors, which takes time and wastes some material. A toolchanger physically swaps between multiple independent toolheads, each with their own nozzle — resulting in faster color changes, virtually no purging waste, and the ability to use different materials or nozzle sizes simultaneously. Toolchangers are more expensive and complex, but produce better results for multicolor prints with many color transitions.
This guide was written to help you make an informed decision — not to sell you something you don’t need. If you’re on the fence, the best move is to decide what you actually need to print, how often, and in what materials — then match a machine to those needs. The right CoreXY printer for you is the one you’ll actually use.
Still Not Sure Which CoreXY Printer to Buy?
We’ve tested and reviewed every major CoreXY printer on the market. Our detailed, hands-on reviews include real print benchmarks, noise measurements, and long-term reliability notes — the stuff spec sheets don’t tell you.
3DTechValley.com | Page
