


A slicer is a computer program that converts a virtual 3D model layer by layer into machine code (G-code). When the model has been converted into G-code, it can be printed by a 3D printer.
Depending on the technology used for layer-by-layer or surface formation of a part, the slicer’s files may contain data on the methods of forming layers – vector lines, raster patches, movement paths, normals to the surface, and other defining or control data.
A simplified version of the theory of tiling (parquet) says that any surface can be tiled (described) by an infinite set of polygons without mutual overlaps and gaps. This simply means that any model can be printed by cutting it into layers.
In this article, we will look at the best slicer programs that allow you to prepare a model and print a part using FDM (Fused Deposition Modeling) technology.
Types of 3D Slicers
Slicers are divided into two main types: universal and specialized (corporate).
Generally, specialized ones are developed for one technology, brand or model line of printers. On the other hand, universal ones have multiple settings and are designed for a wide range of compatible devices.
Before choosing a 3D printer, among other things, ask the seller which slicer is included in the package. Some manufacturers use well-known universal slicers, supplementing them with specialized profiles of their equipment. Others have their own software, which is usually specially designed for their equipment.
However, there are worthy exceptions. For example, the IdeaMaker slicer of Raise3D printers can work with any compatible printer.
If you have already bought a printer and a slicer is included with it, the manufacturer is likely to have filled the program with the necessary profiles and settings. This is usually done to make it easier for beginners to get started printing with the 3D printers.
Therefore, if you are a beginner, do not rush to use third-party slicers, even if they are very popular. First, set your printer to work with the included slicer. You do this by setting a number of specific parameters.
Also, the benefits that the best 3D slicers offer may not be practical for beginners. Finally, the basic principles of operation and the results of slicing are largely identical for all slicing programs.
Some differences can be found in the quality of slicing, interfaces, number of available settings, resource intensity of the program, speed and additional services, which, at times, are marketing tricks. Learn how to achieve acceptable printing results with standard tools first, and only then proceed to more advanced options.
3D slicers are also available as paid or free versions. In FDM technology, Simplify3D seems like the only paid program.
Slicer Structure
To get quality models through 3D printing, there are some slicer settings to be considered. The settings are related to the printer, model, material, print profile, extruder(s), additional options, scripts and macros. Each slicer has its own settings.
However, generally, all slicers convert 3D model files into G-code machine control language. Apart from this, they six have standard settings:
1. Slicer Settings
These are determined by the slicer developer. The common settings include program language, preferences for actions and process automation, design colors, sequences upon completion of work, operations over data and settings, as well as legal and marketing information blocks.
These settings have little to no effect on print quality. However, sometimes they allow the user to correctly set the units of measurement, port connection speeds, visualization of slicing results, model display and other useful options.
2. Your Printer Settings
By this term, we mean not only the “hardware” of the printer, but also its control electronics.
Software compatibility
The number of available settings varies depending on the slicer.
With regular slicers, you can select only the printer model. On the other hand, professional slicers will require you to specify which G-code language the control board firmware understands. With some slicers, you can even adjust the values of movement speeds, accelerations, jerks (jerk), retracts (thread rollbacks), which will allow such a slicer to calculate the time to print more correctly, among others.
Mechanics
This informs the slicer what kind of movement to expect from your printer. Here, we have things like the kind of mechanical movement system of your printer (delta, cartesian, robot arm, etc.), the dimensions of the print area, and what indents from the edges are acceptable,
2. Extruders
This setting informs the slicer how many extruders your printer has, the nozzle diameter, maximum temperature supported by the hotend design, distance between the nozzles in dual extruder printers, etc.
3. Material Settings
Here, we have the filament profile settings, i.e., filament diameter, melting point, density, manufacturer, price, etc.
4. Model Settings
These are tools for managing the scaling and positioning of the model in the working area. These tools are used for “repair” and modification of the loaded model.
5. Slicing Settings (slicing)
These are the tools and parameters for forming a part from a model. They comprise of auxiliary tools and object management settings, e.g., supports, walls, towers, rafts and service operations.
6. Additional Services
Here, we have command sequences, such as scripts and macros.
Let’s now look at some of the best 3D slicers and how they work.
Best 3D Slicer Software
1. Ultimaker Cura
- Official site: https://ultimaker.com/software/ultimaker-cura
- Availability: Free
- Platforms: Windows (64 bit), MacOS (64 bit), Linux (64 bit)
Cura is one of the most popular all-purpose slicers. The open source slicer, along with Slic3r, became the defacto slicers of new 3D printers over the last decade.
Built on the Cura Engine console application, this is an improved version of the Skeinforge slicer written in C++ using Angusj’s clipper system libraries.
Slic3r was developed in 2011 within the RepRap Community. Due to its high configurability, it has become a workhorse for 3D printing. The first release of the slicer served as a platform for implementing several new (experimental) ideas that later became technology standards. Examples of such standards include multiple extruders, brim, variable height layers, per-object settings, modifiers, post-processing scripts, macros G-code and more. Despite being based on a volunteer effort, Slic3r is still pushing the boundaries of 3D printing. ( https://github.com/slic3r/Slic3r )
Cura was originally created by David Braam, who was later hired by 3D printer manufacturer Ultimaker, to collaborate on software development and maintenance. Today, CURA is included in the delivery package of all printers under the Ultimaker trademark.
However, Cura also works with printers from other manufacturers, including home-made printers with compatible mechanics (RepRap printers).
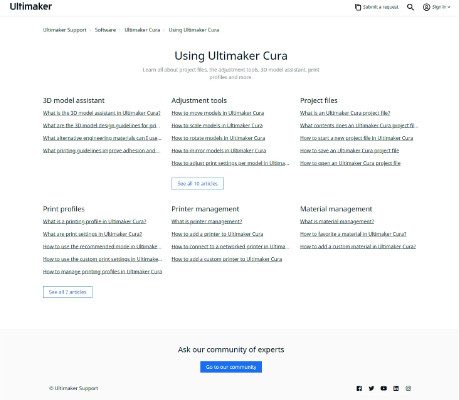
Cura is a compilation of various mini applications made in the open source community. Check Ultimaker Cura Help for a list of projects that the software uses. Cura is one of the best free 3D slicers.
The popularity of Cura can be attributed to its mass distribution in most budget 3D printers, since it is open source. The software has basic templates that make it easy to get started with 3D printing and be sure of predictable printing results.
Cura also has many options for fine-tuning a model into a detail. There are many settings that can make your model detailed, even more than you can accomplish with Simplify3D.
Below is a quick summary of Cura:
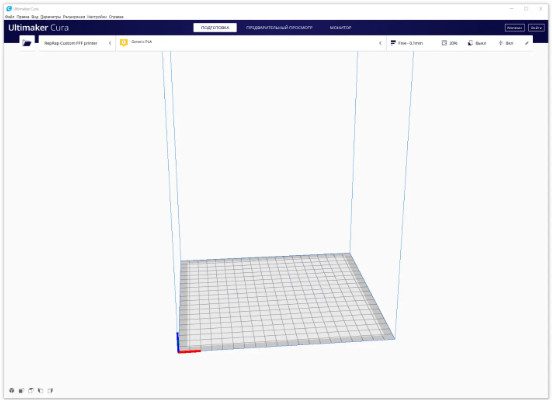

The simple interface and settings make the Ultimaker Cura one of the best 3D slicers on the market.
The interface is concise and easy to use. The software is also regularly updated with profiles of new 3D printers. You can also add your own, “custom” 3D printer profile version.


If you do not see your 3D printer in this list, then…
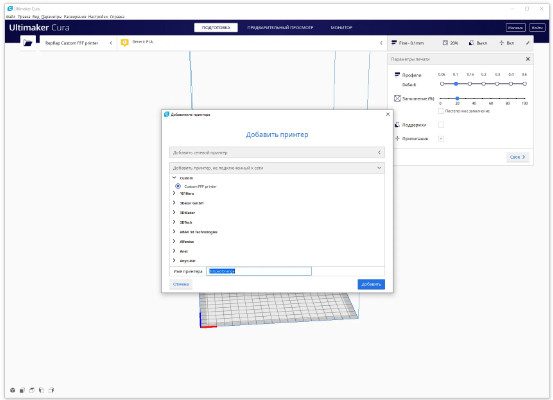

… set it up yourself.
After selecting or configuring your printer settings, you can choose from different materials to use for printing your model.
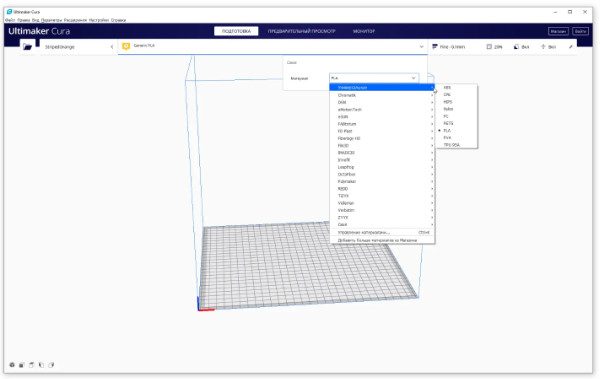

Many well-known filament manufacturers are found in the list of typical materials.

Moreover, if you don’t find what you need, you can create your own.
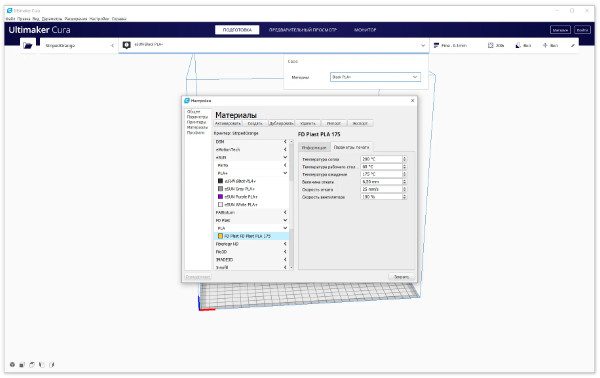

And adjust its working parameters.
When setting up printing, CURA takes the nozzle and table temperature values from the material settings. However, if necessary, these can be changed in the advanced options of the “Custom” mode of the “Print Settings” panel in the upper right part of the screen.
Also, you cannot select a material with the desired thickness until you set the correct number in the Extruser1 tab of the Settings -> Printers menu. This is a filter for the list of materials! For example, if you set 3, then only materials with a filament thickness of 2.85 mm will be available to you. If you set the value to 2, then you can choose only filaments with a thickness of 1.74-1.75 mm.
Now let’s look at the “custom” printer settings.
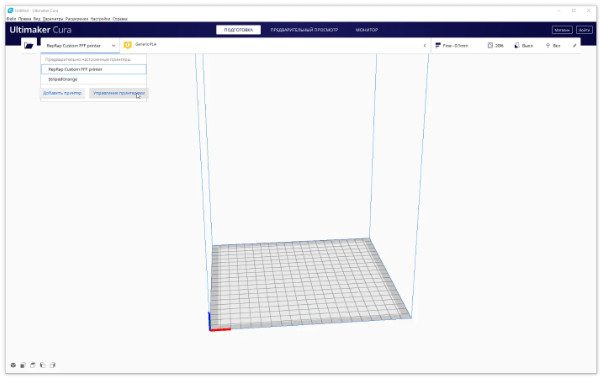
There are several ways to get to the printer settings. This is one of them.

The main settings of your “custom” printer usually do not raise questions.

Basic extruder settings are also not difficult.
Let’s find out how to import and place the part in the working area of the Ultimaker Cura slicer.
Click on the button with the image of an open folder in the upper left corner of the screen and select the desired model in STL format. Place the model on the table and position it correctly. To do this, you can use the tools located on the left in the center of the screen.
The tools comprise of linear movements along the basic axes, various scaling options, rotations and rotations of the model, mirroring, model parameters and support blocker.

Almost every button has a sub-menu, and a “right-click” of the mouse that brings up related settings.
Find out more about the settings on the official Cura website.

Use the button on the far right in the rotation tool and put the model on the table after selecting the desired plane.
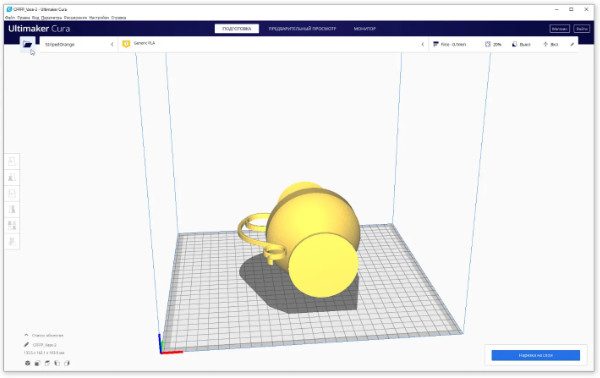
Next, import the model by clicking on the “folder” at the top left


Then turn the model upright.

…this may mean moving it a couple of times…

And now we are ready to print.
The only things remaining now are to prepare a print profile, slice the model and check its correctness, and finally send the G-code file to a 3D printer through WI-Fi or a USB flash drive.
Move the blue dot of the engine to the left or right on the “Print Options” tab, and select the print quality we need from the standard slicer profiles (e.g., Fine, with a layer of 0.1 mm and an infill of 20%). Next, add support, which is registered by default in the profile, and enable additional “sticking” to the table by checking the boxes in the corresponding menu items.
Click the “Slicing into layers” button on the lower right corner of the screen.

When the slicing is completed, Cura can show you the preview results if you click on the “preview” button at the bottom right.

The lower information screen shows the weight of the part, the length of the plastic used, and the approximate print time. The accuracy of these details depend on the settings you’ve indicated for th moving parts of the printer.
Generally, the information does not match the actual print time if you are printing to a “custom” printer and have not specified the exact printer firmware data in the advanced version of the print settings. If you are using the factory profile of the 3D printer, this time is approximated more correctly.

Check the results of the slicer by moving the “sliders” on the right and bottom for a layered and line-by-layer view of the model layers.


By moving the right slider, control the correctness of the formation of layers and the “hanging” parts of the model, mentally imagining the process of forming the part.
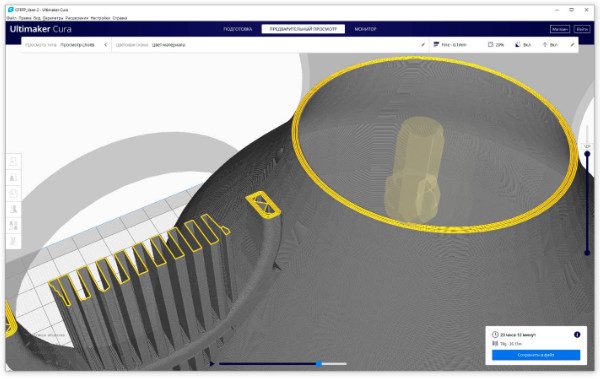
By moving the lower slider, you can check the movement of the extruder nozzle over the layer.
Well, you have checked everything. If your printer is connected to the computer and ready to print, click the “Print” button. If you prefer offline printing, click on the “Save to File” button to save the G-code print file to a USB drive.
This is a simple overview of how to use the Ultimaker Cura slicer. There are many educational and informational materials about its advanced settings on the Internet.
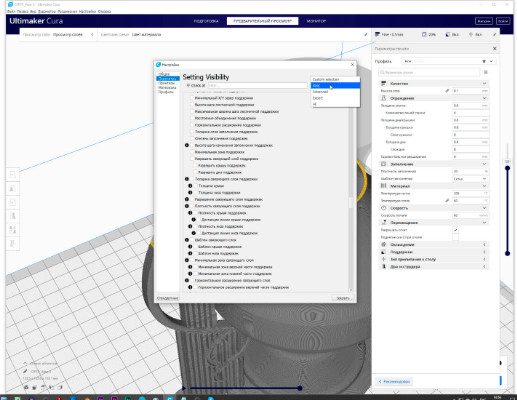
In short, to use the advanced features of the print settings, you must first customize the visualization of the settings you need. This is done in the Settings -> Options menu. Each of more than 200 options can be ticked off separately. Alternatively, you can select several options at once using the presets, which are in turn selected in the drop-down menu in the upper right corner of the window.

With the wide range of options available, this slicer offers you a good opportunity for experimentation. It is interesting to try new materials and complex print forms with it. However, it can be difficult to maintain the exact geometric dimensions than Simplify3D.
Ultimaker Cura’s native slicer settings are small compared to the advanced print profile settings.

In terms of performance, Cura is average. On a modern office machine, it moves quite confidently. However, slicing complex models takes a lot of time and is not always successful. Rotation and viewing the result of layer separation is normal and informative.
Ultimaker Cura takes about 300 MB from the computer’s RAM. The amount of disk space occupied increases with each new version.
You can download the software from the official website.


Many 3D printer manufacturers tried to adapt Cura to their models, cutting off some of the functionality and simplifying the settings. However, for some reason, things didn’t move very far. For example, Cura Wanhao Edition, having undergone several iterations, quietly disappeared a couple of years ago.
Summing up this brief review of the popular 3D slicer Ultimaker Cura, we recommend novice users to try to work with it at its basic settings first. In the print results are unsatisfactory, try customizing the advanced settings.
2. Simplify3D
- Official site: https://www.simplify3d.com/
- Paid ($149).
- Platforms: Windows (32, 64 bit), MacOS X (10.7 and later), Linux (Ubuntu (Ubuntu 14.04 LTS and later recommended), Debian, and Fedora (32,64 bit)
- Language: English
Simplify3D is an all-in-one paid personal slicer. With the software, you get one license per machine and one year of free updates. This is one of the few professional 3D slicers we recommend, thanks to it long history, ease of use, a powerful and fast math processor, a wide range of settings and tools, stable operation and high-quality results.
The software features a large list of profiles of various 3D printer models. There is also an “Automated Configuration Assistant” that enables you to configure the print settings of your 3D printer if you are connected to the Internet and are a registered license owner.
The necessary slicing settings can be downloaded from the official website. Alternatively, you can customize them by creating your own process profile.
Simplify3D also allows you to create your own equipment template with unique settings and support for a large number of kinematics options, including Delta.
Simplify3D is located in Cincinnati, Ohio (USA), in a building that houses perhaps the largest collection of various 3D printers in the world. According to the company’s employees, they work daily with new generation equipment, new materials and advanced technologies to improve their product and adapt it to the latest promising developments. All new functionality is instantly tested using their own 3D equipment.
Since its founding in 2013, Simplify3D has become the world’s leading provider of commercial 3D printing software, with customers in over 145 countries. The company’s mission is to expand the possibilities of innovation with intuitive software tools that unlock the power of additive manufacturing.
What are the possibilities of this 3D slicer? The main advantage of Simplify3D is the wide range of settings based on the creation of profiles or templates for different processes.
Other features of the 3D slicer include:
- Convenient informative interface
- Simplified and advanced settings modes
- Fast slicing process, even on large and complex models.
- Large set of customizable parameters for organizing the correct printing of complex objects
- Readable, convenient, informative and fast slicing preview
- “Smart” and editable in form and content support (there are no tree-like ones)
- Create multi-process tasks with different settings for multiple models
- An integrated tool for “treatment” of models with wide functions.
- Multi-extruder support
- Control panel and control modes of the connected printer.
- Firmware configurator with support for a large number of formats
- A large number of filling patterns
Below is an incomplete list of tools that allow you to quickly and efficiently prepare and print a model of any complexity.
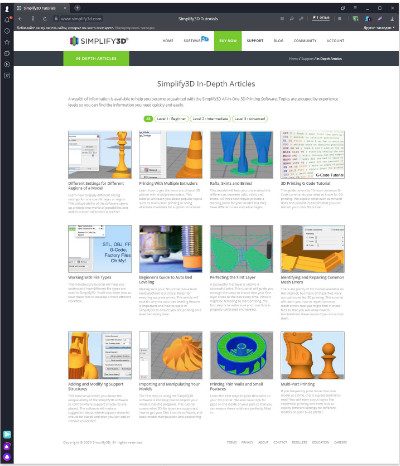
Reference Materials
Powerful online support for Simplify3D owners in the form of reference and information materials. The materials are available in various formats on the official website. Go through the material to master the settings and learn how to use the 3D slicer.

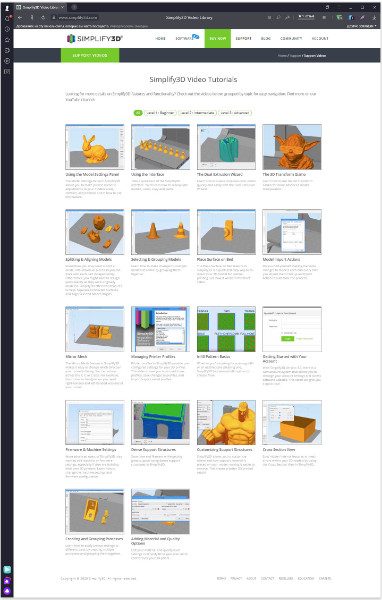
Video Tutorials
There is a large number of video tutorials on the main functions of Simplify3D. Go through the learning process and take full advantage of its wide range of features.

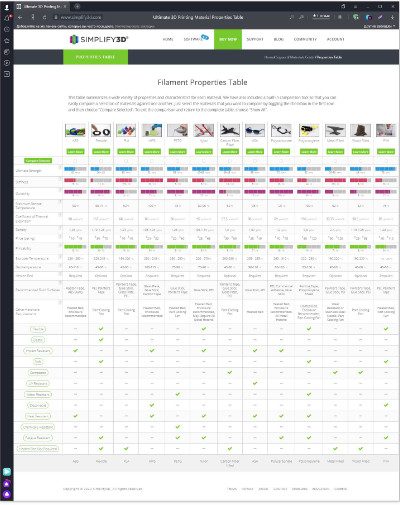
Materials Library
The library of materials will remove many questions about selecting a suitable filament for your tasks.

Easy Installation
The program is easy to install and works quickly on any computer, laptop or tablet. There is only some slight limitation when preparing complex models.
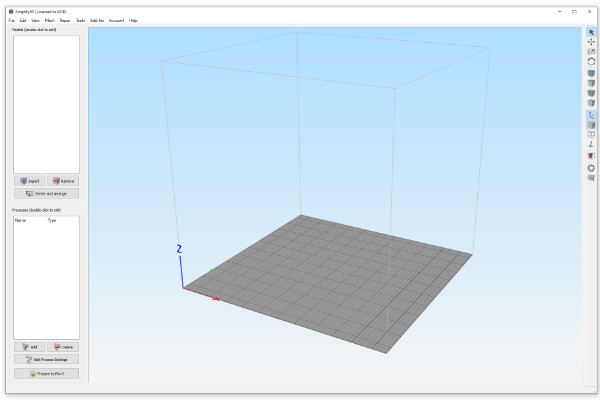

Simplify3D doesn’t have a welcome window and gets straight to the point.
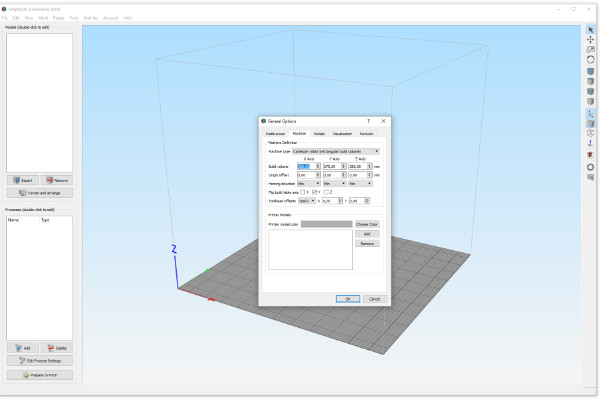
After launching the program, you will be prompted to launch the “Configuration Assistant”. Here, you can select the profile of the 3D printer model you need.
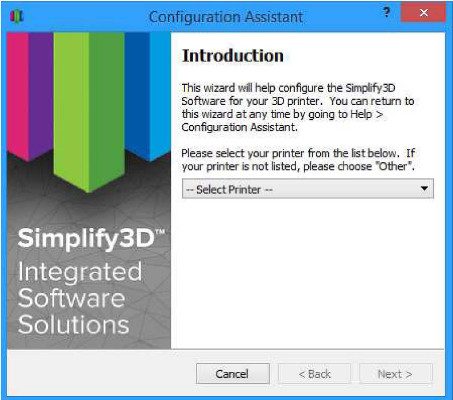

If your printer is not in the list, you can create a profile for it by selecting Tool -> Options from the menu. There, you can also configure the slicer, units of measurement, automated operations on the model, visualization modes and network connection settings. You can also visualize the desktop of your printer if you have its STL model
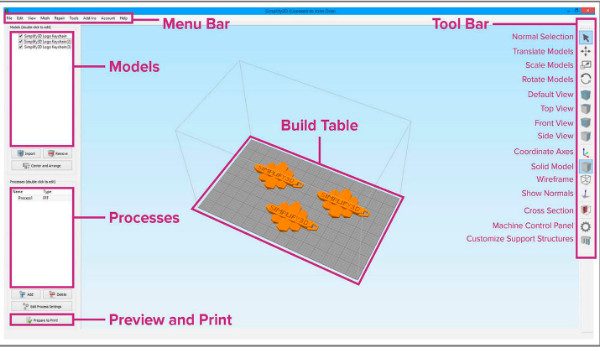
After completing the printer and slicer settings, proceed to import the model. Before we do that, let’s get familiar with the tools and menus of the interface.

More detailed information about the initial launch of the program and its use can be found on the official Simplify3D website.
Our task is to print our first 3D model after slicing it with Simplify3D.
To begin, load a model or several models into the program by clicking on the “Import” button in the upper left window. Simplify3D supports the common 3D print file formats, i.e., stl, obj, and 3mf.
The Center and Arrange button will center your models on the workplane and place them on the table surface. You can move or rotate, mirror and scale, as well as perform other standard manipulations using the four top buttons in the right toolbar.
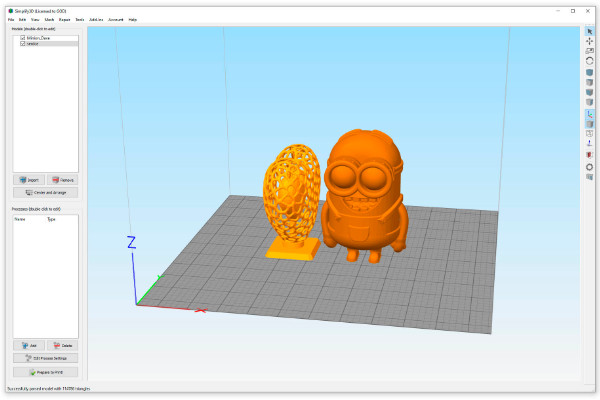
If you need to repair the model, run the procedures listed in the drop-down list of the top menu “Repair”. However, there is no automatic analysis of the quality of the model.
The next step is to create a process, or several processes, of printing the models. Press the “Add” button in the lower left window of the program.
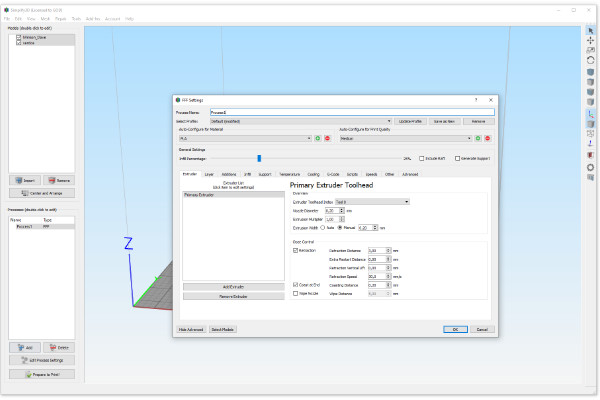
The main window of the main settings necessary to prepare the model for printing opens.
After assigning a name to this process, select the profiles of the printing process prepared earlier or downloaded from the site, click the OK button, and proceed to the slicing process. If you do not have a ready profile, make one. Simplify3D website has detailed instructions on how to do this the right way.
In a nutshell, the procedure is as follows.
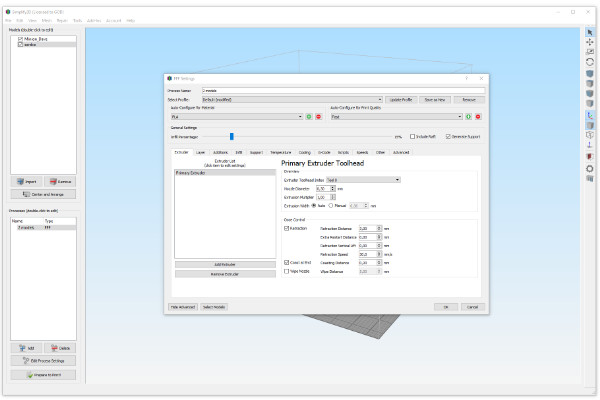
- Set up the extruder in the “Extruder” tab by assigning a serial number to it, specifying the nozzle diameter, retract length and speed.
2. Set the layer thickness in the “Layer” tab, (as a rule, this is the product of the nozzle diameter by its half or by its two-thirds), the number of upper and lower solid walls, and the number of perimeters (not in mm, but in nozzle diameters)

3. In the “Additions” tab, select the method of adhesion of the first layer to the table. You can use a raft, skirt or border with the appropriate settings.

4. In the “Infill” tab, organize the shape and percentage of filling the internal volume of the model. The many settings give you a wide scope for experimentation aimed at achieving the best quality prints.

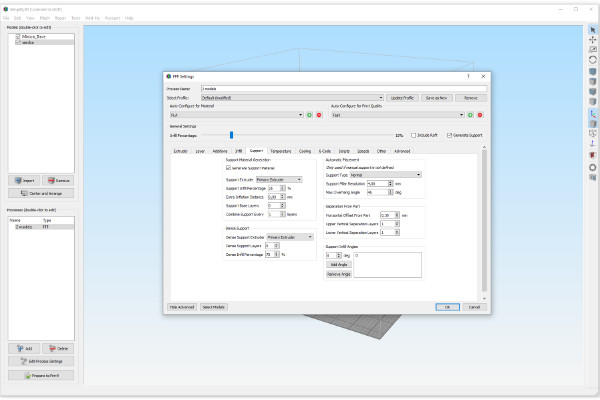
4. The “Support” tab needs a little more attention. Here, you can decide whether to use supports and configure their basic parameters, which will be tied to the profile and activated with each new use of it. However, for fine-tuning custom supports, it is better to use the tool on the right panel.
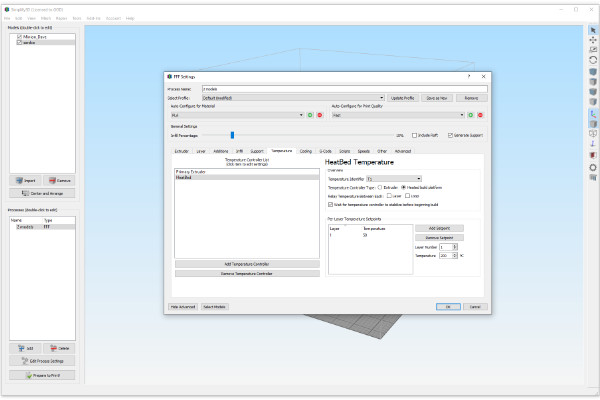
Celsius degrees for the table and extruder(s) are written in the “Temperature” tab, and with reference to layers, if there is such a need. However, to make such a binding sometimes, you first need to perform test slicing. After that, you can return to the print profile settings to add or change temperature modes. This is not very convenient but is useful.
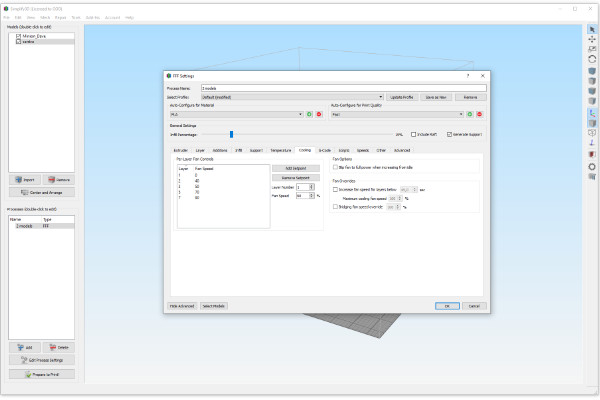
“Cooling” describes the cooling modes of the part. They are also fashionable to “bind” to the layers if necessary. And also set up a “sharp start” (Blip fan to full power …) of the fan to prevent it from “sticking” at low percentages of revolutions.
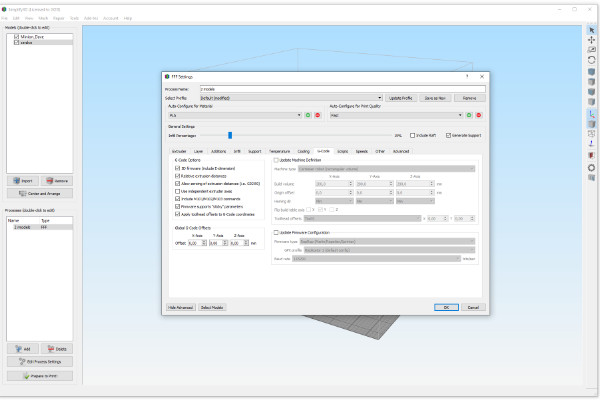
The description of the settings of the G-code options is quite specific. If you are a beginner, focus on the default settings or use the profile settings. However, it is useful to study this topic in developer tutorials or on the Internet.
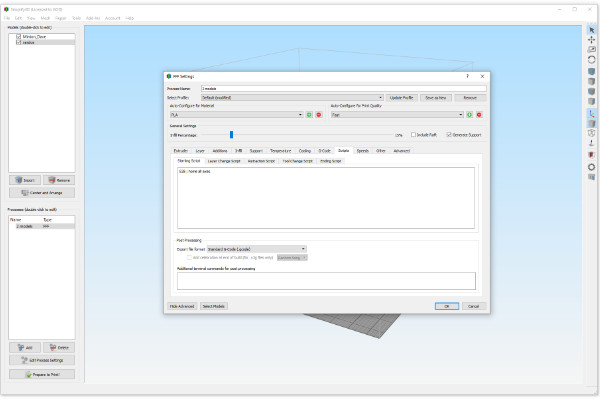
The “Scripts” tab allows you to write typical machine operations using the standardized G-code commands of your 3D printer when starting and finishing printing, changing tools (extruder), retracting, and switching to another layer.
The speed modes of the various print areas in the “Speed” tab are determined as a percentage of the default “Default Printing Speed”. They can be assigned to outer perimeters, inner infill, supports, and movement in the XY and Z planes.
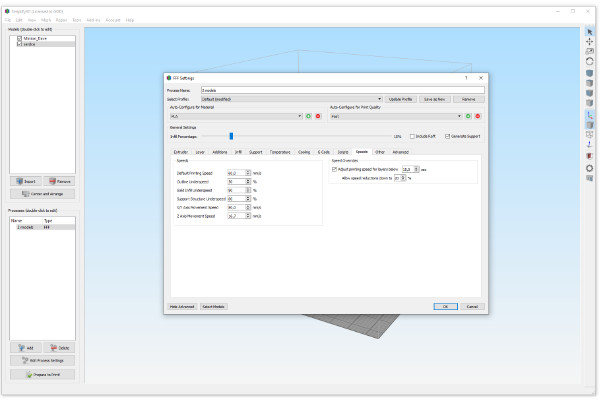
The “Other” tab allows you to set the parameters for printing bridges, the diameter and characteristics of the filament thread, and data for changing the extruder (tool).

We will omit a detailed description of specific settings in the “Advanced” tab in this article, since they are not critical for test printing.

After configuring all the above settings as necessary, save the new profile by clicking on “OK”. You can always return to editing this profile by clicking on the “Edit Process Setting” button.
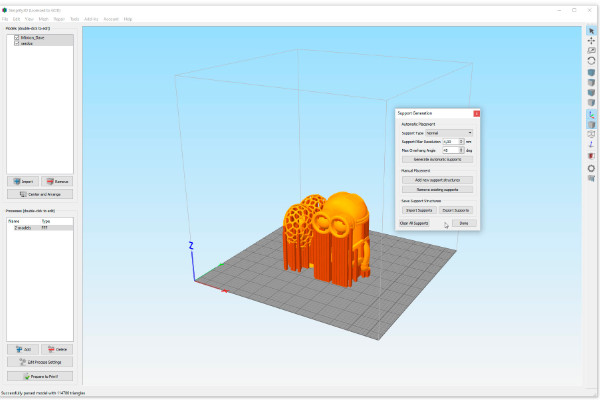
Before moving on to the next step, let’s remember the organization of “custom” supports that we mentioned earlier. It looks like this.
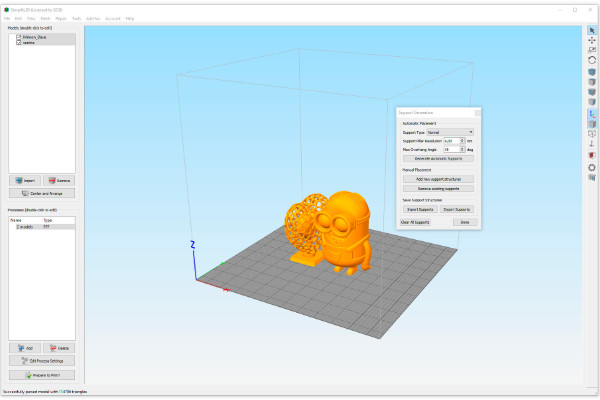
The support settings are quite simple and include defining the threshold angle and the thickness of the support segment that will be converted into user-defined support structures when sliced. You can click buttons to generate supports automatically, add and remove them, import, export and clear them, and so on. The result is this.
Now we can start slicing our models.
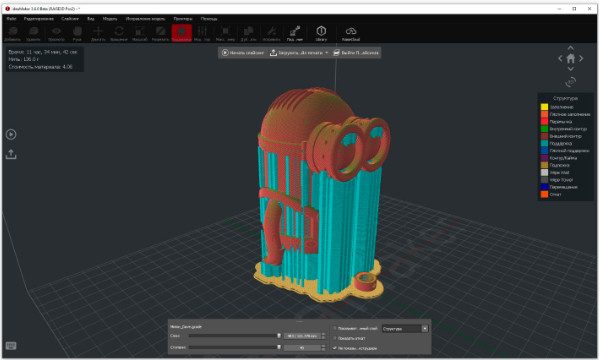
Select the process and click “Prepare to print”. The slicing process takes some time. The good news is that the program will automatically show a preview of the result of the work.

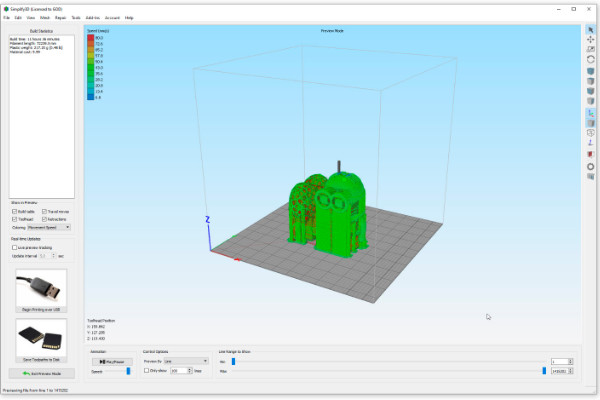
The screen will show multi-velocity sections painted with spectral colors.
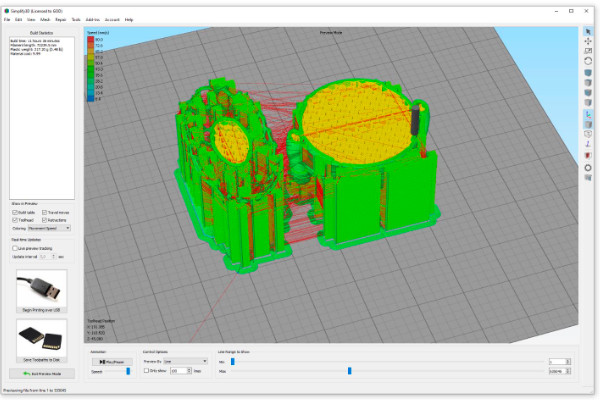
By switching the tabs “Coloring” and “Show in Preview” you can set the visibility of various parts of the model, tool, displacements, supports, tool paths, retracts and other parameters of part formation when printing.
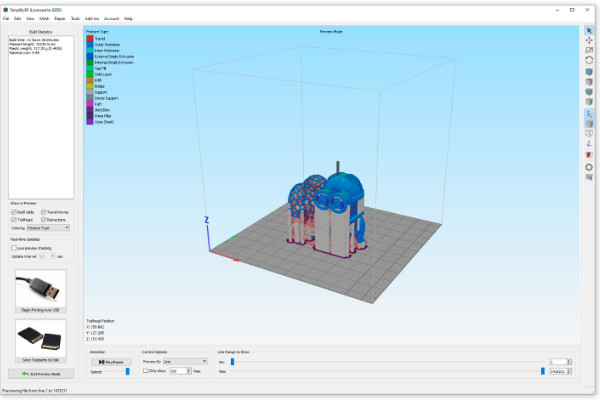
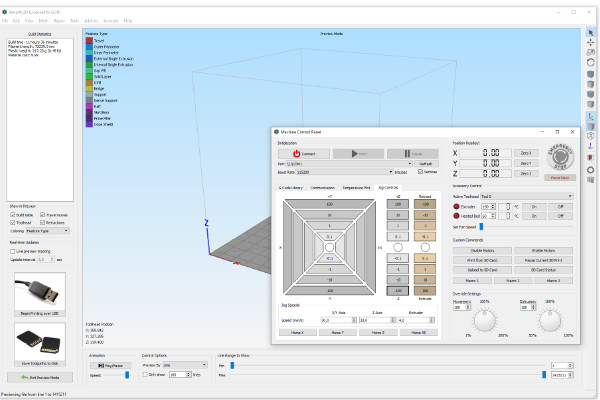
After the control review, you can burn the finished G-code file to portable media by clicking the “Save Toolpaths to Disk” button or send it to the printer. For the latter, choose “Begin Printing over USB” using the same button.
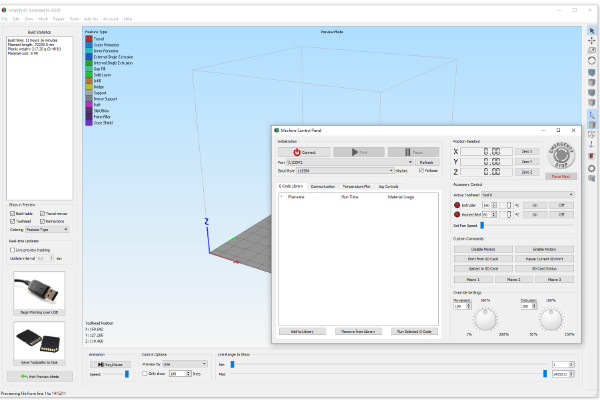
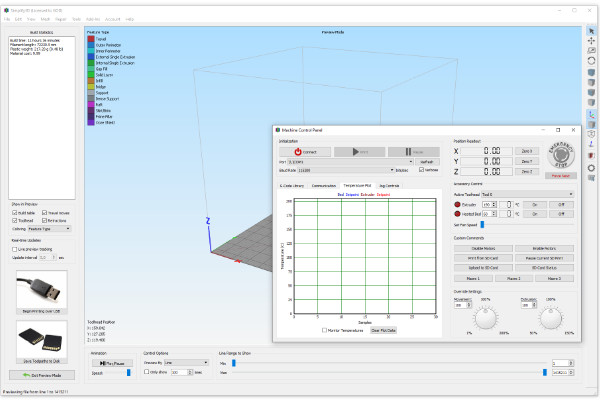
The “Machine Control Panel” allows you not only to manage and control the units and components of your printer, but also to make a print queue from finished documents, adding and removing them from the G-code library.
Reports on the temperature conditions of your printer nodes in On-Line mode.
Management of printer mechanisms and tools.
That’s probably all that can be described in a short review of this popular Simplify3d slicer. Much more information can be found on its official website. Even if you are not yet ready to pay $149 to purchase this 3D slicer, you can learn how to use it for free.
There is a two-week refund guarantee if you choose to pay for the program. However, even if you don’t buy, you can still watch video tutorials about the software
Here are some links to get you started:
For beginners:
https://www.simplify3d.com/support/articles/#level-1-:-beginner
3D printing – G-code tutorial, working with file types, perfecting the first layer, omporting and managing your models.
https://www.simplify3d.com/support/articles/#level-2-:-intermediate
Different settings for different model areas, rafts, skirts and fields! This is a beginner’s guide to automatically leveling the site, identifying and fixing common mesh errors, adding and modifying support structures.
https://www.simplify3d.com/support/articles/#level-3-:-advanced
Multi-component printing, print thin walls and fine details, print with multiple extruders.
3. IdeaMaker
- Official website: https://www.raise3d.com/
- Availability: Free.
- Platforms: Windows (32,64 bit), MacOS X (10.7 and later), Linux (Ubuntu (Ubuntu 14.04 LTS and later recommended), Debian, and Fedora (32,64 bit)
- Language: English, Russian, etc.
Raise3D started its life with the creation of a slicer. Today, it is a global company that produces professional 3D printers and equipment. The company’s slicer is known as IdeaMaker. The slicer has all the necessary characteristics of a reliable, high-quality, trouble-free software with powerful computing capabilities. It also has a flexible adaptive interface, and a high degree of integration capabilities.
As if foreseeing the development of the 3D industry and its gradual shift to cloud services based on various 3D technologies, RAISE3D developers focused on network solutions, autonomy, process control, and storage information necessary for the operation of the equipment.
In our IdeaMaker slicer review, we will first look the basics of this software. In May 2020, an update of the software made it possible to integrate the workflow into the “pick and print” system. This simplifies the tasks of preparing models remotely, material selection, print settings and getting the finished model.
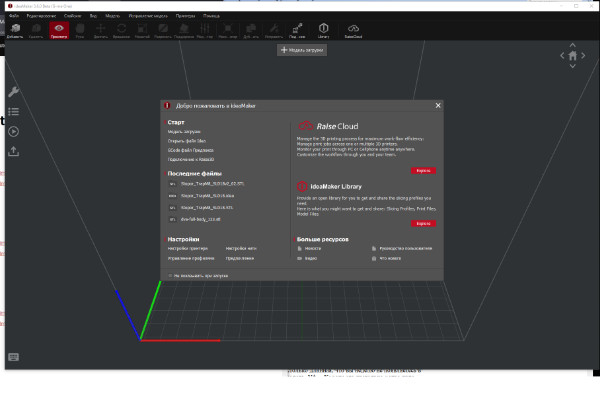
The IdeaMaker has an informative welcome window, where you can immediately integrate your work into the cloud space, control its execution remotely, and select ready-made profiles for slicing using a wide range of materials. This can even be done on your smartphone.


Apart these unique features, it is easy to get started with the software. Without pressing extra buttons or sorting through the menus, you can go to “Printer Settings” and threads, “Manage Profiles”, and select “Preferences”.
Of course, you can still download recent files and select items from the standard Start menu. There is also a section for news, current videos, and the User’s Guide.
Initially, IdeaMaker was developed for Raise3D printers. The program has wide functionalities, including a built-in webcam for printing control. This program is based on a 64-bit engine.
However, if you don’t have a Raise3D 3D printer, you can create and use the settings of your printer. This means that the slicer also works with third party 3D printers, just like is the case with Cura and Simplify3D.
However, there is a major limitation of IdeaMaker; kinematics compatibility. The software can only support Ultimaker type print head movement mechanism and rocker type extruder up to 2 hot ends.


The program is available in English and other languages.
Coming to quality and convenience, IdeaMaker easily outperforms some of the best 3D slicers on the market. The slicer has a powerful engine, comprehensive set of utilities for solving almost any task of preparing models for printing and its successful completion.
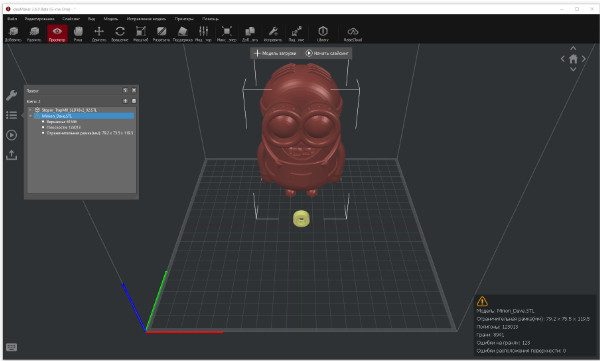
There is a robust model repair function. When loading a damaged STL file, an alarm will appear in the project folder. And in the lower right corner, the information window will provide details about the damages detected.

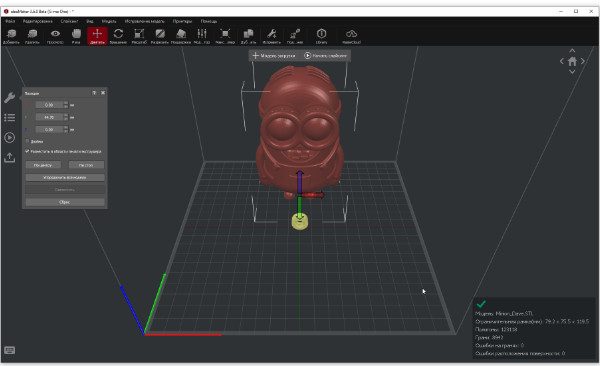
You can repair your damaged model by clicking the “Fix” button with the image of a wrench with a plus in the upper panel of tools.

When the repair process is complete, a green checkbox and a detailed report will appear in the lower left info window.

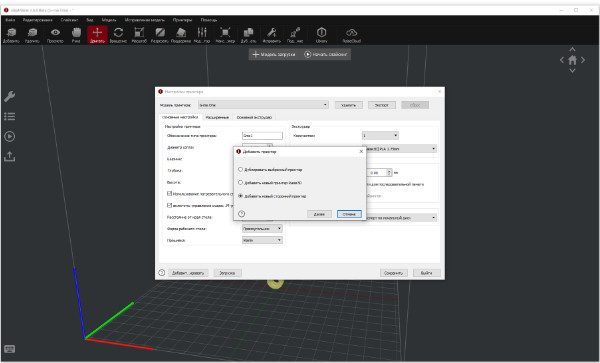
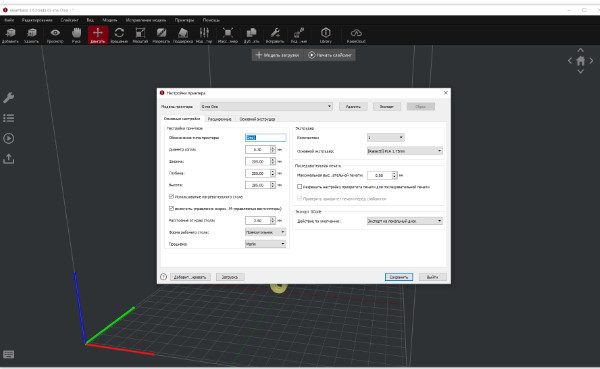
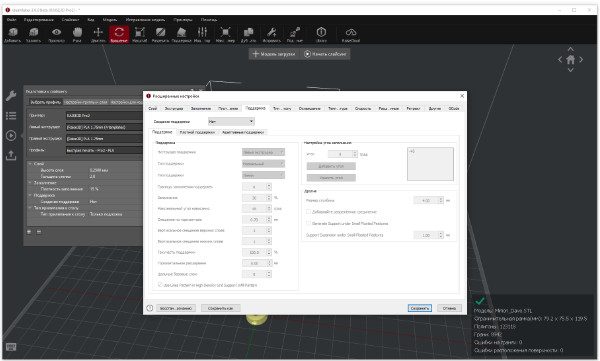
The settings algorithm of this slicer is somewhat different from its counterparts.
Apart from choosing ready-made printer settings, template or creating your own profile, you can configure or select a Filament Settings template. This is basically the same as media settings. Next, bind these templates to each of the active extruders.


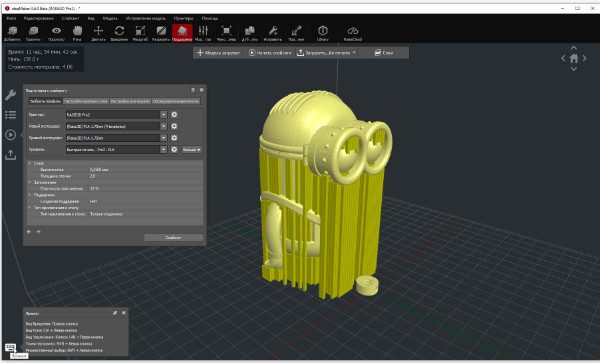
After that, set up or choose a ready-made print profile.


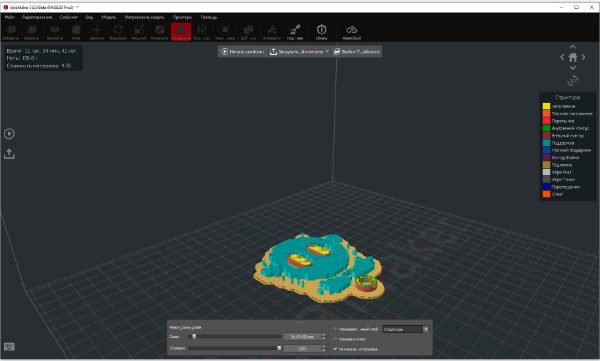
Next, select a model or a group of models and start slicing by clicking on the appropriate button.


When the process is complete, a window will open. In the window, you can immediately send the result for printing to a printer or to the “cloud”. You can also go to the layer-by-layer view by clicking the layers button.
After completing the control review of the result, you can return to editing models by selecting the right button under the top toolbar called “Exit Slicing”. Alternatively, you can start a new slicing process by changing the print settings profiles in the “Select Profile” window that opens.
The next step is to upload the print file either to a printer or cloud, or save it to a USB drive.

Generally, preparing a model for printing in an ideaMaker slicer is not complicated. Of course, the 3D slicer works best with Raise3D printers, e.g., the most popular Raise3D Pro2 or a more modest Raise3D E2 model.
However, to a greater extent, entrepreneurs working in the 3D printing industry professionally will appreciate it. The software especially comes handy in system-integrated production structures.
If the mechanical parameters of your printer are compatible with ideaMaker, the slicer will be the most balanced solution for organizing the printing process for both one and several of your printers. Even better, the software is available for free.
Other notable features of IdeaMaker include support for up to 2 extruders, the ability to split the model into parts for separate printing, adaptive layers and smart editable supports, support for sequential printing of several parts, among others.
In general, ideaMaker has many settings that allow you to fully customize your print job.
A detailed instruction manual for the ideaMaker slicer is found on the Internet. Here is a quick video guide:

4. U.P. Studio
- Official website: https://www.tiertime.com/
- Availability: Free.
- Platforms: Windows 7 and above (32,64 bit), MacOS 10.10, (iPhone iOS, iPad iOS)
- Language: English, Russian, etc.
Tiertime’s lineup of 3D printers include the X5, UP300, UP Mini 2 ES, UP Box+, UP Plus 2, UP Mini 2, Cetus3D, among others.
In recent years, many 3D printer manufacturer have shifted their business model from emphasizing on the technical aspects of their equipment to the convenience and ease of use. More manufacturers are thinking of the end user when making their printers.
With the best 3D printers on the market, users have wide options in terms of accessibility, storage and preparation of 3D printing models. Most 3D printer software and hardware are not tied to a brand’s ecosystem.
Today’s 3D printing cloud ecosystem allows you to receive, prepare and send the model you need to print on any printers available, as long as you are connected to the internet. Of course, you will need to insert filament on the 3D printers before sending a job. Also, you will have to manually remove the printed part from the printer when a job is completed.
In the future, 3D printing mini-factories will become as the 3D printing cloud infrastructure matures.
Tiertime is known for its large format 3D printers. The company’s printers feature stylish industrial design and integrated technical solutions. For example, complex unique parts of the printer coexist with 3D printed parts.
The Up Studio slicer by Tiertime is more than just a slicer. The program is a critical link with other software in the 3D printing ecosystem. It’s interface is simple, easy to understand, and functional.


If you don’t have a Tiertime printer, or it is not connected to your computer, you can open a model but you will not see anything on the screen.
After launching UP Studio, create an account and register your printer. If you already have an account, then log in.
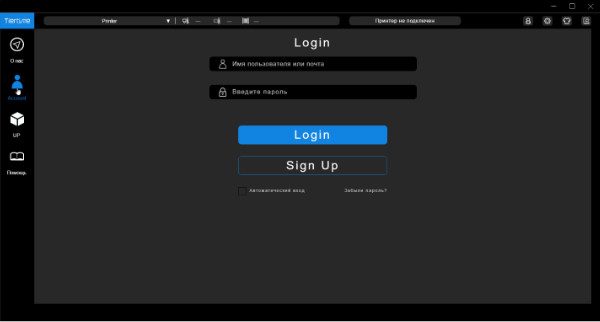
On the upper part of the working screen, there is an information and service line.
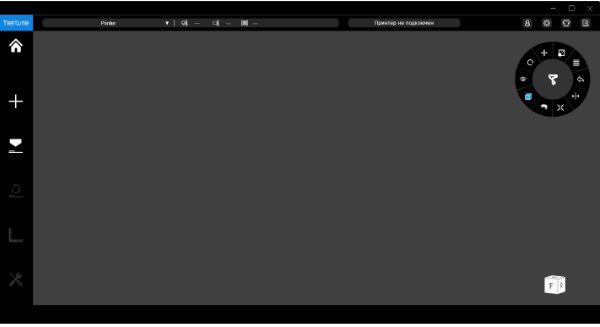

Other information provided on the screen include information about the connected printer model, adding a new one, temperature conditions of active zones, and connection status.
There are also 4 buttons, including the “Login” that we have already seen in the previous window. The second button, indicated by the gear icon, is the “Settings”. This button opens the program settings window.


U.P. Studio has nine language interfaces. You can select or add a printer on the interface by searching the Wi-Fi network. You can also check the software version and, if necessary, update it. Other things that you can do include clearing the cache of downloaded models and configuring networks for different protocols and ports.
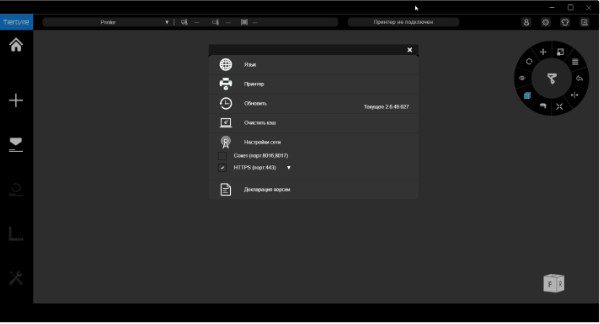
You can also see the license of the program.
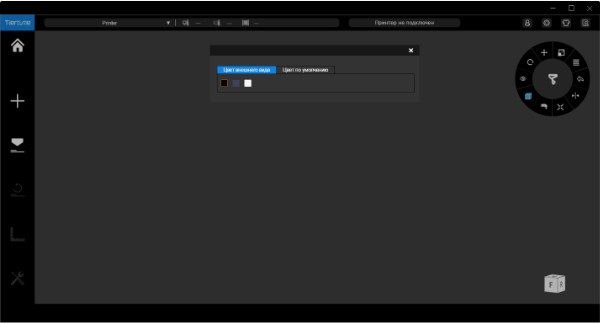
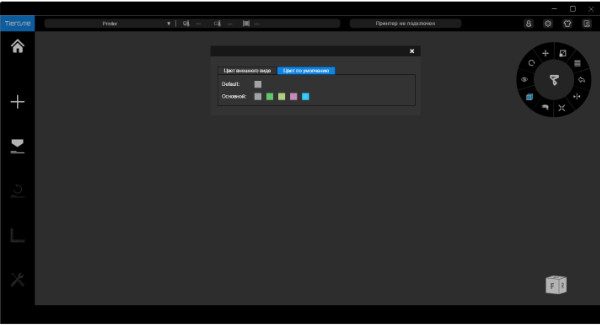
The third button, in the form of a “shirt”, displays the design menu interface. There is also an option of coloring the program.

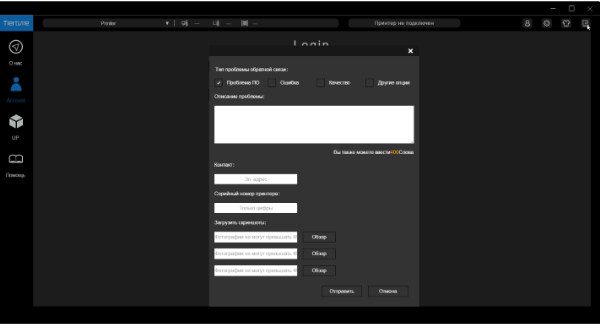
The button on the far right on the top information field (scroll with a pen) allows you to quickly create and submit a request for technical support.
The tool menu in the column on the left consists of four sections (buttons). The “About us” button opens a screen with general information from the manufacturer. The “Account” button duplicates the top menu and offers to register or enter the network. The “Help” button opens a window with links to training and informational videos posted on the manufacturer’s Youtube channel.
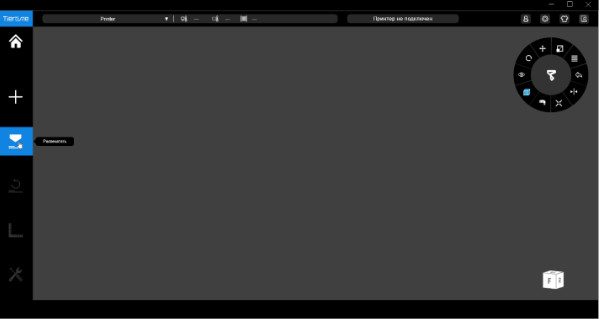
The most functional button on this list is the “UP” button. By clicking it, you get access to the functionality of the slicer. To exit this mode, click on the “Home” button at the top of the left column.
Let’s take a closer look at this screen.
The Plus button allows you to add objects that you want to print. The “Print” button opens a menu of print settings and printer options. You can open the advanced mode by clicking on the double arrows in the upper right menu of the window.


Several CAD tools are built into the functionality of Up Studio.
Using the “Add” (+) tool, you can import a finished STL file, and also create, place and modify several “primitives” (a cube, a sphere, a cylinder, prisms of various shapes, a cone, a pyramid, a torus, a puck, a star and text).

Up Studio is perhaps the only slicer that integrates a tool for converting a two-dimensional bitmap into a 3D model.

By uploading an image, you can give it a thickness and then print it.


Let’s look at the interface tool, which is in the form of a circular menu. It is functional and pleasant to work with.
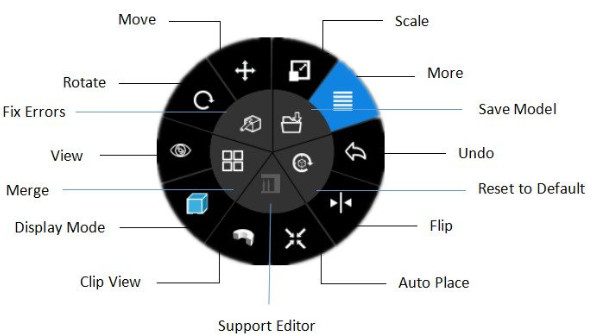

Use the standard tools for moving and modifying, located on the circular menu, to place an imported part in the working volume of the printer.


The print setup menu has both a simplified standard view and advanced settings.
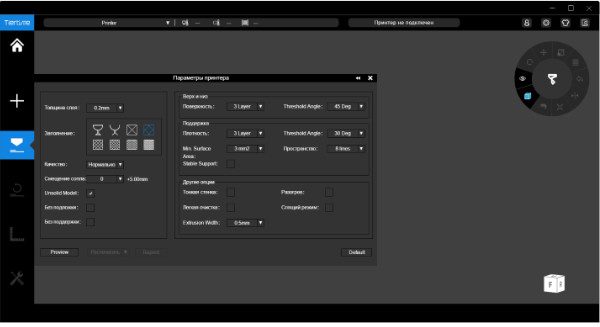
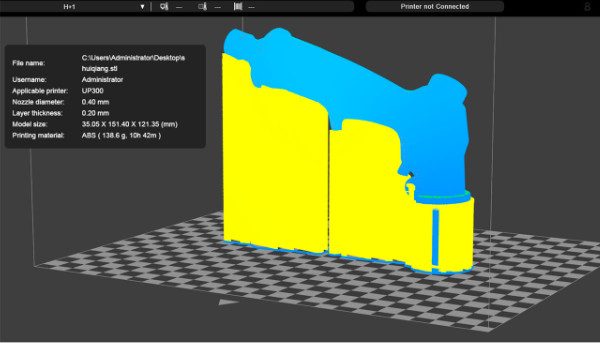
After slicing, you can check the results by moving the slider at the bottom of the screen. The print time and weight of the material are also indicated there.


The UP Studio slicer can start printing in three clicks. There are also many advanced options for setting up and printing both simple and “heavy” models with a complex organization of supports.


For their formation, a whole Support Editor is used. The Support Editor allows you to turn on or off the visualization of each support individually, set the “activation” angle for it, set its coverage area, set the “roof density”, etc.


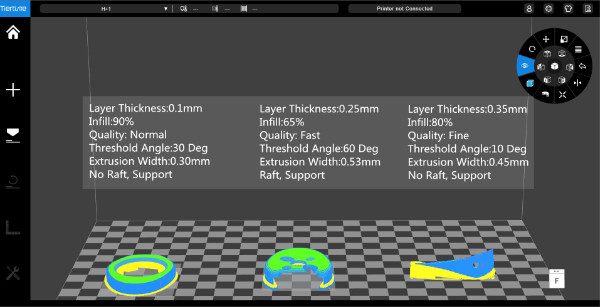
There are also some almost standard printing options, which show the information about printing parts with different settings.

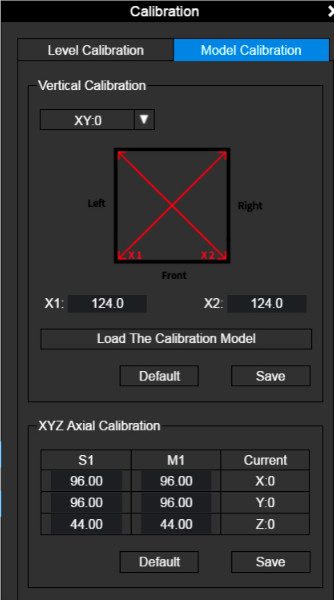
The complex organization of the 9-point process of determining the dimensions of the print and leveling the Martix desktop is on a separate menu.

For a full review of all the features of UP Studio and cloud applications, watch the video below:

Ad here is the official TierTime Youtube channel.
5. FlashPrint
- Official site: https://www.flashforge.com/
- Availability: Free.
- Platforms: Windows (32,64 bit), MacOS, Linux (32,64 bit)
- Language: English, Russian, etc.
Zhejiang Flashforge 3D Technology Co., Ltd was established in 2011 in China, and is one of the largest 3D printer manufacturers today. The 3D printers from this company are in the top ten on various categories.
Flashforge 3D printers are reliable and offer excellent value for money.

Flashprint slicer start window
However, Flashprint is only designed to work with Flashforger 3D printers. Moreover, it is available online only. Therefore, if you do not have a Flashforge 3D printer model nor are you connected to the internet, you won’t be able to use this slicer.
When you click the “Toolbar”, “Settings” and “Printer Information” buttons on the “Tools” menu and have not connected a Flashforge printer, a window will pop up with the message: “Connect to Printer”.

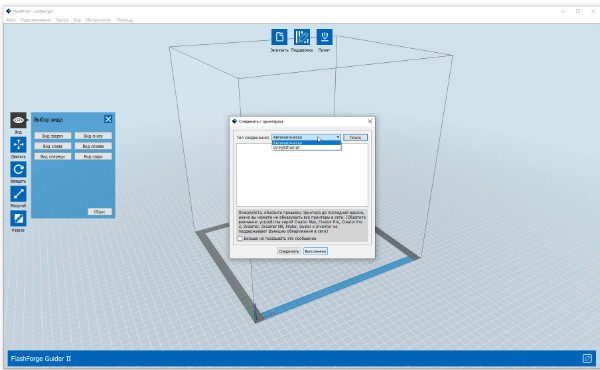
Printer communication window.
The logic of this “corporate” slicer is very simple. You have to do everything in a certain sequence, step by step. Simply open the slicer, indicate which printer you have and connect it to the program, and if necessary, update the firmware. Without doing this, all your actions will be considered only preparatory work.
However, the stages can be saved in a USB disk in unique slicer formats.

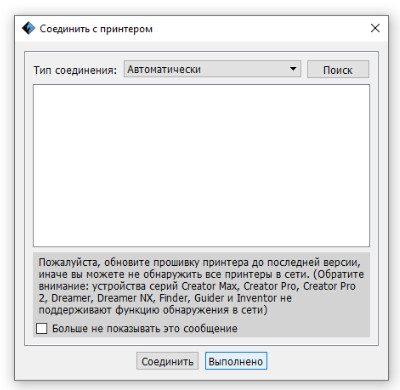
Some printer models do not support network discovery.
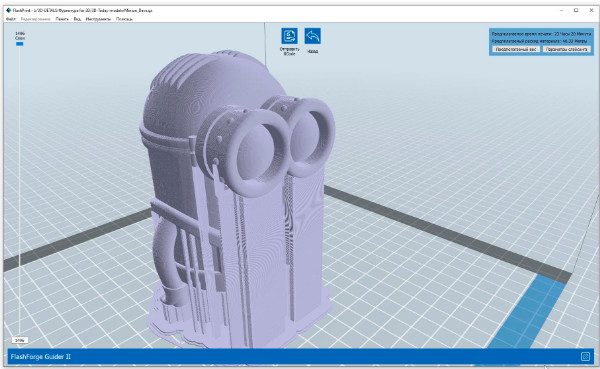
After that, upload the model. You cannot make any other presets without a model. The slicer will automatically check the model for errors and, if any, treat repair with your consent.
You can then place the model on the table however you like using the standard manipulation tools. In the “Rotate” tool, there is a “Surface to platform” option that will put the selected plane on the table by double-clicking on the desired polygon.

There is also a function of automatically placing the model in the working volume


Auto repair model is also present

And it works fast
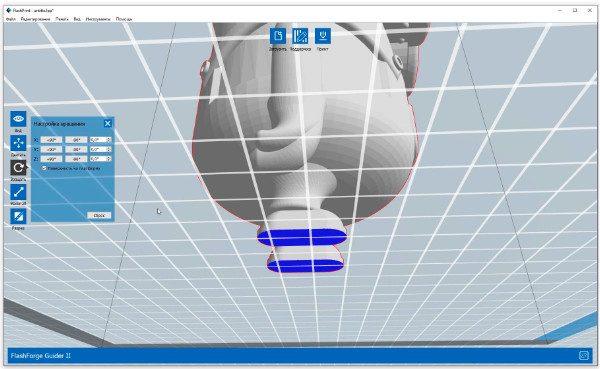
Surface to Platform in action
When the model fits correctly in the working volume, the “Support” and “Print” buttons in the middle of the upper part of the screen are activated. This means that the slicer allowed you to move on.
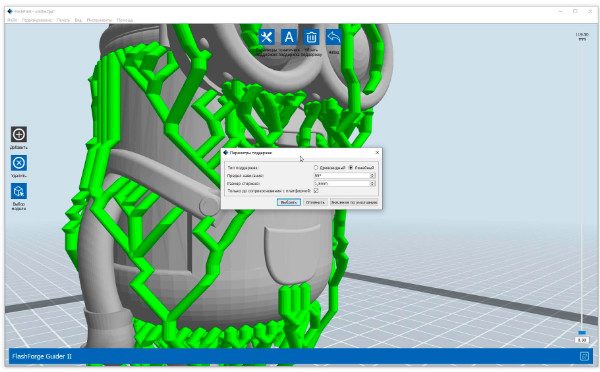
When you click on “support”, you get 4 buttons on the top and 3 on the left with the following functionality: parameter settings, automatic placement, adding and removing supports, selecting a model, deleting all supports and returning to the previous menu.
The parameters of the two types of supports, tree-like and linear, are concise like the whole program. Check the screenshots below.


Automatic creation of tree supports that can be edited.

Setting parameters of tree supports.

When support is complete, you can add or remove support.
Tree supports can be replaced by linear ones.
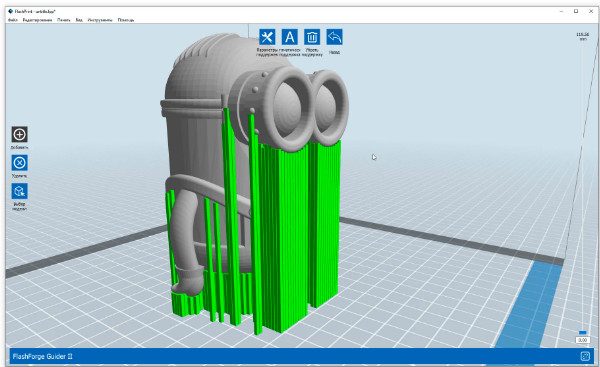
They can also be edited.

And you can also manually arrange supports as you like.
After the supports are generated, you will be prompted to save these supports in the program’s unique *.fpp format. You may need them in the future.
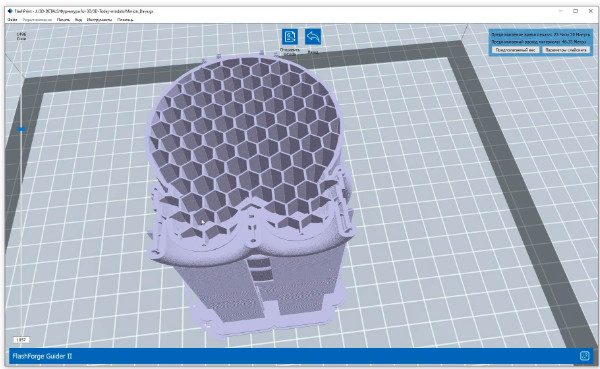
Moreover, by launching the slicing settings with the “Print” button, you can select several ready-made print profiles or specify the values \u200b\u200b of some standard print parameters in the tabs; “layer height”, “shells”, “filling”, “speed”, “temperature” and “others”.
When a printer is connected, you can enter Expert mode (an advanced setting of print settings) by clicking the “Settings” menu and selecting the type of settings window. In this mode, there is an option to set internal and external compensation.
After indicating the parameters, press the “Select” button and start the slicing procedure. Make sure you save the project along the way with a unique *.gx extension

The window for selecting standard print profiles …

… and additional settings.
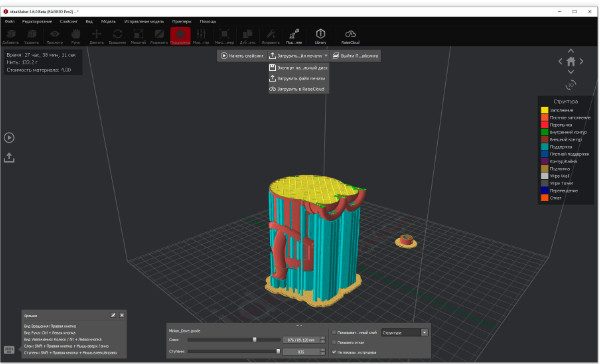
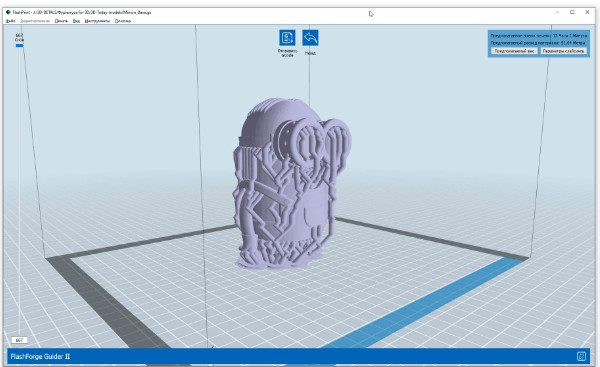
The visual result of slicing can frighten even an experienced user. In a single pale lilac mess, you will not be able to distinguish the outer walls, infills, supports and other elements of the printing process. The developers decided that apart from layer-by-layer control, you are not supposed to look at the result.

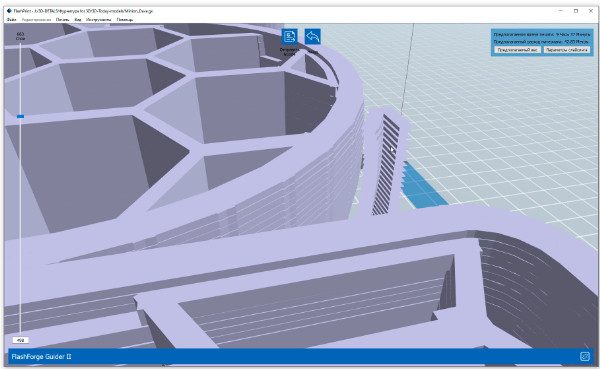
The next step is to click on the “Submit GCode” button and control the printing process if you own a Flashforge 3D printer. Otherwise, click the “Back” button and save the result of your work in stl, obj, 3mf or fpp file format.
While the program performs all the preparatory procedures quite quickly, the speed reduces after slicing. Viewing the object cut into layers is very slow, even if you have a good PC with excellent resources.
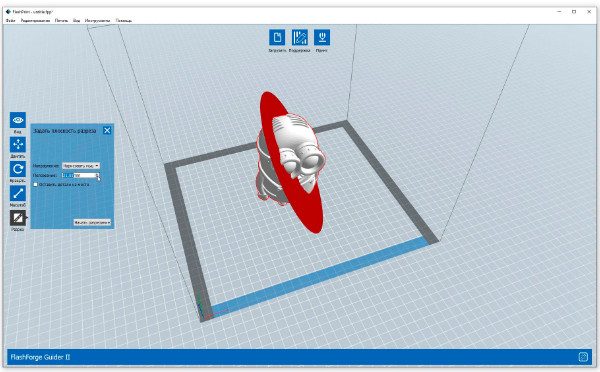
There is also a “Cut” button that launches the tool for dividing a part with a plane to print it in parts. Planes can be X, Y, Z or drawn with the mouse. The ends are automatically closed.


In summary, FlashPrint has a set of standard features suitable for everyday routine work with Flashforge 3D printers. The slicer does not work with other third party printers.
With this slicer, you can import a model, place supports, and save the result in stl. However, the supports look like baobabs in a birch grove, Just be aware of this is you’re used to Meshmixer services.
In addition to the listed slicers, we should also mention other slicers available. These include Slic3R, Prusa Slicer (this is actually a redesign of Slic3R), Repetier-Host, Kisslicer, and Skeinforge. Some of the 3D slicer deserve a separate review.
There are also dozens of different programs that allow you to prepare 3D models for printing. Even Windows 10 has a built-in 3D printing application ready to process and print your model to Microsoft partners, if it passes the built-in examination.
Choosing a slicer is just like choosing a printer. Consider your goals and choose a program based on your priorities and tasks. Also, if you are running a 3D printing farm, the printers can be effectively managed if there is a cloud-based system for managing and distributing print jobs.