
There is another laser machine from Aufero, this time in a box frame. We are talking about the Aufero Laser 2. This unit comes with no surprises, apart from the frame. From the design, the Aufero 2 largely looks like the Aufero 1 laser engraver.
If you are new to Aufero, this brand belongs to Ortur, which is known for its laser engravers for hobby users. And as you can expect, the brand keeps up with the high-quality standards that Ortur is known for.
Let’s get started with our review of the Aufero Laser 2 Engraver.
Aufero Laser 2 Engraver
AVAILABLE ON SINISMALL
What’s in the Box?
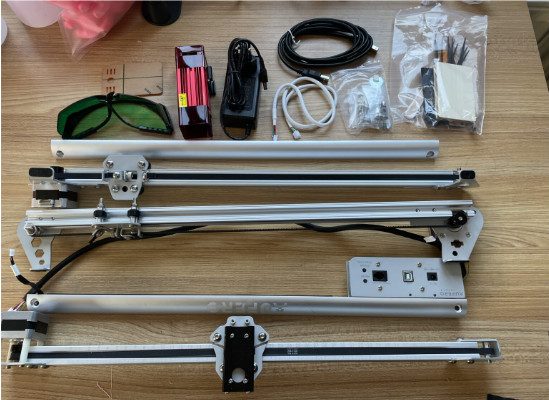
Inside the box, you’ll get the following:
- 4 pre-assembled frame parts screwed together with 2 screws each.
- Ortur LU2-10A 10W fixed-focus.
- Focusing aid and stray light protection
- Green goggles
- External 110/240V power supply, 24V 2A
- USB cable
- 4 sample materials (wooden plates)
- A brush
- Some tools are also included (an Allen key, a small Phillips, an open-end wrench, and side cutters)
- Instruction manual (in different languages)
Connectivity and Setup
The Aufero Laser 2 is very easy to set up, even for beginners in laser engraving. The setup process is pretty straightforward. To assemble the machine, simply plug the cable harness into the laser and fix it with a few cable ties. All of this is done in less than 10 minutes.
Here’s how to do it:
Place the Aufero Laser 2 on a flat, horizontal surface (preferably a work table) and connect the power cord. Next, plug your PC or Mac with the USB data cable, and open your engraving software.
There are various engraving software you can use. However, most people use LightBurn (paid option) or LaserRGBL (free). Regardless of which software you choose, you’ll have to calibrate the machine before using it. The handy instructions in the software you choose are easy to follow.
After the calibration, you will be ready for your first engraving or cutting work.
Software
For software, Ortur/Aufero recommends LaserGRBL (Windows only) or LightBurn (Win, Mac, Linux). These is what the Ortur range of laser engravers usually use.
LaserGRBL is free and easy to use. This is why we recommend it for beginners.
For image compatibility, both LaserGRBL and LightBurn support a wide range of file types, including JPG, PNG, SVG, BMP among others. You won’t really have an issue with images, unless you are working with a highly unusual file type.
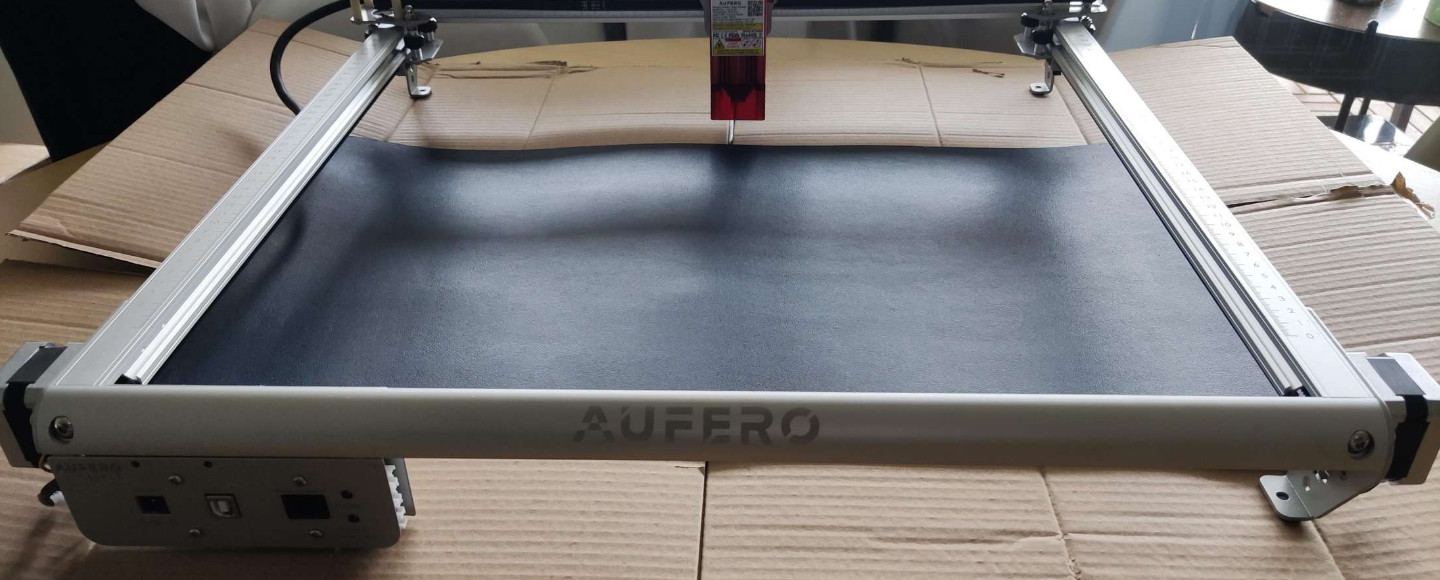
Aufero Laser 2 Engraver Review
The Aufero Laser 2 has a 400 x 400mm work area and is powered by a powerful 32-bit board “OLM Pro V1.2” based on ESP32. The unit also has a glass that covers the laser beam to prevent it from bouncing off to unwanted areas, and causing damages.
Let’s see what it has to offer.
Safety Features
We also love the safety features that this laser engraver comes with. First, there is a built-in gyroscope that senses the machine’s position. If the machine starts to tilt (for example, you had set it on a raised surface and it starts to fall), the laser will automatically shut off for your protection.
Also, if the machine detects that your computer has been disconnected, the laser will automatically shut off. This way, the material you are engraving or cutting won’t be damaged.
The laser will also shut off automatically if the system detects that it has stayed in place for a long time. This is important to prevent fires, in case you’re not monitoring the machine during operations.
Finally, there is protection against voltage overcharge. Electric current issues brought about by power surges will not affect the machine. The system will automatically power off the machine to protect it.
In a nutshell, the safety features of the Aufero Laser 2 are:
- Monitoring of burn time, power, and overheating
- Detection of standstill, vibration or tilting
- 24V current reduction system
- Protective “glass” against scattered light on the laser module
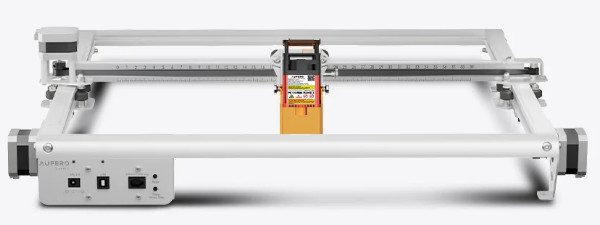
The Frame
The Aufero 2 has pretty stable full metal frames that stand up well. You can screw the frames on your work table for convenience when doing your laser work. The frame has a scale printed on top in mm, and looks pretty good.
Now let’s look at the mechanics of the Aufero 2.
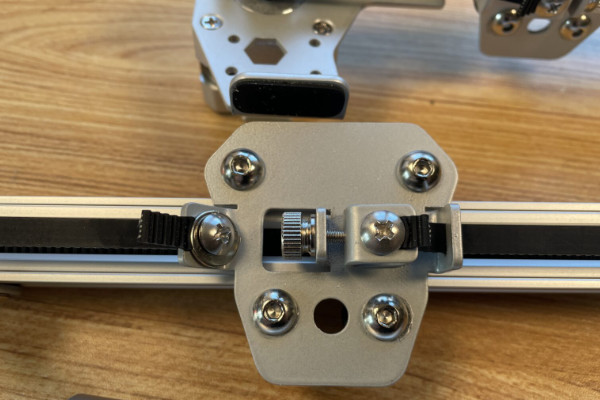
The mechanics comprise of a double Y drive, which, unfortunately is not synchronized. As a result, you can easily rotate the entire crossbar of the “X-axis” a few degrees.
Therefore, before you start any engraving work, make sure that everything is in the right angle. You can do this by letting the Y drive against the frame, and it would have to align itself.

The frames are at an angle. You have to align them to right angles before you start engraving.
On the Y axis, we have belt tensioners and on the X axis, there is a closed belt and a slot on the idler pulley. You can tighten the belt using the idler pulley.
The Aufero 2 Laser Engraver uses the same rail that the Aufero 1 has to hold the laser module. The rail is made of metal, and snags a little.
Electronics

The Aufero 2 Laser comes with the OLM ESP Pro V1.2a board, which we also saw in the Aufero 1. There is an ON/OFF button, reset button, USB socket for connecting to the PC, and socket for connecting the optionally available offline controller.
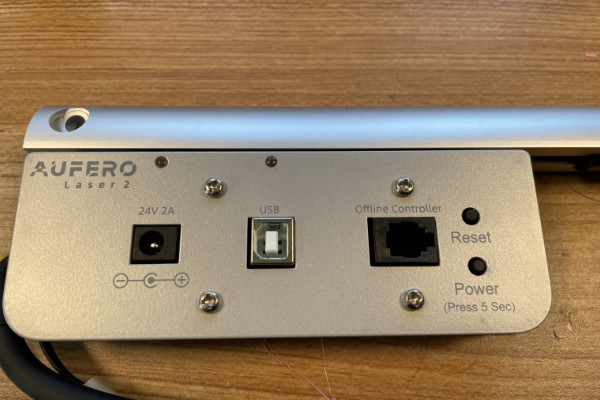
Unfortunately, the Aufero 2 does not have end stops. Therefore, you cannot set home based on the endstops. Moreover, if you’re not careful, the laser module will sometimes hit the frame because it has no idea where it is or how far it should go.
However, this is an easy issue to correct. You can simply retrofit the end stops yourself.
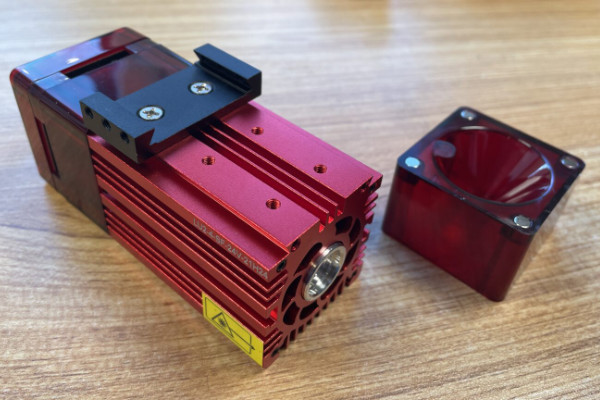
The Aufero 2 Laser can work with different laser modules. For our test, we used the LU2-10A 10W, which was also compatible with the Aufero.
If you don’t like the LU2-10A, you can also choose from the entire Ortur product range (as long as you choose a 24V version). For example, you can go with the LU2-4-LF with Air Assist nozzle & hose in a set or the 1.6 W LU2-2 for engraving without cutting.
Supported Materials
The Aufero 2 Laser can work with the following materials;
- Cut 6mm plywood
- Cut “Paulownia” (a type of tree like balsa) up to 10mm
- Cut to 6mm pine boards
- Cut cardboard up to 3mm
- Cut up to 250g/m² Kraft paper
- Cut to 5mm acrylic (black)
- Cut leather up to 0.7mm
- “Coloring” metals previously painted with Edding
- Ceramics and stone can also be colored with color transfer foil
You can see the complete list of materials that can be cut on the Ortur website.
Engraving Performance
One thing I must mention about the Aufero Laser 2 is that it’s extremely fast when it comes to engraving. The Aufero 1 is pretty fast with a maximum engraving speed of 5,000mm per minute. But with the Aufero 2, things are even faster thanks to its more robust motherboard. This unit has an engraving speed of speed to 10,000mm. That’s about 32 feet of printing per minute.
Of course, the engraving speed will largely depend on your settings, e.g., how deep you want the laser to cut. Generally, the deeper you want your cuts to be, the slower the laser will move.

The material you are engraving also determines the speed of the machine. For example, engraving stone and metal takes considerable amount of time than wood or fabric.
Also, it can be tricky to work with transparent and white surfaces since the laser will and pass through a transparent surface and bounce off a white surface. If you are planning to work with such surfaces, make sure you color them with a dark pigment. This way, the laser can heat the material and make the engraving you want.
For this review, we were testing the 10W laser head. However, the Aufero Laser 2 can also work with other laser heads (3 options) from Ortur. Depending on what you plan to do, you can order a single module or multiple modules so that you can work on various types of materials.
Let’s go through what you should expect of the different laser modules:
Image
Aufero Laser 2 Compatible Laser Modules

LU2-2 Module
The LU2-2 module has a power rating of 1,000 to 1,600mW. For the small amount of power, this unit is great for working on soft materials, such as wood, fabric, leather, etc.
The module’s laser point size is only 0.07mm x 0.06mm. Therefore, you can make detailed, high-resolution engravings with it.
LU2-4-SF
The LU2-4-SF has a rating of 4,500 to 5,500mW. Therefore, it’s more powerful than the LU2-2 module. With this module, you can make quick works on stone and metal engravings. You definitely don’t want to use it for softer fabrics because the power is too much.
But for its advantages, the unit also has one disadvantage: the laser is four times as large, at 0.12mm x 0.15mm. Therefore, when you need to make a fine engraving on a hard surface, you’ll get the best results with the slower LU2-2.
LU2-4-LF
The LU2-4-LF has the same power rating as the LU2-4-SF. However, its focal distance is significantly longer. Therefore, this module is perfect for cutting even hard materials. If you will mostly be cutting items, this is the module you want to use. Otherwise, for actual engraving, you want to go with either the LU2-4-SF or the LU2-2 module.
Test Results
The online instructions for using the Aufero 2 laser comprise of small video clips, a fairly large collection of uncommented screenshots from LaserGRBL, and various table value tables. Overall, the documentation is not comprehensive.
However, laser engraving doesn’t really require a lot of documentation like with, for example, 3D printing. So, even if you are a beginner, you’ll find the instructions good enough.
Together with the Aufero Laser 2, there is another box with a copy of the manual available online on a USB stick. There are also four board materials in the box that you can use for your tests.
Let’s now start our own tests.
The Aufero 2 is automatically recognized in LightBurn as a GRBL device with 390 x 390 mm work area. The acceleration is extremely high, so you might want to adjust it yourself. We decided to use the GRBL value table, which is on the Ortur homepage for a start. Also, make sure you turn off the auto-home feature unless you like the blocked stepper sound.
When the laser is connected and switched on, it will be on alarm status. This is intentional. You can only start using it after clicking on Stop in LightBurn.
Apart from this, the Aufero Laser 2 Engraver works great. You might get a notification on LightBurn that the maximum working range may be exceeded. We couldn’t find a way to get rid of that message. But the bottom line is that the machine works.
Focusing is fairly easy thanks to the included acrylic plate. To focus, loosen the knurled screw on the module slide. This will make the module fall onto the acrylic plate. After that, tighten the knurled screw again.
With a moderate 500mm/s and only 20% laser power, the laser module makes nice black lines in the poplar wood. I think 20% is maybe even a bit much:
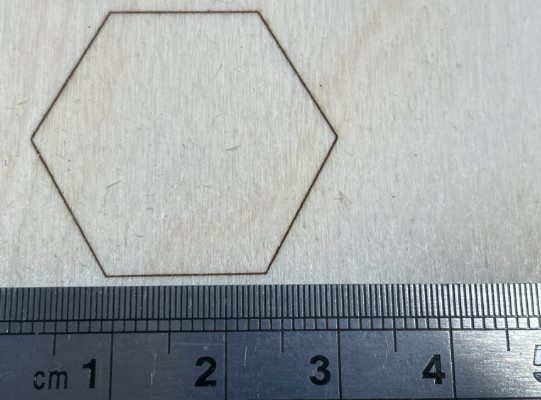
The laser module makes finer lines in the Y direction than in the X direction. The laser dot, according to Ortur is an FAC laser. Therefore, it is particularly small. The LU2-10A does not appear to be square. I’m going to say this without any judgment because I don’t know if that’s normal in this price range. However, with 10% laser power, the lasers become a bit finer, but never as powerful as the round lasers.
At times, I find working without a clearly defined zero point unusual. However, with time, I’ve gotten used to using the “Frame” function in LightBurn to see exactly where the engraving will happen.
You can also run the laser with minimum power in LightBurn, simply activate the “Fire” function in the device properties and restart LightBurn. And don’t forget to keep your hands off the home button.
And here are some of my results:
Cut 3.5mm plywood
(300mm/s 90%, 1 pass)
we see the underside

The laser cut this 3.5mm poplar plywood panel at 200mm/s with 90% laser power in 1 pass.
PS: If I cut it on the honeycomb board, the area of brown discoloration will be less. That’s why I bought such a board.
Below are a few more cuts:

I’m actually happy with the performance of this unit.
Conclusion
The LU2-4-SF module is very interesting and the OLM ESP Pro V1.2a board is fin. The frame is nice and solid, but I don’t like the Y-axis drive and the lack of endstops.
Overall, the Aufero Laser 2 is a great choice anyone looking to get started with laser engraving, or even if you have some experience in the field. The unit is easy to set up and configure (just takes 10 minutes), and easy to use.
The best thing about the unit is its speed. At 10,000mm per minute, this machine can quickly make novelty items that you may need for personal use or your small hobby workshop.
Moreover, while we used the 10W laser head, the unit can work with other Ortur laserhead options, which will allow you to get great results when engraving or cutting aa wide range of materials.
You can purchase the Aufero Laser 2 Sinismall.
BUY AT SINISMALL
