
📋 Quick Navigation
Anycubic Wash & Cure 3 Review: Everything You Need to Know
If you’ve been printing with resin for any length of time, you already know that post-processing can make or break your final results. The Anycubic Wash & Cure 3 positions itself as an all-in-one solution to eliminate the mess and guesswork from cleaning and curing your prints. But does it live up to the hype?
In this Anycubic Wash & Cure 3 review, I’ll walk you through everything from build quality and specifications to real-world performance and value for money. Whether you’re upgrading from manual washing or buying your first dedicated station, this guide will help you decide if the Wash & Cure 3 is the right fit for your workflow.
The third generation brings notable improvements over its predecessors, including better UV coverage, refined controls, and enhanced build quality. For hobbyists and miniature painters working with Photon series printers or similar resin machines, this could be the upgrade that transforms your post-processing routine from a chore into a streamlined, repeatable process.
What Is the Anycubic Wash & Cure 3?
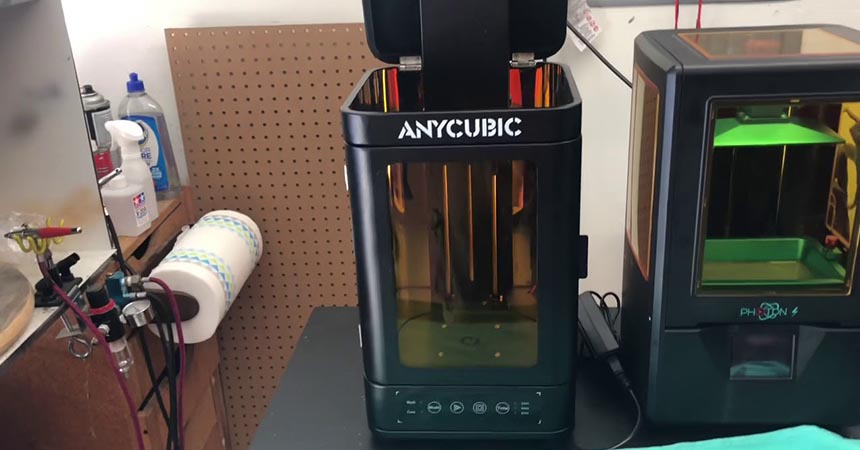
The Anycubic Wash & Cure 3 is a two-in-one post-processing station designed specifically for resin 3D prints. Instead of manually scrubbing your prints in a container of isopropyl alcohol and then moving them to a separate UV curing box, this device handles both steps in a single, compact unit.
Here’s how it fits into your typical resin workflow: after your print finishes, you remove it from the build plate, place it in the washing basket or mount it directly on the build plate adapter, and let the machine agitate it in cleaning solution for several minutes. Once clean, you switch modes, place the print on the rotating curing platform, and expose it to 360-degree UV light until fully hardened.
The Anycubic Wash and Cure 3 stands out from generic wash and cure stations through its thoughtful integration with Anycubic’s ecosystem. The build plate adapter fits most Photon series printers perfectly, and the chamber dimensions are optimized for the print volumes those machines produce. While you’ll find cheaper alternatives on the market, few match the build quality and reliability you get here.
For anyone serious about resin printing, this isn’t just a convenience item. Proper washing removes uncured resin that can remain tacky and toxic, while thorough curing ensures your prints reach their full mechanical strength and dimensional stability. The Anycubic Wash and Cure review consensus across the community has been largely positive, with users praising its consistency and ease of use.
Key Specifications & Technical Overview
Understanding the specifications helps you determine whether the Wash & Cure 3 can handle your typical print sizes and workflow demands. Here’s what you’re working with:
| Specification | Details | Notes |
|---|---|---|
| Wash Chamber Capacity | 155mm × 155mm × 180mm | Sufficient for most miniatures and small parts |
| Curing Chamber Dimensions | 165mm × 145mm × 180mm | Slightly different proportions than wash chamber |
| UV Specifications | 405nm wavelength LEDs, 360-degree array | Optimized for standard 405nm resins |
| Compatible Build Plate Size | Approx. 195mm × 120mm | Fits most Anycubic Photon series |
| Power and Footprint | 80W max, 245mm × 225mm × 360mm | Compact and desk-friendly |
For comparison shoppers, these specs position the Wash & Cure 3 as a mid-range option. It’s larger than bare-minimum units but smaller than industrial solutions, making it ideal for hobbyists who want professional results without investing in production-scale equipment.
Build Quality & Design Improvements (Wash & Cure 3.0)
The Anycubic Wash & Cure 3.0 represents a noticeable step up in construction quality compared to earlier iterations. The main body is constructed from durable ABS plastic with a matte finish that resists fingerprints and cleaning solution residue. After several months of regular use, my unit shows no signs of warping, cracking, or chemical damage from isopropyl alcohol exposure.
The lid design deserves special mention. Unlike the first-generation model, which had issues with light leakage, the Wash & Cure 3 features a double-seal lid with UV-blocking material. When the curing function is active, virtually no UV light escapes, protecting both your eyes and anything else on your workbench. The lid closes with a satisfying click and stays securely shut even during vigorous washing cycles.
The control panel has been significantly refined. You get a large, easy-to-read dial for setting wash or cure times, with clear mode indicators. The interface is intuitive enough that you won’t need to reference the manual after your first use. One minor complaint: the buttons feel slightly mushy rather than clicky, but they’re responsive enough that it doesn’t impact functionality.
What’s new in the Anycubic Wash & Cure 3.0 compared to version 2? The most significant changes include improved LED positioning for more even curing, a redesigned washing basket with finer mesh for better cleaning, and upgraded electronics that run quieter during operation. The rotating mechanism for curing also feels more robust, with less wobble and smoother motion. These incremental improvements might not sound revolutionary on paper, but they add up to a noticeably more polished experience.
What’s in the Box?
Unboxing the Wash & Cure 3 is straightforward, with everything you need to get started right away. Here’s what Anycubic includes:
The main unit comes well-packed with protective foam inserts to prevent shipping damage. Inside the washing chamber, you’ll find the metal washing basket with its fine mesh construction and sturdy handle. This basket is essential for washing prints without having them float around loose in the cleaning solution.
The rotating curing platform sits at the bottom of the chamber and features a textured surface to prevent prints from sliding during rotation. There’s also a transparent cover for the curing platform that helps contain prints and improves UV reflection for more efficient curing.
The build plate adapter is included and fits directly onto the washing basket, allowing you to wash prints while they’re still attached to the build plate. This is particularly useful for delicate prints or when you want to wash multiple prints in sequence without removing them individually.
You’ll also find a power cable appropriate for your region, along with a quick-start guide that covers basic setup and operation. While the guide is helpful, you might want to download the more detailed Anycubic Wash & Cure 3 manual from Anycubic’s website if you have specific questions about maintenance or troubleshooting. The full manual provides more thorough information about compatible cleaning solutions, recommended wash times for different resin types, and proper UV bulb care.
Notably absent from the box: cleaning solution (isopropyl alcohol or dedicated wash solution) and resin. You’ll need to provide these yourself based on your specific printing needs.
Ready to Upgrade Your Workflow?
Anycubic Wash & Cure 3 – How to Use (Step-by-Step)
Setting up and operating the Wash & Cure 3 is remarkably simple, even if you’ve never used a dedicated post-processing station before. Here’s how to get started and use it effectively.
Initial Setup: Remove all packaging materials from the washing chamber and curing platform. Place the unit on a stable, level surface away from direct sunlight. Pour your cleaning solution (typically 99% isopropyl alcohol or a dedicated resin cleaning solution) into the washing chamber until it reaches the “MAX” fill line marked inside. Don’t overfill, as this can cause spillage during agitation.
Washing Resin Prints: For prints removed from the build plate, place them in the metal washing basket. Make sure they’re secure and won’t get stuck in the mesh. Turn the control dial to “WASH” and set your desired time (typically 3-6 minutes for a first wash). Close the lid and press start. The basket will agitate back and forth, ensuring cleaning solution reaches all surfaces.
If you prefer to wash prints while still on the build plate, install the build plate adapter onto the washing basket, mount your build plate, and follow the same process. This method is excellent for delicate prints that might be damaged during removal.
Switching from Wash Mode to Cure Mode: After washing, remove your prints and allow excess cleaning solution to drip off or dab them dry with a paper towel. Remove the washing basket from the chamber and pour the used cleaning solution back into its storage container (you can reuse it multiple times until it becomes cloudy with dissolved resin).
Dry the chamber thoroughly with a clean cloth. Place your washed prints on the rotating curing platform. If you have small parts, arrange them so they don’t touch each other for maximum UV exposure.
Using the Cure Function: Turn the control dial to “CURE” and set your desired curing time (typically 2-5 minutes depending on resin type and print size). Close the lid, and press start. The platform will rotate while UV LEDs illuminate your prints from all angles. You’ll see a blue glow through the lid—this is normal and indicates the UV lights are working.
Control Dial and Timer Usage: The dial interface is graduated in one-minute increments, with maximum settings of 10 minutes for washing and 10 minutes for curing. For most standard resins, you won’t need to max out these timers. The machine will beep when the cycle completes, and the rotation or agitation will stop automatically.
For users searching Anycubic Wash and Cure 3 how to use, the key takeaway is this: it’s genuinely plug-and-play once you understand the basic wash-then-cure workflow. The hardest part is determining optimal times for your specific resin, which brings us to the next section.
How Long Should You Wash Resin Prints?
One of the most common questions from new resin printers is: Anycubic Wash and Cure how long to wash? The answer depends on several factors, but I can provide practical guidelines based on testing various resin types.
Standard Resin (Most Common): For typical 405nm standard resins from Anycubic, Elegoo, or similar brands, a wash time of 3-5 minutes in 99% isopropyl alcohol is usually sufficient. I typically do two wash cycles: the first for 3 minutes in “dirty” alcohol that’s been used before, then a second 2-minute wash in fresher alcohol for a final clean. This two-stage approach removes the bulk of uncured resin in the first wash, then polishes the surface in the second.
Water-Washable Resins: These specialized resins are designed to be cleaned with water instead of alcohol, which simplifies disposal and reduces chemical exposure. With water-washable resin, you’ll typically need 4-6 minutes of washing because water is less aggressive at dissolving uncured resin compared to alcohol. The Wash & Cure 3 handles water-washable resins perfectly—just make sure to thoroughly dry the chamber between uses to prevent corrosion.
ABS-Like and Tough Resins: Engineering resins that mimic ABS plastic properties often require slightly longer wash times, typically 4-6 minutes, because they tend to be more viscous and sticky in their uncured state. These resins benefit from the more vigorous agitation that the Wash & Cure 3 provides.
How Agitation Strength Affects Cleaning: The Wash & Cure 3’s agitation is moderately vigorous—strong enough to dislodge uncured resin from complex geometries but not so aggressive that it damages delicate features. This is one area where it outperforms DIY solutions using simple sonic cleaners, which can be too gentle, or magnetic stirrers, which can be too harsh.
Common Mistakes to Avoid: Don’t underwash thinking you’ll save time. Insufficiently washed prints will remain tacky and can cause skin irritation or allergic reactions. Conversely, overwashing (beyond 8-10 minutes) doesn’t necessarily improve cleanliness and can actually start to degrade surface detail in extreme cases. The sweet spot for most resins is that 3-5 minute range, possibly with a second wash if you’re going for showroom-perfect results.
Pay attention to your prints after washing. If they still feel sticky or have visible cloudy residue, extend your wash time by 1-2 minutes next time. If they come out perfectly clean and dry quickly, you can potentially reduce wash time to improve efficiency.
Curing Performance & Real-World Results
Curing performance is where the Wash & Cure 3 really justifies its price point. The 360-degree LED array provides remarkably even UV exposure, which is critical for achieving consistent mechanical properties and color across your entire print.
Evenness of UV Exposure: During testing with various print geometries, I found that the UV coverage is impressively uniform. The rotating platform ensures that even complex shapes with deep recesses and overhangs receive adequate exposure. I tested this by curing identical prints with and without rotation—the difference is obvious. Without rotation, you get hard outer surfaces but softer, under-cured interiors on complex models. With rotation, everything cures evenly.
Effectiveness on Detailed Miniatures: For tabletop gaming miniatures and highly detailed small prints (think 28mm scale figures with fine weapons and delicate features), the Wash & Cure 3 performs excellently. The UV wavelength is well-matched to standard miniature resins, and the curing process doesn’t create any additional brittleness or discoloration when used correctly. I’ve cured hundreds of miniatures without any yellowing or loss of detail.
Performance with Large Prints: For larger prints that nearly fill the curing chamber, performance remains consistent. The 165mm × 145mm × 180mm curing volume accommodates substantial pieces, and the LED arrangement ensures even coverage from top to bottom. However, for truly oversized prints that extend beyond these dimensions, you’ll need to cure in multiple sessions, rotating the print manually between sessions.
Rotation Platform Performance: The motorized turntable rotates smoothly at a steady pace—approximately one full rotation every 15-20 seconds. This speed is ideal for ensuring all surfaces receive equal UV exposure without creating any centrifugal force that might dislodge prints. The platform is stable with minimal vibration, and I’ve never had a print fall over during curing.
Typical Curing Times: For standard resin prints, 2-4 minutes is usually sufficient for initial curing. I typically cure for 3 minutes as a baseline, then add an additional 1-2 minutes for particularly thick or dense prints. Functional parts that will experience mechanical stress benefit from a longer cure—up to 5 minutes—to maximize strength. Flexible resins require shorter cure times (1.5-2.5 minutes) to maintain their intended flexibility.
Visual and Tactile Results: Properly cured prints come out of the Wash & Cure 3 fully hardened with a consistent surface finish. You should be able to tap them with your fingernail without leaving an impression. The surface should be smooth and dry, not tacky. Colors remain true to the resin’s original hue—I’ve noticed no yellowing or color shift with proper curing times. Overcuring (beyond 8-10 minutes) can cause yellowing and brittleness, so resist the temptation to cure excessively.
The real test of curing quality comes weeks and months later. Prints cured in the Wash & Cure 3 maintain their hardness and dimensional stability over time, with no delayed curing reactions or gradual softening that you sometimes see with undercured prints.
Software, Firmware & Downloads
This is an area where the Anycubic Wash & Cure 3 keeps things refreshingly simple, though it can cause confusion for users expecting a more complex device.
Does the Anycubic Wash & Cure 3 Require Software? No. The Wash & Cure 3 is a standalone mechanical device with a simple electronic control system. There’s no companion app, no Wi-Fi connectivity, and no computer required. You control everything through the physical dial and buttons on the front panel. This is actually a strength rather than a limitation—it means one less thing that can crash, require updates, or become obsolete.
Clarifying Common Confusion Around Anycubic Wash & Cure 3 Software Download: Many users search for Anycubic Wash & Cure 3 software download, but this is based on a misunderstanding. You don’t need to download any software to operate the unit. What you might be looking for is the digital version of the user manual or product specifications, which are available as PDF downloads from Anycubic’s website. These documents are helpful for reference but aren’t required for operation.
Firmware Update Process: Unlike Anycubic’s 3D printers, the Wash & Cure 3 doesn’t have updateable firmware. The control system is simple enough that it doesn’t require or benefit from firmware updates. This is consistent with most wash and cure stations on the market—they’re mechanical devices with basic electronic controls, not smart devices.
Where to Find Official Resources and Manuals Safely: For the official user manual, safety information, and technical specifications, visit Anycubic’s official website and navigate to the Support or Downloads section. Search for “Wash & Cure 3” to find the relevant documentation. Avoid downloading files from third-party sites, as these may be outdated or contain incorrect information. The official manual is available in multiple languages and includes detailed safety guidelines, recommended cleaning solutions, and basic troubleshooting.
If you encounter any issues with your unit, Anycubic’s customer support can be reached through their official website. Common issues like the unit not powering on or the rotation platform not spinning are usually simple to resolve with guidance from the manual or support team.
Anycubic Wash & Cure 3 Price & Value for Money
Pricing is always relative to what you’re comparing against, so let’s break down what you’re actually getting for your money with the Anycubic Wash & Cure 3.
Current Market Price Range: At the time of writing, the Anycubic Wash & Cure 3 price typically falls between $140-$180 USD, depending on retailer and any ongoing promotions. This positions it in the mid-range category—not the cheapest option available, but far from the most expensive. Prices can fluctuate during major sales events like Black Friday or Prime Day, where you might find it discounted by 15-25%.
What You’re Paying For vs Competitors: At this price point, you’re getting a well-engineered device from an established brand with reliable customer support. Compare this to generic no-name wash and cure stations at $80-$100, which often suffer from poor UV LED quality, flimsy construction, and inadequate customer support. On the other end, premium units from brands like Elegoo or PRUSA can run $200-$300, offering slightly larger chambers or additional features, but with diminishing returns for hobbyist use.
The Wash & Cure 3’s value proposition centers on reliability and convenience. You’re not just buying plastic housing and some UV LEDs—you’re buying consistency. Every print washes and cures the same way, with predictable results. For serious hobbyists who print regularly, this consistency is worth the premium over budget alternatives.
Cost Compared to Buying Separate Wash and Cure Machines: If you were to purchase standalone units, a decent ultrasonic cleaner runs $50-$80, and a dedicated UV curing station costs $60-$100. You’re looking at $110-$180 for separate units, plus the hassle of managing two devices, two power cables, and twice the desk space. The Wash & Cure 3 consolidates everything into one footprint while offering better UV coverage than many standalone curing boxes.
Long-Term Value Considerations: The UV LEDs are rated for thousands of hours and aren’t user-replaceable, so the lifespan of the unit is essentially the lifespan of the LEDs. Based on typical hobbyist usage (10-20 curing cycles per week), you’re looking at several years of reliable service. The mechanical components—the agitation motor and rotation platform—are the most likely failure points, but quality control has been good on recent production runs.
Is It Worth It? For casual printers who do one or two prints per month, the Wash & Cure 3 might be overkill. A bucket of alcohol and some sunshine can suffice. But for anyone printing weekly or more frequently, the time savings, consistency, and improved results easily justify the investment. You’ll also find that proper washing and curing reduces print failures from improper post-processing, saving you money on wasted resin over time.
Anycubic Wash & Cure 3 vs Plus
Choosing between the standard Anycubic Wash & Cure 3 vs Plus comes down to your typical print sizes and how much desk space you’re willing to dedicate to post-processing.
Size and Capacity Differences: The Plus model offers significantly larger chambers—the washing basket accommodates prints up to 192mm × 192mm × 290mm, while the curing chamber measures 200mm × 200mm × 300mm. That’s roughly 65% more volume than the standard model. If you regularly print large terrain pieces, full-size helmets, or production runs of larger functional parts, the extra capacity is genuinely useful. For miniature painters and small-part hobbyists, the standard model’s 155mm × 155mm × 180mm wash capacity handles everything you’ll throw at it.
Performance Comparison: Both models use the same 405nm UV LED technology and wavelength, so curing quality is essentially identical. The Plus has more LEDs to cover its larger chamber, maintaining the same even coverage you get in the standard model. Washing agitation is similar between the two, with the Plus’s basket moving through a larger range but at comparable vigor. In practical terms, a print that takes 3 minutes to wash in the standard model will take 3 minutes in the Plus—capacity doesn’t affect washing time, only the size of what you can wash.
Price Difference and Value: The Plus typically retails for $200-$250, about $50-$80 more than the standard model. That’s a 30-40% price premium for 65% more capacity. From a pure value perspective, the Plus offers more chamber volume per dollar, but only if you actually need that extra space. Empty space in a larger chamber doesn’t add value if you’re only washing miniatures.
Who Should Choose the Standard Version: If your typical prints fit comfortably within a 150mm × 150mm × 170mm envelope, the standard Wash & Cure 3 is the smarter choice. It takes up less desk space, costs less, and delivers identical results to the Plus on prints within its capacity. This includes most miniatures, jewelry, dental models, small functional parts, and anything printed on machines like the Photon Mono, Mono X, or similar mid-sized printers.
Who Should Choose the Plus: Consider upgrading to the Plus if you regularly print large terrain pieces, cosplay armor components, full-scale helmets, or production runs where you need to batch-process multiple prints simultaneously. The Plus also makes sense if you own or plan to own a large-format resin printer like the Photon Mono X 6K, where print dimensions routinely exceed the standard model’s capacity.
The Compromise Position: Some users buy the standard model first and upgrade to the Plus later if their printing needs evolve. This is a reasonable approach since both units have good resale value in the used market. You’re not locked into a permanent decision.
Bottom Line: For 80% of hobbyist users, the standard Wash & Cure 3 hits the sweet spot of capacity, performance, and price. The Plus is excellent, but it’s a specialized tool for larger prints or higher volume workflows.
Pros and Cons
After months of testing and hundreds of prints processed, here’s my honest assessment of the Wash & Cure 3’s strengths and limitations.
Pros
Ease of Use: This is perhaps the biggest advantage. Setup takes minutes, operation is intuitive, and you don’t need to reference the manual after your first use. The dial-based interface is foolproof—turn to wash or cure, set your time, press start. Even complete beginners can achieve professional results immediately.
Build Quality: The construction is solid and durable. The UV-blocking lid seals properly, the washing basket is robust metal mesh rather than flimsy plastic, and the rotation platform spins smoothly without wobble. After extensive use, there’s no wear or deterioration visible on any components.
Effective Washing and Curing: This is what you’re buying the device for, and it delivers. Washing agitation thoroughly cleans complex geometries, and the 360-degree UV coverage cures prints evenly from all angles. Results are consistent and repeatable—once you dial in your times for a particular resin, every print comes out identically.
Good Compatibility with Anycubic Resin Printers: The build plate adapter fits all Photon series machines perfectly, and the chamber dimensions are well-matched to the print volumes those printers produce. You get the feeling that Anycubic actually tested this with their own printers, which isn’t always the case with third-party accessories.
Compact Footprint: Despite being a two-in-one device, it doesn’t dominate your workspace. The roughly 245mm × 225mm × 360mm dimensions fit comfortably on most desks, and the vertical orientation minimizes the horizontal footprint.
Reliable Timer System: The mechanical timer is simple but effective. It automatically shuts off when the cycle completes, so you’re not monitoring it constantly or worrying about over-curing prints.
Cons
Capacity Limitations for Very Large Prints: The 155mm × 155mm × 180mm washing capacity is adequate for most hobbyist prints, but if you regularly produce large terrain pieces or full-scale functional parts, you’ll find yourself working in batches or considering the Plus model. This isn’t a flaw per se, but a limitation to be aware of.
Noise Level: During washing, the agitation motor produces a noticeable hum and the basket moving back and forth creates some mechanical noise. It’s not excessively loud—you can hold a conversation over it—but it’s not whisper-quiet either. If your printing space is in a bedroom or shared living area, you might find the 3-5 minutes of washing noise mildly annoying. The curing function is much quieter, with only the soft whir of the rotation motor.
Not Ideal for Production-Scale Workflows: If you’re running a small business or print shop processing dozens of prints daily, the single-print-at-a-time nature of the Wash & Cure 3 will be a bottleneck. Production environments need either multiple units or industrial-scale washing and curing solutions. This is a hobbyist device, and that’s reflected in the throughput capacity.
No Automation or Smart Features: There’s no timer memory, no preset programs for different resin types, no smartphone integration, and no automatic switching from wash to cure mode. Every cycle requires manual setup. While I personally prefer the simplicity, users who want “set it and forget it” automation will be disappointed.
Cleaning Solution Not Included: This is more of a minor inconvenience than a real con, but you’ll need to purchase isopropyl alcohol or dedicated cleaning solution separately, which adds to the initial investment.
Who Should Buy the Anycubic Wash & Cure 3?
The Wash & Cure 3 isn’t for everyone, but it’s ideal for specific user profiles and printing situations.
Best for Hobbyists: If you’re printing for enjoyment rather than production—whether that’s miniatures for tabletop gaming, small figurines, jewelry, props, or prototypes—this device is perfectly suited to your needs. The capacity and throughput match typical hobbyist volume, and the price point is accessible without being a major investment.
Miniature and Tabletop Gaming Enthusiasts: The chamber dimensions were practically designed with 28mm-32mm miniatures in mind. You can wash and cure multiple miniatures simultaneously in the basket, and the even UV coverage ensures consistent results across entire armies. Detail preservation during washing is excellent, so you won’t lose fine features on weapons or faces.
Small-to-Medium Resin Print Focus: If your typical prints range from 50mm to 150mm in any dimension, the Wash & Cure 3 handles them effortlessly. This covers a huge range of applications: dental models, hearing aid shells, jewelry prototypes, small mechanical parts, architectural models, and most figurative sculpture.
Ideal Printer Pairings: The Wash & Cure 3 is the perfect companion for printers like the Anycubic Photon Mono, Mono X, Mono SE, and similar build-volume machines from other manufacturers. If your printer’s build plate is 150mm or smaller in any dimension, the Wash & Cure 3 can process everything you produce. Owners of the Photon Mono 4K, Mars 2, or comparable machines will find this an ideal match.
First-Time Buyers: If you’re transitioning from manual washing (the notorious “jar of alcohol” method) or makeshift curing setups (sunlight, UV flashlights, etc.), the Wash & Cure 3 is an excellent first dedicated post-processing station. It’s simple enough to not be intimidating, reliable enough to not frustrate you, and effective enough to noticeably improve your results.
Who Should Consider Upgrading to Plus Instead: If you regularly print terrain pieces that fill a 190mm+ build plate, create cosplay armor sections, or produce larger functional parts, look at the Plus model. The extra chamber volume justifies the additional cost for users who consistently work at larger scales. Also, if you frequently batch-process multiple prints and need to wash several medium-sized prints simultaneously, the Plus’s larger basket accommodates more items at once.
Who Shouldn’t Buy This: If you only print one or two items per month, you might not need a dedicated station at all—manual washing and outdoor UV exposure can suffice. Similarly, if you’re running a production operation processing hundreds of prints weekly, you need industrial solutions with higher throughput. The Wash & Cure 3 occupies the sweet spot for active hobbyists, not casual experimenters or commercial operations.
Final Verdict – Is the Anycubic Wash & Cure 3 Worth It?
🏆 FINAL VERDICT: HIGHLY RECOMMENDED
For active resin printing hobbyists, the Anycubic Wash & Cure 3 is an excellent investment that delivers professional results with remarkable consistency. It streamlines post-processing, reduces mess, and improves print quality—worth every penny for regular users.
After extensive testing across different resins, print sizes, and usage patterns, I can confidently say the Anycubic Wash & Cure 3 is a solid investment for the right user.
What It Does Well: This device excels at its core functions—washing and curing resin prints with consistency and reliability. The build quality inspires confidence, the interface is refreshingly simple, and the results are professional. You’ll notice the improvement immediately if you’re coming from manual processing methods. Your prints will be cleaner, more thoroughly cured, and finished faster with less mess.
Value Proposition: At $140-$180, the Wash & Cure 3 represents good value for active hobbyists. You’re paying for convenience, consistency, and time savings—all of which compound over months and years of printing. The device pays for itself in reduced frustration and improved success rates, especially when you consider that improper washing or curing can ruin an otherwise perfect print.
Who Gets the Most Value: Regular printers who process multiple items weekly will find this invaluable. If you’re printing miniatures for tabletop gaming, creating jewelry prototypes, or working on iterative design projects, the Wash & Cure 3 becomes an essential part of your workflow. The repeatability it provides means you can focus on printing and painting rather than troubleshooting inconsistent post-processing results.
Quick Recommendation Summary: Buy the Wash & Cure 3 if you print regularly with resin, value consistency over manual effort, and work primarily with prints under 150mm in any dimension. Consider the Plus if you need larger capacity. Skip it if you’re a very casual printer or running production-scale operations.
Room for Improvement: While the Wash & Cure 3 is excellent for its intended purpose, I’d love to see future iterations include timer memory presets, slightly larger capacity without increasing footprint, and perhaps quieter agitation motors. These would be refinements rather than fixes, as the current design is fundamentally sound.
The Bottom Line: For hobbyists and miniature enthusiasts looking to streamline their resin printing workflow, the Anycubic Wash & Cure 3 delivers professional results in a user-friendly package. It’s not perfect, but its combination of build quality, performance, and ease of use makes it easy to recommend. If you’re on the fence about adding a dedicated wash and cure station to your setup, this is a safe bet that you’re unlikely to regret.
Ready to Transform Your Resin Workflow?
Click below to get your Anycubic Wash & Cure 3 today!
Frequently Asked Questions
99% isopropyl alcohol (IPA) is recommended for best results with standard resins. 91% IPA works but is less effective and requires longer wash times. Avoid 70% IPA as it contains too much water. For water-washable resins, use regular tap water.
Yes. Dedicated resin cleaning solutions like Mean Green or Simple Green (diluted) work well with water-washable resins. Some users prefer these for reduced fumes and easier disposal. Always check your resin manufacturer’s recommendations.
Replace IPA when it becomes cloudy or stops cleaning effectively—typically after 10-20 prints depending on size. You can extend its life by filtering out dissolved resin or allowing contaminated IPA to sit in sunlight, which cures suspended resin for easier filtering.
The lid blocks virtually all UV light when closed. Never operate the unit with the lid open during curing. If the lid is damaged or doesn’t close properly, discontinue use and contact Anycubic support.
It’s better to let prints drip dry or pat them with a paper towel first. Excess alcohol or water on the print surface can interfere with curing efficiency. A quick 30-second air-dry is usually sufficient.
The included adapter fits most Anycubic Photon series printers and many other brands with similar mounting systems. Check the specifications for maximum build plate dimensions: 195mm × 120mm.
Don’t let post-processing hold you back! Get perfect results every time with the Anycubic Wash & Cure 3.
