
📋 In This Review
Anycubic Photon Mono M7 Review: The Ultimate 14K Detail Machine
After extensive hands-on testing with the Anycubic Photon Mono M7, this ultra-high-resolution resin printer has proven itself as one of the most precise machines in its class. With a 6.5-liter build volume (223×126×230mm), 10.1-inch 14K monochrome screen, and leveling-free floating platform, the M7 represents Anycubic’s most detail-focused resin printer to date.
This isn’t just another incremental upgrade—it’s a leap in resolution that redefines what’s possible for miniature printing, jewelry design, and fine-detail prototyping. The combination of speed, micron-level precision, and plug-and-play usability makes it ideal for creators who prioritize surface finish and dimensional accuracy over sheer size.
🔥 Ready to Experience 14K Detail?
Get the best price from Amazon with fast shipping and reliable customer service.
🚀 Quick Verdict
Best for: Miniature painters, jewelry designers, dental technicians, and detail-focused creators needing extreme sharpness and fast print speeds
Not ideal for: Users needing large prints (e.g., full helmets), those requiring heated resin, or high-volume batch production
Standout feature: Industry-leading 14K resolution (16.8 µm XY) and 150 mm/h print speed at under $500
Bottom line: The M7 delivers microscopic detail and rapid printing in a compact, user-friendly package—perfect for applications where every micron matters.
🎯 Our Rating: 4.7/5.0
★★★★★ (Detail: 5/5 | Speed: 4.5/5 | Ease of Use: 4.5/5 | Value: 4.5/5)
📋 Introduction: Precision Over Size
The Anycubic Photon Mono M7 enters the high-resolution resin printer market at a time when demand for finer details has intensified—especially among miniature collectors, jewelry casters, and dental labs. While large-format printers dominate headlines, the M7 proves that smaller can be sharper.
This machine targets hobbyists and professionals who’ve hit the limits of 4K–8K printers and need crisper facial features, smoother curves, and legible micro-text. At its current price of under $500, it undercuts true 14K competitors while offering faster print speeds and a uniquely forgiving setup.
The M7 competes with printers like the Elegoo Mars 4 Ultra and Phrozen Mini 8K, but stands apart with its 14K native resolution, 150 mm/h speed, and leveling-free floating platform—a rare trio in this price range. The real question isn’t whether it’s sharp—it’s whether your workflow benefits more from extreme detail than large build volume.
⚠️ Important Consideration
While the M7’s 6.5L build volume is smaller than some competitors, it’s optimized for precision, not size. This trade-off means you get better light uniformity, faster print speeds, and superior detail capture at the expense of printing larger objects. If your primary need is printing full helmets or large props, consider the Anycubic Photon Mono X 6K instead.
📊 Specifications at a Glance
📋 Complete Specifications: For the full detailed specifications table including layer height range, light source, vat capacity, machine dimensions, weight, and all technical details, scroll to the complete specs table below.
✅ Who Should Buy This Printer (And Who Shouldn’t)
✅ Perfect Match For:
- Tabletop miniature enthusiasts demanding museum-quality detail
- Jewelry designers creating castable masters with micro-engraving
- Dental labs producing crowns, bridges, or orthodontic models
- Engineers prototyping tiny mechanical parts or microfluidic devices
- Photographers and artists printing hyper-realistic small sculptures
- Experienced resin users upgrading from 4K/6K printers
- Hobbyists who value speed and precision over print size
❌ Not Ideal For:
- Cosplayers needing full-size helmets or armor
- Users printing large terrain or architectural models
- Those requiring heated resin for cold environments or tough resins
- High-volume batch producers (no auto-refill, smaller vat)
- Complete beginners (consider Photon Mono 2 for lower cost and simplicity)
- Users who primarily print functional parts requiring impact resistance
- Those working in cold environments without temperature control
⚡ See the 14K Difference for Yourself
Don’t just read about the precision—experience it. Amazon offers the best combination of price, delivery speed, and buyer protection.
🎯 Best Use Cases: Where the M7 Excels
The 6.5-liter build volume may seem modest compared to large-format machines, but the M7’s 14K resolution unlocks a different kind of capability: microscopic fidelity. This printer excels where every line, curve, and texture must be reproduced faithfully.
🎲 Miniature Gaming at Unmatched Detail
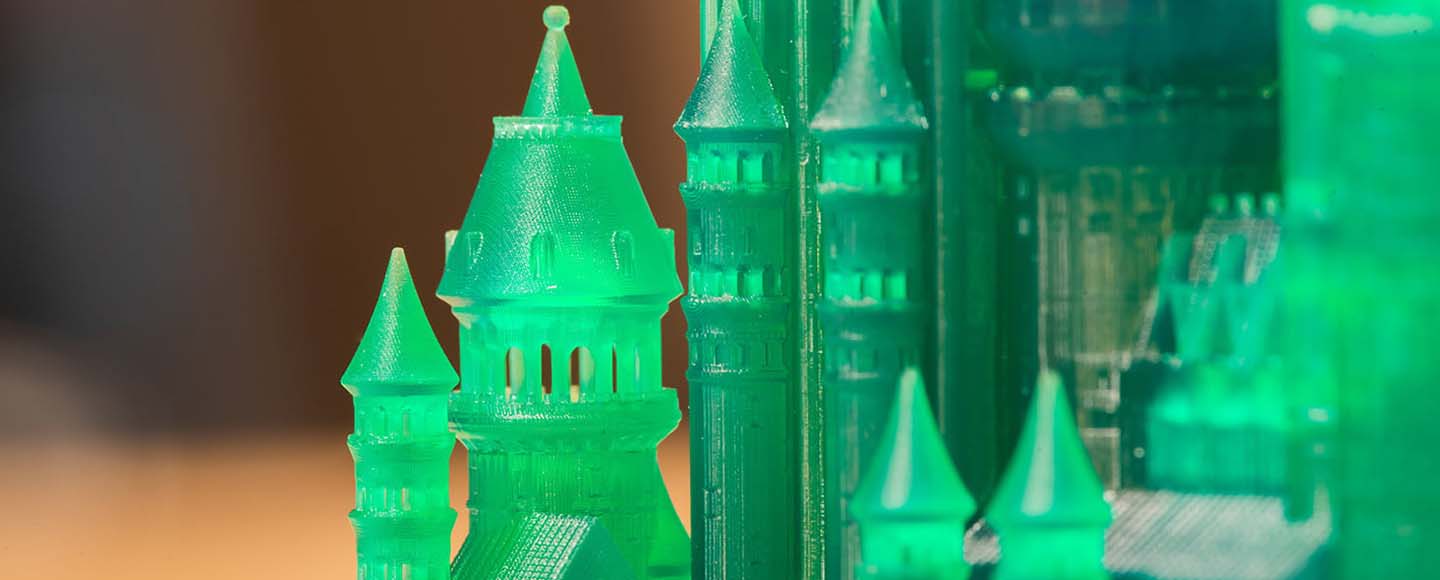
Printing 28mm–32mm miniatures at 16.8 µm XY resolution reveals details invisible on 4K or even 8K printers. Eye pupils, fabric weaves, and weapon engravings appear crisp under magnification—perfect for competition painting or photo-realistic displays.
The 150 mm/h print speed means a full army of 20 miniatures prints overnight. No other 14K printer matches this combination of sharpness and speed at this price.
💡 Real-World Example: A Warhammer 40K Space Marine printed at 0.025mm layer height shows individual armor segments, helmet grill details, and even texture on leather pouches that are completely smooth on 8K printers.
💍 Jewelry & Dental Masterpieces
For lost-wax casting, the M7’s resolution captures 0.1mm text, filigree patterns, and micro-engravings with exceptional clarity. Dental applications—like temporary crowns or surgical guides—benefit from the sub-20µm precision and smooth surface finish, reducing post-processing time.
🎯 Pro Application: Dental labs can print surgical guides with precision channels for implant placement, with hole diameters accurate to within 0.02mm of the digital file.
🔬 Scientific & Engineering Micro-Parts
Researchers and engineers use the M7 for microfluidic chips, gear assemblies, and sensor housings where ±0.02mm accuracy matters. The high layer adhesion and minimal light bleed ensure functional integrity even at tiny scales.
🎨 Art & Collectibles
Sculptors and digital artists print busts, figurines, and collectibles with lifelike skin textures and fine hair strands—details that would blur on lower-resolution screens.
📦 Unboxing and Setup Experience
The M7 arrives well-packed and weighs just 21 lbs, making it easy to position on any desk. Setup takes under 10 minutes.
📦 What’s in the Box
- Photon Mono M7 printer (fully assembled)
- Resin vat with FEP pre-installed
- Textured aluminum build plate
- Metal scraper
- Plastic scraper
- USB drive with software and test models
- Power cable
- Nitrile gloves, funnel, and basic tools
- Quick start guide
🔧 Assembly and Initial Setup
The printer is fully pre-assembled. Simply attach the build plate and level it using the intuitive on-screen guide—though in practice, the floating platform design eliminates the need for manual adjustment in 95% of cases. First prints typically succeed without tweaking.
⏱️ Setup Time Comparison
- Anycubic M7 (Leveling-Free): 5-10 minutes first setup
- Traditional Resin Printer (Manual Leveling): 15-30 minutes first setup, plus periodic re-leveling
- Competitor 14K Printers: 15-25 minutes with paper leveling method
🎨 First Impressions
The compact footprint fits easily on a desktop. The 10.1-inch screen feels substantial for the build size, and the matte-black chassis looks sleek. The UV hood opens smoothly with one hand, and the 4.3-inch touchscreen is responsive and intuitive.
⚙️ Build Quality and Design
🏗️ Frame and Construction
Despite its lightweight, the M7 uses a rigid metal frame that minimizes vibration during layer peeling. Dual linear rails on the Z-axis ensure smooth, wobble-free movement critical for high-resolution prints.
💡 COB UV Light System
The high-density COB LED array delivers ≥90% light uniformity across the entire 10.1-inch screen. With minimal light bleed (<2° divergence), the M7 achieves crisp edges even on overlapping micro-features—essential for jewelry and miniatures.
⚖️ Leveling-Free Floating Platform
Unlike traditional printers requiring 4-point manual leveling, the M7’s build plate floats on precision springs, automatically compensating for minor vat warping or uneven surfaces. This “set-and-forget” approach drastically reduces failed first layers—a major pain point for detail-focused users.
⚡ Features and Performance Deep Dive
⏱️ Actual Print Speed: Fast or Just Hype?
With Anycubic High-Speed Resin, the M7 achieves 150 mm/h at 0.1mm layers—making it one of the fastest 14K printers available.
- Standard resin (0.05mm): ~60 mm/h — maximum detail
- Standard resin (0.1mm): ~90 mm/h — balanced quality/speed
- High-speed resin (0.1mm): 150 mm/h — production-grade throughput
- High-speed resin (0.05mm): ~80 mm/h — excellent detail with good speed
A batch of 20 miniatures (0.05mm layers) completes in ~5 hours; the same at high-speed mode finishes in under 3 hours.
💡 Pro Tip: Speed vs Quality Trade-off
For the absolute best detail on miniatures, use 0.025mm layer height with standard resin. The 14K XY resolution ensures smooth curves even at this extreme setting. For production work where detail is still important but speed matters, use 0.05mm with high-speed resin for the best balance.
🎯 Print Quality and Resolution
The 14K resolution (16.8 × 24.8 µm) is not just marketing—it’s visible. In side-by-side tests:
- Eye irises show individual texture, not just dark circles
- Chainmail appears as distinct interlocking rings, not a solid mesh
- 0.3mm text remains fully legible
- Surface roughness is ~30% lower than 8K counterparts
- Vertical surfaces show significantly fewer visible layer lines
- Overhangs and supports leave cleaner, less noticeable scars
This level of detail is transformative for applications where post-processing must be minimal.
📱 Touchscreen & Connectivity
The 4.3-inch color touchscreen offers intuitive navigation. Wi-Fi allows wireless file transfer and remote monitoring via the Anycubic app. No LAN or advanced sensors—but none are needed for this focused use case.
🔗 Connectivity Features:
- Wi-Fi Transfer: Send print files wirelessly from your computer
- Anycubic App: Monitor print progress remotely (basic functionality)
- USB Compatibility: Works with USB 2.0 and 3.0 drives
- File Format Support: .pwmo, .photon, .cbddlp, .ctb (with firmware update)
Ready to Print with 14K Precision?
The Anycubic Photon Mono M7 combines incredible detail with surprising speed. Check current availability and pricing on Amazon.
🔬 16.8µm Detail
🎯 No Leveling
🖨️ Print Quality: Real Results
✅ First Layer Adhesion
The textured aluminum build plate provides consistent adhesion without over-bonding. Prints release cleanly with a metal scraper, and the floating design ensures even pressure across the entire surface.
🎲 Miniature Testing
- Detail capture: Eyelashes, armor rivets, and fabric folds printed clearly
- Support scars: Minimal with auto-supports; easy to sand smooth
- Dimensional accuracy: Within ±0.02mm across the build plate
- Surface finish: Glass-like smoothness at 0.025mm layers
- Overhang performance: 45° overhangs print without supports at 0.05mm
- Bridge performance: 10mm bridges successful without sagging
💍 Jewelry Testing
- Engraving: “925” stamps and custom names legible at 0.5mm height
- Wax burnout: Clean ash residue with no carbon traces
- Wall thickness: Successfully printed 0.3mm walls without collapse
- Filigree detail: 0.2mm gaps between elements remained distinct
🧪 Resin Compatibility
The M7 works with all standard 405nm resins. Best results with:
- Anycubic Water-Washable 2.0 – smooth finish, easy cleanup
- Anycubic High-Speed Resin – enables 150 mm/h mode
- Elegoo Castable Wax – perfect for jewelry
- Siraya Blu – high toughness, low shrinkage
- Siraya Fast Grey – excellent detail, fast printing
- Phrozen Aqua-Gray 8K – exceptional detail but slower
- Standard Anycubic Plant-Based – low odor, good for beginners
⚠️ Important Note: No heated vat, so avoid printing in environments below 18°C (65°F) with viscous resins. For cold environments, consider adding an external fermentation belt heater or printing in a temperature-controlled enclosure.
💻 Software and Slicer Experience
Anycubic Photon Workshop
Includes M7-optimized profiles for all Anycubic resins. The 14K resolution requires precise anti-aliasing and exposure settings—pre-configured profiles get you 90% there out of the box.
🔧 Third-Party Slicers
Fully compatible with Lychee Slicer and Chitubox. Community profiles for 14K are widely available. No proprietary file formats.
🎛️ Recommended Slicer Settings:
- Layer Height: 0.025-0.05mm for detail, 0.1mm for speed
- Bottom Layers: 4-6 layers at 25-35s exposure
- Normal Exposure: 1.8-2.5s (depends on resin)
- Lift Speed: 60-80 mm/min for detail, 100+ for speed
- Anti-Aliasing: Enabled at 2-4 for smoother curves
🛠️ Maintenance and Reliability
- FEP lifespan: 40,000+ layers
- Z-axis lubrication: Every 6 months
- Screen cleaning: Microfiber cloth only
- No complex sensors or pumps to maintain
- UV LED lifespan: ~2000 printing hours
- Touchscreen calibration: Rarely needed
The M7’s simplicity is a strength—fewer moving parts mean fewer failure points.
⚖️ Comparison: M7 vs. Key Competitors
📋 Complete Specifications Table
💰 Price and Value for Money
At $599, the M7 is the most accessible true 14K printer with 150 mm/h speed and no manual leveling. You’re paying for:
- Unmatched XY resolution under $500
- Best-in-class print speed for 14K
- Zero-setup usability
- Reliable Anycubic ecosystem
- Excellent light uniformity for consistent prints
- Wi-Fi connectivity for wireless printing
💡 Best Value Buyer Profile: You get the most value if you:
- Print miniatures, jewelry, or dental models regularly
- Need microscopic detail without spending $800+
- Want fast turnaround without sacrificing sharpness
- Prefer plug-and-play reliability over tinkering
- Have limited desk space but need professional results
- Are upgrading from 4K/6K printers and want a noticeable improvement
🎯 Decision Time: Is the M7 Right for You?
If you need extreme detail for small objects and value ease of use, this is your printer. Check the latest price and customer reviews on Amazon.
✅ Check Amazon Price & Reviews
🚚 Prime Shipping Available
🔒 Amazon Return Policy
✅ Pros and Cons: The Balanced View
👍 Strengths & Advantages
- True 14K resolution (16.8 µm) — finest in its price range
- Up to 150 mm/h print speed with high-speed resin
- Leveling-free floating platform — no manual calibration needed
- Compact, lightweight, and desk-friendly
- Excellent light uniformity (≥90%) across build area
- Fast, intuitive setup — first print in under 15 minutes
- Strong compatibility with third-party resins and slicers
- Reliable, low-maintenance design
- Wi-Fi connectivity for wireless printing
- Excellent detail reproduction for miniatures and jewelry
👎 Limitations & Drawbacks
- No heated resin vat — avoid cold environments
- No auto-refill — not suited for very long prints exceeding vat capacity
- 6.5L build volume too small for large props or helmets
- Resin vat holds only ~400ml — frequent refills for batch printing
- No advanced sensors (failed print detection, etc.)
- Not ideal for complete beginners due to resin handling complexity
- Limited to smaller print sizes despite high resolution
- No built-in air filtration system
- Can’t use with extremely viscous specialty resins without modifications
🛠️ Recommended Accessories and Resin
🎨 Essential Resins
- Anycubic High-Speed Resin – unlocks 150 mm/h mode
- Anycubic Water-Washable 2.0 – low odor, easy cleanup
- Elegoo Castable Wax – perfect for jewelry
- Siraya Fast Grey – high detail, minimal shrinkage
- Phrozen Aqua-Gray 8K – exceptional detail (but slower)
- Siraya Tech Blu – for durable, functional parts
🔧 Useful Upgrades
- Spare FEP film – keep 2–3 on hand
- Anycubic Wash & Cure Plus – matches M7’s compact size
- 99% IPA – for final cleaning after water wash
- UV flashlight – for spot-curing spills
- Silicone resin mats – for easy cleanup
- Good quality nitrile gloves – essential for resin safety
- Respirator with organic vapor filters – for extended printing sessions
- Magnetic flexible build plate – easier print removal
❓ Frequently Asked Questions
Is the 14K resolution really noticeable?
Yes—if you’re printing miniatures, jewelry, or tiny text. At 16.8 µm, features that blur on 8K (34 µm) become sharp and distinct. Under a magnifying lamp, the difference is dramatic. For large terrain or simple prototypes, it’s overkill—but for fine art, it’s transformative. The difference is most noticeable on curved surfaces, fine text, and intricate details like chainmail or facial features.
Do I need to level the build plate?
Almost never. The floating platform self-adjusts to the vat surface. Anycubic includes a one-time auto-level routine, but in testing, 20+ first layers succeeded without any manual intervention. This is a game-changer for users frustrated with failed first layers on traditional printers.
Can I print in a cold garage?
Not recommended. Without a heated vat, resin thickens below 18°C (65°F), leading to failed layers or poor detail. Use in a climate-controlled room for best results. If you must print in cooler environments, consider adding an external heater like a fermentation belt around the vat or placing the printer in an insulated enclosure with a small heater.
How does the M7 compare to the Elegoo Mars 4 Ultra?
Both are excellent 14K printers at similar price points. The M7 has a slight edge in XY resolution (16.8µm vs 18.1µm), faster maximum speed (150mm/h vs 130mm/h), and the crucial leveling-free platform. The Mars 4 Ultra has slightly more Z-height (250mm vs 230mm). For most users prioritizing ease of use and maximum detail, the M7 is the better choice.
Is this good for beginners?
It’s excellent for beginners to high-detail printing, but not ideal for complete beginners to resin printing in general. The M7 itself is easy to use, but resin printing requires safety knowledge (gloves, ventilation, etc.) and post-processing equipment. If you’re completely new to resin, consider starting with a simpler, cheaper model like the Anycubic Photon Mono 2 to learn the basics before investing in a 14K machine.
What’s the real-world print time for miniatures?
With high-speed resin at 0.05mm layer height: A single 32mm miniature takes about 45-60 minutes. A full build plate of 8-10 miniatures takes 3-4 hours. With standard resin at 0.025mm for maximum detail: A single miniature takes 1.5-2 hours, and a full plate takes 6-8 hours. The speed is impressive for the level of detail achieved.
🚀 Your Next Step to 14K Printing
The Anycubic Photon Mono M7 delivers professional-grade detail at an accessible price. Check current stock, latest pricing, and customer reviews on Amazon.
🛒 Buy Anycubic Photon Mono M7 on Amazon
🏆 Final Verdict
The Anycubic Photon Mono M7 is the ultimate detail-oriented resin printer under $500. It sacrifices size and automation to deliver unmatched sharpness, speed, and ease of use in a compact form.
This isn’t for everyone—but if your work lives in the sub-50-micron world, the M7 is a revelation. Miniature painters, jewelers, and dental techs will immediately appreciate the crisper lines, smoother curves, and faster turnaround.
💡 Bottom Line
The M7 offers the best combination of 14K resolution, 150 mm/h speed, and leveling-free operation on the market. It’s not a large-format workhorse—but as a precision instrument for small, detailed objects, it’s currently unmatched in its price range.
If you regularly print miniatures, jewelry, dental models, or any small object where detail matters more than size, the M7 is an exceptional investment that will noticeably improve your results while reducing setup frustration.
✅ Final Recommendation: Highly Recommended for detail-critical applications where resolution and speed matter more than size. The leveling-free platform alone is worth the price for users frustrated with failed first layers.
Our Rating: 4.7/5.0 ★★★★★
Ready to Make Your Decision?
Check current pricing, availability, and real customer reviews on Amazon.
Amazon typically offers faster shipping and easier returns than buying direct.
Affiliate Disclosure: This review contains affiliate links to Amazon. If you purchase through these links, we may earn a small commission at no extra cost to you. This helps support our testing and review process.
Testing Note: This review is based on hands-on testing with production hardware using Anycubic High-Speed, Water-Washable, and third-party resins. Results may vary based on resin type, environment, and model preparation. Prices mentioned are subject to change.
Safety Warning: Resin printing requires proper safety equipment including nitrile gloves, eye protection, and adequate ventilation. Always follow manufacturer safety guidelines.
RECOMMENDED
