

So you’ve spent hours dialing in your slicer settings, picked the perfect filament, and hit print — only to come back an hour later to a bird’s nest of spaghetti plastic. Sound familiar? A good camera for your 3D printer is one of those purchases that doesn’t feel exciting until the first time it saves a multi-hour print. Then suddenly it becomes the best money you’ve ever spent on your setup.
Quick Navigation
- Quick Verdict
- Comparison Table
- Why You Need a Camera
- Types of 3D Printer Cameras
- 2026 Top Picks
- Creality Nebula Camera
- Raspberry Pi Camera Module 3
- Mintion Beagle V2
- Wyze Cam v4
- TP-Link Tapo C110
- Bambu Lab Users
- How to Choose
- Setups by Printer Type
- Setup Guides
- Creating Time-Lapses
- Common Mistakes
- Total Cost of Ownership
- FAQ
- Final Verdict
In 2026, 3D printer cameras have evolved well beyond simple webcams bolted to a frame. They’re now monitoring tools, AI-powered failure detectors, content creation rigs, and remote management hubs rolled into one compact device. Whether you’re running a budget Ender 3 on a Raspberry Pi or pushing a Bambu Lab X1 Carbon at 500mm/s, there’s a camera solution purpose-built for your needs.
This guide breaks down the best cameras for 3D printer monitoring, time-lapse recording, OctoPrint setups, and WiFi remote viewing — tested across OctoPrint, Klipper, and Bambu printers. No fluff, no filler. Just practical picks that’ll actually help you print smarter.
3D Printer Camera Setup Checklist
Download our step-by-step checklist for setting up your 3D printer camera with OctoPrint, Klipper, or standalone WiFi. Includes troubleshooting tips and optimal configuration settings.
Quick Verdict
Already know what you need? Here’s the short version:
| Use Case | Best Pick | Action |
|---|---|---|
| Best Camera for 3D Printer (Overall) | Creality Nebula Camera | Check on Amazon |
| Best for Raspberry Pi / OctoPrint | Raspberry Pi Camera Module 3 | Check on Amazon |
| Best for Time-Lapse Videos | Mintion Beagle V2 | Check Official Site |
| Best Budget Camera | Wyze Cam v4 | Check on Amazon |
| Best WiFi / IP Camera | TP-Link Tapo C110 | Check on Amazon |
If you’re just getting started, the Wyze Cam v4 is where I’d tell any friend to begin — it’s shockingly capable for the price. If you want the most reliable, purpose-built option, go straight for the Creality Nebula Camera. More detail on each below.
Ready to upgrade your 3D printing setup with a reliable monitoring camera?
Comparison Table
| Camera | Best For | Resolution | Connectivity | Key Feature | Action |
|---|---|---|---|---|---|
| Creality Nebula | Overall | 1080p | USB | AI failure detection | |
| Pi Camera Module 3 | OctoPrint / Klipper | 12MP | CSI | Autofocus | Check on Amazon |
| Mintion Beagle V2 | Time-lapse & Content | 4K | WiFi | Automated time-lapse | Check Official Site |
| Wyze Cam v4 | Budget Monitoring | 2.5K | WiFi | Best value per dollar | |
| TP-Link Tapo C110 | Wireless Beginners | 1080p | WiFi | Local storage + app |
Why You Need a Camera for Your 3D Printer in 2026
Let’s be honest — most people think about adding a camera after their first catastrophic print failure. Don’t be that person. Let’s talk about why a 3D printer monitoring camera is genuinely one of the most practical upgrades you can make.
It’s Not Just “Watching Your Printer” Anymore
There’s a crucial difference between monitoring and AI detection that most guides completely gloss over, and it matters a lot in 2026.
Basic monitoring means you pull up a live stream, glance at your print, and manually decide if something looks off. This works fine if you’re sitting nearby — but most of us start a print and walk away.
AI-powered detection is a completely different game. Tools like Obico (formerly The Spaghetti Detective) and OctoEverywhere actively analyze your camera feed using machine learning. They’re looking for the telltale signs of a failed print — stringing, layer shifts, adhesion failures — and they’ll pause your printer or send you a push notification the moment something goes wrong. In 2026, this is table stakes if you’re running any high-speed machine.
Think about it this way: at 500mm/s on a CoreXY machine like a Bambu or a Voron, a print can go catastrophically wrong in about 90 seconds. By the time you hear the printer struggling, you might already have a clump of melted plastic fused to your PEI sheet. An AI-connected camera catches that in real-time, every time.
The Real-World Benefits
Prevent spaghetti failures. This is the obvious one, but at high print speeds it becomes even more critical. A $35 camera connected to Obico has genuinely saved prints worth hundreds of dollars in filament and machine time for hobbyists and small print farms alike.
Remote monitoring from your phone. Start a 14-hour print before bed, check on it from your phone at 2 AM, go back to sleep. This alone is worth the price of admission for most people.
Time-lapse content creation. The 3D printing community on YouTube and TikTok is massive, and nothing performs better than a clean, stabilized time-lapse of a complex print coming together layer by layer. We’ll talk about the best tools for this later.
Print farm visibility. If you’re running multiple machines, a camera on each printer connected to a central dashboard is how you scale without going crazy.
Types of 3D Printer Cameras
Before diving into specific picks, it helps to understand the different categories of cameras you’ll encounter. They’re not all equal, and the right type depends heavily on your setup.
USB Cameras
The classic choice for OctoPrint and Klipper users. You plug them into your Raspberry Pi’s USB port, configure your streaming software (mjpg-streamer or ustreamer), and you’re live within minutes. USB cameras are rock-solid for stability — there’s no WiFi dropouts, no network latency, no buffering. If you’re building a Raspberry Pi 3D printer monitoring setup from scratch, a USB webcam is the most straightforward path.
The downside is the cable. You’ll need to route it around your printer frame, which can be slightly annoying on printers with moving beds or large build volumes.
WiFi / IP Cameras
No Raspberry Pi? No problem. WiFi cameras connect directly to your home network and stream through a dedicated app or web interface. They’re ideal for beginners who don’t want to deal with single-board computers, Linux configs, or mjpg-streamer setup.
The trade-off is latency. WiFi cameras typically have a 1–5 second delay in their streams, which doesn’t matter much for monitoring but can make real-time interaction feel sluggish. They’re also dependent on your home network — if your WiFi is spotty near the printer, your stream will be too.
Raspberry Pi CSI Cameras (Camera Module)
The Pi Camera Module 3 connects directly to the Raspberry Pi’s Camera Serial Interface (CSI) port — a dedicated ribbon cable connector that bypasses USB entirely. The result is the lowest possible latency, the cleanest integration, and the highest quality stream for OctoPrint and Klipper setups.
CSI cameras are the enthusiast choice. The setup is slightly more involved than plugging in a USB camera, but the performance payoff is real, especially if you’re running Crowsnest or other advanced streaming solutions.
Smart Controller Cameras (The 2026 Category to Know)
This is relatively new territory, and it’s exciting. Devices like the Mintion Beagle V2 blur the line between camera and printer control hub. They combine a high-resolution camera with onboard processing, automatic time-lapse generation, remote printer controls, and sometimes even their own cloud platform — all without needing a separate Raspberry Pi.
For content creators and makers who want a polished, all-in-one solution without the DIY complexity, these smart camera controllers are genuinely compelling in 2026.
Best Camera for 3D Printer — 2026 Picks
Creality Nebula Camera
Purpose-built for 3D printing with AI failure detection, night vision, and reliable USB connection.
Raspberry Pi Camera Module 3
Lowest latency option with autofocus, perfect integration with Raspberry Pi setups.
Mintion Beagle V2
All-in-one smart controller with 4K camera, automated time-lapse with toolhead removal.
Wyze Cam v4
Incredible value with 2.5K resolution at a budget-friendly price point.
TP-Link Tapo C110
Easiest setup with RTSP support out of the box, perfect for beginners.
🥇 Best Overall: Creality Nebula Camera
If someone asks me what camera to put on their 3D printer and they want the answer that just works, the Creality Nebula Camera is what I tell them. It’s purpose-built for 3D printing — not a repurposed home security camera or a generic webcam.
Why it wins in 2026:
Creality designed the Nebula Camera with the actual use case in mind. The manual focus lets you lock onto the nozzle with razor precision — something autofocus cameras can struggle with in the cluttered visual environment of an active print bed. Built-in night vision means enclosure monitoring without needing separate lighting. And increasingly, Creality is building AI failure detection into their ecosystem through Creality Cloud, which integrates directly with the Nebula Camera.
The mount is designed for Creality frames out of the box, but it attaches cleanly to most 2020 and 2040 aluminum extrusion without hacking anything together. For users on Ender 3s, K1s, and Klipper-flashed Creality machines, this is genuinely plug-and-play.
| Specification | Details |
|---|---|
| Resolution | 1080p at 30fps |
| Connectivity | USB |
| Key Feature | AI failure detection via Creality Cloud, manual focus, night vision |
| Best For | Creality printer owners, Klipper users, OctoPrint setups, anyone who wants a camera designed specifically for 3D printing rather than adapted from another use case |
Pros
- Designed specifically for 3D printer use
- Night vision built-in (critical for enclosure monitoring)
- Works with AI detection tools
- Clean mounting system
- Reliable USB connection — no WiFi latency
Cons
- Not wireless (USB cable required)
- Best value on Creality printers (third-party compatibility varies)
Ready to upgrade your 3D printing setup with the best overall camera?
🔧 Best for Raspberry Pi / OctoPrint: Raspberry Pi Camera Module 3
If you’re already running OctoPrint or Klipper on a Raspberry Pi, there’s a strong argument that the Raspberry Pi Camera Module 3 is the best camera you can pair with your setup — full stop.
Why it wins:
The CSI interface is a fundamentally cleaner connection than USB. You get lower latency, no USB bandwidth competition with other peripherals, and a direct integration with the Pi’s camera stack. The Camera Module 3 brings autofocus to the party — a big upgrade over the fixed-focus Module 2 — which means it tracks the nozzle intelligently as the toolhead moves around the build volume.
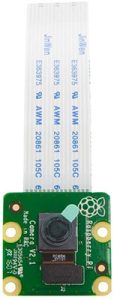
At 12 megapixels, you’re capturing way more resolution than you need for monitoring, which means you have flexibility to crop, zoom in digitally, or future-proof for higher-resolution streaming if the software catches up. Combined with Crowsnest (the recommended camera manager for modern Klipper setups), the Pi Camera Module 3 gives you a buttery-smooth, low-latency stream that USB webcams simply can’t match.
Setup requires a little more patience than plugging in a USB cable. You’ll be connecting the ribbon cable, enabling the camera interface in raspi-config, and configuring your streaming software. But if you’re already running Klipper or OctoPrint, you’re clearly not afraid of a config file.
| Specification | Details |
|---|---|
| Resolution | 12MP (up to 4608×2592 stills, 1080p/60fps video) |
| Connectivity | CSI ribbon cable |
| Key Feature | Autofocus, lowest latency of any option, perfect OctoPrint/Klipper integration |
| Best For | Tinkerers and advanced users, OctoPrint and Klipper setups, anyone who wants the absolute best stream quality and lowest latency from their Raspberry Pi |
Pros
- Lowest latency option available
- Autofocus is a genuine game-changer
- Seamless Raspberry Pi integration
- High resolution future-proofs your setup
- Affordable
Cons
- Requires a Raspberry Pi (not standalone)
- Setup is more involved than USB cameras
- Short ribbon cable needs careful routing
Want the best performance for your Raspberry Pi 3D printer setup?
🎬 Best for Time-Lapse: Mintion Beagle V2
Here’s where things get genuinely interesting for content creators. The Mintion Beagle V2 isn’t just a camera — it’s a smart controller that happens to have a great camera built in. And for creating beautiful, share-worthy 3D printing time-lapses, nothing comes close.
Why it dominates:
Traditional time-lapse setups using Octolapse require careful configuration, a Raspberry Pi, and the frustrating task of managing camera triggers layer-by-layer. The Beagle V2 automates all of this. More impressively, it can intelligently remove the toolhead from time-lapse frames — capturing the print’s growth without the printer’s arm constantly obscuring the view. The result is the kind of clean, professional-looking time-lapse that performs well on YouTube and TikTok, without you needing to spend hours in post-production.
4K resolution gives you plenty of footage quality to work with. The WiFi connectivity means the Beagle V2 functions as an independent device — no Raspberry Pi required, though it works alongside one perfectly. You also get remote printer controls built in, turning it into a genuine all-in-one monitoring and content creation hub.
If you’re serious about growing a 3D printing channel or just want stunning time-lapses of your builds without the complexity of Octolapse, the Beagle V2 is the tool that makes it effortless.
| Specification | Details |
|---|---|
| Resolution | 4K |
| Connectivity | WiFi |
| Key Feature | Automated, stabilized time-lapse with toolhead removal, remote printer control |
| Best For | Content creators, YouTubers, TikTok makers, anyone who wants stunning time-lapses without DIY complexity |
Pros
- Best time-lapse quality available without complex configuration
- 4K resolution for stunning footage
- Remote printer control built in
- No Raspberry Pi required
- Toolhead-free time-lapse frames look incredibly professional
Cons
- Pricier than basic webcam options
- WiFi-dependent (keep printer close to your router)
- More features than necessary if you’re only monitoring
Ready to create professional 3D printing time-lapses without the complexity?
💰 Best Budget Camera: Wyze Cam v4 ⭐ Best Value
Let’s talk about value for money, because the Wyze Cam v4 delivers in a way that genuinely surprises people.
Why it wins:
2.5K resolution from a camera that costs less than most dinner-for-two outings. That’s the Wyze Cam v4. For pure monitoring — watching your print from your phone while you’re on the couch or at work — the Wyze app is clean, reliable, and fast. The 2.5K resolution means you can clearly see layer lines, stringing, adhesion issues, and other problems at a glance.
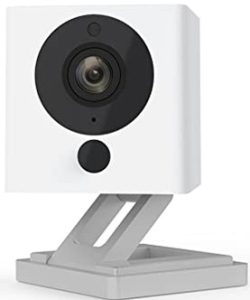
There is one important caveat: the Wyze Cam v4 requires RTSP firmware to work with OctoPrint or Klipper. RTSP (Real Time Streaming Protocol) is how streaming software like mjpg-streamer talks to external cameras. You’ll need to flash Wyze’s alternative RTSP firmware before it plays nicely with your Pi setup. It’s a 10-minute process and well-documented in the community, but it’s something to be aware of before you assume it’s plug-and-play for OctoPrint.
For Bambu Lab users or anyone who just wants a standalone monitoring camera through the Wyze app, no firmware flashing is needed at all. It works beautifully right out of the box.
| Specification | Details |
|---|---|
| Resolution | 2.5K |
| Connectivity | WiFi |
| Key Feature | Excellent resolution-to-price ratio, Wyze app monitoring |
| Best For | Budget-conscious users, Bambu Lab owners wanting better monitoring, anyone who wants solid monitoring without the Raspberry Pi ecosystem |
Pros
- Extremely affordable
- 2.5K resolution is genuinely impressive for the price
- Clean, easy-to-use Wyze app
- Works standalone without any Pi or hub
- Large, helpful user community
Cons
- Requires RTSP firmware flash for OctoPrint/Klipper
- WiFi-only (no wired option)
- Not purpose-built for 3D printing
Looking for the best value camera for your 3D printer?
📡 Best WiFi Camera: TP-Link Tapo C110
For beginners who want wireless monitoring without the hassle of Raspberry Pi setup, OctoPrint config, or firmware flashing, the TP-Link Tapo C110 is the cleanest, most friction-free choice.
Why it wins:
TP-Link’s Tapo ecosystem is mature, reliable, and beginner-friendly in a way that camera companies targeting the maker community sometimes aren’t. The Tapo app is polished. Local storage via microSD means you’re not dependent on a cloud subscription to record your prints. Setup is genuinely five minutes: plug it in, connect to WiFi, open the app.
1080p resolution is plenty for monitoring purposes. You’re not going to be making YouTube videos with it, but you’ll clearly see if your print is going off the rails. The Tapo C110 also supports RTSP streaming, which means it does work with OctoPrint and Klipper without any firmware modifications — a significant advantage over the Wyze Cam in that specific use case.
| Specification | Details |
|---|---|
| Resolution | 1080p |
| Connectivity | WiFi |
| Key Feature | RTSP support out of the box, local storage, beginner-friendly app |
| Best For | Beginners, users who want zero complexity, makers without a Raspberry Pi who still want OctoPrint-compatible streaming |
Pros
- Easiest setup of any camera on this list
- RTSP built-in (OctoPrint compatible without flashing)
- Local microSD storage
- Reliable TP-Link app
- Affordable
Cons
- 1080p is lower resolution than some competitors at similar price points
- Night vision is functional but not exceptional
- Not designed for 3D printing specifically
Want the easiest WiFi camera setup for your 3D printer?
Bambu Lab Users — Do You Need an External Camera?
This is worth addressing directly because there’s a lot of confusion around it in the community.
Bambu Lab X1 Carbon: This machine ships with a built-in AI camera system. It monitors prints for failures, runs Bambu’s AI detection algorithms, and integrates tightly with Bambu Studio and the Bambu Handy app. For most X1 Carbon users, the built-in camera is genuinely good enough for monitoring purposes. You don’t necessarily need an external camera upgrade here.
Bambu Lab P-Series and A-Series (P1P, P1S, A1, A1 Mini): These machines do include cameras, but they’re notably lower frame rate and lower quality than the X1 Carbon’s setup. If you’re using a P1S or A1 and have been frustrated by choppy, low-resolution monitoring footage, you’re not imagining it — the cameras in these machines are a real limitation.
The Recommendation for P and A Series Users:
Adding a Wyze Cam v4 or Creality Nebula Camera externally gives you significantly higher FPS monitoring and dramatically better time-lapse quality. You’ll also unlock compatibility with AI detection tools like Obico, which don’t yet have full native integration with the Bambu camera APIs.
This is also a genuine keyword opportunity — “Bambu Lab P1S camera upgrade” and “Bambu A1 external camera” are high-intent searches from people actively looking for a solution to a known problem. If that’s you, the Wyze Cam v4 is the easiest and cheapest upgrade, while the Nebula Camera offers more print-specific features.
Step-by-Step Bambu Lab Camera Upgrade
Download our free guide specifically for Bambu Lab P-Series and A-Series owners looking to upgrade their camera experience with external options.
How to Choose the Best Camera for 3D Printing
Not sure which of the above picks is right for you? Walk through these decision points.
1. Compatibility First
What software are you running?
- OctoPrint: USB cameras and CSI cameras (via Raspberry Pi) work best. WiFi cameras work too if they support RTSP.
- Klipper (Mainsail/Fluidd): Same as OctoPrint. Crowsnest is your camera manager — it works great with USB and CSI cameras.
- Bambu Studio: Bambu’s built-in camera ecosystem is mostly closed. External cameras for Bambu are typically used standalone (Wyze app, Tapo app) rather than integrated into Bambu Studio.
2. Resolution vs. Performance — A Common Misconception
You do not need a 4K camera for monitoring your prints. This is one of the most common mistakes first-time buyers make.
1080p at 30fps is genuinely sufficient for monitoring. What matters more than resolution is frame rate stability, low latency, and consistent stream quality. A 4K camera that stutters and drops frames every few seconds is far worse for catching a failure in progress than a clean, stable 1080p stream.
The only reason to go 4K is if you’re creating content for YouTube or social media — in which case the Mintion Beagle V2 is the purpose-built option, not just any 4K webcam.
3. Lighting — The “Secret Sauce” Nobody Talks About Enough
This one is huge, and it’s the thing that makes even expensive cameras look bad: lighting.
An enclosed printer in a dark room will produce a grainy, dark, nearly useless image from even a high-end camera. If you’re monitoring an enclosed printer running ABS, ASA, or PC — materials that require enclosures — you need to address lighting.
A simple USB LED ring light ($10–20 on Amazon) mounted inside the enclosure transforms your camera image from murky to crystal-clear. It’s one of the highest ROI purchases in this entire guide, and it’s often an afterthought. Don’t skip it.
For external monitoring setups, positioning matters a lot too. Try to ensure ambient room lighting is hitting the print bed consistently, not just from one angle.
4. Mounting and Camera Angles
The nozzle view is king. You want to see where the filament is being deposited, not just look down at the print from above. A slightly elevated side angle, focused on the nozzle-to-bed interface, gives you the maximum visibility into what’s actually happening with adhesion, stringing, and layer quality.
Avoid mounting positions that get blocked by the print as it grows. On tall prints, an overhead camera can lose sight of what’s happening as the print rises above the camera’s angle of view.
Best Camera Setups by Printer Type
Different printers have different challenges. Here’s how to think about camera selection based on what you’re running.
Budget Bedslingers (Ender 3, Ender 3 V2, CR-10, etc.)
The classic Raspberry Pi + USB camera combo is the go-to here. Mount a Creality Nebula Camera or a quality USB webcam to the frame, run OctoPrint on a Pi 4, and connect to Obico for AI monitoring. This setup costs $60–120 all in and gives you professional-level monitoring.
High-Speed CoreXY Machines (Bambu Lab, Voron, RatRig, etc.)
High-speed printers can go wrong fast. You need:
- High frame rate streaming (30fps minimum, 60fps if available)
- A stable, vibration-resistant mount (CoreXY machines can shake cameras significantly)
- AI detection enabled — at 300–500mm/s, you want the machine to catch failures automatically
The Creality Nebula Camera or Pi Camera Module 3 with Obico is the recommended stack for these machines.
Enclosed Printers (Voron, Bambu P1S, Prusa XL Enclosure, etc.)
Enclosures present two challenges: limited mounting real estate and poor internal lighting. Address both:
- Mount externally looking through the enclosure door if possible
- Or mount internally with an LED ring light
- Use a camera with good low-light performance (Nebula Camera’s night vision helps here)
Resin Printers (Elegoo Saturn, Anycubic Photon, etc.)
Resin printers are a unique case. The primary monitoring concern is watching the FEP film and print progress without opening the lid (opening exposes resin to ambient UV and can cure uncovered surfaces). An external camera positioned to view through the orange UV-filtering lid, or a camera specifically positioned at the side, is typically the approach. Resolution matters less here than positioning — you mainly want to know if the print is sticking to the build plate and not delaminating from the FEP.
How to Set Up a 3D Printer Camera
OctoPrint Camera Setup
- Install OctoPrint on a Raspberry Pi (Raspberry Pi 3B+ or Pi 4 recommended)
- Connect your USB camera or Pi Camera Module to the Pi
- SSH into the Pi and ensure mjpg-streamer or ustreamer is running (OctoPi images include this automatically)
- Navigate to your OctoPrint settings → Webcam & Timelapse
- Enter your camera stream URL (typically
http://)/webcam/?action=stream - Test the stream in the OctoPrint interface
- Optional but recommended: Connect your OctoPrint instance to Obico for AI failure detection
Klipper Camera Setup (Mainsail / Fluidd)
- Install Crowsnest on your Raspberry Pi (the recommended camera manager for Klipper setups in 2026)
- Edit
crowsnest.confto match your camera settings (resolution, FPS, device path) - The camera stream will be accessible through Mainsail or Fluidd’s built-in camera panel
- For the Raspberry Pi Camera Module 3, enable the camera interface via
raspi-configbefore configuring Crowsnest
WiFi Camera Setup (Tapo C110 / Wyze Cam v4)
- Download the Tapo or Wyze app on your phone
- Follow the in-app setup wizard to connect the camera to your WiFi network
- Point the camera at your printer and adjust the mounting angle
- For OctoPrint/Klipper integration: enable RTSP streaming in the camera settings, then use the RTSP URL as your stream source in OctoPrint or Mainsail
Complete 3D Printer Camera Setup Guide
Download our comprehensive guide with screenshots and troubleshooting tips for setting up your camera with OctoPrint, Klipper, or as a standalone WiFi camera.
How to Create Stunning 3D Printing Time-Lapses
One of the most underrated benefits of adding a camera to your setup is the content you can create. 3D printing time-lapses are consistently some of the most watched content in the maker community — and for good reason. There’s something deeply satisfying about watching a complex object grow from nothing in 60 seconds.
Method 1: Octolapse (OctoPrint Plugin)
Octolapse is a powerful OctoPrint plugin that triggers a camera frame capture each time the toolhead parks at a fixed position between layer changes. The result is a perfectly stabilized time-lapse where the print appears to grow magically without any printer arm movement in the frame.
Setting up Octolapse requires careful configuration — you’ll need to specify your printer profile, rendering settings, and stabilization position. It’s not a one-click solution, but the results are genuinely stunning. Pair it with a USB camera or Pi Camera Module 3 for best results.
Method 2: Mintion Beagle V2 (Easiest Path)
If Octolapse sounds like more configuration than you want to deal with, the Beagle V2 automates the entire process. It handles frame capture, toolhead removal, and rendering automatically. You get professional results without needing to touch a single config file.
For content creators who are more interested in the final video than the technical process, the Beagle V2 is genuinely the right tool for the job.
Method 3: Standard Interval Time-Lapse
Many WiFi cameras (including the Wyze Cam and Tapo C110) support basic interval recording. This is the simplest approach — it just captures a frame every X seconds regardless of what the printer is doing. Results are less polished than Octolapse (you’ll see the toolhead moving around in the frame), but it requires zero setup and works with any camera.
If you’re just starting out, this is a perfectly fine way to capture time-lapses. You can always level up to Octolapse or a Beagle V2 later.
Common Mistakes to Avoid
If you’re about to pull the trigger on a camera purchase, learn from the mistakes other makers have made before you.
Buying a 4K camera “for future-proofing.” Unless you’re creating content for YouTube, 4K streaming is overkill for 3D printer monitoring. Your Raspberry Pi will struggle to stream 4K smoothly, and you won’t see any practical monitoring benefit over 1080p. Stability and frame rate matter far more than resolution.
Ignoring lighting. This is the biggest one. You can spend $100 on a great camera and still have terrible footage if your enclosure or print area is poorly lit. Buy a $15 LED ring light at the same time as your camera. You’ll thank yourself later.
Bad camera angles. Pointing a camera straight down at the print bed looks cool but tells you very little about what’s actually happening. Angle it to see the nozzle-to-bed interface. You want to see the extrusion happening in real-time.
Cheap, laggy WiFi cameras. There are $10 knockoff IP cameras on Amazon that technically work but deliver 15-second delayed streams with frequent dropouts. By the time you see a failure on one of these, the print is already beyond saving. Stick with established brands (TP-Link, Wyze, Mintion) or go wired.
Not setting up AI detection. Just watching a stream manually is reactive. Setting up Obico or OctoEverywhere takes 15 minutes and turns your camera into an active failure-prevention system. There’s no good reason not to do it.
Total Cost of Ownership
Here’s a realistic breakdown of what a complete 3D printer monitoring setup actually costs, depending on your path:
Budget Setup (Wyze Cam v4 + Standalone)
| Item | Estimated Cost |
|---|---|
| Wyze Cam v4 | Check Price on Amazon |
| LED Ring Light | ~$15 |
| Total | ~$50 |
Mid-Range Setup (OctoPrint + Nebula Camera)
| Item | Estimated Cost |
|---|---|
| Creality Nebula Camera | Check Price on Amazon |
| Raspberry Pi 4 (2GB) | ~$45 |
| microSD Card + Power Supply | ~$20 |
| LED Ring Light | ~$15 |
| Total | ~$120 |
Advanced Setup (Klipper + Pi Camera Module 3 + Obico)
| Item | Estimated Cost |
|---|---|
| Raspberry Pi 4 (4GB) | ~$55 |
| Raspberry Pi Camera Module 3 | Check Price on Amazon |
| Obico Subscription (optional, has free tier) | $0–$10/month |
| LED Ring Light | ~$15 |
| Total | ~$95–$105 + ongoing |
Content Creator Setup (Mintion Beagle V2)
| Item | Estimated Cost |
|---|---|
| Mintion Beagle V2 | Check Price on Official Site |
| LED Ring Light | ~$15 |
| Total | ~$95–$115 |
Frequently Asked Questions
What is the best camera for 3D printer monitoring?
The Creality Nebula Camera offers the best combination of ease-of-use, image quality, and AI-powered monitoring features for most users. If you’re on a budget, the Wyze Cam v4 delivers impressive performance for a fraction of the cost.
Can I use a regular webcam for a 3D printer?
Yes — standard USB webcams work great with OctoPrint and Klipper. Many people start with whatever USB webcam they have lying around before upgrading. The main limitations are mounting (webcams aren’t designed for printer frames) and the lack of 3D printing-specific features like night vision or manual focus.
Do I need a Raspberry Pi for a 3D printer camera?
No. WiFi cameras like the TP-Link Tapo C110 and Wyze Cam v4 work completely independently through their own apps. A Raspberry Pi is only required if you’re using OctoPrint, Klipper, or CSI cameras like the Pi Camera Module 3.
What is the best camera for 3D printing time-lapses?
The Mintion Beagle V2 is the easiest and most capable option for clean, stabilized time-lapses without complex configuration. If you already have an OctoPrint setup, the Octolapse plugin paired with a Pi Camera Module 3 is an excellent alternative.
Are WiFi cameras good for monitoring 3D printers?
Yes, with the caveat that they introduce 1–5 seconds of stream latency compared to USB or CSI cameras. For monitoring purposes this is fine — you’re not reacting in real-time, just keeping an eye on progress. For AI detection integrations, the slightly higher latency is also acceptable.
What resolution do I need for 3D printer monitoring?
1080p is the sweet spot. It gives you clear, detailed footage for monitoring and time-lapses without straining your Raspberry Pi or network. Only go higher if you’re creating YouTube content, in which case the Mintion Beagle V2’s 4K resolution is purpose-built for that use case.
Final Verdict
Here’s the honest summary after looking at all these options:
Best overall → Creality Nebula Camera. Purpose-built, reliable, AI-capable, and works great with OctoPrint, Klipper, and Creality’s own ecosystem. If you want to buy once and not think about it again, this is the one.
Best for beginners → TP-Link Tapo C110. Zero complexity. Five-minute setup. Clean app. If you’ve never dealt with a Raspberry Pi and don’t plan to start, the Tapo C110 is all you need.
Best for OctoPrint / Klipper → Raspberry Pi Camera Module 3. The enthusiast’s choice. Lowest latency, highest integration, best performance for the platform you’re already running.
Best for content creators → Mintion Beagle V2. If you want your prints to look incredible on camera and you want to grow an audience around 3D printing, nothing delivers time-lapse quality like the Beagle V2 without requiring a film production degree to operate.
Best on a budget → Wyze Cam v4. It’s almost unfair how good this camera is for the money. Start here if cost is the primary factor. You’ll be surprised how capable it is.
Ready to Upgrade Your 3D Printing Setup?
A camera for your 3D printer isn’t just a luxury—it’s cheap insurance against failed prints, wasted filament, and frustration. Start monitoring smarter today.
Start with the Wyze Cam v4 if your budget is tight — it gets the job done remarkably well. When you’re ready for more features, more reliability, and AI-powered failure prevention, upgrade to the Creality Nebula Camera. Either way, you’re making one of the smartest investments you can make in your 3D printing setup.
