

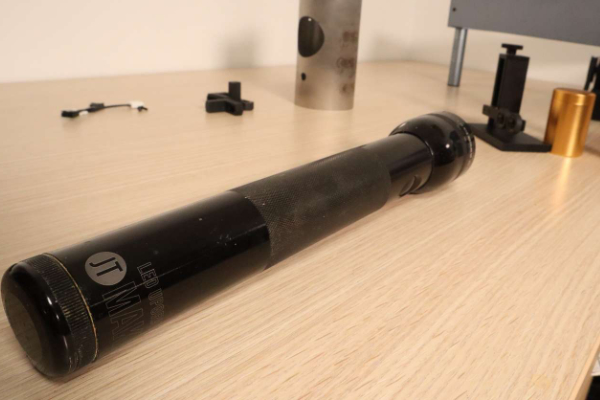
Tired of crooked logos, skewed text, or failed engravings on mugs, bottles, or tapered glassware?
You’re not doing anything wrong—your rotary attachment is. Most laser engravers rely on rubber roller systems that slip during fine vector work, especially on non-uniform or handled objects. The result? Wasted time, ruined blanks, and frustrated customers.
Enter the xTool RA2 Pro—marketed as the world’s first 4-in-1 rotary attachment for laser engravers—and after weeks of real-world testing, we’re convinced it solves the #1 pain point in cylindrical engraving: slippage.
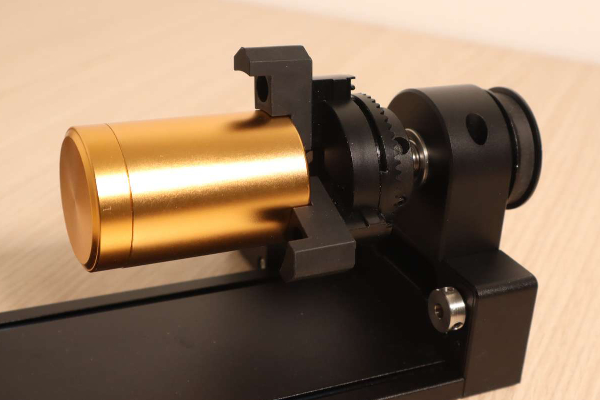
Unlike traditional rubber rollers, the RA2 Pro features a precision lathe-style chuck that clamps your object securely, delivering pixel-perfect alignment—even on intricate motorcycle engravings or fine script. And yes, it also works as a standard rubber roller when you need it.
In this in-depth xTool RA2 Pro review, we’ll show you:
- How it outperforms rubber roller systems (with side-by-side results)
- Real engraving tests on wine glasses, baseball bats, rings, and even spherical ornaments
- Full compatibility with xTool, Sculpfun, Atomstack, and more
- And whether it’s worth the investment for hobbyists, Etsy sellers, and small laser businesses
Let’s dive in.
👉 Get the xTool RA2 Pro on Amazon (Fast Shipping + Prime)
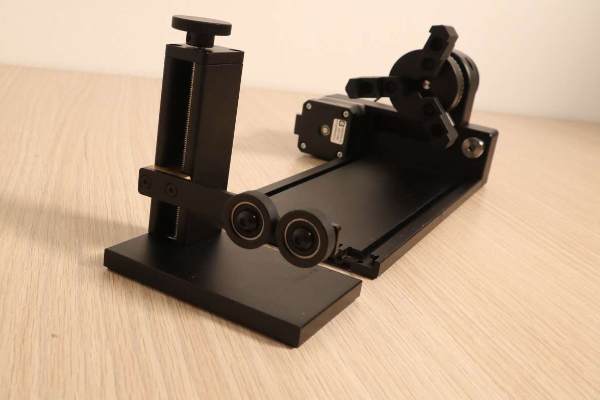
Build Quality & What’s in the Box
The xTool RA2 Pro arrives in premium, protective packaging—and the moment you unbox it, you’ll notice the difference: all-metal construction, precision-machined components, and a weight that screams “built to last.”
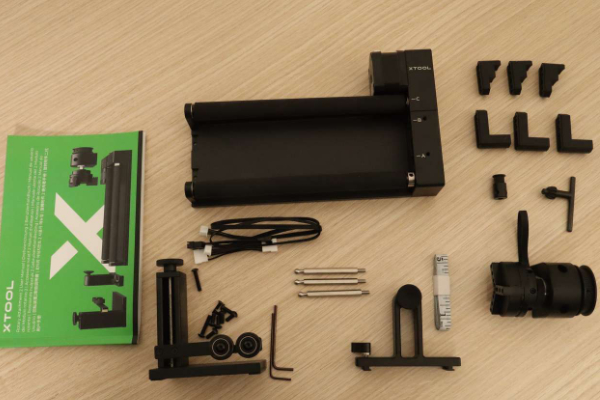
Here’s what’s included:
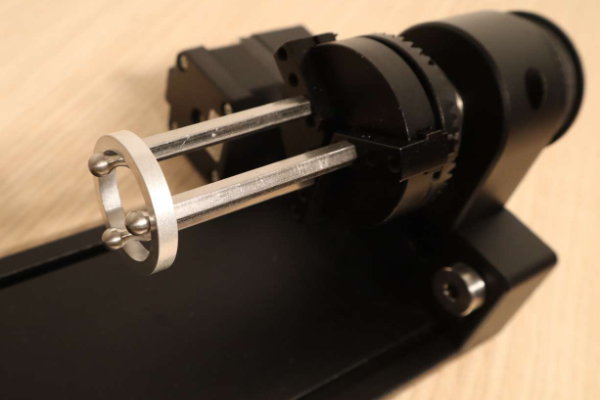
- Heavy-duty rotary chuck (lathe-style, zero flex)
- Two sets of interchangeable jaws (for small to medium objects like pens, mugs, and flashlights)
- Free 3D-printable jaw files from xTool’s website (for oversized items like vases or bottles)
- Roller support arm – critical for long/heavy objects (we engraved a full-size baseball bat without wobble!)
- Spherical object bracket (yes, you can finally engrave Christmas ornaments reliably)
- Steel alignment pins – perfect for rings, lids, or hollow cylinders
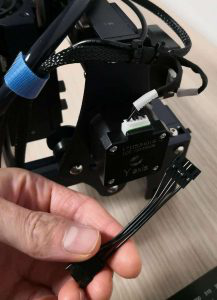
- Universal adapter cable – works with non-xTool lasers (more on that later)
Every metal component feels industrial-grade—a major upgrade over plastic-heavy competitors. This isn’t just an accessory; it’s a workshop-worthy tool.

Quick & Tool-Free Setup
Installation is surprisingly straightforward:
- Attach one end to your laser’s stepper motor.
- Replace the left-side X-axis motor with the rotary’s drive gear.
- Snap on the included riser feet to accommodate taller items (like pint glasses or bottles).
No firmware updates. No complex wiring. Just plug, clamp, and engrave.
💡 Pro Tip: The riser feet also improve airflow under your work area—great for smoke management during long jobs.
Chuck vs Rubber Roller: Which Rotary System Is Right for You?
If you’ve ever ruined a custom tumbler or watched your logo twist halfway around a bottle, you know the limitations of traditional rubber roller rotary attachments. But how exactly does the xTool RA2 Pro’s chuck-style system solve these issues? Let’s break it down.
| Feature | Rubber Roller System | Chuck-Style Rotary (xTool RA2 Pro) |
|---|---|---|
| How It Works | Friction between rubber wheels and object | Object clamped securely in metal jaws (like a lathe) |
| Best For | Simple raster engravings on straight cylinders (pens, straight tumblers) | Vector graphics, tapered items, handled mugs, spheres, cones, flashlights |
| Slippage? | Yes – causes skewing, especially in detailed work | No – perfect alignment every time |
| Setup Difficulty | Easy (great for beginners) | Slightly more involved (but worth it) |
| Price | Low ($30–$60) | Higher (~$200–$250), but replaces multiple tools |

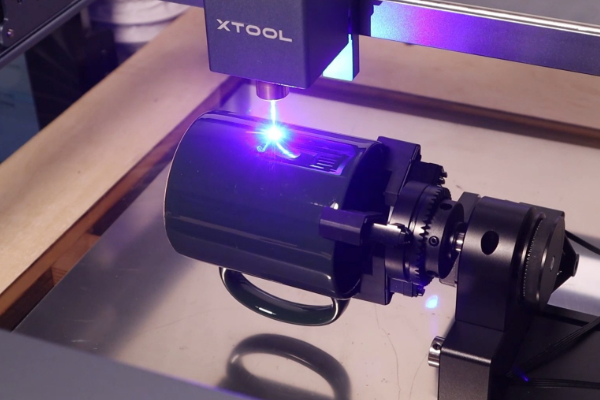
Real-World Test: Same Design, Two Results
We engraved the exact same vector motorcycle graphic on identical stainless steel cylinders—one using rubber roller mode, the other in chuck mode.


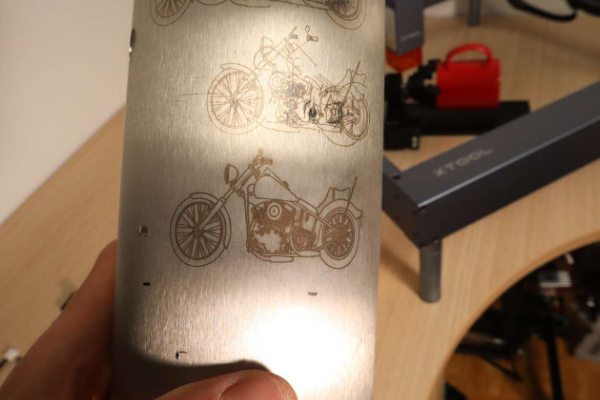

- Top engravings (rubber roller): Noticeable distortion, especially in tight curves. Slippage worsened with aggressive optimization settings.
- Bottom engraving (chuck mode): Crisp, clean lines with perfect 360° alignment—zero slippage.
In chuck mode, the cylinder is locked in place using the included wrench. You can even mount hollow items from the inside out for maximum stability.
Engraving Long Objects? No Problem.
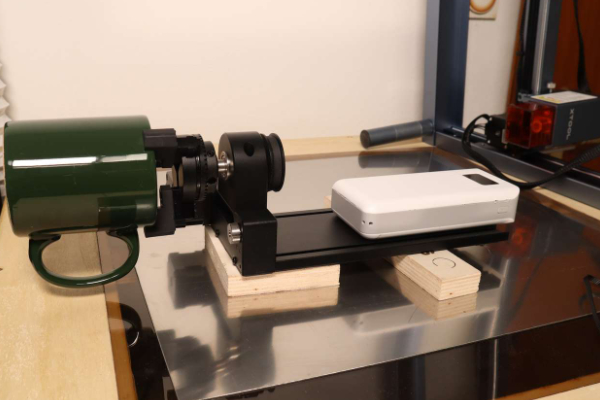
The included support arm module stabilizes heavy or lengthy items. We tested it on a full-size Maglite flashlight—a dense, top-heavy object that would wobble or sag on most rotary systems.
AVAILABLE ON XTOOL
Using the built-in bubble level, we perfectly leveled the piece—ensuring consistent focus and depth across the entire engraving.

Yes, You Can Even Engrave Spheres!
Thanks to the included spherical object bracket, the RA2 Pro handles round items like Christmas ornaments, globes, or resin balls.

We accidentally used too much power (user error!), causing slight overburn—but the engraving path itself was perfectly precise. With proper settings? Flawless holiday personalization.


Who Is the xTool RA2 Pro For?
The xTool RA2 Pro isn’t just a rotary—it’s a business enabler. Here’s who benefits most:
- Etsy & Shopify Sellers: Finally offer custom wine glasses, tapered vases, mugs with handles, and holiday ornaments without fear of rejects or refunds.
- Small Laser Workshops: Expand your service menu to include flashlights, baseball bats, bottles, and conical awards—high-margin items most competitors can’t do.
- Serious Hobbyists: Stop wasting expensive blanks on skewed engravings. Achieve pro-level results on complex projects.
- Gift Makers & Crafters: Personalize spherical resin art, baby bottles, thermoses, or even makeup compacts with confidence.
If you’re still using rubber rollers and avoiding anything non-cylindrical—you’re leaving money (and creativity) on the table.
👉 Get the xTool RA2 Pro on Amazon (Prime Shipping + Easy Returns)
Pro Tips: Creative Ways to Use the xTool RA2 Pro
The included steel alignment pins unlock even more versatility—especially for tiny or delicate items:
- Rings: Mount horizontally without jaw interference
- Lids & bottle caps: Engrave the outer rim cleanly
- Small cylinders: Elevate them above the chuck for full laser access

How to Engrave a Mug with a Handle (Yes, Really!)
Rubber rollers? Impossible. Even basic chucks often fail—but the RA2 Pro handles it with a clever workaround:
- Unscrew the bottom steel plate from the chuck assembly.
- Rotate the entire gantry 180 degrees.
- Lift the assembly slightly and add a counterweight to the opposite side.
This creates clearance for the handle to spin freely—no collisions, no repositioning.
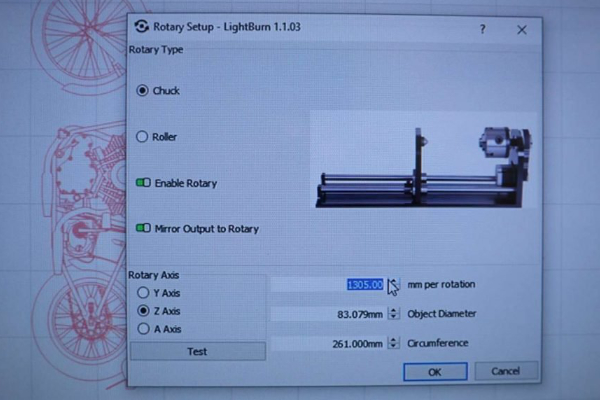
Setting Up the RA2 Pro in LightBurn (Step-by-Step)
For best results in chuck mode:
- Open File → Rotary Setup.
- Enter the circumference of your object (in mm).
- Create a test rectangle with height = circumference.
- Frame the job and watch: does it complete exactly one rotation?
- If not, adjust “mm per rotation” until alignment is perfect.
💡 Beginner tip: xTool’s Laserbox software auto-calculates this—but lacks advanced controls. Use it to start, then switch to LightBurn as you grow.
Works with Sculpfun, Atomstack & More!
Yes! The RA2 Pro includes a universal adapter cable**—making it compatible with most 24V diode laser engravers:
- Sculpfun S9
- Sculpfun S10
- Sculpfun S30 Pro Max
- Atomstack A10 / X7 Pro
- Atomstack A20 / X20 Pro
We tested it on a Sculpfun S10—plug, calibrate, and engrave. No firmware mods needed.
Final Verdict: Is the xTool RA2 Pro Worth It?
Yes—if you’re serious about laser engraving. This isn’t just a rotary attachment; it’s a creative and commercial upgrade that:
- ✅ Eliminates slippage for perfect vector engravings
- ✅ Handles mugs with handles, wine glasses, spheres, cones, and baseball bats
- ✅ Works with xTool, Sculpfun, Atomstack, and more
- ✅ Pays for itself by reducing wasted materials and enabling premium products
While the upfront cost is higher than basic rollers, the versatility, precision, and durability make it the best rotary attachment for laser engravers in 2025.
👉 Get the xTool RA2 Pro on Amazon (Prime Eligible + Fast Shipping)
Frequently Asked Questions (FAQ)
Q: Does the RA2 Pro work with the xTool D1 Pro?
A: Yes! It’s designed specifically for the D1/D1 Pro (risers included).
Q: Can I engrave tapered wine glasses without slippage?
A: Absolutely—this is where the chuck system shines. Rubber rollers fail here; the RA2 Pro excels.
Q: Do I need LightBurn to use it?
A: No—xTool Laserbox works for basic use. But LightBurn unlocks full precision for advanced projects.
Q: Is it worth it for hobbyists?
A: If you’ve ever ruined a gift due to crooked engraving—yes. It saves time, materials, and frustration.
Ready to stop wrestling with rubber rollers?
Get the xTool RA2 Pro on Amazon today →
