
Read our Wanhao D12/230 review to find out the features, specs and capabilities of this printer.
Wanhao is one of the leading 3D printer manufacturers today. The company has been on the market since 2012, and has a wide range of printers of different sizes, kinematics and prices. One of their budget 3D printers is the Wanhao Duplicator 12.
Like Wanhao D9 printers, the Wanhao D12 also come in 3 sizes; 300, 400 and 500.

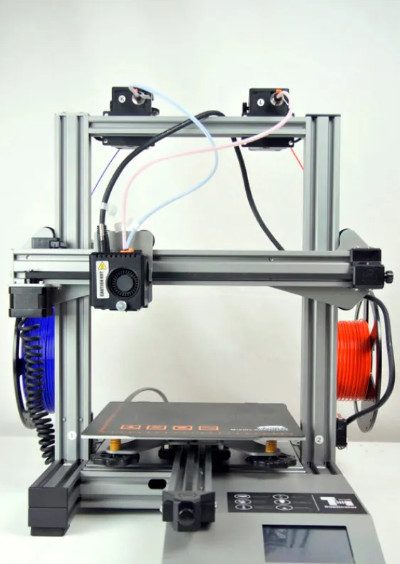
The Wanhao D12/230 is quite different from other Duplicator series printers in terms of design. From the outside, the D12/230 looks like Creality Ender-3 and the like.

All versions of the D12 come with both a single-extruder and dual-extruders. The latter use two feeders to print the filament through a single nozzle.
In this review, we’ll take a look at the smallest dual extruder version, the D12/230.
Wanhao D12/230 Review
BUY ON WANHAO STORE
What’s in the Box?
As usual, let’s start by unpacking.
When you open the printer package box, you will find a detailed English manual. The manual has all the information you need to know about assembling the printer and using the slicer.

The other items in the box include:
- A set of the second extruder – a Teflon tube with fitting retainers, screws and T-nuts
- Filament spool holder
- Feeder with motor and filament end sensor
- The first extruder
- Printhead
- Second filament holder
- Power cord
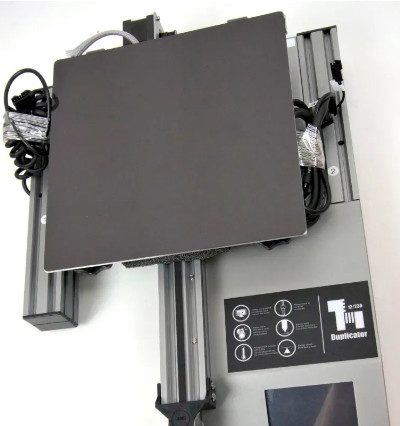
- Portal assembly, with already installed motors and tensioned belts

- Removable flexible printing surface
- Two PLA probes
- The teflon tube of the first extruder
- Screws
- A set of tools for assembling and using the printer (hexagons with a wrench, tweezers, a needle for cleaning the nozzle)

- A microSD card with a card reader
- A spatula
- A USB cable for connecting to a computer
- A calibration card
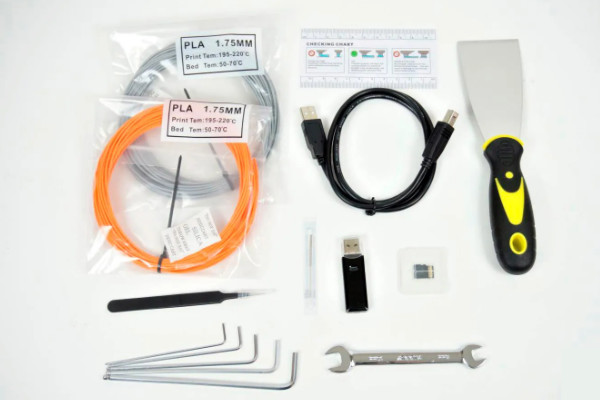
At the bottom of the box is a control unit with a power supply and a table.
Assembling the Printer
The assembly process is not complicated. You simply need to screw the portal to the bottom with 4 screws.

Attach the printhead to the X-axis carriage.

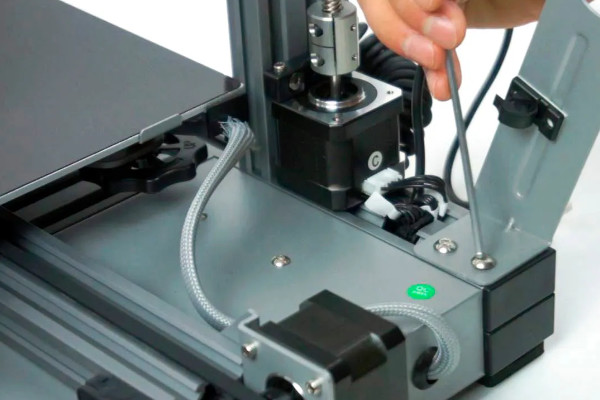
Install the feed mechanisms on the top bar.

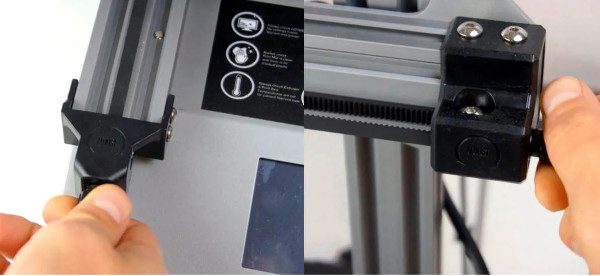
Screw the holders for the filament spools with filament end sensors on the back.
After that, tighten the belts using the tensioners that are on the X and Y axes.
It is also advisable to check the pressure of the rollers to the profiles. If necessary, use a wrench to tighten the eccentrics that are on all carriages. The pressure should be such that nothing dangles but, at the same time, also moves freely.

Next, connect the wires. For convenience, all wires are marked.

Insert the Teflon tubing from the feeders to the printhead.
Next, install the plastic clips of the fittings so that the tubes do not play in them.

The assembly takes about an hour. But, as usual, we do not recommend rushing. It is better to do everything carefully and recheck everything several times.
Wanhao D12 /230 Features
Let’s quickly go over the technical characteristics and design features of the printer.
Printable Area
The printable area is 230 x 230 x 250 mm.

The kinematics are Prusia-like and are implemented according to the Openbuilds system, i.e., rollers that roll on aluminum profiles.

The Z-axis is driven by a single trapezoidal screw motor. At the top, the screw is held in place by a bearing. From experience, with such a print area, one motor is enough for the axis to rise evenly if the rollers are adjusted properly.
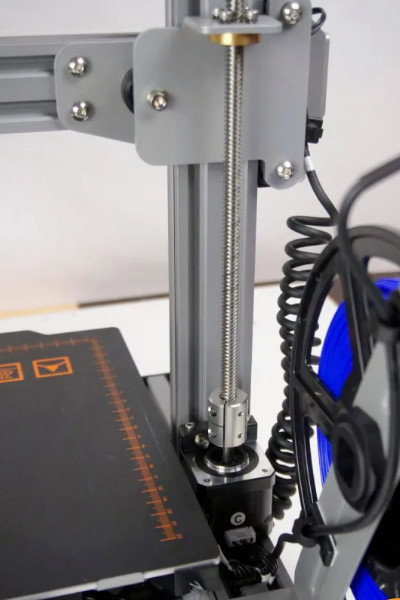

The Y axis moves along the profile 20 by 40 mm.

The printbed adjustment knobs are large and comfortable. The springs are impressive and hold their shape well without bending to the sides.

There is a convenient belt tensioner at the front. The heated table operates from 24 volts.
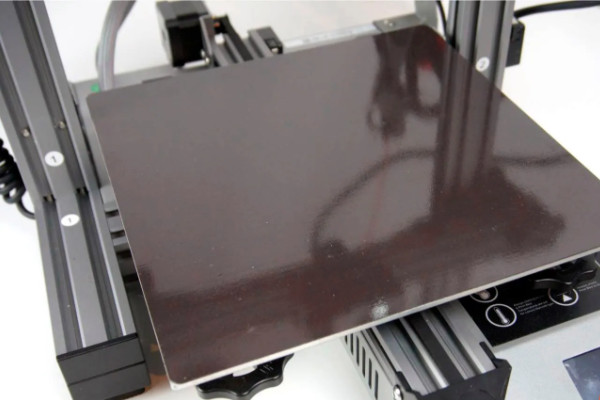
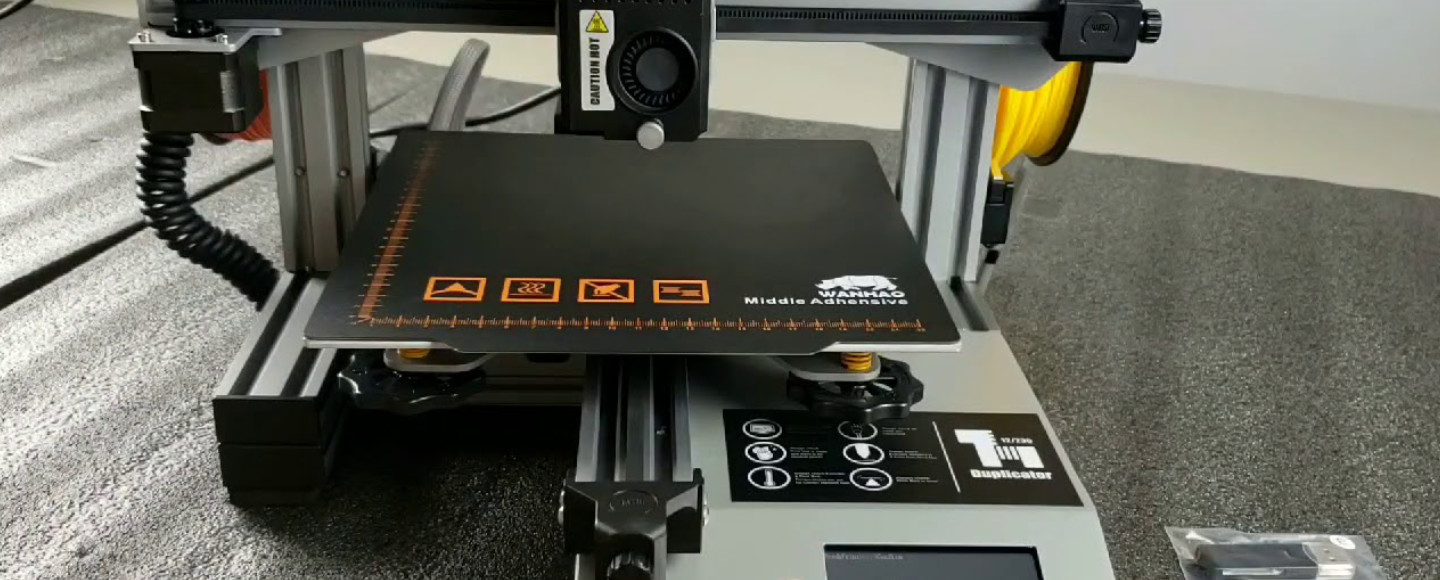
A magnetic surface is glued on top of the heated bed, and a flexible metal sheet is magnetized to it. The metal sheet is glued with an adhesive coating.
A removable flexible table is convenient.

The X axis also moves along a 20 by 40 profile, and also has a belt tensioner.

Extruder
The hotend is closed with a plastic casing and attached to the carriage with two screws at the back.

At the bottom front, there is a knob that holds the air duct for blowing the part. The knob is pressed against the 4010 turbine fan .
The blowing is circular and is realized in such a way that the air flow goes exclusively to the tip of the nozzle and cannot fall on the heating block.

The hot-end radiator is cooled by a conventional 4010 axial fan. The hotend is Y-shaped, has one nozzle but two filaments are loaded into it from above.
There is something like a fork inside the radiator. When printing with two materials, the plastics flow in turns, as if giving way to each other to the nozzle. That is, when changing the material, one filament is rolled back to the fork and the second is loaded through the free channel.


The advantage of this method is that there is no need to align and calibrate individual hotends. Moreover, plastic does not leak from the inactive nozzle.
However, there are also some drawbacks of this solution. We’ll go through them later with specific examples.
The heating block of the extruder resembles E3D v5. However, the nozzle is not installed as usual.

The nozzle looks like MK8 on the outside. However, it is slightly larger and has a small Teflon tube inside. We are not sure why it is needed there. Moreover, the tube was slightly shorter than necessary and we had to replace it.
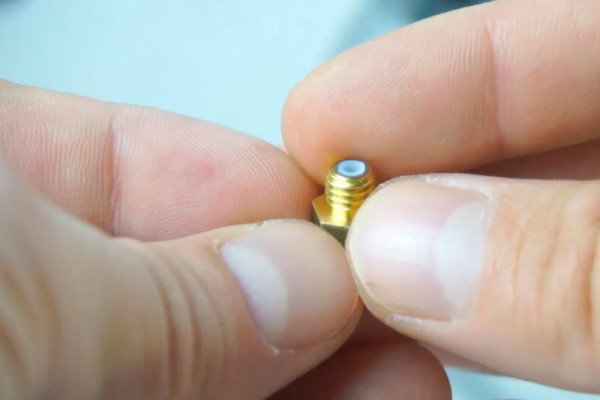
The thermal barrier between the radiator and the heating block is not all-metal. Moreover, it has a small tube.
In the hot end, there are Teflon tubes of different sizes and diameters. We don’t thing using a proprietary nozzle on a budget printer is convenient. And while the standard MK8 or E3D v6 nozzles are normally screwed into the heating block, they are too short to reach the print area cooling duct.

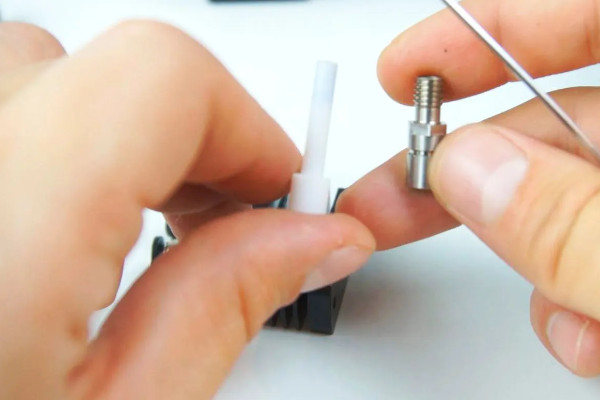
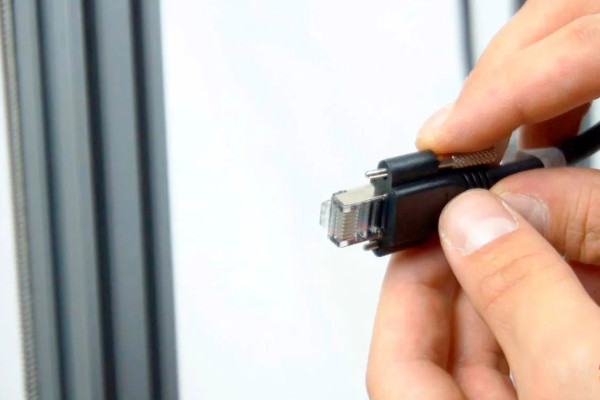
Inside the print head, there is an adapter board into which a twisted pair wire with RJ45 connectors is connected.

On the side of the hot-end, the plug has screws for fixing the wires to ensure nothing dangles or falls off.
The Wanhao D12/230 has two feeding mechanisms. The mechanism are of the Titan type here, i.e., they have a gearbox inside that increases the torque and feed accuracy. But unlike BMG-like mechanisms, the feed gear here is on one side. On the other side there is a reciprocal roller.
The Titan is more convenient to use when it comes to loading and unloading plastic.
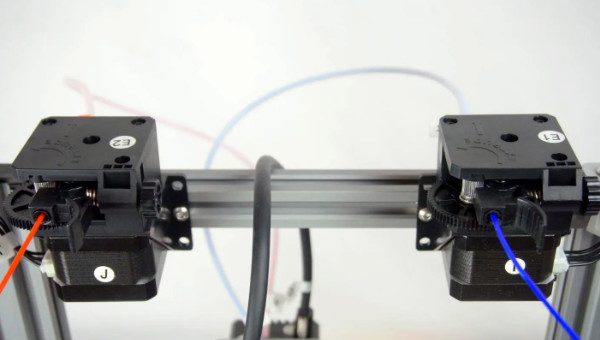
Each feeder has a pressure adjustment knob on the left.
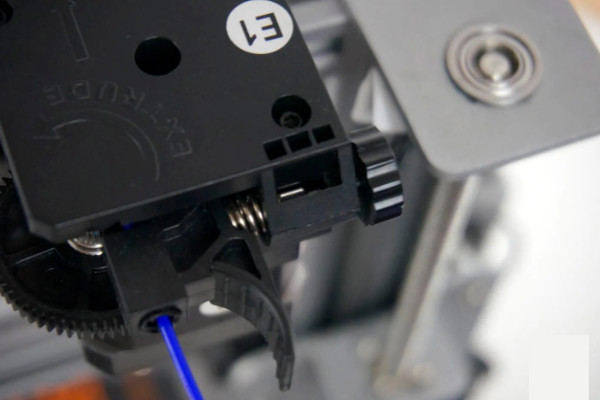
Each extruder has a filament end sensor.

When printing with one extruder, there must be filament in both sensors. Otherwise, the printer will show an error. To prevent this from happening, you can simply take a piece of filament and insert it into the sensor of an inactive extruder.
Electronics
Let’s see what the printer has in terms of electronic and electrical parts.
The Wanhao D12/230 has the common 32-bit MKS Robin Nano version 1.2 control board. This is a decent board but is not the best.

On the XYZ axes, there are quiet TMC2209 drivers. On the extruders, we get the cheap A4988. Considering that TMC2209 can work remarkably well on extruders, it would have been better if they were also used here rather than the cheap A4988 drivers.
However, all drivers are removable and it will not be difficult to replace them later.

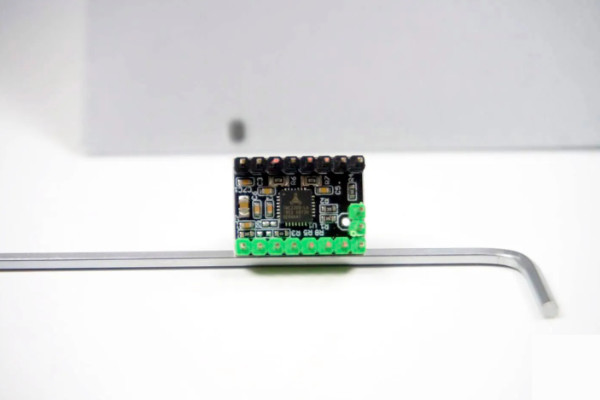
The Wi-Fi module is already installed on the board.
The screen is standard for such a board – a touch-sensitive color MKS TFT35.

The wires are laid a little bit carelessly. Instead of shortening everything to the required length and carefully separating the power section from the signal one, all the wires are simply twisted into a bundle and tightened with ties.
Despite the careless arrangement, the wires will still work.

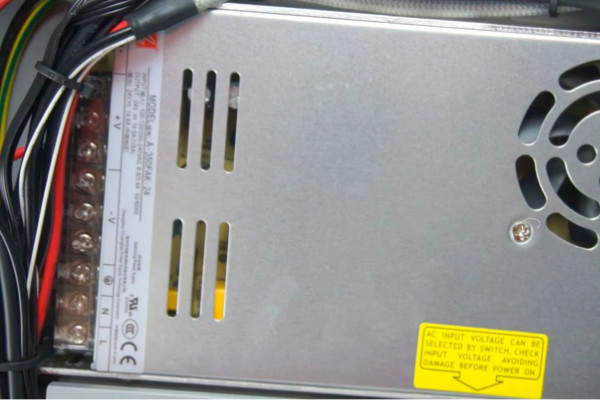
The power supply is from ChuengLiang, which is quite reliable. And the 350 watts power for such a printer is enough.
Quality of Print
Let’s move on to examples of printing.
To prepare models, Wanhao suggest using their slicer. More precisely, this is an old Cura slicer converted for Wanhao printers.

We do not see the point of using it. The program is outdated and has limited settings.
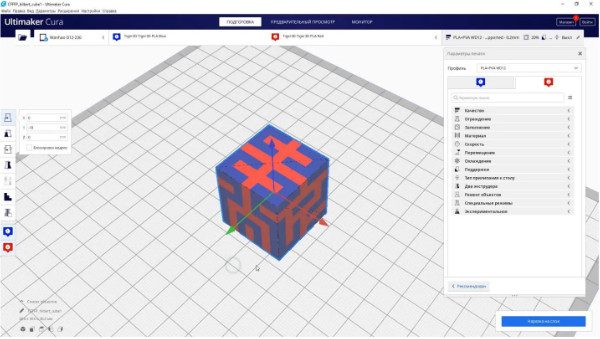
Fortunately, the printer understands regular Gcode and almost any slicer can be used. We chose Cura version 4.5.
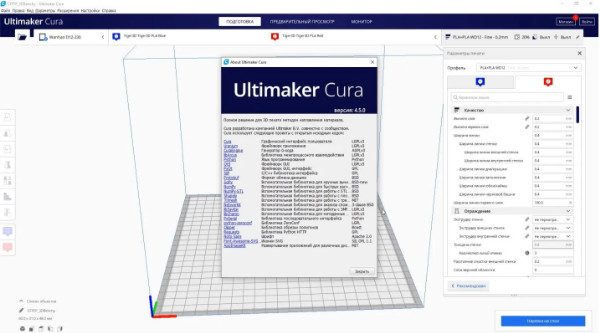
There are newer versions of Cura, but this one is probably one of the most stable and compatible with this dual-extruder printer.
Since the printer is new, there is no already configured profile for it in this version of Cura. Therefore, you need to create a Custom FDM printer.
In addition to the main parameters, the most important thing is to set 2 extruders and check the “Common heater” checkbox. Also, in the settings of each extruder, specify the filament diameter of 1.75 mm.
To connect to the printer via Wi-Fi, click on the corresponding item in the settings in the screen menu, select your Wifi network, enter the password and connect.
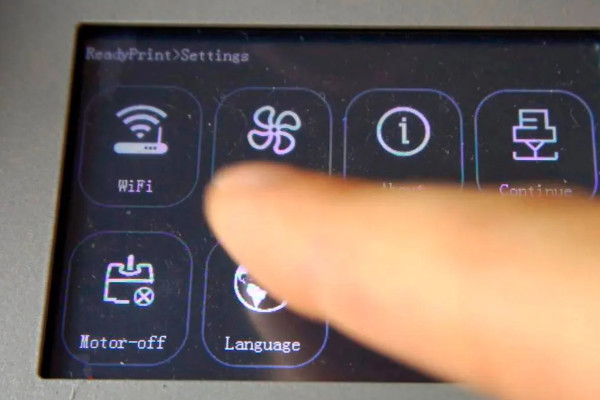
An IP address is assigned to the printer and displayed on the screen.

Read the manual to learn how to set up a connection in the Wanhao slicer.
To connect from another version of Cura, go to the store, find Plugin MKS Wi-Fi and install it.
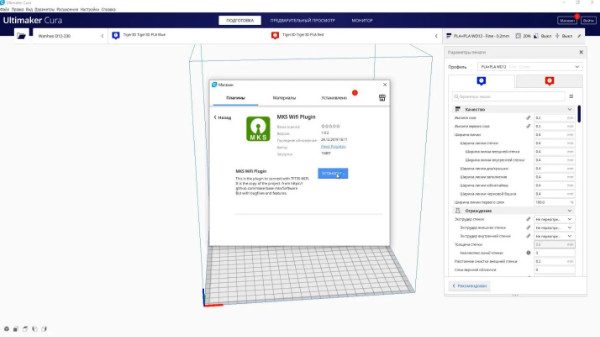
After restarting Cura, the MKS Wi-Fi button will appear in the printers settings. Click on it, add the IP address that was issued to the printer and click “Connect”.
After that, the printer control menu will appear in the Monitor tab. And when slicing a model, it will be possible to send the sliced model to the printer and start it for printing.
If the control does not work right away, restart Cura. After this, everything should connect.

The Wi-Fi function is convenient. However, files are transferred rather slowly. This is not critical when submitting small models. But if the files are large, the download may take several minutes.
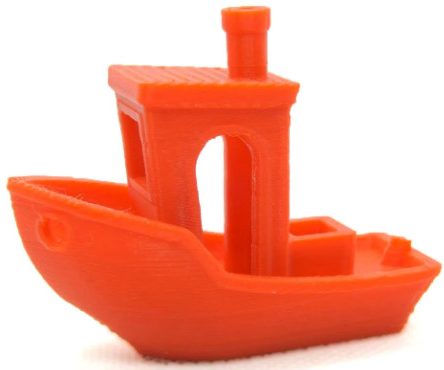
Since the printer is similar to the Ender-3, we printed the well-known Benchy boat with a profile from it.
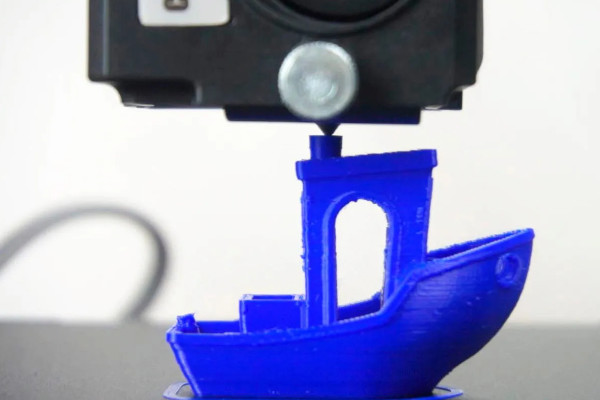
This model was printed with Hatchbox PLA.
The boat turned out good but had obvious flaws. First, the seemingly well-implemented airflow turned out to be not very effective. On strong slopes and in places of transitions between layers, the plastic did not cool enough and was bent upwards.
Secondly, after the transfers, strong plastic smudges remained on the model. There are also strange gaps on the surfaces.


After blowing, the model becomes clear. You need to lower the temperature a little to get the best results.
In addition, we used a function in Cura called “Angle of the overhanging wall”. With this function, walls that are printed at an angle greater than the specified one will be printed at the speed specified in the “Overhanging Wall Printing Speed” paragraph.
The angle is measured in degrees, and we set it to 60. The speed is a percentage of the usual print speed, and we set it to 40 percent. Thus, on strong slopes, the blowing should have more time to cool the plastic.
To adjust the retracts, we printed several tests with plastics of different brands and colors. We did this to exclude possible problems with any particular material.
As a result, stringing was very minimal during transfers. However, it was not possible to completely get rid of them. Very thin strings remained, almost like fluff. Another issue is that there were still gaps on the surfaces.

Such gaps occur because during retracts, an air bubble enters the nozzle, which comes out a couple of millimeters after returning to printing. To solve this problem, you can decrease the retraction speed.
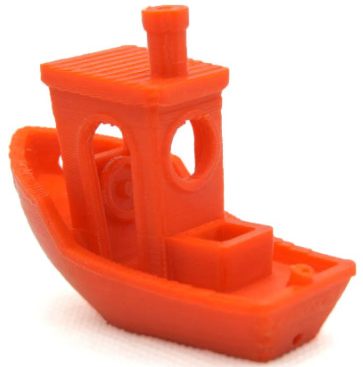
We reduced the retraction speed from 35 to 25 and the problem went away. Also, the strings almost disappeared.
With the new parameters, we printed another boat from Hatchbox orange PLA. The model turned out much better. There are still problems with airflow, but there are no gaps, smudges or strings.


We also printed a vase in Hatchbox blue PLA. This is the most convenient and fastest way to check the printer for wobbling along the Z axis and, in general, to see how evenly the layers are stacked.
The print speed of the outer walls was 40mm/s, and the line width was 0.6mm with a nozzle diameter of 0.4mm.
The vase turned out very well. There is not a single flaw on the surfaces. All layers are even; nothing sticks out anywhere. There is no wobbling nor gaps.

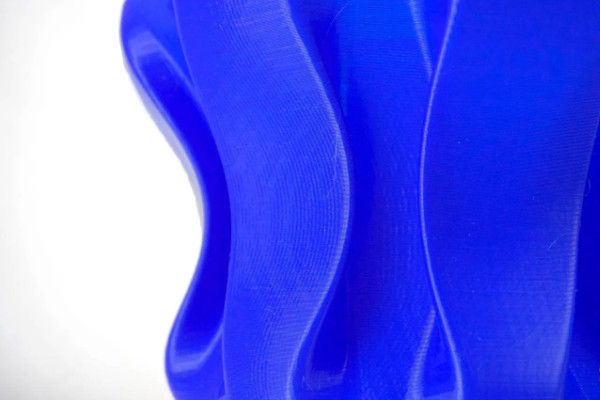
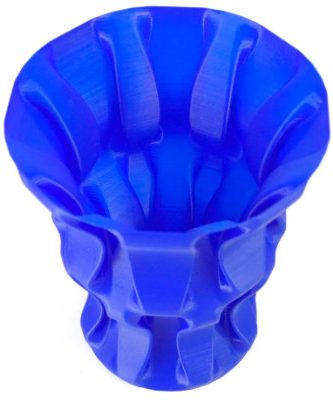
With the right settings, it is quite possible to achieve good printing, with the exception of a little insufficient airflow.
With one-color printing sorted out, we move on to test dual extruder printing.
If you have used a 3D printer before, you know that when you replace the plastic, a little material remains in the hotend. You need to push the new plastic until the color completely changes.
The same problem is present in this type of hotends. However, it appears every time you switch the extruder. Therefore, when printing, it is necessary to use the so-called roughing tower.

There are several parameters here, i.e., coordinates where this tower will be printed, the diameter of the tower, and the volume of plastic that needs to be driven off before printing.
The last parameter is set independently for each extruder. For example, when switching from a light color to a dark one, you don’t need a large volume. And if you switch from dark to light, you have to drive away much more, since impurities are strongly visible on the light material and the color is obtained with a tint of the second plastic.

It is also advisable to write a command to move to a point above the roughing tower in the starting Gcode for each extruder. This is necessary so that when the temperature stabilizes or changes, the extruder does not hang over the part, but does it over the tower.
The approximate coordinates of the middle of the tower have to be calculated independently. You can use the variables prime_tower_position_x and prime_tower_position_y. However, these coordinates are not above the tower, but next to it.

Another issue, for dual extruders, it is necessary to correctly indicate the length and speed of plastic rollback when changing the extruder. The length should be sufficient so that when loading the second material, the first is behind the fork and does not interfere with the passage of the second. We set this parameter to 55mm at a rollback speed of 25mm / s.
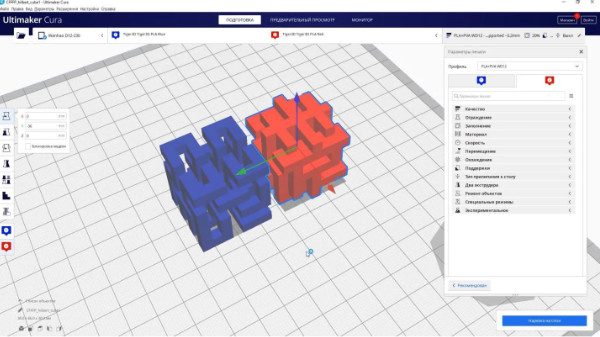
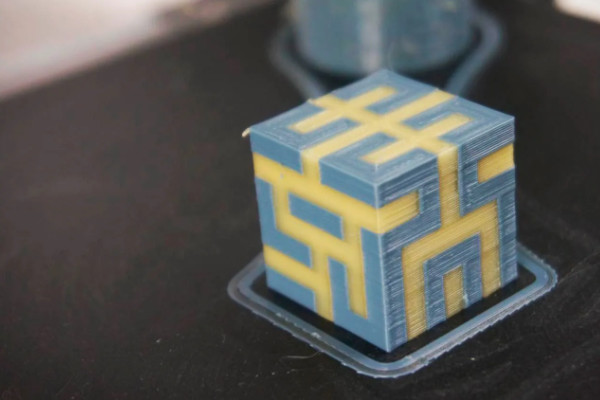
We tried to print a simple test. A small two-color cube in Hatchbox orange PLA and Hatchbox blue PLA. The volume of plastic driven through the roughing tower when changing to blue was set to 40 cubic mm, and for orange, 60 cubic mm.
The cube printed well. The only problem was that the volume of plastic being channeled when changing to orange turned out to be insufficient. As a result, the orange turned out with a bluish tint.
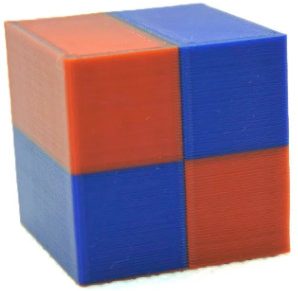
Otherwise, everything is pretty smooth and neat.
There was one strange moment at the very beginning of printing: at the first change of plastic, the first material rolled back to the required distance and the second one remained in place. Therefore, we had to manually move it and on the first layer the plastic did not have time to fully change.

To solve this problem, we set “minimum skirt / rim” length of of the second extruder to 3000 mm. Thus, on the first layer, when printing the skirt of the second extruder, the plastic will have time to pass to the nozzle, and the color will change.

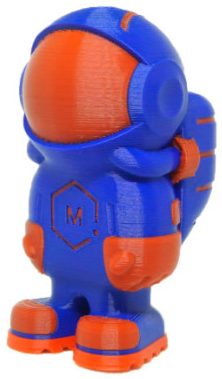
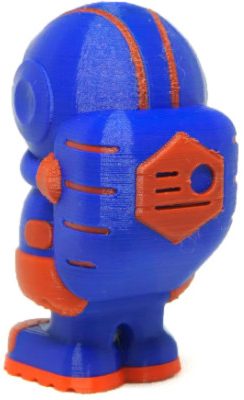
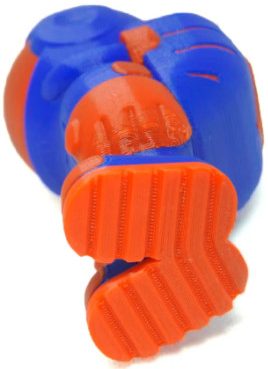
The volume of the roughing tower for blue plastic was increased to 60 cubic millimeters and for the orange material, we increased it up to 75 cubic millimeters. We then printed a two-color model of the astronaut from the MakerBot company.
Almost immediately, it became clear that the increased volume of the roughing tower was still not enough. Especially in contrast to the soles, which were printed without changing the extruder, they turned out to be pure orange. And then, where the extruders had already changed, the orange turned out to be dark with an obvious bluish tint.
A little later, there was a lack of airflow again in the places where hands began to be printed. Although, in fairness, these places have really strong slopes.
As for the rest, the astronaut finished printing without any incident. The quality turned out to be quite decent but not perfect. There are some small smudges in a couple of places, but they are not significant.


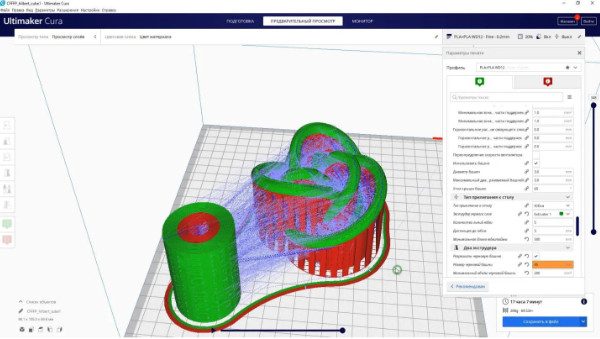
Two-color printing with the same materials is rather interesting. With two extruders, you can use solvent-supported printing. There are two main types of soluble supports – PVA and HIPS.
HIPS is used for printing with ABS plastic or similar materials. This will be problematic on this printer. But PVA supports are suitable for printing with PLA plastic. And PVA dissolves with ordinary water.
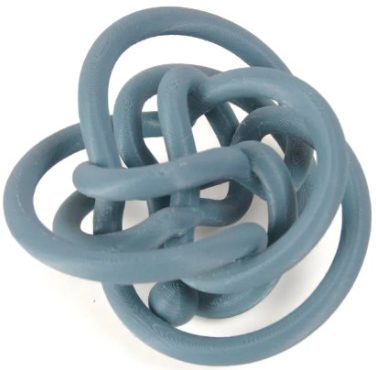
We took one of the most stable and easy-to-print PVAs from Esun . And we tried to print the most famous test for printing with a dissolving material – Gilbert Cube.
This model has no support, and like a regular two-color model, it consists of two STL files.
The main part was printed in Overture gray PLA , the auxiliary part was printed in PVA ESun. The volume of the roughing tower during the transition to PVA was set to 80mm2.
It doesn’t matter if a little PLA gets into the PVA, even if not completely, but it can dissolve. But with the transition to PLA, the situation is more complicated. If it contains PVA residues, the part that should remain intact may dissolve in the water. Therefore, the volume of the roughing tower for the model was set to 100mm2.

In appearance, everything was printed very well, even despite the capriciousness of PVA.
We put the model in the water and our fears were justified.
At first, everything was fine. However, after a few hours, we found that some of the PLA had dissolved in some places and the model fell apart.

We did some more tests to find an acceptable roughing tower volume.

This is a labyrinth of a very tricky shape where there is a ball inside. And after removing the supports, this ball should roll. Of course, this model can be printed with the usual supports. But to get such a quality of surfaces as with soluble ones, it most likely will not work.
The volume of the roughing tower during the transition to PLA was set as much as 200mm2. The gaps between the supports and the model on all axes were set to 0.
We then sent the model to print.

The labyrinth was printed to the very end without incident. All the supports worked well. There were no problems with overhanging elements and places that start to print in the air.

The printing took about 21 hours and a large amount of plastic was spent on the roughing tower. Fortunately, the plastic was not the expensive PVA but the relatively cheap PLA.

We did not dare to leave the model in the water for a long time and most of the supports were removed simply under running warm water. As a result, the maze did not fall apart.
The surfaces above the supports are exactly the same quality as above, regardless of the slopes. After the final flushing, small gaps appeared on the PLA. Apparently, PVA still got into the main model. This spoiled the appearance a little. Still, the model remained intact and works well.
To be honest, we were very happy with the labyrinth.


Finally, let’s go back to single-extruder printing, only this time with PETG plastic.
We used white Overture PETG. The Benchy boat turned out well. There are no gaps, the number of strings is minimal, the geometry is even.

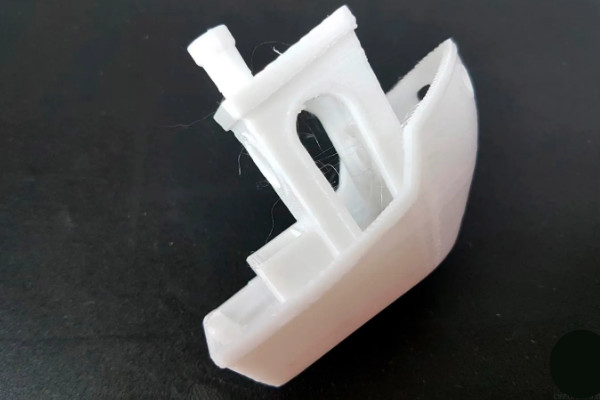
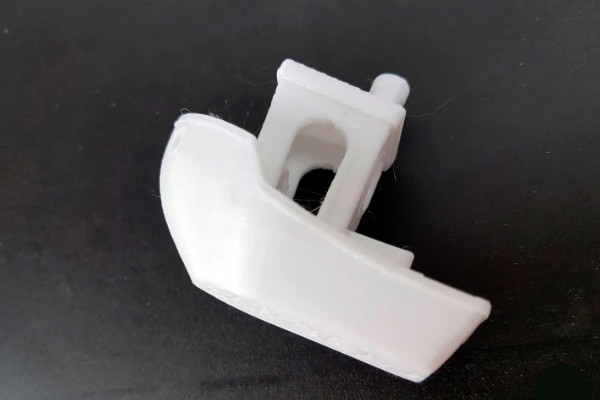

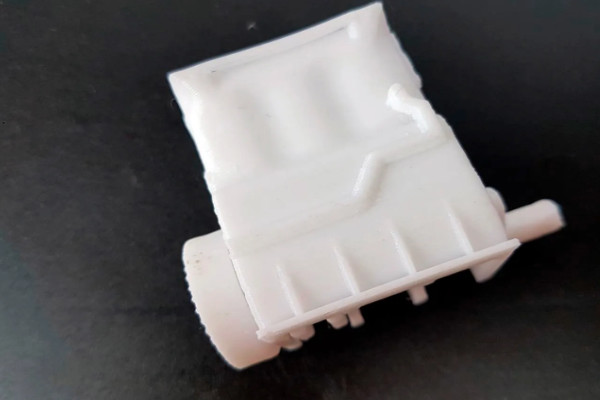
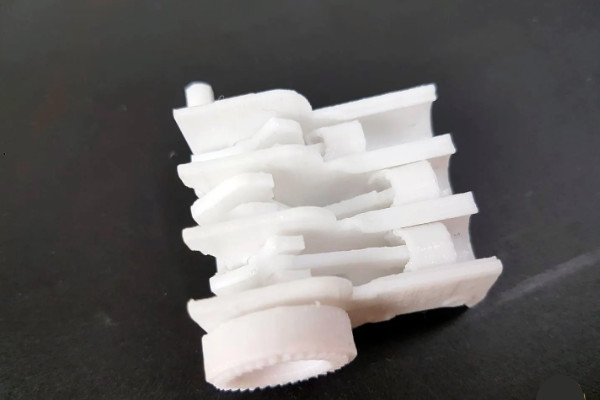
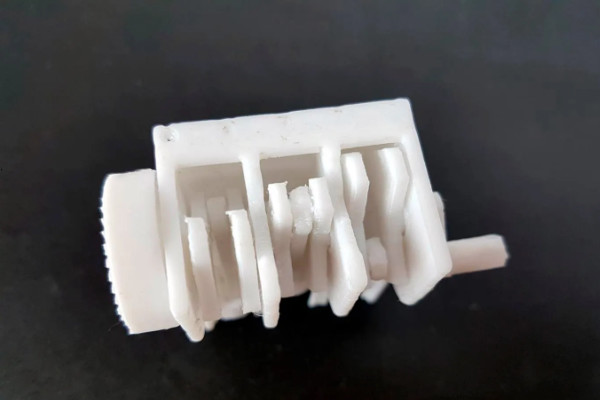
We also tried to print a very difficult test – a small motor. It is printed assembled, and after printing it should move, simulating the operation of an internal combustion engine.
This model also printed well, and had no significant flaws.

Conclusion
What can we say about the printer?
The Wanhao D12 230 is well made and makes a good impression. In single-extruder mode, with well-chosen settings, print quality is decent. However, there was a little lack of airflow on strong slopes when printing PLA.
In dual-extruder mode, with the correct settings, you can also achieve normal printing from this printer. However, the Y-shaped hotend has a lot of complications, including: a large volume of the roughing tower, tinting of one material with another, long retracts when changing an extruder, and time for hot-end warming up or cooling down when printing with materials with different temperatures.
Still, the flaws that we have just mentioned are not unique to this Wanhao printer but in general, to all dual-extruder printers.
BUY ON WANHAO STORE
