
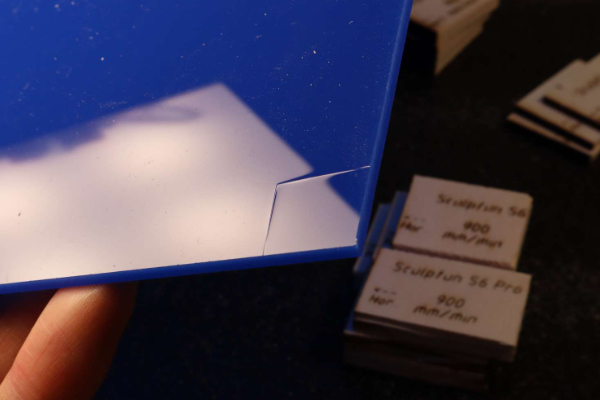
After much testing of laser engraving machines, I have made an unbiased comparison of two popular models – the Sculpfun S6 and the Sculpfun S6 Pro. If you’re planning to purchase one of these machines, read on.
In this article, I’ll be comparing the advantages of the two engravers in terms of cost, usability, and speed. Let’s get started.
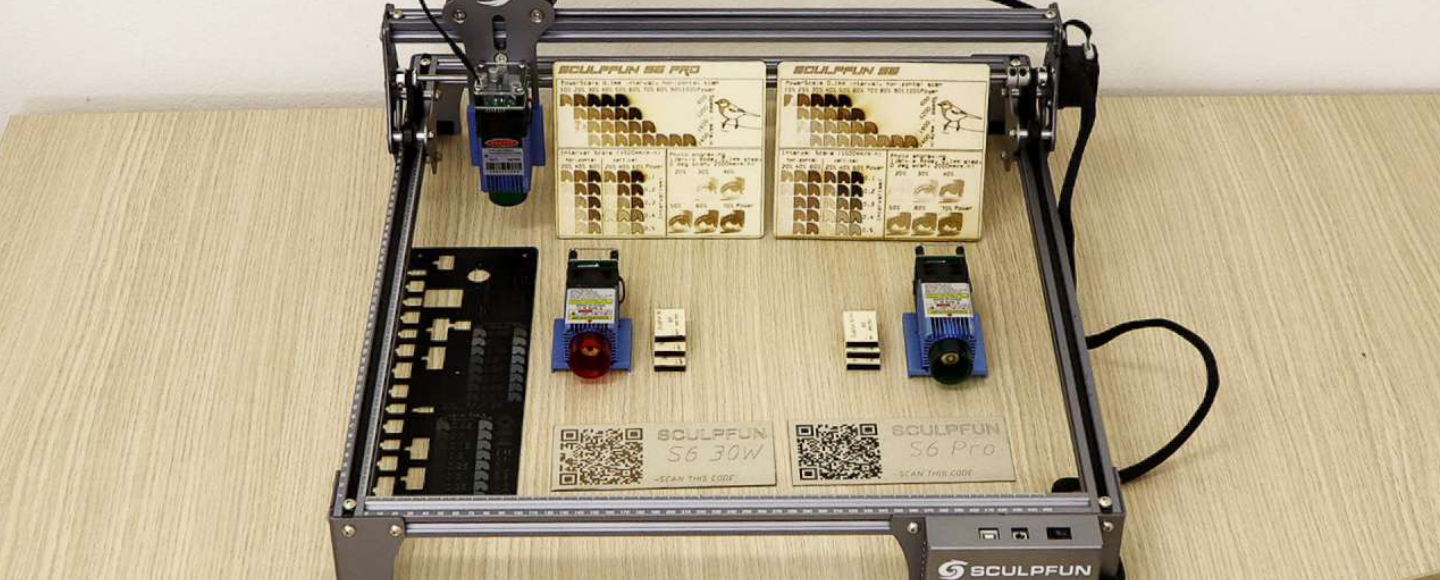
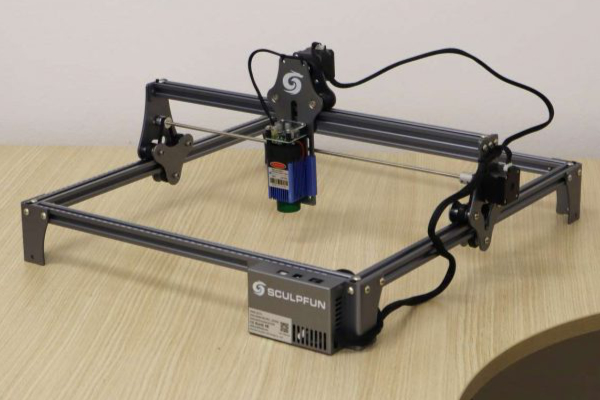
Sculpfun S6 and S6 Pro Laser Engravers
![]()
AVAILABLE ON AMAZON
About Sculpfun And the S6 Laser Engravers
Sculpfun is a company that focuses on producing small laser engravers thata re suitable for hobbyists and small businesses. While products from competitors like Atomstack have similar features with Sculpfun engravers, the latter have extra features that make them stand out from the crowd.
Assembling the Sculpfun laser engravers is a breeze, thanks to their well-written instruction manual. When you get your package, the necessary tools will be inside. Screws and parts are separated into labeled bags that are referred to in the manual. As a result, you can easily assemble the machines in under 30 minutes.
Specifications
[su_table]
| Parameter | Value |
|---|---|
|
Engraving Size
|
410 x420mm
|
|
Engraving Materials
|
wood, paper, cardboard, plastic, white, PCB board, aluminum oxide, black-painted metal/ceramic
|
|
Laser Output Optical Power
|
5.5-6W
|
|
Laser Wavelength
|
455±5nm
|
|
Focusing Method
|
Fixed focus laser
|
|
Operating Software
|
LaserGRBL, LightBurn, Benbox, GrblController, LiteFire, Support Windows system, Support OSMAC system. Supported file formats NC, BMP, JPG, PNG, DXF and other image formats.
|
|
Input voltage
|
AC100-240V, 50/60Hz
|
|
Weight
|
3.0kg
|
|
Warranty
|
One Year
|
[/su_table]
Laser Diode
The Sculpfun S6 and S6 Pro laser engravers have a laser diode that delivers around 5.5W of optical power. The S6 Pro is promoted as having an equivalent of a 60W Co2 laser power, while the S6 has an equivalent power of 30W.
The laser module has a fixed-focus diode. While both machines have similar output power, the S6 Pro has a much smaller focus dot. In this review, we will test the S6 Pro.
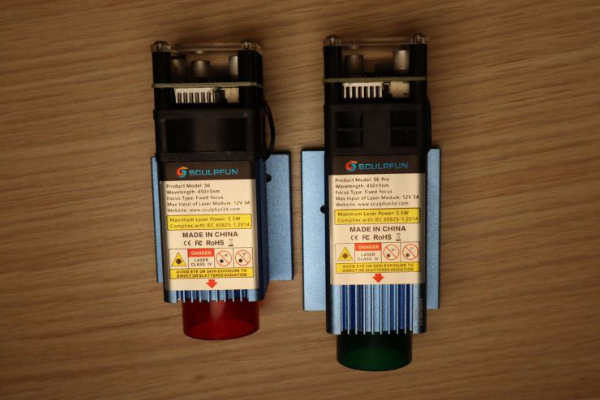
When a laserhead has a fixed focus, there are no moving parts that obstruct the beam’s path. This allows for a narrower focus and quicker focusing procedure than laserheads with adjustable focus.
While the laserhead of the Sculpfun S6 and S6 Pro have a protective shield for safety, it is still important to wear the safety goggles that ship with the machine. However, I strongly suggest investing in high-quality goggles with OD6+ protection to provide maximum protection for your eyes. Remember, you only have one pair of eyes, so it’s crucial to protect them. The lasers used in these machines operate in the visible light spectrum, and even reflections can be extremely hazardous to your eyes.

AVAILABLE ON AMAZON
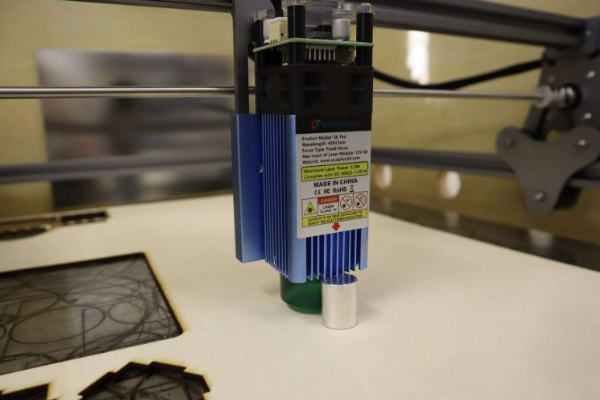
Focusing Process
To achieve optimal cutting, the laser head should be positioned about 3mm above the engraving surface. This can be done by placing the provided aluminum block beneath the laser head and lowering it onto it. After tightening the z-axis screws using a thumb screw, the head remains at a consistent 3mm distance from the surface.
This focusing process is much quicker than the Atomstack’s method, which requires you to use an hex wrench to adjust the focus.
Cutting and Engraving Different Materials
The Sculpfun S6 and S6 Pro can engrave a variety of materials, and even cut through some.
The machines can engrave wood, leather, cotton (clothing), rubber, paper, fruit, foam, acrylic, and black anodized aluminum. They can also cut wood, paper, tape, cloth, acrylic, and cardboard.
These machines can cut paper and tape in a single pass. On the other hand, cardboard or wood require multiple passes.Poplar plywood, which is a soft wood, is the preferred wood for laser cutters. The wood can be cut easily with these machines.
Please be cautious when using the machine to cut certain plastics such as PVC and vinyl. Such materials release hydrogen chloride gas when they are being cut. This gas is highly toxic and corrosive. Therefore, it’s best to avoid cutting these materials altogether.
Software and Supported Formats
The Sculpfun laser engravers are compatible with LaserGRBL, which is free to use. The software works fine but can be a bit cumbersome to use. While it’s great for testing purposes, I personally prefer Lightburn software due to its advanced features and user-friendly interface.
While Lightburn is not free, there is a one-month fully functional free trial version. After using it, you can decide if it’s worth the $60 license fee. For me, it’s definitely worth it as it saves a significant amount of time (which is valuable).
The Sculpfun laser engravers are advertised to work with Benbox, GrblController, and LiteFire software. However, we have not yet tested their compatibility.
LaserGRBL allows you to import both vector files (NC, BMP, JPG, PNG, DXF, etc.) and bitmap image files (bmp, jpg, png, and gif).
Lightburn has support for a wider range of file formats, including vector formats such as AI, SVG, DXF, PDF, HPGL, PLT, and RD. It also supports image formats such as PNG, JPEG, BMP, TIFF, TGA, and GIF.
These machines are best used for engraving vector files. This is because the laser head tracks the paths around the shape edges directly, resulting in faster engraving. In contrast, engraving bitmap images (such as photos) involves scanning like a printer and making dots.
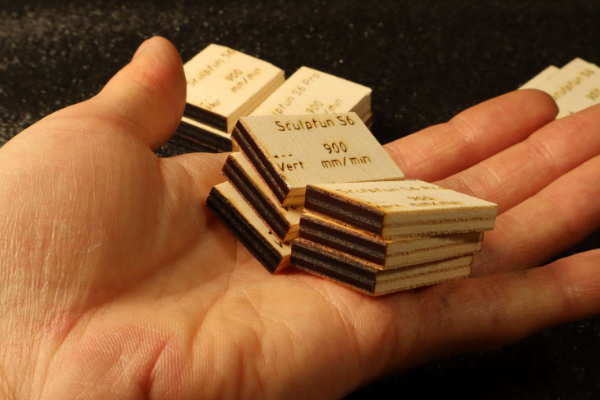
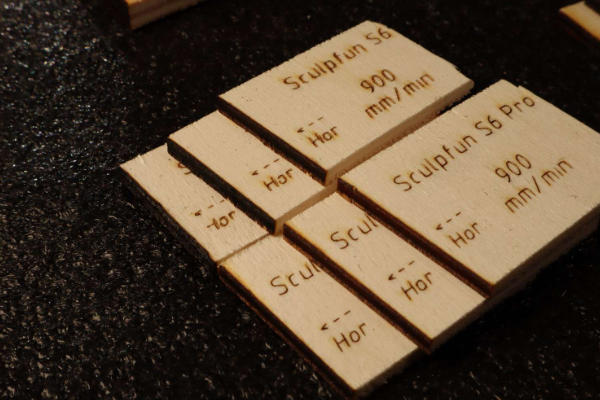
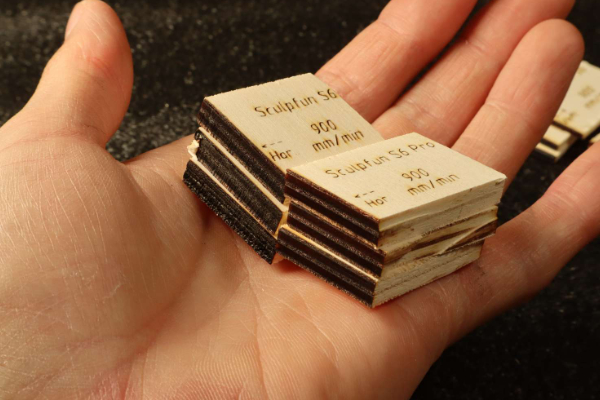
Our Test Results
We conducted a standardized test on both the Sculpfun S6 Pro and S6 laser engravers. The test enables easy comparison of results between machines.
Wood Engraving
The engrave pattern we use is a standardized one that displays the engraving capabilities of the machine at various settings. This way, you can evaluate the effectiveness of the laser beam.
If you wish to test your own laser, you can get the test file from the link provided.

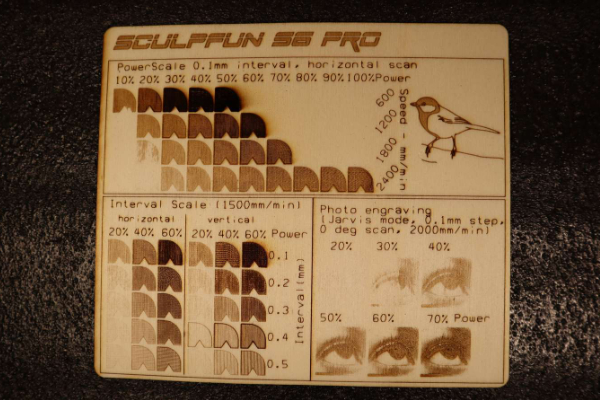
Power Scale
The power scale test pattern demonstrates the machine’s engraving capabilities at different power levels and speeds. Power is adjusted in increments of 10% from 10% to 100%, and speeds of 600, 1200, 1800, and 2400mm/min are used. The slow speed/high power shapes used in the test with the Atomstack A5 20W have been excluded. Why? Because the beam causes excessive burning at slow speeds, resulting in charred blobs that are of no practical use.
Although the Sculpfun S6 Pro has slightly more output power, the difference is not very noticeable due to the smaller size of its focus dot.
The engrave interval for filling the shapes is set to 0.1mm. This is smaller than the S6 focus dot but larger than the S6 Pro focus spot. This indicates that with the S6, the beam overlapped at each line, while with the S6 Pro, it did not.
The text engraving also demonstrates the significantly smaller focus spot of the S6 Pro.


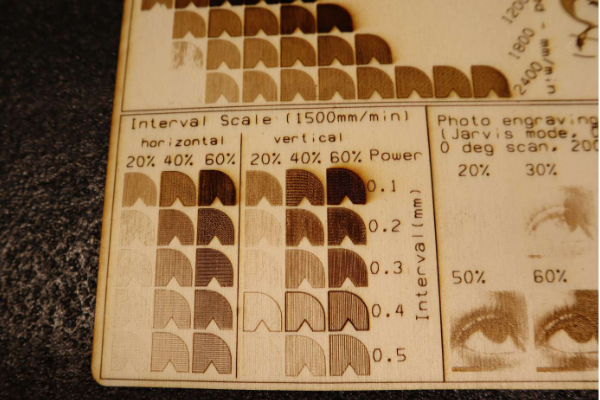
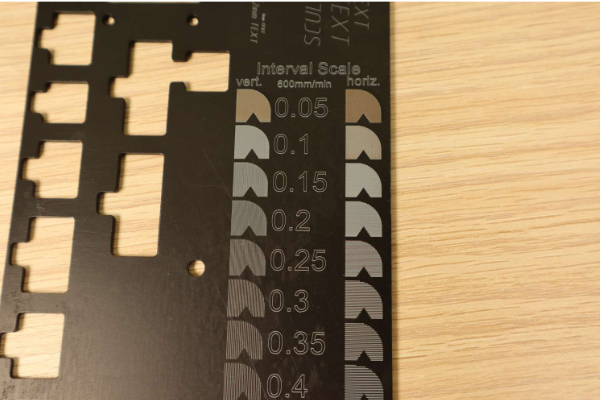
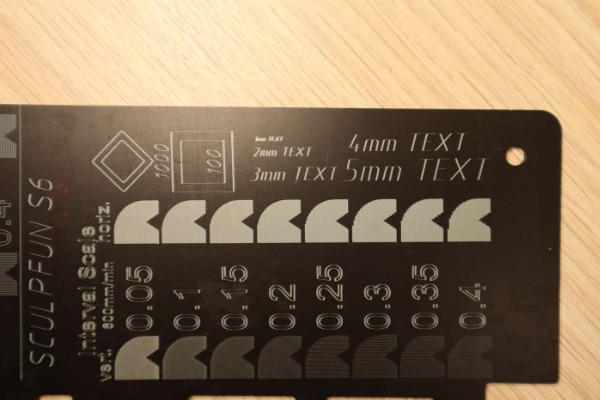
Interval Scale
The interval scale test helps to determine whether the laser focus spot is a square or rectangle shape. The test involves gradually increasing the scanning interval from 0.1mm to 0.5mm.
The Sculpfun S6 shows a rectangular shape in the interval scale test. This is because it behaves differently when scanning horizontally and vertically.
The results indicate that the S6 Pro has a smaller and more square-shaped spot compared to the S6.
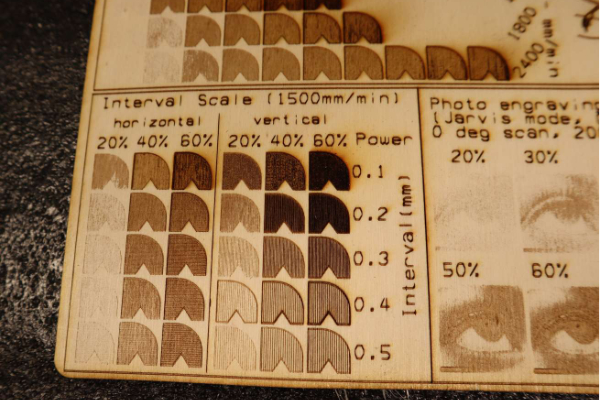
Sculpfun S6
Sculpfun S6 Pro
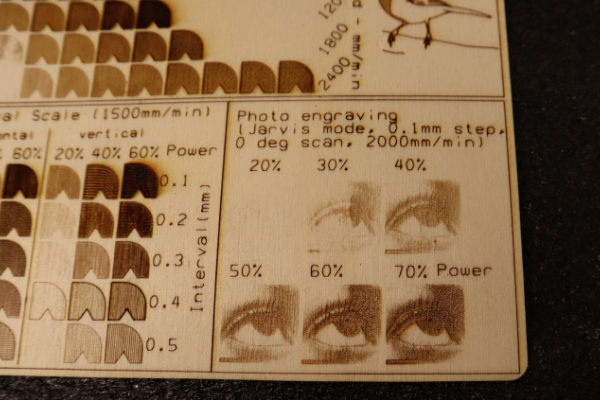
Photo Engraving
Below is a test of engraving a 20mm size photo while adjusting the maximum laser power. Engraving photos is a slow process as the laser head needs to scan each line, similar to an inkjet printer. Engraving a large photo can take several hours, so be prepared for a long wait.
As can be observed in the following image, the Sculpfun S6 has a significant advantage in this scenario as it has a smaller focus spot, resulting in a much more detailed photo engraving.
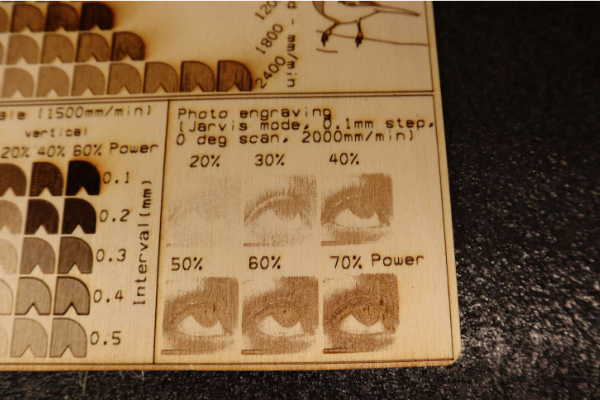
Sculpfun S6
Sculpfun S6 Pro
Vector Image Engraving
Engraving vector images is considerably faster as the laser head can directly follow the paths. However, it’s not possible to create a grayscale image with vector images.
The test piece features a charming photo of a Tit bird in the upper right corner. The photo was engraved in just a few minutes. In the software, you have the option to fill closed shapes with a pattern. In this case, the shape was filled by scanning with a 0.1mm step. For larger engravings, you can increase the step to 1mm or more to speed up the process. This would create a raster or grid pattern in the black areas.

Sculpfun S6
Sculpfun S6 Pro
Anodized Aluminum Engraving
We proceeded to test the Sculpfun S6 Pro and Sculpfun S6 by engraving on a piece of black anodized aluminum that we had available.
Here is the test pattern that we engraved on the black anodized aluminum. Our goal was to evaluate the focus dot size in both directions and the effects of speed.

Sculpfun S6
Sculpfun S6 Pro
The interval scale is the most crucial part of the test, The test helps to estimate the laser dot size by scanning in both vertical and horizontal directions with various interval steps.
Based on the results, it is evident that the laser dot of the S6 30W is rectangular since the engraved pattern appears distinct when scanning along the X and Y axis.
The Sculpfun S6 Pro boasts a smaller beam size, which results in more detailed engravings. Additionally, the interval test indicates that the S6 Pro has a smaller and more rectangular dot shape. The text engravings are also noticeably sharper and more defined on the S6 Pro.
The texts were engraved tt a speed of 600 mm/s, which is relatively fast for small movements. As a result, there was some shaking of the laser head in the corners. However, this issue can be resolved by adjusting the acceleration and speed settings. By decreasing the speed and acceleration by a factor of two, the outcome is significantly improved.
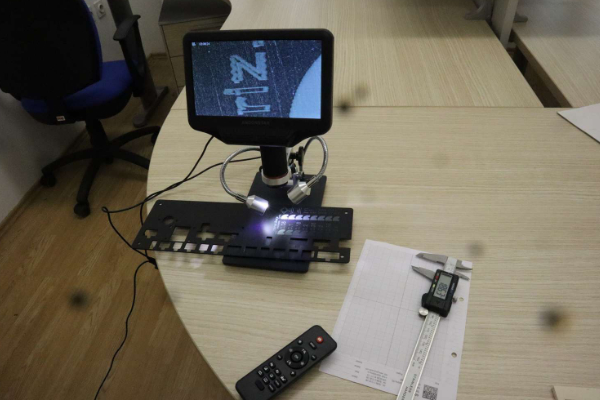
Let’s proceed with some additional testing using the digital microscope. Here are the images captured using the Andonstar AD407 digital microscope.
Sculpfun S6 Pro

Sculpfun S6 Pro
Sculpfun S6 Pro
Sculpfun S6 Pro

Sculpfun S6

Sculpfun S6
Sculpfun S6
Sculpfun S6
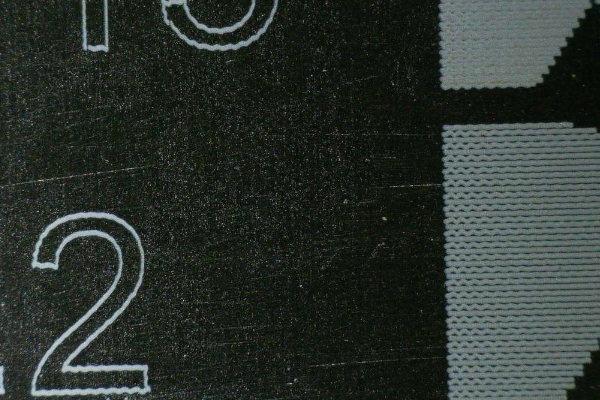
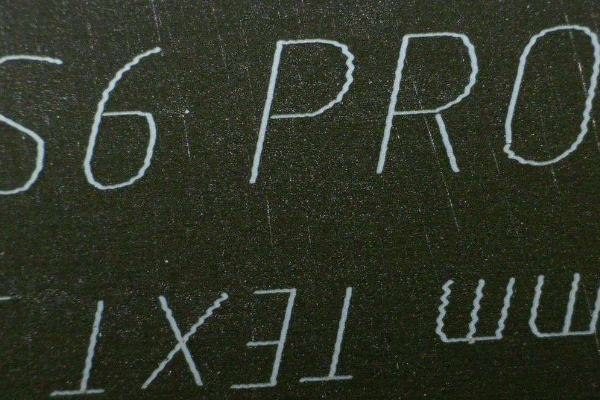
The initial observation reveals that the Sculpfun S6 Pro has a significantly smaller dot size of approximately 0.1 x 0.2 millimeters. On ther other hand, the Sculpfun S6 has a rectangular dot shape of approximately 0.08mm x 0.4mm.
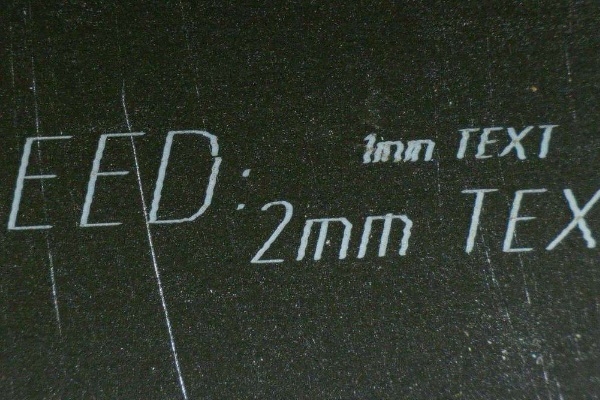
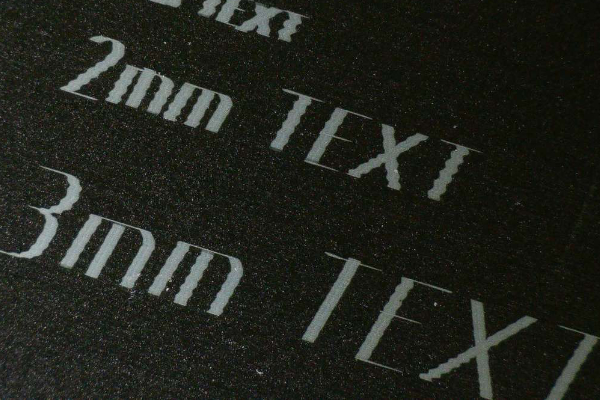
The next test involves using different text sizes. It can be observed that the machine can still produce readable text at 2mm size. However, the 1mm text height becomes illegible. Furthermore, there is some wobbling present in one axis, which is likely due to mechanical effects.
However, keep in mind that the speed used in this test is relatively high (600mm/min).At a lower speed, the accuracy is expected to increase as we will see in later tests.
Sculpfun S6

Sculpfun S6 Pro

Sculpfun S6
Sculpfun S6 Pro
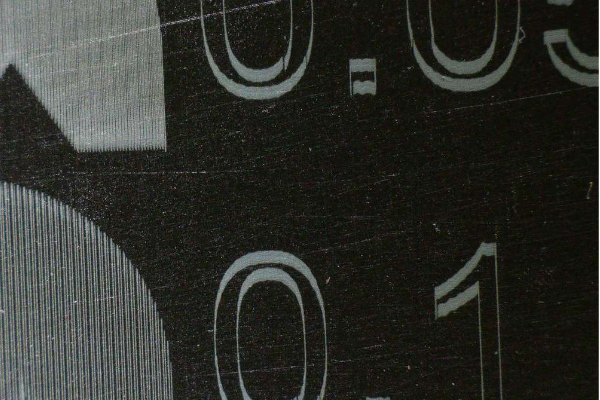
The engraving below shows two sets of squares on the right side, one inside the other. The inner square is engraved at a speed of 1000mm/min while the outer square is engraved at 100mm/min.
It can be observed that there is more wobbling present at higher speed. This is most likely due to mechanical effects. Also, it appears that the speed of engraving does not have any impact on the brightness of the engraved pattern.
The lower two squares clearly demonstrate the effect of a rectangular dot shape, as the vertical lines are noticeably thinner than the horizontal ones.

Sculpfun S6 Pro
Sculpfun S6
Laser Focus Distance Test
This test will demonstrate how the size of the laser dot expands as it goes deeper into the material. The laser’s ability to maintain focus as it penetrates the material determines the thickness of material that can be cut.
To achieve this, we gradually lower the board by 3mm for each square, without readjusting the focus of the laser head.
The 0mm position indicates the optimal focus setting (using the aluminum block). Subsequently, for each square, the test piece is lowered by 3mm without refocusing the laser head. This process demonstrates how large the dot becomes at a depth of 3mm in the material being cut. This principle can be extrapolated to greater depths as well.

It can be observed that lowering the test piece by 3mm from the optimal focus does not increase the dot size significantly for the Sculpfun S6 Pro.
Moreover, the shape of the beam in the S6 becomes less rectangular and more square as we move farther away from the optimal focus. As we move further away, the dot size increases considerably. At 6mm and 9mm, the dot becomes significantly thicker.
The thickening effect can be useful in situations where low-detail engravings on larger objects are desired. By intentionally positioning the laser out of focus, the beam will be larger and the engraving can be done faster as the distance between engraved lines can be increased.

Acrylic Engraving And Cutting
We also tested 3mm black acrylic (also known as plexiglass) at a speed of 600mm/min. Both machines performed well, with clean cut edges achieved. The Sculpfun S6 required 16 passes while the Sculpfun S6 Pro only needed 10 passes to cut through the material.
We tried doing the same test on blue acrylic, but it did not produce the desired results. The blue color of the material is not dark enough to sufficiently absorb the laser light. Moreover, it may cause the material to reflect the blue laser light.
After 50 passes at 600mm/min with full power, both machines were only able to melt the board slightly and there were no visible engraved letters. Therefore, it can be concluded that the Sculpfun S6 and S6 Pro laser machines are only capable of cutting and engraving on very dark acrylic boards.
Sculpfun S6

Sculpfun S6 pro

Plywood Cutting Test
We tested three different cutting speeds on 3mm and 6mm. We cut thick Poplar plywood using both machines in two scanning directions – horizontal X-axis (left-right) and vertical Y-axis (back to front). The cutting performance varied in each direction due to the rectangular shape of the dot in the Sculpfun S6.
Here are the results of the test:


The results indicate that as the speed decreases, more charring occurs. Moreover, when the speed increases, more passes are required.
The results indicate that the Sculpfun S6 30W has better cutting performance in the Y axis due to its rectangular dot shape. On the other hand, the Sculpfun S6 Pro shows a more balanced cutting performance in both directions.
Hardwood Cutting Test
This test demonstrates the cutting performance of Sculpfun S6 and S6 Pro laser engraving machines on harder woods at a speed of 600mm/min.
Initially, we attempted to cut 4mm pine wood, which is considered a relatively soft wood. Cutting 4mm pine wood was not a challenge for both machines. They were able to cut through it in just 12 passes.
We proceeded to test on harder 3mm thick Beech wood. The S6 machine encountered some difficulties cutting along the X axis. Overall, it required 50 passes to cut through and also produced a lot of charring. It was difficult to determine the exact moment when the cut was complete as the piece did not fall off immediately.
On the other hand, the Sculpfun S6 Pro had no issue with the task and completed it in 9 passes.

Pine wood

Beech wood
This is one of the most cost-effective laser engraving machines available!
Conclusion
You might be wondering whether to purchase the Sculpfun S6 or the more expensive Sculpfun S6 Pro. If your primary focus is laser engraving, we recommend the cheaper S6 30W machine as it performs just as well. However, if your primary focus is laser cutting and you require detailed photo engraving, investing in the Sculpfun S6 Pro may be worth it in the long run.
We hope this article has provided useful information to assist you in making an informed decision on which laser engraver would best suit your needs. To begin using either of these machines, click on the links below!
If you find the machines appealing, you can make a purchase through the links provided below:
