
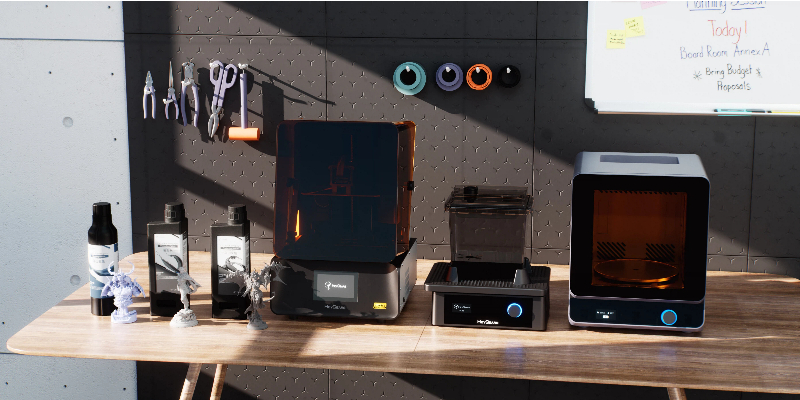
Best 3D Printer for Prototyping (2026 Buyer’s Guide)
If you’ve ever waited two weeks and paid $300 for a prototype that came back wrong, you already understand why owning the right 3D Printer changes everything. The best 3D Printer for prototyping isn’t just about specs on paper – it’s about how fast you can go from a CAD file to a part you can actually test, iterate on, and eventually hand off to production.
This guide is written for engineers, product designers, small business owners, and serious hobbyists who want real advice before spending money. We’ve structured it around the concept of iteration speed – because in the modern design cycle, the team that can test ten ideas in the time it takes a competitor to test two will almost always win.
Let’s get into it.
Ready to Speed Up Your Prototyping?
See our top-rated pick for rapid iteration right now.
Jump to Section
1. Quick Verdict: Top Picks by Prototyping Goal
Not everyone has time to read 8,000 words. Here are the top picks before we dig into the detail.
- High-speed printing
- Auto Flow Dynamics calibration
- Fully enclosed build chamber
- AMS multi-material system
- 350°C nozzle temperature
- Actively heated 60°C chamber
- Prints Nylon, ABS, Carbon Fiber
- Real dimensional stability
- Large 305×305×280mm volume
- 350°C nozzle & heated chamber
- Perfect for enclosures/housings
- Scales to small production runs
- Under $500
- Hardened steel Unicorn nozzle
- Supports carbon fiber
- Fast with Klipper firmware
- Fine-detail prototypes
- Tilt-Release technology
- Reduces peel-force failures
- Excellent for tight tolerances
- Open Material Mode
- Integrated wash-and-cure
- Business-grade support
- Predictable, repeatable results
2. What Actually Makes the Best 3D Printer for Prototyping?
This is where most buyer guides fall short. They list specs without explaining why those specs matter – or when they don’t. Let’s build the right mental model before you spend a dollar.
2.1 Speed vs. Iteration Speed – They’re Not the Same Thing
You’ve probably seen printers advertised at 500mm/s or even 600mm/s. Those numbers are seductive. But raw print speed is only one variable in what actually matters: time-to-part.
The printers that win at time-to-part typically share a few traits. They have reliable first-layer detection so they don’t silently fail during a run you started before bed. They have good automatic calibration so setup time between jobs is minimal. They handle filament changes gracefully. And they have enclosed build environments that reduce the environmental variables that cause failures.
When evaluating any machine for prototyping, ask: “What’s the realistic failure rate per print?” – not “What’s the top speed?”
2.2 Accuracy vs. Precision vs. Repeatability
These three terms get used interchangeably in marketing material, but they mean very different things – and for prototyping, getting them right matters.
Accuracy describes how close your printed part is to the dimensions in your CAD file. If your model is 50.0mm wide and your print comes out at 49.6mm, your printer has an accuracy issue.
Precision refers to the smallest movement increment the printer’s motion system can execute. A printer with 0.001mm precision can theoretically position the nozzle extremely finely – but precision alone doesn’t guarantee accurate prints, because other variables (thermal expansion, filament flow variation) also affect the final part.
Repeatability is arguably the most important metric for engineering prototyping. It describes whether you can print the same part ten times and get the same result each time. If you’re prototyping a snap-fit enclosure and the tabs fit the first print but not the third, your printer has a repeatability problem – and that’s a workflow killer.
For most functional prototyping, especially when testing fit, clearance, and mechanical behavior, repeatability is what you should prioritize over raw accuracy numbers on a spec sheet.
2.3 Nozzle Temperature vs. Chamber Temperature – Why Both Matter
A common point of confusion for people entering engineering-grade 3D printing: high nozzle temperature and high chamber temperature are not the same thing, and they solve different problems.
Nozzle temperature determines which materials you can melt and extrude. Standard brass nozzles top out around 260–270°C, which covers PLA, PETG, and soft TPU. If you want to print Nylon 12, carbon fiber composites, or polycarbonate reliably, you need a nozzle that can sustain 280–350°C – and ideally a hardened steel nozzle that won’t be worn down by abrasive filaments.
Chamber temperature is about what happens to the part after the plastic is deposited. When hot plastic cools unevenly – which happens whenever the ambient temperature around the print is significantly lower than the extrusion temperature – you get warping, layer delamination, and dimensional shift. A passively enclosed printer reduces this somewhat. An actively heated chamber (like the 60°C chamber in the QIDI Q1 Pro) maintains a stable thermal environment throughout the entire print.
2.4 Material Compatibility for Prototypes
The right material depends entirely on what you’re testing. Here’s a practical framework:
- Visual and concept prototypes – you want PLA or PLA+. It’s easy to print, dimensionally stable at room temperature, comes in hundreds of colors, and can be sanded, painted, and finished easily. The goal here is communicating form, not testing function.
- Functional testing prototypes – move to PETG. It has better impact resistance than PLA, doesn’t warp like ABS, and has reasonable chemical resistance. For parts that need to flex slightly without snapping – clips, living hinges, snap-fit tabs – PETG is often the best balance of ease and performance.
- Mechanical and load-bearing parts – ABS and ASA are the workhorses here. ABS has good layer bonding and post-processability; ASA adds UV stability for outdoor applications. Both require an enclosed printer (ideally heated) to avoid warping on larger parts.
- Engineering-grade applications – Nylon (PA6, PA12, PA-CF) and polycarbonate for parts that need to survive real-world conditions: heat, repeated flex cycles, chemical exposure. These materials are unforgiving – they need high nozzle temperatures, heated chambers, and dry filament storage.
- High-strength and weight-sensitive prototypes – Carbon fiber composites (PAHT-CF, ABS-CF, PETG-CF) give you excellent stiffness-to-weight ratios. They require hardened nozzles and generally perform best with heated chambers for large parts.
3. Comparison Table
Here’s a side-by-side look at the top recommendations for 2026. Use this as a quick reference when narrowing down your decision.
| Printer | Build Volume | Nozzle Temp | Chamber Temp | Enclosed | Ecosystem | Maintenance | Best For |
|---|---|---|---|---|---|---|---|
| Bambu Lab P2S | 256×256×256mm | 300°C | Passive | Yes | 5/5 | Low | Rapid prototyping, startups |
| QIDI Q1 Pro | 245×245×245mm | 350°C | Active 60°C | Yes | 4/5 | Medium | Engineering parts, Nylon/ABS |
| QIDI Plus4 | 305×305×280mm | 350°C | Active 60°C | Yes | 4/5 | Medium | Small business, larger builds |
| Creality K1C | 220×220×250mm | 300°C | Passive | Yes | 4/5 | Low–Medium | Budget engineering materials |
| Elegoo Saturn 4 Ultra | 218×123×260mm | N/A (resin) | N/A | Yes | 4/5 | Medium | Detail parts, housings |
| Formlabs Form 4 | 200×125×210mm | N/A (resin) | N/A | Yes | 5/5 | Low | Professional workflow |
Ecosystem scoring note: Bambu Lab and Formlabs score 5/5 because they offer tightly integrated software, hardware, and materials ecosystems that just work out of the box – at the cost of being somewhat closed. QIDI and Creality score 4/5 because they’re highly tunable and open, which gives experienced users more control but requires more setup investment.
4. Best 3D Printer for Prototyping – Detailed Reviews
4.1 Bambu Lab P2S – Best 3D Printer for Rapid Prototyping
If you’re evaluating the best 3D Printer for rapid prototyping, the Bambu Lab P2S is probably the machine most people should buy in 2026. It’s not necessarily the cheapest, the most open-ended, or the best at any single metric – but as a complete package optimized for iteration speed, it’s in a class of its own at its price point.
What makes it exceptional for prototyping?
The P2S’s standout feature for day-to-day prototyping isn’t its maximum print speed – it’s Auto Flow Dynamics. This automatic pressure advance calibration system continuously adjusts extrusion parameters during a print to maintain consistent line width even at high acceleration. The practical effect is that you can push print speeds significantly without the corner blobbing and under-extrusion that plague less sophisticated machines. First prints work. You’re not spending the first three hours of machine ownership dialing in settings.
The AMS (Automatic Material System) is genuinely useful for prototyping workflows. Multi-material printing with soluble supports – specifically BVOH or PVA – is transformative for complex geometries. Bridging and overhangs that would require extensive manual support removal can instead be printed with dissolvable supports that you just drop in water. For teams iterating on complex enclosures or organic forms, this is a genuine workflow accelerator.
The fully enclosed build chamber, while not actively heated, significantly reduces the variability that causes print failures. Combined with a high-quality build plate system and reliable automatic bed leveling, the P2S consistently delivers first-layer adhesion without the prayer rituals lesser machines require.
Remote monitoring via the Bambu Handy app means you can set up a print, go to a meeting, and actually know if something went wrong before you come back to a plate full of spaghetti.
Slicer and software ecosystem
Bambu Studio, the P2S’s companion slicer, has become one of the best desktop printer slicers available. It handles support generation, multi-material assignments, print profile management, and machine monitoring from a single clean interface. The cloud connectivity allows you to push print jobs remotely and monitor print progress via camera feed. For teams who need to track machine uptime and print history, this is practical value – not a gimmick.
The Bambu ecosystem also includes a large and growing library of community profiles for third-party filaments. While Bambu markets its own filament line, the machine works well with Polymaker, Bambu-compatible Sunlu, eSUN, and most major filament brands.
Maintenance and longevity
The P2S is notably low-maintenance relative to its capabilities. Automatic nozzle wiping before prints, a self-purging multi-material system, and a build plate that releases parts cleanly all reduce the day-to-day friction of running a busy prototyping machine. Regular maintenance tasks – nozzle replacement, lubrication, belt tension checks – are well-documented and straightforward.
- You prioritize speed and ease of use over open-source tinkering.
- You need multi-material capabilities for complex prototypes.
- You are printing primarily in PLA, PETG, TPU, and basic composites.
- You want a “set it and forget it” experience for startup environments.
Best for: Startups and product teams iterating daily on functional prototypes. Designers who want excellent results without extensive tuning. Anyone whose time is more valuable than saving $200 on a printer.
Ready to Iterate Faster?
Get the Bambu Lab P2S now and slash your prototyping lead time.
4.2 QIDI Q1 Pro – Best 3D Printer for Engineering Prototyping
When someone asks for the best 3D Printer for engineering prototyping, they’re usually asking about a specific problem: they need parts that actually work in real conditions. Parts that fit tight tolerances, survive heat, take repeated flex cycles, or live inside a product that might go through certification testing. The QIDI Q1 Pro is built for exactly this.
The heated chamber advantage, explained
The QIDI Q1 Pro’s 60°C actively heated chamber is not just a marketing feature – it is the single most important differentiator for engineering-grade prototyping. Here’s why.
When you print ABS or Nylon without chamber heat, the first layers deposited cool to room temperature before the next layers are added. The differential thermal contraction between cooled lower layers and still-warm upper layers creates internal stresses. On small parts, this manifests as slight warping. On larger parts – anything over about 100mm in a critical dimension – it can cause dramatic banana warping that makes the part useless.
At 60°C chamber temperature, the entire part maintains a consistent thermal state throughout the print. The temperature gradients that cause warping are eliminated. You get parts that come off the bed dimensionally accurate and stay that way.
350°C nozzle temperature
The QIDI Q1 Pro’s 350°C hardened steel nozzle opens up the full range of engineering-grade and composite filaments. ABS-CF, PA-CF, PAHT-CF, and high-temperature PETG variants all fall within reach. The hardened steel construction won’t wear down under abrasive carbon fiber or glass fiber composites the way standard brass nozzles do.
Repeatability for mechanical parts
In testing across multiple machines in this class, the QIDI Q1 Pro’s combination of heated chamber and quality motion system delivers excellent dimensional repeatability. Parts printed across multiple sessions – different days, different spools of the same filament – maintain consistent enough dimensions that press-fit components, bearings, and bolt patterns stay within specification. For engineers who need to test assemblies across multiple iterations, this is not a trivial thing.
Best for: Mechanical engineers prototyping load-bearing components, automotive and aerospace engineers printing functional test parts, and anyone whose prototype material requirements go beyond PLA and PETG.
Slicer and workflow
QIDI uses its own slicer (based on Orca Slicer, which is itself a fork of Bambu Studio), and it comes with well-tuned profiles for the QIDI Q1 Pro’s engineering material capabilities. Experienced users can also run the machine with Orca Slicer directly, which offers excellent control over the parameters that matter most for high-performance materials – precise temperature management, adaptive layer height, and careful retraction tuning for hygroscopic filaments.
One workflow consideration worth noting: engineering materials like Nylon require dry filament storage. QIDI’s ecosystem doesn’t include a built-in filament dryer, so factor a dedicated dryer (Bambu AMS for Nylon is not ideal – a standalone unit like the Sunlu S4 or EIBOS Cyclopes is better) into your total setup cost and workflow.
Need Serious Engineering Power?
Check out the QIDI Q1 Pro for demanding materials.
4.3 QIDI Plus4 – Best for Scaling Functional Prototypes
The QIDI Plus4 shares the Q1 Pro’s core engineering strengths – 350°C nozzle, actively heated 60°C chamber, hardened steel hot end – but scales them up to a 305 × 305 × 280 mm build volume. This makes it the best 3D Printer for small business use cases where the priority is printing larger functional parts or running small batch production prototypes.
In practice, the Plus4’s larger build envelope means you can print enclosures, control panels, and mechanical assemblies that would need to be split across multiple prints on a smaller machine. For small businesses prototyping consumer products, IoT device housings, or industrial tooling, the ability to print the whole thing in one run – rather than gluing or joining sub-components – saves significant time and improves structural integrity.
The Plus4 also benefits from the same thermal management philosophy as the QIDI Q1 Pro. Warp-free ABS at this build volume is genuinely useful and not something many competitors can match without significant compromise.
Best for: Small businesses building larger products, teams who need to print full-scale housing prototypes, anyone bridging the gap between one-off prototyping and small-batch production.
Scale Up Your Prototyping
Get the QIDI Plus4 for larger builds and business growth.
4.4 Creality K1C – Best Budget 3D Printer for Prototyping
Finding the best budget 3D Printer for prototyping means navigating a lot of compromise. Most sub-$500 machines will handle PLA fine but fall apart when you ask them to print anything more demanding. The Creality K1C is an exception worth knowing about.
The Unicorn nozzle
Creality’s hardened steel “Unicorn” quick-swap nozzle system is legitimately clever engineering at this price point. You can swap nozzles in under a minute without tools, and the standard nozzle is hardened steel – ready for carbon fiber composites out of the box. On most competitors at this price, hardened nozzles are an aftermarket upgrade that adds both cost and setup friction.
Carbon fiber ready
The K1C is designed to handle CF-composite filaments natively. PETG-CF, PLA-CF, and ABS-CF all print well on the K1C with appropriate settings. For engineers on a budget who need to prototype lightweight structural components, this is a meaningful capability.
Speed and automation
The K1C runs Klipper firmware with input shaping, which allows for higher print speeds than you’d expect at this price. Automatic bed leveling and a reasonable failure detection system reduce the babysitting burden. It’s not as polished or as reliable as the Bambu P2S, but it’s a capable machine for its price bracket.
Best for: Engineers and designers on a strict budget, students, hobbyists stepping up to functional prototyping, small teams running visual prototypes alongside occasional engineering material runs.
Prototyping on a Budget?
The Creality K1C delivers performance without breaking the bank.
4.5 Elegoo Saturn 4 Ultra – Best Resin 3D Printer for Prototyping
When discussing the best resin 3D Printer for prototyping, it’s worth first clarifying when resin is actually the right choice. Resin excels at fine surface finish, tight dimensional tolerances on small-to-medium parts, and isotropic strength (unlike FDM, resin parts don’t have obvious layer-direction weaknesses in tension). It’s ideal for connector housings, aesthetic mockups for client presentations, snap-fit components where precise mating geometry matters, and any part where “looks like injection-molded” is a requirement.
The Elegoo Saturn 4 Ultra is the most capable machine in this segment for serious prototyping work.
Tilt-Release technology
The biggest failure mode in MSLA resin printing is peel-force failure – the force required to separate each cured layer from the FEP film at the bottom of the vat can exceed the structural strength of a partially-cured print, causing catastrophic delamination. Elegoo’s Tilt-Release mechanism reduces this peel force significantly by using a tilting action (rather than a direct peel) to separate layers. In practice, this translates to higher success rates on large, flat-sectioned parts and on prints with high cross-sectional area.
For teams printing production-representative prototypes – housings, bezels, ergonomic grips – this is the detail that separates a machine you trust from one you babysit.
Build volume and resolution
The Saturn 4 Ultra’s 218 × 123 × 260 mm build volume is large for MSLA resin printing, which is typically constrained to smaller formats. Combined with a high-resolution monochrome LCD and fast cure times, it delivers excellent surface finish on parts that would be challenging to prototype any other way.
Resin options and material considerations
Standard resins are brittle, which limits their usefulness for functional mechanical prototyping. However, the Saturn 4 Ultra is compatible with a wide range of third-party engineering resins – ABS-like, flexible, high-temp, and tough formulations – that significantly expand functional prototyping capability. We’ll discuss specific resin choices in the fishing lure and filament sections below.
Post-processing workflow:
Resin printing requires a wash-and-cure step after printing. The Elegoo Mercury XS bundle pairs well with the Saturn 4 Ultra, handling both isopropyl alcohol washing and UV curing in one unit. Factor this into your total workflow and budget.
Best for: Product designers and engineers who need fine surface finish and tight dimensional accuracy on small-to-medium parts. Teams presenting prototypes to clients or for photography. Anyone prototyping snap-fit, thin-wall, or fine-feature components.
Need Ultra-Fine Details?
Get the Elegoo Saturn 4 Ultra for professional-grade resin prints.
4.6 Formlabs Form 4 – Professional Workflow Solution
The Formlabs Form 4 represents a different philosophy from every other machine in this guide. Where the others are optimized for capability-per-dollar, the Form 4 is optimized for reliability, repeatability, and workflow integration. It’s the machine for professional environments where the printer is a tool in a larger process – not a project in itself.
Open Material Mode
The Form 4 ships in a curated closed ecosystem where Formlabs resins are engineered to work precisely with the machine’s settings. This is excellent for predictability. But the addition of Open Material Mode means that advanced users and R&D teams can also run validated third-party resins, which meaningfully expands the material palette for specialized applications.
Integrated ecosystem
The Form 4 pairs with the Form Wash and Form Cure units for a seamless post-processing workflow. Software (PreForm) handles support generation, orientation optimization, and print management from a clean desktop interface. Fleet management via Dashboard makes it practical to run multiple printers across a studio or facility.
For product teams, this integration has a real value: less expertise is required per operator, prints are more consistent across different team members running the machine, and the entire workflow from file to finished part is smoother.
Business-grade support
Formlabs’ commercial support tier is in a different class from what you get with most desktop printer brands. For businesses where printer downtime has a real cost, this matters.
Best for: Professional product development studios, medical device and consumer electronics prototyping, teams presenting high-fidelity prototypes to clients or executives, any organization where printer reliability is a business-critical requirement.
Upgrade to Professional Workflow
Experience the reliability of the Formlabs Form 4.
5. The Workflow Factor: What Most Buyers Overlook
Most buyer guides stop at comparing printers. But experienced prototypers know that the printer is only part of the equation. Total workflow efficiency – from file preparation through print completion to post-processing – determines how many iterations you actually get done in a week.
5.1 Multi-Material and Soluble Supports in FDM Printing
If you’ve ever spent 45 minutes with a dental pick removing support material from the inside of a complex enclosure, you understand why soluble supports are such a significant workflow advancement.
The Bambu Lab AMS and Creality CFS (filament spool systems) enable multi-material printing, including the use of BVOH or PVA water-soluble support filaments alongside your build material. The practical workflow looks like this: you design your part normally, slice it in software that automatically assigns soluble material to support structures, print the part, and then soak it in water. The supports dissolve. You’re left with a clean part.
For parts with internal channels, complex geometries, or large unsupported overhangs – exactly the kinds of features common in functional prototypes – this eliminates hours of manual cleanup per part. If you’re printing five parts per week, that’s meaningful time savings.
The limitation is that soluble support materials are more expensive than standard filaments, and the AMS/CFS systems add setup overhead for simple single-material prints. They’re best suited to teams regularly printing complex geometries.
Slicer-side support optimization
Even without soluble supports, modern slicer software has improved dramatically at generating supports that are easier to remove. Tree supports in particular – organic branching structures that contact the part at minimal points rather than solid columns – have become very capable. For many parts that would have previously required soluble supports, well-tuned tree supports are a good enough alternative at zero additional material cost. The Bambu Studio and Orca Slicer implementations of tree supports are among the best available.
The key slicer settings for prototyping support workflows are: support interface layer thickness (thinner = cleaner separation), support-to-part distance (larger = easier removal, slightly worse surface quality underneath), and support density (denser = better overhang quality, harder to remove). Tuning these three parameters for your most common prototype geometries will save significant post-processing time across a week of printing.
5.2 Resin Post-Processing Workflow
One thing potential resin buyers frequently underestimate is how much time post-processing adds to the total workflow. Unlike FDM prints, which typically come off the bed ready to use (or nearly so), resin prints require:
- Washing: The printed part must be washed in isopropyl alcohol (IPA) or a purpose-made cleaning solution to remove uncured liquid resin from the surface. This takes 5–15 minutes depending on part size and complexity, plus ventilation time.
- Curing: Post-print UV curing hardens the resin to full strength. Undercured parts are brittle and prone to failure. Overcured parts can warp or become discolored. Dedicated cure stations with controlled UV intensity and rotation (like the Elegoo Mercury XS) make this step reliable rather than guesswork.
Workflow Steps: FDM vs. Resin
FDM Printing
Print (30%) | Post-Process (10%)
Resin Printing
Print (40%) | Wash & Cure (20%)
For a professional resin workflow, the Formlabs integrated ecosystem – Form 4 printer, Form Wash, Form Cure – is the smoothest available. The ecosystem is designed as a system, not a collection of compatible parts, and it shows in day-to-day use.
Budget-conscious users can build a capable workflow around the Saturn 4 Ultra and Mercury XS, though with more hands-on management required.
6. Best 3D Printer for Prototyping Fishing Lures
This might seem like an oddly specific section in a technical buyer guide, but searching for the best 3D Printer for prototyping fishing lures actually reflects a growing community of serious designers and small manufacturers who use 3D printing to iterate on lure bodies, test weight distributions, and validate molds before committing to production tooling. It’s a genuinely interesting use case that cuts across several prototyping requirements.
What makes fishing lure prototyping unique?
Fishing lures have demanding material requirements. They need to be water-resistant, impact-resistant (hitting rocks, dock pilings, tackle boxes repeatedly), dimensionally precise (a few grams of weight difference changes how a lure swims), and optically interesting – many lure prototypes benefit from translucency so designers can visualize internal weight chamber placement.
Material recommendations for lure prototyping:
Tough resins are exceptionally well-suited for lure bodies. Formlabs Tough 2000 resin and Siraya Tech Blu are both high-impact engineering resins that produce parts significantly more resilient than standard resins. Tough 2000 is rated for high impact and elongation before break – a meaningful spec when your prototype is hitting rocks at speed.
Clear resins enable something really useful for lure design: you can print a transparent body, insert weighted components, and actually see how they sit inside the lure before finalizing the design. This kind of rapid weight distribution prototyping used to require committing to a mold.
FDM + silicone mold workflow: For teams who want to produce multiple lure variants quickly, an efficient approach is to use FDM printing (PETG or ABS on the K1C or P2S) to create master patterns, then cast silicone molds around them. This hybrid approach lets you iterate the geometry in 3D printing and then produce soft-body lure variants in production-representative materials.
7. Best 3D Printer for Prototyping for Beginners
Finding the best 3D Printer for prototyping for beginners means looking for machines that solve a specific problem: how do you get good results without deep expertise in 3D printing?
The core challenges for beginners are bed leveling (getting the first layer right), calibration (dialing in flow rates, temperatures, and speeds), and failure recovery (what happens when something goes wrong mid-print). The best beginner machines minimize the expertise required for all three.
Why the Bambu Lab P2S wins for beginners
The P2S was built around the philosophy that calibration should be automatic. Auto bed leveling, Auto Flow Dynamics, automatic first-layer calibration, and automatic material profile selection from the AMS system mean that a beginner’s first print is much more likely to succeed than on a machine that requires manual tuning.
The Bambu slicer (Bambu Studio) is polished, well-documented, and beginner-friendly. You can import an STL, hit print, and get a usable result without understanding every parameter. The machine handles the complexity behind the scenes.
Why the Creality K1C is also a strong beginner choice
At a lower price point, the K1C offers most of the same automatic calibration features – auto bed leveling, input shaping via Klipper – with a lower barrier to entry. For beginners who aren’t sure they want to invest heavily in 3D printing and want to test the waters, the K1C provides a capable starting point.
The K1C is also widely used in the maker community, which means there’s a large library of community resources, troubleshooting guides, and modification tutorials. When something does go wrong (and eventually it will), finding help is easy.
Beginner pitfalls to avoid:
- Don’t start with resin. It’s not that resin printers are unreliable – the Elegoo Saturn 4 Ultra is quite capable – but the post-processing workflow, chemical handling requirements, and learning curve around resin parameters make it a difficult entry point. Start with FDM, build your intuition for how print settings affect output, then add resin capability once you have baseline confidence.
- Don’t start with engineering materials either. PLA is easier to print than ABS or Nylon, and it’s fine for learning. Once you understand how your machine behaves, upgrading to tougher materials is a smaller jump.
Best picks for beginners: Bambu Lab P2S (best overall, easiest path to good results), Creality K1C (best value starting point, strong community support).
Starting Your 3D Printing Journey?
Choose the printer that grows with you.
8. Best 3D Printer Filament for Prototyping
Choosing the best 3D printer filament for prototyping is almost as important as choosing the printer itself. The same printer can produce parts that range from decorative paperweights to functional mechanical components depending entirely on the filament.
Visual and Concept Prototyping
PLA and PLA+ are the right choice for communicating form. PLA prints beautifully, comes in hundreds of colors and finishes (including silk, matte, marble, and wood), has good dimensional accuracy, and is easy to sand and paint. The limitation is heat resistance – PLA typically softens around 60°C, which rules it out for functional parts that might see elevated temperatures.
PLA+ variants add impact modifiers that improve toughness somewhat without significantly complicating printability. For concept prototypes that need to survive handling and presentation, PLA+ is often the better choice over standard PLA.
Functional Testing Prototypes
PETG is the workhorse for functional prototypes in non-demanding environments. It has better layer adhesion than PLA (translating to better impact resistance), reasonable chemical resistance, and a heat deflection temperature around 70–80°C. It’s slightly trickier to print than PLA but not meaningfully so on a well-calibrated machine. For snap-fit components, living hinges, and parts that need to flex without cracking, PETG often threads the needle between printability and functional performance.
TPU and flexible filaments for prototypes where the finished product will be elastic, grippy, or impact-absorbing. Shore hardness varies between 85A (quite soft) and 98A (fairly rigid) depending on the formulation. Printing TPU requires slower speeds and direct-drive extruders – most modern enclosed printers like the P2S handle it well.
Mechanical Stress Testing
ABS for parts that need to be machined, sanded, or acetone-smoothed after printing, or that will see modest mechanical loads. Requires an enclosure; benefits from a heated chamber on larger prints. Post-processing with acetone vapor smoothing is uniquely available for ABS and produces near-injection-molded surface finish.
ASA if you need UV stability – ABS’s surface degrades under prolonged UV exposure, but ASA maintains appearance and mechanical properties. For outdoor products or prototypes that will be photographed in direct light, ASA is the right call.
Engineering-Grade Materials
Nylon (PA12, PA6, PA-CF) for maximum toughness, repeated flex tolerance, and real-world durability. PA-CF (carbon fiber reinforced nylon) is the standard choice for structural prototype components that need high strength-to-weight ratio. Nylon absolutely requires a heated chamber and dry filament storage – it will absorb moisture from the air and print poorly within hours of opening a new spool in humid conditions.
Polycarbonate (PC) for extreme impact resistance and very high heat deflection temperature (~120°C+). Difficult to print but enormously capable when done right. Needs 280–310°C nozzle temperature and ideally an actively heated chamber.
Carbon Fiber Composites
PETG-CF, PLA-CF, ABS-CF, PAHT-CF – carbon fiber reinforced composite filaments offer significantly improved stiffness and reduced weight compared to their base polymers. For structural prototype parts where rigidity matters, CF composites are increasingly the default choice among engineering teams. They require hardened steel nozzles; standard brass nozzles will wear out rapidly.
Filament Storage and Handling
A frequently underestimated variable in print quality and repeatability is filament moisture content. Most engineering-grade filaments (Nylon, PC, some PETG formulations) are hygroscopic – they absorb moisture from ambient air, and that moisture causes steam bubbling during extrusion, poor surface finish, and compromised layer adhesion.
If you’re printing Nylon, you should be drying it before every print session in a dedicated filament dryer. Even sealed filament that’s been sitting in a warehouse for months can have enough absorbed moisture to cause problems. For PLA and PETG, moisture is less of an acute issue but still worth managing if you keep filament for months at a time.
9. Budget and ROI Breakdown
The question of how much to spend on a prototyping 3D Printer is really a question of what your time and your outsourced prototype costs are worth. Here’s a framework.
Example: Creality K1C
At this tier, you can produce good-quality PLA and PETG prototypes and make initial forays into carbon fiber composites. The ROI case is straightforward: if you’re currently paying a service bureau $30–100 per part and ordering two or three prototypes per week, a $500 machine pays for itself in weeks.
Limitation: Material versatility – you won’t get the heated chamber needed for large ABS or Nylon runs, and the build volume is smaller.
Example: Bambu Lab P2S
This range buys you a fully capable, highly reliable prototyping machine. The P2S sits comfortably here and represents excellent value for teams prioritizing iteration speed. At this price, you get auto-everything calibration, multi-material capability with the AMS, and a machine that can run unsupervised without constant attention.
ROI: Teams printing five or more prototypes per week should buy here. Time savings from higher reliability pay back the difference quickly.
Example: QIDI Plus4
At this price point, you’re buying engineering-grade material capability: actively heated chambers, 350°C nozzle temperatures, and the repeatability needed for functional mechanical prototyping. ROI comes from replacing expensive outsourcing and shortening design cycles from one week to one day.
Competitive Advantage: Compressing prototype cycles allows you to find flaws earlier and ship better products.
Example: Formlabs Form 4
You’re paying for reliability, workflow integration, and business-grade support. The ROI calculation shifts from “cost per part” to “cost of failure.” For teams where a bad prototype presentation has real business consequences, the Form 4’s predictability has genuine value.
Cost per iteration vs. outsourcing
A useful mental model: desktop 3D printing costs roughly $2–10 per part in materials for typical prototypes. Service bureaus typically charge $30–300 per part (depending on material, complexity, and lead time), plus shipping. The math gets compelling quickly.
But beyond raw cost, the more important factor for most prototyping teams is lead time. Waiting a week for an outsourced prototype means waiting a week to find out your snap-fit tab is 0.2mm too short. An in-house printer turns that into a two-hour learning cycle.
Hidden Costs to Factor In
A common mistake when budgeting for a 3D Printer is treating the machine purchase price as the total cost. In practice, a complete and productive prototyping setup has additional costs worth factoring in.
- Filament: A quality 1kg spool of PETG or PLA runs $20–40. Engineering materials like PA-CF run $50–100 per kg. For an active prototyping setup printing multiple parts per week, monthly filament costs of $100–300 are normal.
- Maintenance consumables: Nozzles (especially hardened steel, which should still be replaced every few months of heavy use), build plate surfaces, and lubricants are ongoing costs. Budget $100–200 per year for a well-used machine.
- Post-processing tools: Even FDM prints often benefit from a heat gun (for bending/forming), sandpaper, filler primer, and basic hand tools for support removal. A basic post-processing kit runs $50–100.
- Filament storage: Sealed containers, desiccant packs, and ideally a dedicated filament dryer ($30–120) for engineering materials.
Total cost of ownership for a productive FDM prototyping setup typically runs 30–50% more than the machine purchase price in the first year, settling to 15–25% ongoing annually. This is still dramatically cheaper than outsourcing at any meaningful volume.
10. FAQ
What is the best 3D Printer for prototyping?
For most users, the Bambu Lab P2S offers the best combination of speed, reliability, and ease of use for prototyping. For engineering applications requiring demanding materials like Nylon or carbon fiber composites, the QIDI Q1 Pro’s actively heated chamber and 350°C nozzle makes it the better engineering prototyping tool. The right answer depends on your specific materials and use case.
Is resin or FDM better for prototyping parts?
It depends on what you’re prototyping. FDM (filament-based) printing is generally better for large parts, structural components, and high-throughput iteration. Resin printing excels at fine surface finish, tight dimensional tolerances on small-to-medium parts, and isotropic strength. Many professional prototyping setups use both – FDM for structural and functional iteration, resin for client-facing mockups and fine-detail components.
What is the best 3D Printer for small business prototyping?
The QIDI Plus4 is the top recommendation for small businesses. Its 305 × 305 × 280 mm build volume accommodates larger parts, the heated chamber handles engineering materials reliably, and it bridges the gap between prototype and small-run production. For businesses primarily printing visual prototypes and simpler functional parts, the Bambu Lab P2S offers faster iteration at lower cost.
What is the best filament for functional prototypes?
PETG is the best starting point for functional prototypes – it has better impact resistance than PLA, prints reliably without enclosure requirements, and handles modest mechanical loads well. For more demanding applications, PA-CF (carbon fiber reinforced nylon) offers significantly better mechanical performance but requires a heated chamber printer like the QIDI Q1 Pro.
How accurate are desktop 3D printers?
Modern desktop FDM printers typically achieve dimensional accuracy of ±0.1–0.3mm on well-calibrated machines. Resin printers can achieve ±0.05–0.1mm on small parts. For context, injection molding typically achieves ±0.1mm. Desktop 3D printing accuracy has become genuinely useful for most prototyping applications, though very tight-tolerance parts (±0.05mm or better) may still require professional-grade equipment.
It’s worth distinguishing accuracy from repeatability here too. A printer might produce one part at ±0.1mm but drift to ±0.3mm on the fifth print if temperature or calibration shifts. For engineering prototyping where you’re testing assemblies across multiple iterations, look for printers with active thermal management and good calibration retention – the QIDI machines are strong performers here.
Do I need a heated chamber for engineering parts?
For small parts under 100mm and materials like ABS that tolerate modest warping, a passively enclosed printer (like the Bambu P2S or Creality K1C) may be sufficient. For large ABS or Nylon parts – anything that exceeds about 150mm in a critical dimension – an actively heated chamber (as found in the QIDI Q1 Pro and Plus4) is strongly recommended. Without chamber heat, large Nylon prints in particular are unreliable and prone to warping and delamination.
Can I use a 3D Printer for production, not just prototyping?
Desktop 3D printers are increasingly viable for small production runs – especially between prototype validation and injection molding tooling being ready. The QIDI Plus4‘s large build volume makes it particularly suitable for this bridging role. For low-volume, high-mix production (think custom fixtures, spare parts, or low-demand consumer products), the economics can work even at steady state. That said, injection molding beats 3D printing on per-unit cost at volumes above a few hundred to a few thousand units, depending on part complexity.
Setting Up Your Prototyping Workflow: Practical Tips
Having the right printer is step one. Getting the most out of it for prototyping specifically requires thinking about your workflow holistically.
Develop a CAD-to-Printer Pipeline That Minimizes Friction
The fastest prototyping teams have reduced their file-to-print time to near zero through good process design. This means keeping your slicer open alongside your CAD tool, maintaining a library of pre-tuned print profiles for your most common materials and part types, and establishing a consistent naming and versioning convention for print files so you can easily track which iteration is which.
A concrete recommendation: for each printer-material combination you use regularly, develop and save a “known good” profile that you only change when deliberately experimenting. Running every print from this baseline means you’re not reintroducing variability when all you changed was the geometry.
Print Orientation Affects More Than You Think
Where you place a part on the build plate and how you orient it relative to the Z-axis has significant effects on surface finish, strength, and support requirements – all of which affect how useful a prototype is for testing.
- For functional parts that will be load-tested: orient the part so the primary load direction aligns with XY movement (perpendicular to layer lines), not Z (parallel to layer lines). FDM parts are weakest in tension along the Z axis because that’s where layer adhesion limits strength.
- For aesthetic prototypes: orient the most critical surface face-up, away from the build plate, to get the best top-surface quality. Or, if surface finish matters most, consider printing in a resin-capable orientation and using the Saturn 4 Ultra instead.
Calibration Cadence
Even the most automated printers benefit from periodic manual calibration checks. For high-throughput prototyping setups, a weekly calibration check – verifying first layer height, running a flow rate calibration cube, confirming belt tension and motion system health – takes 20 minutes and prevents hours of failed prints down the road.
📥 Free Resource: Prototyping Material Cheat Sheet
Confused about which filament to use for your next prototype? Download our free PDF guide covering the top 10 engineering filaments, their print settings, and ideal use cases.
Ready to Start Prototyping?
Don’t let slow iteration times kill your product development cycle. Choose the right tool today.
