


Quick Answer3D printing is the process of turning a digital design into a real, physical object — layer by layer — using materials like plastic or resin. Think of it like a hot-glue gun guided by a computer: precise, repeatable, and surprisingly affordable. From hobbyist prototypes to medical implants, 3D printing has become one of the most exciting and accessible technologies of our time.
📋 Free Beginner Checklist — Before Your First PrintDon’t waste your first spool on rookie mistakes. Grab our free setup checklist and avoid the top 10 beginner errors.
📌 Table of Contents
- What Is a 3D Printer?
- How Does 3D Printing Work?
- What Is 3D Printing Used For?
- Advantages of 3D Printing
- What Materials Do 3D Printers Use?
- Key 3D Printing Terms
- How to Use a 3D Printer
- Best 3D Printers for Beginners
- Why Multi-Color Is the New Standard
- 3D Printing Tips for Beginners
- Beginner Projects
- Is 3D Printing Worth It?
- FAQs
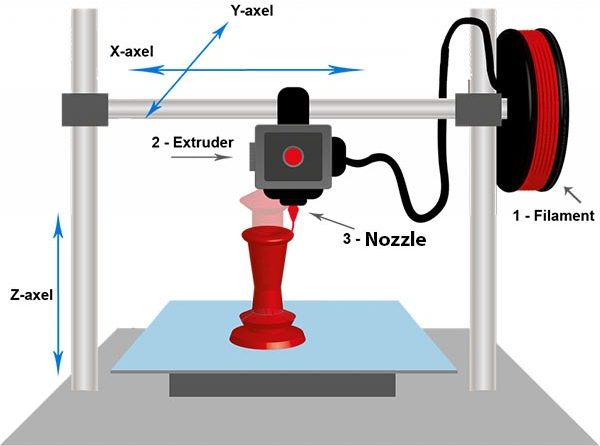
What Is a 3D Printer?
At its core, a 3D printer is a machine that creates physical objects from a digital blueprint. Instead of cutting material away like traditional manufacturing, 3D printers add material — stacking ultra-thin layers on top of each other until the full object takes shape. This additive approach is why you’ll often see 3D printing referred to as “additive manufacturing” in professional circles.
But here’s what makes it genuinely exciting: that “object” can be almost anything. A replacement knob for your kitchen appliance. A custom phone stand. A miniature figurine. A working mechanical hinge. The only real limits are the size of your print bed and the creativity of your design.


Fidget spinners can be created with 3D printers
For beginners, there are two main types of 3D printers you’ll encounter:
FDM (Fused Deposition Modeling) — The Beginner’s Best Friend
FDM printers are the most common type and the best starting point for most people. They work by melting a plastic filament and depositing it layer by layer through a heated nozzle. Imagine a very precise hot-glue gun, and you’re close. FDM printers are affordable, easy to use, and produce durable prints that are great for functional objects, prototypes, and creative projects. Most of the printers we recommend in this guide are FDM.
Resin Printers — For Fine Detail Work
Resin printers (also called MSLA or SLA printers) use UV light to cure liquid resin into solid layers. They produce significantly finer detail than FDM printers, which makes them the go-to for miniatures, jewellery, and dental models. The trade-off? They require more handling care — resin is a chemical that needs proper ventilation and gloves — and post-processing is more involved.
💡 Our Recommendation for BeginnersStart with an FDM printer. They’re more forgiving, cheaper to run, and better suited to the wide variety of projects most beginners want to tackle. You can always add a resin printer later for specialised detail work.

How 3D printers work
How Does 3D Printing Work? (Step-by-Step)
Understanding the 3D printing process is simpler than most people expect. Here’s the complete workflow from digital file to physical object:
Step 1: Create or Download a 3D Model
Every print starts as a digital 3D model — essentially a virtual blueprint of the object you want to create. You can either design your own using CAD software like Fusion 360 or TinkerCAD (which is free and beginner-friendly), or you can download ready-made models from websites like Thingiverse, Printables, or MakerWorld. The model is saved as an STL or 3MF file, which the printer can understand.
CAD software is needed for 3D printers
If you’re just starting out, downloading pre-made models is a completely valid approach — thousands of free designs are available, and many are specifically optimised for easy printing. Check our list of free sites to get STL files.
Step 2: Slice the Model
Before your printer can do anything, the 3D model needs to be converted into instructions the machine can follow. This is done by a piece of software called a slicer. The slicer takes your model and literally “slices” it into hundreds or thousands of horizontal layers. It then generates a file (called G-code) that tells the printer exactly where to move, how fast to extrude material, and when to pause for cooling.
Popular slicers include Bambu Studio, PrusaSlicer, Orca Slicer, and Ultimaker Cura. If you’re looking for the best slicer software, most modern printers come with a recommended slicer that has pre-configured profiles — so you don’t need to manually tweak everything from scratch.
Step 3: Print Layer by Layer
Once the G-code file is sent to the printer (via USB, SD card, or Wi-Fi), the magic begins. The print head heats up, the build plate prepares, and the printer starts laying down material one micro-thin layer at a time. A typical layer height is somewhere between 0.1mm and 0.3mm — for reference, a human hair is about 0.07mm thick.
Think of it like decorating a very elaborate cake: you apply one thin layer of icing, let it set slightly, then apply the next layer on top. Repeat that a few hundred times, and suddenly you have a 3D object. Print times range from under an hour for small objects to 10+ hours for larger, detailed prints.
Step 4: Post-Processing
Once the print finishes, you remove it from the build plate and do any finishing work required. For FDM prints, this usually means removing any support structures (temporary scaffolding the printer builds to support overhanging areas), light sanding, and optionally painting or priming. For resin prints, the process involves washing the print in isopropyl alcohol and curing it under UV light.
What Is 3D Printing Used For?
One of the most common questions beginners ask is “okay, but what would I actually print?” The answer is broader than most people realise. Here are the most common uses — from everyday hobbyist applications to serious industrial ones:
DIY Household Items: Replacement parts, cable organizers, wall hooks, drawer handles, custom shelf brackets, kitchen gadgets. If something broke and the manufacturer no longer sells the part, there’s a good chance someone has uploaded a 3D model for it.
Prototyping and Product Development: Engineers and designers use 3D printing to rapidly build physical prototypes of products before committing to expensive tooling. What once took weeks and thousands of dollars can now be done overnight for the cost of a few dollars’ worth of filament.
Automotive and Aerospace: From custom dashboard mounts to lightweight structural components, 3D printing is increasingly used in industries where customisation and weight savings are critical.
Medical Applications: Custom prosthetics, surgical guides, anatomical models for training, and even bioprinting of human tissue are all active areas of 3D printing research and application.
Education and Hobby: Schools use 3D printers to bring STEM concepts to life. Tabletop gamers print custom miniatures. Model enthusiasts create scaled replicas. Artists and designers use the technology as a creative medium. This is, honestly, where most hobbyist beginners spend their time — and it’s a genuinely fun rabbit hole to fall down.
Advantages of 3D Printing
Customisation: Nothing is off-limits. You can tweak any dimension, add your name, change the colour, adjust the thickness — all before printing a single layer. No other manufacturing method offers this level of individual customisation at this price point.
Speed: Modern 3D printers — especially fast machines like those from Bambu Lab — can produce usable parts in 30–60 minutes. For prototyping and iteration, this is a game-changer compared to waiting days or weeks for factory-produced parts.
Cost Efficiency: A kilogram spool of PLA filament typically costs $15–$30 and can produce a large number of prints. For hobbyists, businesses running small batches, and makers who would otherwise buy custom parts, the cost savings are real and significant.
Low Waste: Traditional “subtractive” manufacturing (like CNC machining) cuts away large amounts of raw material. 3D printing only uses what the object actually needs — and many materials, including PLA, are biodegradable or recyclable.
What Materials Do 3D Printers Use?
What Is 3D Printing Filament?
3D printing filament is the raw material used in FDM printers — it comes on a spool and looks like a thin plastic wire (typically 1.75mm in diameter). The printer melts this wire and deposits it as described above. Choosing the right filament for your project is one of the most important decisions you’ll make as a beginner. Here’s a quick rundown of the most common types:
PLA (Polylactic Acid) — The default starting material for almost every beginner, and for good reason. PLA is easy to print with, produces minimal warping, is derived from plant materials (corn starch or sugarcane), and comes in an enormous range of colours. Use it for decorative items, prototypes, cosplay props, and anything that won’t be exposed to high heat. If you’re just starting out, best PLA filament options are widely available and very affordable.
PETG (Polyethylene Terephthalate Glycol) — Think of PETG as PLA’s more durable older sibling. It’s stronger, slightly flexible, and handles heat better, making it ideal for functional parts like brackets, enclosures, and anything that might experience some stress. It’s slightly trickier to print than PLA but not dramatically so. Check out our guide to the best PETG filament when you’re ready to step up.
ABS (Acrylonitrile Butadiene Styrene) — ABS was once the industry standard but has been largely displaced by better materials for most use cases. It’s strong and heat-resistant, but it warps easily, requires an enclosed printer, and — importantly — releases fumes that you really don’t want to breathe in.
⚠️ Safety Note: Ventilation MattersWhen printing with ABS, Nylon, or resin, always ensure your workspace is well-ventilated. These materials release VOCs (volatile organic compounds) that can irritate your respiratory system with prolonged exposure. Consider an air purifier with a HEPA + activated carbon filter if you’re printing frequently. PLA is much safer for indoor use, but good ventilation habits are always a good idea regardless of material.
Resin Printing Explained
Resin printers use a different material entirely: liquid photopolymer resin that solidifies when exposed to UV light. Standard resin is great for fine detail; ABS-like resins offer more durability; flexible resins can produce rubbery, bendable parts. Resin is generally pricier per litre than filament per kilogram, and the post-processing steps add time. But for miniature painters, jewellers, and dental technicians, the detail quality is simply unmatched by FDM.
Key 3D Printing Terms Beginners Should Know
You don’t need to memorise a textbook, but knowing these terms will make your first few weeks much less confusing:
InfillThe internal structure of a print. Higher infill (e.g., 30%–50%) means a stronger, heavier object. Lower infill (e.g., 10%–15%) saves material and prints faster but reduces strength.
Layer HeightHow thick each individual layer is. Thinner layers (0.1mm) produce smoother, higher-quality prints but take longer. Thicker layers (0.3mm) print faster but show more visible layer lines.
SlicingThe process of converting a 3D model into printer instructions (G-code). Your slicer software handles this and lets you control infill, layer height, supports, speed, and dozens of other settings.
Bed AdhesionHow well your print sticks to the build plate during printing. Poor bed adhesion is one of the most common reasons prints fail.
SupportsTemporary scaffolding structures generated by your slicer to support overhanging parts of your print. They get snapped off or cut away after printing.
AMS / Multi-Filament SystemAutomated systems that switch between multiple filament spools during a print, enabling multi-colour or multi-material objects without manual intervention.
How to Use a 3D Printer for Beginners
Initial Setup
Most modern beginner-friendly printers are largely pre-assembled and come with everything you need in the box. The setup process generally involves: unboxing and removing all packaging/zip ties, doing an auto-levelling calibration (the printer checks its own bed alignment — most machines handle this automatically now), loading filament through the extruder, and running a test print from the included SD card or app.
First Print Workflow
Your very first print should be the test file that comes with your printer — usually a small, simple object that’s pre-sliced and ready to go. This verifies everything is working before you start importing your own models. Once that succeeds, download a simple model from Printables.com or Thingiverse, import it into your slicer, use the default settings, export to the printer, and hit print.
Common Beginner Mistakes to Avoid
Skipping bed levelling: Even with auto-levelling, always double-check your first layer. A slightly off first layer causes more failed prints than almost anything else. Printing too fast too soon: Speed is tempting, but a perfectly printed slow object beats a failed fast one every time. Ignoring moisture in filament: Filament absorbs ambient moisture and prints poorly as a result (you’ll hear popping/crackling and see bubbles). Store spools in sealed containers with silica gel desiccant packs — or use a dedicated filament dryer. Over-complicating slicing settings: Start with the preset profiles for your printer. They’re good enough for 90% of prints.
🏆 Best 3D Printers for Beginners in 2026
Alright — this is the section most of you came for. After hundreds of hours of hands-on testing across multiple machines, here are the printers we confidently recommend in 2026. We’ve chosen each one for a specific type of buyer, so you can match your needs with the right machine rather than just buying whatever happens to be on sale.
| Printer | Build Volume | Max Speed | Ease of Use | Multi-Color | Best For |
|---|---|---|---|---|---|
| Bambu Lab A1 Combo Top Pick | 256×256×256mm | 500 mm/s | ⭐⭐⭐⭐⭐ | ✅ AMS Lite (4 colors) | Overall Best |
| Elegoo Neptune 4 Budget | 225×225×265mm | 500 mm/s | ⭐⭐⭐⭐ | ❌ | Under $300 |
| Bambu Lab A1 Mini Compact | 180×180×180mm | 500 mm/s | ⭐⭐⭐⭐⭐ | ✅ Optional AMS Lite | Small Spaces |
| Prusa CORE One Premium | 250×220×270mm | 600 mm/s | ⭐⭐⭐⭐ | ❌ (upgrade possible) | Reliability |
| Anycubic Kobra 3 Combo Multi-Color | 250×250×260mm | 300 mm/s | ⭐⭐⭐⭐ | ✅ Built-in (4 colors) | Color Fans |
| Elegoo Mars 5 Ultra Resin | 218×123×220mm | N/A (resin) | ⭐⭐⭐ | ❌ | Fine Detail |
1
Bambu Lab A1 Combo Best Overall
If you’ve been researching 3D printers for more than five minutes, you’ve probably already heard the name Bambu Lab. And there’s a reason: the A1 Combo is genuinely the closest thing to a plug-and-play 3D printer that currently exists. Unbox it, run through the five-minute setup wizard, and you can be printing a high-quality, multi-colour object within an hour. That’s not marketing copy — we’ve done it ourselves, on camera.
What really sets the A1 Combo apart is the included AMS Lite (Automatic Material System Lite), which holds up to four spools of filament and automatically switches between them mid-print. This means you can produce multi-colour prints without any manual filament swapping — something that would have required a premium machine costing 3× as much just a few years ago. For beginners who don’t want to grow out of their first printer, this is huge.
Pros
- Fastest setup of any printer we tested
- Genuinely excellent out-of-box print quality
- AMS Lite for multi-color prints included
- Strong community and app ecosystem
- Future-proof — doesn’t feel like a “starter” printer
Cons
- Pricier than budget options
- Less open-source than Prusa
- AMS Lite purges more filament during color changes
Our VerdictThe A1 Combo is the one printer we would buy if we could only have one. It’s beginner-friendly enough to not frustrate newcomers, capable enough to still be exciting two years in, and the multi-color functionality genuinely changes what’s possible without a steep learning curve.
2
Elegoo Neptune 4 Best Budget
If your budget is the primary concern, the Elegoo Neptune 4 is where we’d point you without hesitation. Powered by the Klipper firmware (the same open-source system that expensive printers use), it prints at speeds that would have been unthinkable on a budget machine two years ago. The print quality-to-price ratio here is genuinely remarkable.
Yes, it requires a bit more initial setup and tuning than the Bambu machines. Yes, it doesn’t include multi-colour capability. But if you want to get into 3D printing without making a large financial commitment, the Neptune 4 is the machine that has converted the most skeptics we know personally. It punches well above its weight class.
Pros
- Excellent speed for the price point
- Klipper firmware = powerful customisation
- Large, active community support
- Very accessible entry price
Cons
- No multi-color capability
- More initial tuning required
- Build quality is noticeably below Bambu
Our VerdictThe Neptune 4 is proof that you don’t need to spend big to print well. If you’re on a tight budget or just want to dip a toe in before committing, this is your machine.
3
Bambu Lab A1 Mini Best Compact
Not everyone has a dedicated workspace or a spare desk to sacrifice. The Bambu Lab A1 Mini is designed for exactly those situations — smaller footprint, same exceptional ease of use as its bigger sibling, and still capable of delivering beautiful prints. It supports the optional AMS Lite for multi-colour printing if you want to upgrade later.
If you live in an apartment, want a printer for a bedroom or office desk, or simply don’t plan on printing very large objects, the A1 Mini makes a compelling case for itself. It’s a machine that respects your space without asking you to compromise on quality or experience.
Pros
- Tiny desk footprint
- Same excellent software as A1 Combo
- Expandable to multi-color via AMS Lite
- Virtually zero setup time
Cons
- Smaller build volume limits print size
- AMS Lite sold separately
Our VerdictA brilliant choice if space is limited. Don’t mistake the size for a lack of capability — this is a genuinely excellent printer in a compact form.
4
Prusa CORE One Best Premium
Prusa Research has been building some of the most respected 3D printers in the world for over a decade, and the CORE One represents the evolution of that expertise. It’s fully enclosed (protecting prints from temperature fluctuations and drafts, which significantly improves quality with temperamental materials like ASA and ABS), built to an extremely high standard of mechanical precision, and backed by legendary after-sales support.
If you’re approaching 3D printing as a serious long-term investment — or if you plan to run demanding materials for functional engineering parts — the Prusa CORE One is the machine you’ll likely still be running happily five years from now. It’s the “buy it once, buy it right” option.
Pros
- Industry-leading precision and reliability
- Enclosed = compatible with demanding materials
- Exceptional Prusa support and community
- Excellent long-term investment
Cons
- Premium price tag
- Larger and heavier than most
- Multi-color requires additional investment
Our VerdictFor those who want a machine that prioritises reliability above all else, the CORE One is simply in a class of its own. The investment is real — and so is the return.
5
Anycubic Kobra 3 Combo Best Multi-Color Value
Bambu Lab isn’t the only game in town for multi-colour printing. The Anycubic Kobra 3 Combo is a strong challenger — and one of the few printers in this price range to include a built-in filament dryer, which actively removes moisture from your filament as it feeds through the printer. Wet filament is one of the most common and frustrating causes of poor print quality, and Anycubic has elegantly solved that problem by baking the solution right into the hardware.
If multi-color is your priority and you want an alternative to Bambu’s ecosystem, the Kobra 3 Combo deserves serious consideration.
Pros
- Built-in filament dryer is genuinely useful
- Strong multi-color capability
- Competitive price for the feature set
- Good print quality for the price
Cons
- Slower than Bambu at top speeds
- Software ecosystem less mature
- Smaller community support base
Our VerdictA compelling multi-color option with practical innovations. If you’re set on an Anycubic or want the filament dryer feature, the Kobra 3 Combo is the one to get.
6
Elegoo Mars 5 Ultra Best Resin
If you’re drawn to miniatures, fine jewellery casting, tabletop gaming minis, or any application requiring extraordinary surface detail, a resin printer is in a completely different league compared to FDM — and the Elegoo Mars 5 Ultra is the best beginner-accessible option in the resin category right now. It features tilt-release printing technology that dramatically reduces the suction forces during layer separation, resulting in fewer failed prints and a quieter overall process.
Fair warning: resin printing requires gloves, eye protection, and good ventilation. The liquid resin is a chemical that should be handled with respect. But for those willing to take those steps, the detail quality is genuinely breathtaking.
Pros
- Exceptional surface detail quality
- Tilt-release = fewer print failures
- Great value for resin printing
- Well-supported by Elegoo software
Cons
- Requires chemical handling and PPE
- Post-processing adds time
- Not ideal as a first printer for most beginners
Our VerdictNot a replacement for an FDM printer — but for the specific use case of highly detailed, small-scale printing, nothing at this price comes close.
🌈 Why Multi-Color Printing Is the New Standard in 2026
If you’re shopping for a 3D printer right now, here’s a trend worth paying attention to: multi-color printing has shifted from a premium luxury to an expected feature. And it’s changing what beginners expect their first printer to be able to do.
Just two or three years ago, printing an object in more than one color required either: manually pausing the print and swapping filament (tedious and imprecise), owning an expensive printer with a dual extrusion system (pricey and complicated), or spending hours painting the finished print (time-consuming). None of these were great options.
Today, systems like the Bambu Lab AMS Lite allow a beginner to print a fully multi-colored object on their very first day, with no manual intervention, as simply as printing a single-color object. The Anycubic Kobra 3 Combo takes a similar approach.
Why does this matter for your buying decision? Because if you buy a single-color-only printer now, there’s a real chance you’ll feel the limitation within 6–12 months as multi-color models become increasingly available and desirable. Buying a multi-color-capable printer from the start is the smarter long-term investment — and the price gap has shrunk significantly.
💡 Future-Proofing Tip: If budget allows, go for the Bambu A1 Combo (or at minimum, the A1 Mini which supports the AMS Lite as an add-on). Multi-color printing isn’t a gimmick — it’s fast becoming table stakes for an enjoyable 3D printing experience.
3D Printing Tips for Beginners
01 | Start with PLA — AlwaysPLA is forgiving, widely compatible, and cheap. Master it before experimenting with PETG, ABS, or specialty materials. There’s no shame in spending your first several months exclusively on PLA.
02 | Don’t Chase Speed EarlyHigh-speed printing introduces vibrations and artifacts that are hard to diagnose when you’re new. Start at moderate speeds (60–150 mm/s), get your settings dialed in, then increase speed once you understand the tradeoffs.
03 | Keep Your Filament DryMoisture ruins filament quality faster than most people expect. Store opened spools in sealed containers or vacuum bags with silica gel desiccant. If you hear crackling or popping sounds while printing, your filament is probably wet — dry it in a dedicated filament dryer or a food dehydrator at 45–50°C for several hours.
04 | Learn Slicing Basics EarlyYou don’t need to master every setting, but understanding infill, layer height, and support placement will help you problem-solve when prints don’t come out as expected. Spend 30 minutes with your slicer’s tutorial mode — it’s worth it.
05 | Join the CommunityReddit’s r/3Dprinting and the respective communities for your printer brand (e.g., the Bambu Lab or Prusa subreddits) are some of the most helpful online communities in tech. When something goes wrong — and occasionally something will — these communities have almost certainly seen the issue before and know the fix.
🔗 Related GuidesLooking to go deeper? Check out our 3D Printing Troubleshooting Guide, our roundup of the Best Slicer Software for beginners, and our detailed guide to Best Nylon Filament when you’re ready to level up your materials.
Beginner 3D Printing Projects to Start With
Wondering what to print first? Here are six projects that are perfectly suited to beginners — each one teaches you something useful about the process:
📏 Calibration Cube
⭐ Difficulty: Easy
📱 Phone Stand
⭐ Difficulty: Easy
🔌 Cable Clips
⭐ Difficulty: Easy
🔧 Tool Holders
⭐⭐ Difficulty: Medium
🎮 Gaming Minis
⭐⭐ Difficulty: Medium
🌱 Planter Pots
⭐⭐ Difficulty: Medium
Start with the calibration cube — it’s a simple 20mm×20mm×20mm box that tells you if your printer’s dimensions are accurate. Then move on to something useful and motivating. A phone stand is a great second project: it’s practical, quick to print, and satisfying to use.
Is 3D Printing Worth It in 2026?
Here’s the honest answer: if you’re even a little curious about 3D printing, the answer is almost certainly yes. The barrier to entry has never been lower, the machines have never been more capable out of the box, and the community has never been more welcoming or well-resourced.
That said — 3D printing does require patience. There will be failed prints. There will be moments of frustration. But there will also be moments of genuine amazement when you hold a physical object that didn’t exist an hour ago and that you designed yourself. For the right person, that feeling never entirely goes away.
Who should buy a 3D printer? Anyone curious about making and building. Engineers and designers. Parents who want a creative activity for kids. Gamers who want custom minis. People who are tired of not being able to find replacement parts. Entrepreneurs who want rapid prototyping on a budget.
Who should wait? If you want a push-button appliance with zero learning curve and zero maintenance, 3D printing isn’t quite there yet. If you’re only vaguely curious and not sure what you’d actually use it for, it’s worth spending a week browsing Printables first to see if anything sparks genuine interest.
For everyone else — our pick is the Bambu Lab A1 Combo for most beginners, and the Elegoo Neptune 4 if budget is the primary constraint. Either way, you’re entering what might be one of the most rewarding hobbies available right now.
⭐ Why You Can Trust Our RecommendationsWe don’t review printers from press releases. Every recommendation in this guide is backed by real, hands-on experience with the actual hardware.
500+ hours of hands-on testing | 12+ printer brands evaluated | 3 years covering the 3D printing market
We earn a small commission if you purchase through our links — at no extra cost to you. This helps us keep testing the latest machines and writing free guides like this one. Our editorial independence and opinions are never influenced by affiliate relationships.
❓ Frequently Asked Questions
What is 3D printing in simple terms?3D printing is a process of creating physical objects layer by layer from a digital design, using materials like plastic filament or liquid resin. It’s essentially a computer-controlled machine that builds objects from the ground up, rather than carving them out of a block of material.
How does a 3D printer work step by step?The process has four steps: (1) Create or download a 3D model file. (2) Import it into slicing software, which converts it into layer-by-layer printer instructions. (3) Send those instructions to your printer, which builds the object one thin layer at a time. (4) Remove the finished print and do any post-processing needed (removing supports, sanding, painting).
What is the best 3D printer for beginners in 2026?The Bambu Lab A1 Combo is our top pick for most beginners — it’s fast, easy to set up, and includes multi-color capability via the AMS Lite. For budget-conscious buyers, the Elegoo Neptune 4 offers excellent performance at a more accessible price point.
Is 3D printing expensive?Entry-level 3D printing is quite affordable. Capable printers start around $200–$300 (like the Elegoo Neptune 4), and a kilogram of PLA filament (which produces a large number of prints) typically costs $15–$30. Mid-range machines with multi-color capability run $500–$800. The main ongoing cost is filament, which is generally very economical per print.
What materials do 3D printers use?FDM printers use plastic filaments, the most common being PLA (beginner-friendly, biodegradable), PETG (stronger and more heat-resistant), and ABS (tough but tricky to print). Resin printers use liquid photopolymer resin, which produces finer detail but requires more careful handling. There are also specialty filaments like nylon, TPU (flexible), and carbon-fiber-filled variants for advanced applications.
How long does 3D printing take?Print times vary widely depending on the size and complexity of the object, your speed settings, and the printer model. Small objects (like cable clips or keychains) can print in 15–45 minutes on a fast modern printer. Medium objects might take 2–6 hours. Large, complex prints can run 10–20+ hours. Fast printers like the Bambu A1 series can significantly reduce these times compared to older machines.