

Post Processing Resin 3D Prints: The Complete Step-by-Step Guide (2026)
From toxic goo to display‑ready perfection – your all‑in‑one blueprint for SLA post‑processing.
📥 Free 12‑point resin checklist
Never skip a step again. Get our printable PDF cheat sheet + IPA life‑extension hacks.
✅ free · no spam · instant access
📖 Jump to section
- Why post-processing matters
- Are resin prints strong?
- Safety & PPE (must read)
- Step 1 – Drain & remove
- Step 2 – Wash (manual vs machine)
- Step 3 – Dry (avoid white haze)
- Step 4 – Support removal
- Step 5 – Post‑curing
- Tools: essential → pro
- Painting resin prints
- Alternative cleaning
- IPA pro tip
- Resin vs PLA
- Common mistakes
- FAQ
- Final verdict
- 🏆 top‑rated stations
Why Post Processing Resin 3D Prints Is Essential
Unlike FDM/PLA printing where parts are ready to use off the build plate, resin prints come out of the printer in an uncured, semi-liquid state. The liquid photopolymer resin has only been partially solidified by the printer’s UV light source. This means every print — no matter how clean it looks — requires proper post-processing before it’s safe to handle or usable.
Skipping post-processing causes loss of fine surface details, sticky or gummy surfaces, incomplete mechanical strength, and potential chemical exposure from uncured resin residue.
Are Resin 3D Prints Strong?
This is one of the most common questions from new resin users — and the answer depends heavily on how well you post-process them. Uncured or under-cured resin prints are noticeably soft, brittle, and prone to breakage. Fully and correctly cured prints, by contrast, can achieve excellent rigidity and detail retention.
Compared to PLA, standard resin prints tend to be more brittle under impact but superior in dimensional accuracy and surface detail. If you need strength, look for tough or ABS-like resins specifically formulated for mechanical durability. The post-curing process is what unlocks a resin print’s full mechanical potential — and over-curing can make parts even more brittle, so timing matters.
Safety First: PPE and Workspace Setup
Before you touch any resin or begin post-processing, your safety setup must be in place. Liquid photopolymer resin is a skin sensitizer and contains toxic compounds. Repeated skin exposure without protection can lead to contact dermatitis, and in serious cases, tissue damage. The vapors from isopropyl alcohol (IPA) are also flammable and irritating.
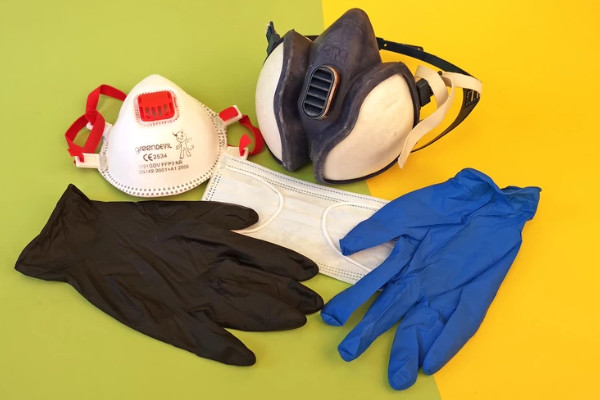
Here is your essential safety checklist:
- Nitrile gloves (not latex) — wear these at all times when handling uncured resin or IPA
- N95 respirator or respirator mask — protects against resin vapors and IPA fumes; a basic cloth mask is not sufficient
- Safety goggles — recommended when working with IPA baths or UV lamps
- Ventilation — work near an open window or use an exhaust fan; never post-process in a sealed room
- Silicone mat or underlay — protects your work surface from resin spills
- UV-blocking containers — store IPA and resin in amber or opaque containers to prevent premature curing
- Rubbish bags — for disposing of resin-soaked paper towels safely
IPA is flammable — keep it away from open flames and store it in a cool, ventilated area. Never pour resin or IPA down the drain; both require proper disposal.
Step 1: Drain and Remove the Print
Once your print has finished, do not immediately remove it from the build plate. Hold the platform over the resin tank at an angle and let excess resin drip back into the vat for several minutes. This reduces waste and keeps your workspace cleaner.
Some users print adapter clips (available on Thingiverse) that hold the build plate diagonally above the tank for hands-free draining. After draining, use kitchen paper to wipe any remaining resin film from the platform before removal.

Step 2: Wash the Print (Manual vs. Machine)
Washing removes the liquid resin film from your print’s surface before UV curing. The most common cleaning agent is isopropyl alcohol (IPA) at 90% concentration or higher. The two-bath method is highly recommended for clean results.
Manual Washing Method:
- Fill two containers with IPA — one primary wash, one clean rinse bath
- Submerge the build plate and printed objects in the first container
- Agitate for 3–5 minutes by swinging, stirring, or using a soft toothbrush for grooves
- Transfer to the second clean IPA bath for a final rinse
- Allow to drip dry before separating prints from the build plate
A magnetic stirrer (available for around $30) automates the agitation process and ensures even cleaning. For very detailed prints, reposition the platform several times during washing to let the IPA reach all recesses.

💰 Magnetic stirrer on Walmart
🔍 Compare on Amazon
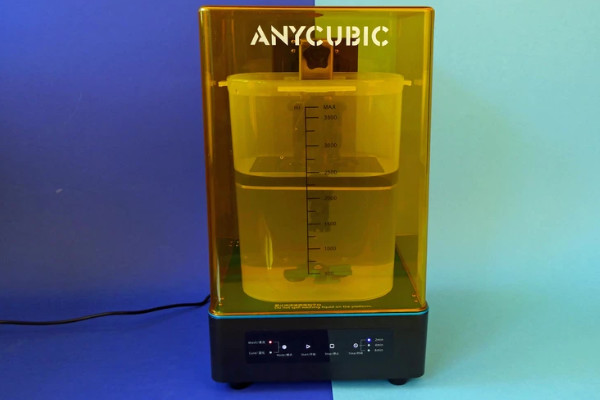
Wash & Cure Stations:
If you want an all-in-one solution, wash and cure stations from brands like Anycubic and Elegoo combine a magnetic-stirrer washing tank with a UV curing chamber in a single device. The washing container typically holds up to 3.5 liters of IPA, and a built-in motor drives the magnetic stirrer. The curing chamber uses LEDs at 365nm and 405nm wavelengths.
These stations reduce paper towel waste, contain odors with a lockable lid, and make the entire process more controlled and consistent. They are highly recommended for anyone printing regularly.
| Option | Cost | Best For | Effort |
|---|---|---|---|
| Manual (IPA + stirrer) | $30–$60 | Budget beginners | High |
| Wash & Cure Station | $60–$150 | Regular users | Low |
| Ultrasonic Cleaner | $50–$200 | Detail-heavy prints | Medium |
Top-rated Wash & Cure stations: Anycubic Wash & Cure Plus, Elegoo Mercury X, Phrozen Cure V2, Vevor Ultrasonic Cleaner, Wanhao Boxman 1. Note: some stations require printed adapter plates to fit certain build platforms.
🛒 Buy on Anycubic official
📦 Check on Amazon
Step 3: Dry the Print Properly
Allow prints to air dry completely after washing. If you’re in a hurry, use a small fan or a quick burst of compressed air to speed evaporation. In most conditions, five to ten minutes of air drying is sufficient. Never cure a wet print.
Step 4: Remove Supports (Before or After Curing?)
Support removal timing is a topic that trips up many resin users. The general rule is: remove supports before final curing when possible. Uncured resin is softer and more flexible, which makes cutting supports away from delicate features much easier and reduces the risk of snapping thin parts.
Pre-cure support removal tips:
- Use flush cutters to snip supports at their base — do not pull or tear
- Work quickly and re-glove after handling — the print is still chemically active
- For stubborn supports, a brief soak in warm water (not hot) can soften the attachment points
- A dental pick or hobby knife works well for removing small sprue marks
After removing supports, give the print a quick rinse and dry again before moving to UV curing. Post-cure support removal (on fully cured prints) is possible but risks chipping or cracking at the support nub sites.
Step 5: Post-Curing for Maximum Strength
Post-curing under UV light is what transforms a soft, chemically reactive print into a hard, stable, fully functional object. Most resins cure optimally at 405nm wavelength, though some also respond to 365nm. Dedicated UV curing stations, nail polish curing lamps, and UV LED strips all work — the key is even coverage.
For uniform curing, either use a rotating turntable (a cheap solar turntable works well) or manually reposition the print several times during the cure cycle. Washing & Cure stations handle this automatically with a rotating platform.

Curing time guidelines:
- Standard resin: 5–10 minutes under a dedicated UV station
- Transparent/clear resin: 3–5 minutes maximum — longer exposure causes yellowing
- Tough or engineering resin: 10–15 minutes for full mechanical properties
- If the surface is still sticky after 10+ minutes, the print was not washed adequately
A word of caution: over-curing is a real problem. Leaving prints under UV for too long — particularly clear resins — causes yellowing and increased brittleness. Follow your resin manufacturer’s recommended cure times as a starting point.
3D Printing Post Processing Tools: What You Actually Need
Having the right tools transforms a frustrating, messy process into a clean and efficient workflow. Here is a breakdown by budget level.
Essential Tools (Every Resin User): Nitrile gloves and N95 respirator, flush cutters and hobby knife, plastic scraper, two airtight IPA containers, UV lamp (405nm), silicone mat, paper towels.
Recommended Upgrades: Magnetic stirrer ($30), Wash & Cure Station ($60–$150), ultrasonic cleaner, solar turntable, drying rack.
Beginner Setup (Budget: $50–$100): Two glass jars, nitrile gloves, flush cutters, a plastic scraper, and a basic 405nm UV nail lamp. Add a $30 magnetic stirrer for a significant quality-of-life improvement.
Pro Setup ($200+): A dedicated Wash & Cure station, ultrasonic cleaner for detailed work, quality flush cutters, a full PPE kit, and UV-blocking storage containers for IPA and resin.
Painting Resin 3D Prints: Pro Finishing Guide
One of the biggest advantages of resin printing is the smooth, detailed surface that accepts paint beautifully — making it ideal for miniatures, figurines, jewelry masters, and display models. Here is how to get a professional finish.
Step 1: Sand the Surface – Start with 400-grit sandpaper to remove support nubs and any surface imperfections. Work up through 800, 1200, and 2000 grit for a progressively smoother finish. Always sand wet to prevent resin dust inhalation.
Step 2: Prime – Apply a light coat of filler primer (rattle can or airbrush). Grey primer reveals surface flaws; white primer gives brighter colors; black primer works for dark-themed models. Let it cure fully before painting.
Step 3: Paint – Both acrylic and enamel paints work well on properly primed resin. Acrylics (like Vallejo, Citadel, or Army Painter) are preferred for their quick drying time and water cleanup. Enamels offer exceptional blending and are favored for vehicle models and larger pieces.
Step 4: Varnish/Clear Coat – Seal your work with a clear coat — matte for realistic models, gloss for vibrant display pieces, or satin for a natural look. This protects the paint from chipping and handling wear.
Airbrush vs. Brush Painting: A brush is perfectly capable for small models and detail work. An airbrush delivers smoother base coats, faster coverage on larger pieces, and gradient/blending effects that are difficult to achieve by hand. If you paint frequently, an airbrush is a worthwhile investment.
Alternative Cleaning Methods
While IPA is the most common cleaning agent, there are valid reasons to consider alternatives. IPA is flammable, odorous, and can be expensive in large quantities.
Specialized Resin Cleaners (e.g., Resinwash by Druckwege): Purpose-built resin cleaning solutions are less flammable than IPA and produce less odor. The main drawback is cost — they are significantly more expensive than IPA per liter.
Water-Washable Resin: Some manufacturers offer resin formulations that clean up with water rather than IPA. This sounds convenient, but the dissolved resin in the wash water is still toxic and must never be poured down the drain. You still need proper collection and disposal containers.
Bioethanol / Denatured Alcohol: A cheaper alternative to IPA, though less effective at dissolving resin residue. Works best for light washing.
Pro Tip – Extend Your IPA Lifespan
Post Processing Resin vs. PLA: What’s the Difference?
| Feature | Resin Prints | PLA Prints |
|---|---|---|
| Washing Required | Yes — IPA or water-washable resin | No washing needed |
| UV Curing Required | Yes — 405nm UV light | No curing required |
| Chemical Hazard | Yes — toxic liquid resin | Minimal — safe filament |
| Surface Detail | Exceptional — perfect for miniatures | Good — layer lines visible |
| Workflow Complexity | Multi-step post-processing | Simple — print and use |
| Cost Per Print | Higher (resin + IPA + PPE) | Lower (filament only) |
Common Post Processing Mistakes (And How to Avoid Them)
- Curing without drying first – always ensure the print is fully dry before UV curing to prevent white haze
- Over-curing transparent resin – clear resin yellows quickly; keep cure times short (3–5 minutes)
- Washing under running tap water – dissolved resin in wash water is toxic; never put it down the drain
- Removing supports after curing – cured resin is more brittle; remove supports before final cure when possible
- Using only one IPA bath – a single bath quickly becomes saturated; always use a two-bath method
- Not agitating the wash – static submersion doesn’t clean deep recesses; stir, swirl, or use a magnetic stirrer
- Skipping PPE – even brief skin contact with uncured resin can cause sensitization over time
- Storing IPA in clear containers near UV light – resin dissolved in IPA can partially cure in clear containers; use amber glass or opaque containers
Frequently Asked Questions
How long should you cure resin 3D prints? Most standard resins need 5–10 minutes under a dedicated UV curing station. Transparent resins should be cured for 3–5 minutes only, as longer exposure causes yellowing. Always follow the resin manufacturer’s recommended cure time as a baseline.
Can you over cure resin prints? Yes. Over-cured prints become more brittle and can warp or discolor, especially clear resins. Cure for the minimum time needed to achieve a tack-free, hard surface.
Why are my resin prints sticky after curing? Stickiness after curing almost always means the print was not cleaned adequately before UV curing. A film of uncured resin on the surface prevents proper hardening. Re-wash the print thoroughly and cure again.
Can you sand resin 3D prints? Absolutely. Resin sands beautifully. Start at 400 grit and work up to 2000 grit for an almost polished surface. Always sand wet to avoid inhaling resin dust, and wear a mask.
How do you dispose of resin waste? Never pour liquid resin or IPA contaminated with resin down the drain. Expose the waste resin to sunlight or UV light until it solidifies completely, then dispose of the hardened resin in regular waste. IPA contaminated with resin can be filtered and reused (see the IPA tip above) or left to cure under UV before disposal. Check local regulations for chemical waste disposal.
What is the best UV wavelength for curing resin? Most resins cure at 405nm. Some also respond to 365nm. Wash & Cure stations typically include both wavelengths for broad compatibility. Check your resin datasheet for the manufacturer’s recommendation.
Final Verdict: Is Resin Post Processing Worth It?
Resin post-processing requires more time, more tools, and more care than FDM printing — there is no getting around that. But for the right applications, it is absolutely worth it. The level of surface detail, dimensional accuracy, and fine feature reproduction that resin printing achieves is simply not possible with filament.
For miniature painters, jewelers, dental professionals, and anyone producing display-quality models, the post-processing workflow becomes second nature quickly. The key is having the right setup from the start.
Our recommendation: invest in at minimum a magnetic stirrer and a dedicated UV lamp. If you print regularly, a Wash & Cure station from Anycubic or Elegoo will save you significant time and reduce your IPA consumption. Always use proper PPE, follow the two-bath washing method, and never rush the drying step before curing.
🏆 Top‑rated Wash & Cure stations
We earn a commission if you purchase through links (Amazon associate / affiliate). Prices are the same for you.
