
Additive manufacturing technologies have significantly improved and become cost-effective over the past few years. Today, there are additive manufacturing 3D printers that whose cost is more affordable to small printer farms and even hobbyist makers.
Today, small businesses can easily integrate resin (FDM/FFF) 3D printers into their workflow to offer a diverse range of print products and services.
FDM printers can be used to produce prototypes, which provide an opportunity to consider the downsides of parts or detect flaws before commencing batch production. In fact, some large resin 3D printers, such as the Optimus P1, also have laser engraving capabilities and other useful features.

3D printing slicing software like Cura, Simplify3D and others allow you to create a wide variety of unique products. With these software programs, you do not need to know advanced design techniques or rules. Simply let your creativity run wild and transform your imagined products into real-world object.
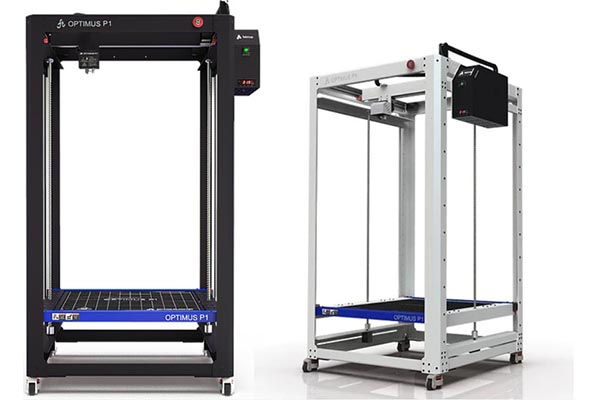
Let’s look at the Optimus P1 3D printers, a large format resin 3D printer that is affordable for both small businesses and consumers.
Optimus P1 3D Printer Review

CHECK PRICE AT TOP3DSHOP
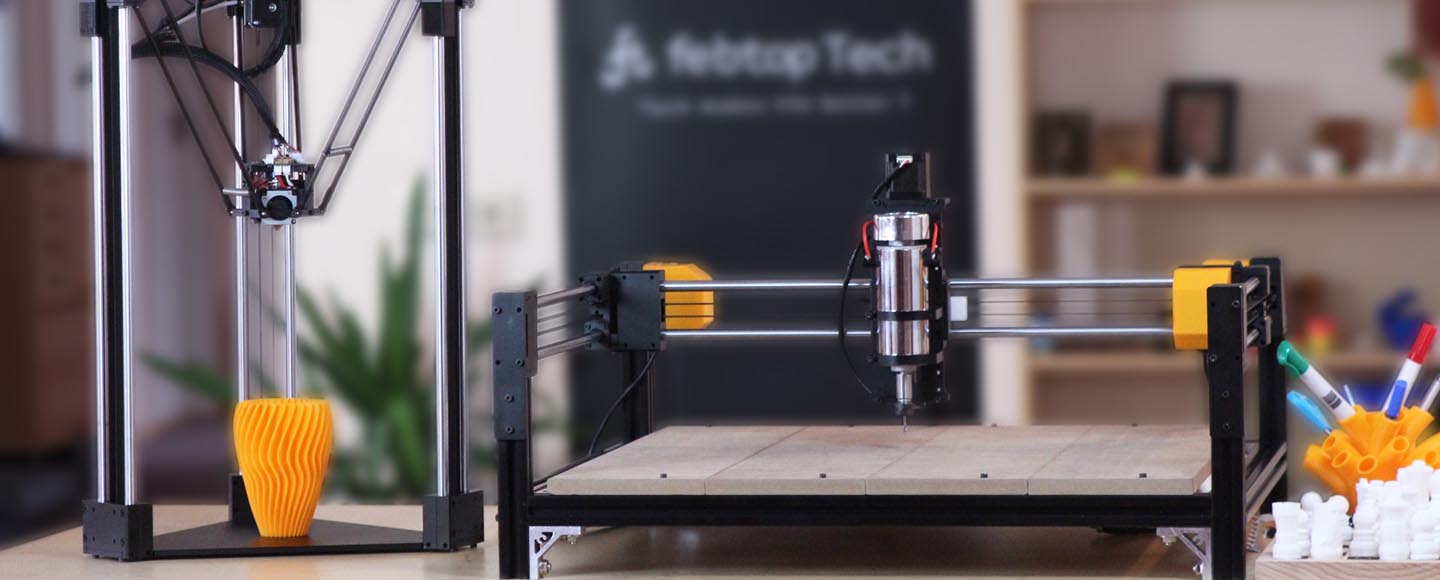
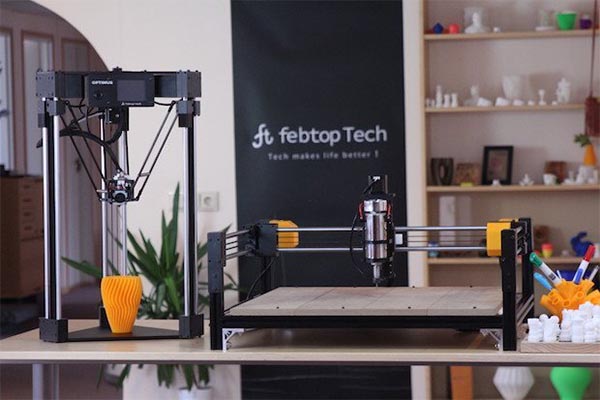
The Optimus P1 is a large professional Fused Deposit Modeling (FDM) 3D printer that is relatively affordable. This large machine has a build volume of 600 x 600 x 1100 mm, is reliable, has a laser engraving function and produces industrial-grade high-precision models.
When it comes to large format 3D printers, the Optimus P1 is at the top of the league. The printer is manufactured by FebTop Tech, a Swedish company that focusses on creating additive manufacturing solutions.
Read on to find out what you should expect of this 3D printer.
Optimus P1 3D Printer Specs
General Specs
[su_table responsive=”yes”]
| Manufacturer | Febtop Tech |
| Manufacturer country | Sweden |
| Assembly | DIY kit |
| Machine dimensions | 850 x 900 x 1500 mm |
| Weight | 55 kg |
| Package dimensions | 900 x 1550 x 2000 mm |
| Connectivity | SD card, USB |
| Frame | 6061 aluminum alloy, customized mold profiles |
| Power supply | 110v/220v MeanWell with an output of 24V/16A |
| Display | 3.5-inch touch screen |
| Motors | NEMA 17 1.2A, 1.8 step angle for XY-axis; Dual NEMA 23 2.0A, 1.8 step angle for Z-axis; NEMA17 0.6A for the Extruder; TMC 2208 Quit Stepper Drivers. |
| Electronics | MKS GEN V1.4 with Custom Marlin Firmware |
| Motion system | MGN16 linear guide rails for X, Y, Z axis |
| Drive system | 15mm GT2 timing belt for X, Y-axis; SFU1610 ball bearing lead screw for Z-axis |
[/su_table]
3D Printer Specs
[su_table responsive=”yes”]
| Technology | FFF/FDM |
| Heated bed material | Anodised aluminum |
| Max. heated bed temperature | 100℃ |
| Build volume | 600 x 600 x 1100 mm |
| Min. layer resolution | 50 microns |
| Bed Leveling | Fully automatic |
| Nozzle diameter | 0.4, 0.8, 1.2 mm nozzle |
| Filament diameter | 1.75mm |
| Printable materials | PLA, ABS, TPU, PETG, etc. |
| Enclosure | Optional 1.5mm aluminum cover, dual separate front doors, and an air filter. |
| Extruder details | Direct drive geared extruder |
[/su_table]
Laser Engraver Specs
[su_table]
| Laser Type | Diode laser |
| Spectrum | 450 nm |
| Engragving head weight | 0.5kg |
| Focus length | 25mm |
| Power | 2W (Included); 7W (Optional) |
| Engraving volume | 600 x 600 mm |
| Compatible materials | Wood, leather, steel, anodized aluminum, and many more |
[/su_table]
Unboxing the Optimus P1 3D Printer

The Optimus P1 3D printer is quite large. Therefore, as expected, the package is also large. Before unboxing it, make sure you have a lot of free space around.
Inside the box, you’ll find the following:
- Optimus P1 main units
- Toolset
- Scraper
- Filament spool
- Pre-cabled wiring assembly with high-quality plugs
- Control unit
- Heated bed
- Laser engraver
- Four pre-assembled nozzles of different sizes

LCTA – Got a question about what’s the box? Contact our pro experts now.
Setting Up the Printer
In the Optimus P1 package, you’ll find a user manual that has all the instructions to follow for successful assembly.
Here are the setup instructions:
Step 1: Prepare the Z-axis
To prepare the Z-axis, remove the four connection plates. Also, separate the two Z-axis frames.

Step 2: Assemble the Bottom Frame and the Left Z-axis
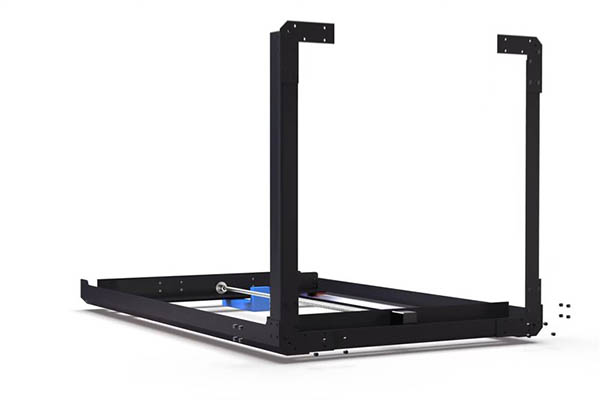
Take out the Z-axis with a cable on the left.
After that, take the bottom frame that has no cable and remove the eight pre-tightened screws.
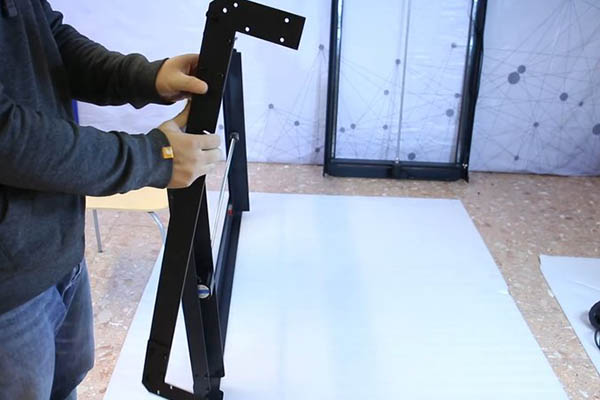
Use the same eight screws to connect the parts together.

Step 3: Connect the Right Z-axis

Place the right-side Z-axis to the right side of the previously assembled construction.

Take the bottom frame that has a cable and install it next to it counterpart.

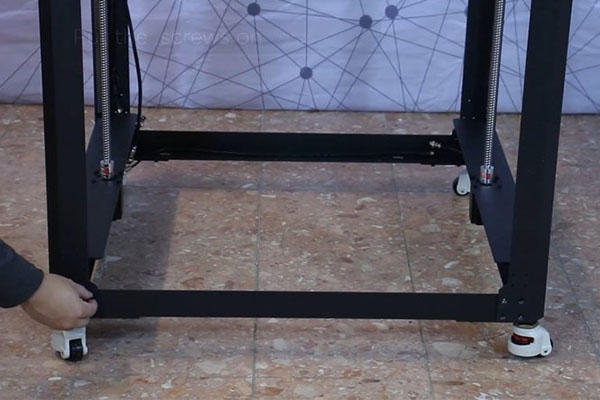
Step 4: Install the Wheels
Install the wheels to the corresponding places and fasten them.

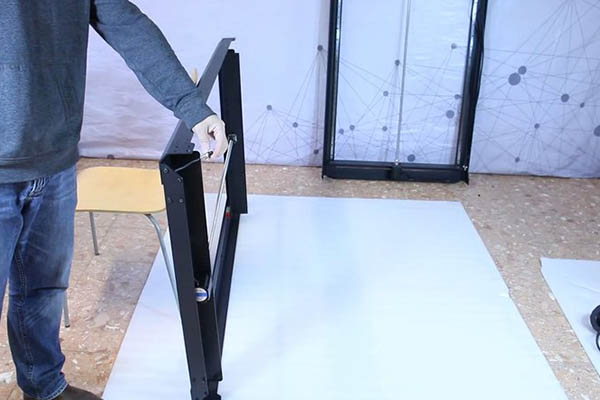
Step 5: Assemble the Top Part
Lift up the printer and place it on the wheels. Make sure all the screws are in place.
Install the XY plate.
Step 6: Install the Cable Chain
Mount the cable chain atop the printer and fasten the print head side.

Step 7: Install the Control Unit

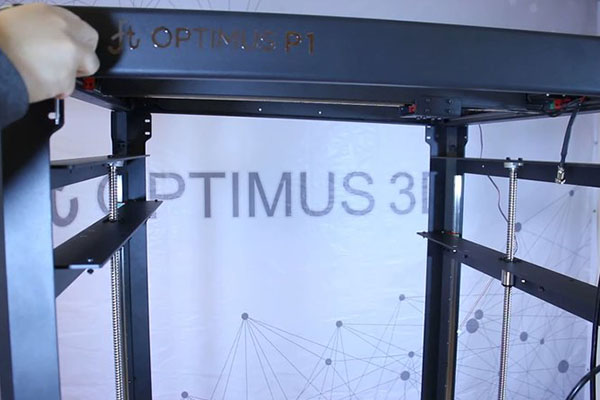
Step 8: Install the Print Bed
To install the print bed, first push both Z-axis slider to the STOP position. Assemble the heated bed and install it into the Optimus P1. Ensure that you install the front and back support bars as in the photo below:

Step 9: Connect the Cables

Step 10: Remove the Stop Screws
Remove the stop screws on each side

Step 11: Load the Filament
To begin, put the filament onto the spool holder. After that, cut the end of the filament and insert it into the tube. Next, rotate the emergency stop button clockwise to release it.
The next step is to head the nozzle up to 200℃ for PLA or 230℃ for ABS. Finally, insert the filament into the extruder and push it until it starts coming out of the nozzle.

If you prefer video instructions, check the playlist at FebTech Support Section.
Optimus PI 3D Printer Features
The Optimus P1 is a DIY kit that comprises of 6 aluminum parts that are reliable and easy to assemble. The printer comes with an instruction manual with all the information you need to set it up. In less than one hour, your printer will be up and ready for your first test prints.
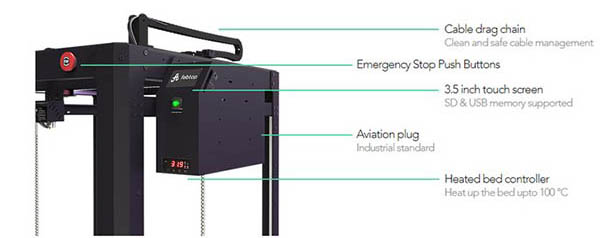
The large format resin 3D printer has an automatic bed leveling system that makes the setup even easier. You can control the printer through a 3.5-inch touchscreen that has a user-friendly interface. The menu options are well laid-out and self-explanatory.
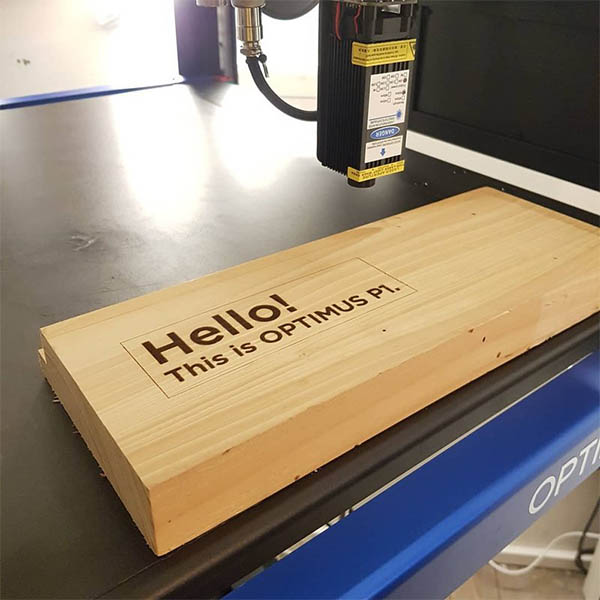
One of the features that make the Optimus P1 3D printer stand out from the crowd is its ability to provide industrial-grade laser engraving. With this unit, you can engrave highly detailed pieces of artwork on a wide range of surfaces, including steel. This is the ultimate 3D printer you need in your workshop to take your business to the next level.
Switching between the laser engraving and 3D printing modes is easy; simply untie four screws and change the laser engraving print head to the 3D printing one. After this, tie the screws again. This procedure will not take more than 5 minutes of your time.

The Optimus P1 3D printer is quite large and heavy. The unit is made of a robust all-metal frame and measures 850 x 900 x 1500 mm. This reliable machine weight about 55kg. To make it easier to move around, the printer has been equipped with wheels.
While the Optimus is a large machine, it does not make a lot of noise when printing. This is because it is powered by an MKS Gen V1.4 mainboard with ultraquiet TRINAMIC stepper motor drivers.

The 3D printer-laser engraver combo has a reliable CoreXY direct drive extrusion system and a powerful cooling system. Other features of the machine include emergency stop buttons, drag chain, and a USB/SD card-based 3D printing.
The PI has a heated bed that can handle a wide range of materials, including PLA, ABS, TPU, PETG and others. This heated bed only accepts 1.75mm filaments.
The Optimus P1 has a high-grade dual Z-axis SFU 1610 ball-bearing screws and MGN16 Hiwin precision linear rails. These two ensure the printer provides industrial-grade quality printing and engraving sessions by preventing any unwanted wobbling.
Coming to print quality, the P1 can print at 1 micron resolution on the Z-axis.

The Optimus P1 comes with an optional enclosure made of thick 1.5mm aluminum sheet and a transparent acrylic cover. The enclosure helps to keep temperatures in the chamber even during a print job to ensure your products are of consistent quality. The enclosure also helps to keep the noise levels down during a print job.
The enclosure is installed with a high-grade air filter that helps to eliminate odors produced by some high-temperature materials such as ABS.
Finally, the enclosure improves your safety when printing or engraving with the Optimus P1 by restricting access to the build chamber. You can see the progress of your print job by looking through the transparent acrylic doors of the enclosure.

Optimus P1 Software
With the Optimus P1 3D printer, you can print models from a computer through a USB cable. Moreover, you can control the printer through the built-in touchscreen with the SD card.

This large format FDM printer and laser works with both Slic3r and Cura software.
The printer runs on both Windows and MacOS and support different file types, including GCODE, IGS, OBJ, and STL.
Optimus PI 3D Printer Print Quality
The Optimus PI produces neat and well-detailed 3D prints. The printer can print layers at 50 micron. The models come out with a smooth finish and are ready for use.
With this machine, you can use different nozzle sizes (0.4, 0.8, and 1.2 mm). Therefore, you have a great balance between speed and details.


The unit also has a professional laser engraver that you can use to produce precise products. Check this piece of woodwork engraved using the laser engraver.
Here is an example of a wall decoration produced by the printer.

Use Cases of the Optimus P1 3D Printer
The Optimus P1 3D printer is best suited for professional applications. The printer is an excellent machine for batch production, prototyping, small and large-scale manufacturing, fine arts, decoration, sculpting, and other applications.
Castle by FebTop Tech
Here is a detailed 3D printed castle measuring 50cm in height. The castle has been printed on a layer height of 50 microns and 15% infill. The whole project took 30 hours to complete.

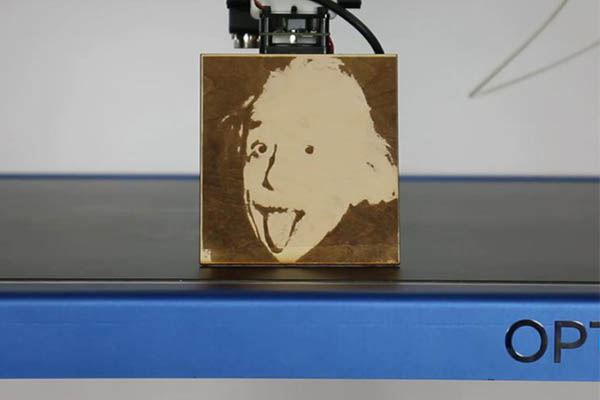
Albert Einstein Engraving by FebTop Tech
You can use the printer’s engraving mode to produce precise engravings on different surfaces, including steel.
Identical Twin by RCLifeOn
Want to clone yourself? You can do so with the Optimus P1 3D printer. This unit produces models that are smooth and realistic. Check this video to see what RCLifeOn was able to accomplish:
Here is an image of the sculpture:

Can you tell the difference?

Pros
- Optimal price-performance ratio
- Has both 3D printing and laser engraving capability
- Large operation area
- Reliable and consistent performance
Cons
- The enclosure and air filter are offered at an additional cost
- The build plate may take up to 10 minutes to heat up to 100 ℃.
Our Verdict: Optimus P1 3D Printer
The Optimus P1 3D printer is a professional large-format resin 3D printer that is reliable and produces industrial-grade models. This unit not only 3D prints but also has a laser engraver. The printer is perfect for experienced makers and professional applications.
This large machine is made of a robust metal frame for durability. It also comes with manufacturer’s warranty.
You can purchase the Optimus P1 3D printer on Top3DShop.
CHECK PRICE AT TOP3DSHOP
