

Are you a beginner in resin 3D printing? One of the things you should know is how to properly clean the prints you make. Read on to find out how to clean resin 3D prints.
Resin 3D printing is great for printing miniatures and models where details matter. However, it also makes a lot of mess than FDM printing. After 3D printing an item with your resin printer, there are a couple of post-processing activities you must do to make it ready. These include washing, curing, and handling the hazardous waste that comes with their prints.
In this guide, you’ll learn how to properly clean resin 3D prints.
How to Clean Resin 3D Prints
Tools
For this exercise, you will need the following tools:
- A wash & cure station
- 5-8 liters of isopropyl alcohol
- A pack of nitrile gloves (Amazon)
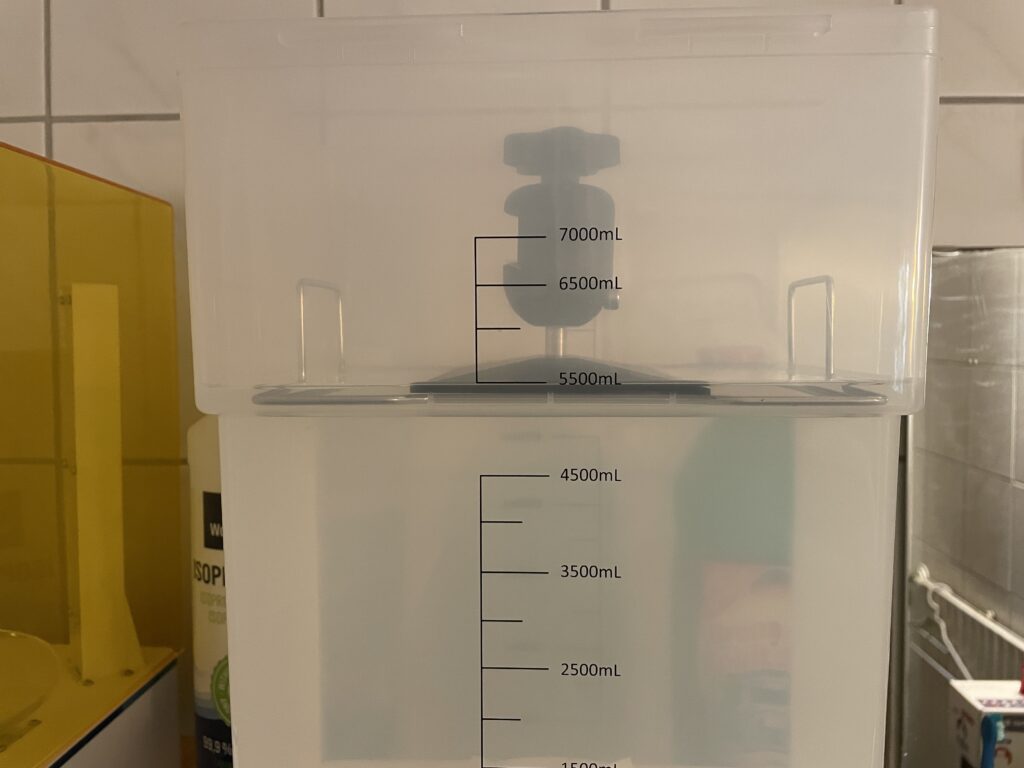
- A transparent, sealable container that is the same size as the guard station’s tank. Ideally, you should simply add a second tank to the washing station if it is available separately.
- A canister for disposal and/or a shallow pan for evaporation. Depending on what you ultimately plan to dispose of.
- Brush, kitchen sponge with green scourer side, Zewa, tea towel
- 1-2m hose. I use 6mm OD/4mm ID from Amazon. You are welcome to use something thicker.
- 1-2 laboratory wash bottles (Amazon)
- A tray to use as a drip catcher
- A source of cold air (freezer or cold/compressed air spray)
- Something that makes wind e.g., a cold air hair dryer or compressed air. I use my airbrush
- A respirator against solvent vapors (Amazon) and goggles (Amazon)
Basic Washing & Hardening Procedure
I’m a big fan of Wash & Cure stations, especially the ones where I can just hang the printer’s build plate without removing the print first. This is important as I usually don’t want to get in contact with uncured resin.
After some practice, I’ve been able to do the washing procedure safely. In fact, I only use one glove for the procedure. Moreover, I don’t like to use a lot of Zewas.
After printing, I only touch the building board on its holder or the knob, because they are usually not dirty with resin.
Immediately after printing, I hang the build plate at an angle for a while so that as much resin as possible drains back into the tank. There are also holders that you can print yourself. My goal is to ensure as little resin as possible gets into the wash water and what’s back in the tank doesn’t make a mess.

After draining, I take a small stainless steel cup, which serves as a drip catcher while I transport the building board from the printer to the washing station and hang it there.
What to Take to Wash
I still use isopropyl alcohol (also called isopropanol) to wash off resin 3D prints. If you want to save, always buy isopropyl alcohol in large containers. Ideally, you should get 5-6 or more liters at a time.
Alternatively, you can use denatured alcohol, ethanol and probably other alcohols to wash the resin.
There are also special cleaning solutions for resin printing. A good example the Monocure Resinaway (Amazon), which smells of roses. There is also the IPA Based 3D Resin Cleaner and others. However, such cleaners tend to be more expensive.
Can You Clean Resin with Pure Water?
Be careful when using pure water in the washing station as it can make the bearings of the stirring propellers to rust. Moreover, using water to clean resins is not recommended since the resin is not water-washable.
By the way, why use isopropyl alcohol for washing resin? Well, nearly every 3D printer manufacturer recommends it (e.g., Formlabs, Prusa, XYZ-Printing and Wanhao . To my knowledge, all resin printer manufacturers still recommend Iso today.
However, I’ve also had success in cleaning resins using alcohol and ethanol. Nevertheless, Iso is still my favourite.
By the way, Formlabs recommends at least 90% Iso and as an alternative to Iso mentions the unknown TPM – tripropylene glycol monomethyl ether. More information about it is here.
Also, Formlabs says the degree of contamination of the Isos can be monitored with an areometer – and includes one with its washing station. More information here.
Washing in the Washing Station
I usually hang the print bed so low or fill the container such that the upper side of the print bed is still washed over. After that, I let the print wash for a few minutes ( about 2-3 minutes) until it is clean.
Alternatively, you can have a rotating system with 2 tanks: a heavily soiled tank for pre-washing, then rinsing again in a slightly soiled tank. However, I find this to be too much work for me.
Detach & Remove Supports
Next, I release the pressure from the bed and try to remove most of the supports with a print removal tool kit. If there are problems with detaching, I put the entire platform, which has meanwhile been cleaned, in the freezer for half an hour. Alternatively, you can cold spray it or put the compressed air bottle upside down.
Often that’s enough to make the supports detach and be easy to remove.
However, there are some exceptions:
- If the support forest was very dense, you may have to put the print in the chip basket again for a 2nd wash.
- If the prints are hollow, rinse the hollow space again vigorously with a laboratory wash bottle. Let the iso flow into the tank of the washing station.
- If the bottom of the print is still a bit sticky, take a soft brush with fresh iso and brush off quickly, letting the iso drip into the wash station.
(After hardening, I loosen the remaining supports. For example, I may use a side cutter with a flat blade, such as that used by plastic model builders. If the printed part is to be primed or made transparent again with clear varnish, I leave a few supports standing. This way, I will still have a grip while spraying.)
Wipe the Build Plate
I brush or wipe the building board again with fresh Iso. I then scrub the board a little with the green scourer side of the sponge. After that, dry everything with a tea towel and the construction board will be ready. I then wash the sponge in the sink. Depending on the degree of soiling, I may wash the tea towel in the wash.
Dry Print
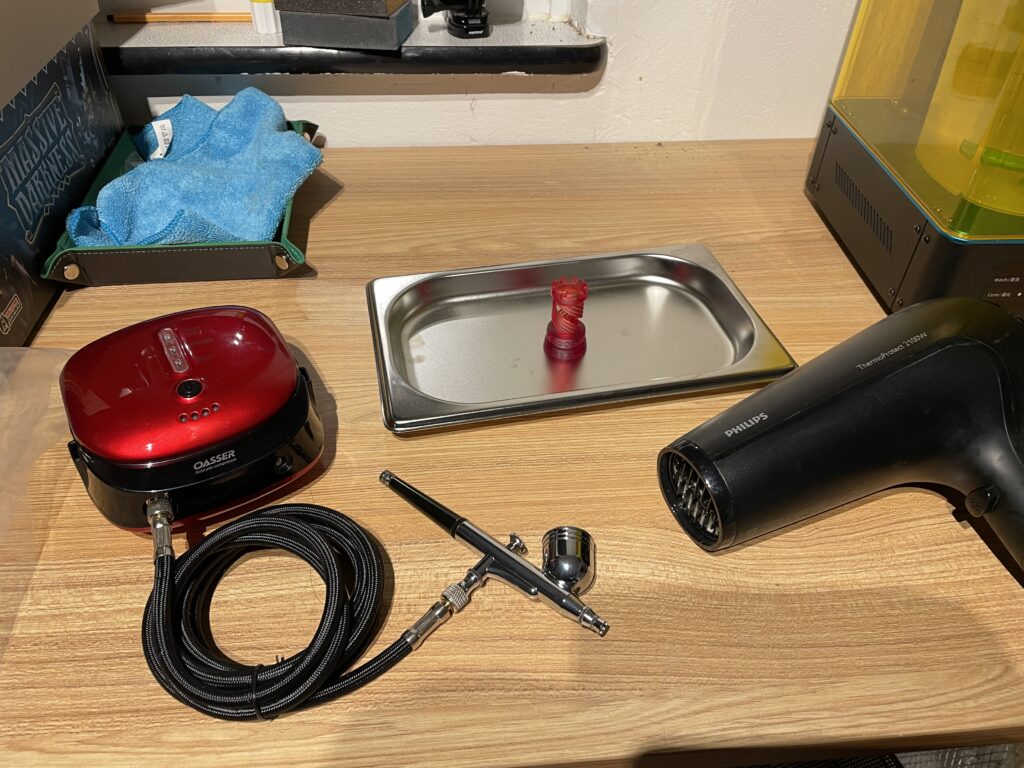
Cheap cordless airbrush or hair dryer
I use my airbrush compressor or any brush that is clean. On the picture above is the Oasser that is available on Amazon. You don’t need a lot of pressure; the pure air flow is enough for the alcohol to evaporate quickly. A small toy compressor is also enough, or a compressed air bottle or a hair dryer (on the cold setting).
I usually let the print air dry for a day before I harden it. When dried, there is less warping and white spots.
What to Do With the Used Alcohol?
During the whole procedure, the iso in the tank of the washing station becomes increasingly dirty. The washing station becomes dark, ie the dissolved resin flocculates very little.
To speed things up, I either put the tank in the sun for an afternoon or use the Cure Station for a minute or. If I need the tank for printing the same day, I first transfer the iso to another clear, sealable container. If you have 2 tanks for your washing station, this is even better.
Regardless of the container I’m using, I let it sit for at least a day or two. The flocculated resin settles at the bottom of the container.
I use a hose to suck off the clear iso from above and make sure I don’t swirl up the slag at the bottom again. That way, you get a good 3/4 or more of the iso back and can keep using it. Simply suck it back into the tank and top up with fresh iso to the desired level.

Not worth it here yet, as there is only a very small amount of slag on the bottom of the tank
It’s like stealing petrol: Set up the container a little higher, put the hose in just far enough that it’s just below the surface, then suck it up and let it run into a container that’s lower down. For suction, I use the above-mentioned laboratory bottle and 1-2m “airbrush hose”. Professionals can suck it up with their mouths.
Admittedly, the 4mm hose I use is actually too thin for this, and takes a while. However, it works and I need it for the airbrush.
The remaining 1/4tel is now the real problem.
- You can try to filter it. For example, you can use coffee filters or something like that. However, this is a very tedious because the filters clog up quickly. The procedure takes long and gives a decent mountain of garbage.
- You can fill this remainder into a canister and then, depending on how your city or municipality handles it, hand the canisters over to the city’s waste collection point, landfill, or recycling centers.
- If it’s sunny, you can put it in a wide tub and let it evaporate outside and harden completely. A dry, fully hardened mass then remains. This mass can be disposed of in the residual waste.
Contaminated Accessories
If I use a scraper, painting knife or brush, I brush them over with some fresh Iso, just like the building board. The Iso that runs off is caught in the wash tank. The laboratory bottle also helps here again.
Zewas, paper filters, the gloves used etc. can be hung up to dry/harden or briefly exposed to light in the Cure Station. They can then be disposed of with the residual waste.
[su_note]
Keep the following principle in mind:
Liquid resin = poorly
Fully cured resin = no problem and can be disposed of with the residual waste.[/su_note]
What if You Don’t Have a Washing Station?
Using a washing station would make your work easier. However, you can still do without it. Simply wash your prints in large containers and collect the alcohol, which is increasingly contaminated with resin.
I would also recommend the rotation system with 3 containers: dirty iso for pre-rinsing, barely soiled for rinsing, then collecting the totally dirty iso for “reprocessing”.
Don’t have a Cure Station?
You can also harden your prints with sunlight. Simply put them on the window sill (provided the window lets enough UV light through) or outdoors on the balcony, terrace or something.
You can also harden the prints with a UV lamp or DIY with UV LED strips. To avoid one-sided hardening, turn the part every now and then so that too much tension does not build up due to uneven hardening. Another tip is to place the printed part in a water bath in the light.
Water Washable Resin, Ultrasonic and Water
Water washable resin sounds so tempting in advertising: just wash with water. However, what is usually not mentioned is that the water used to wash prints should not be discharged into the sewage system. Therefore, you don’t really save anything.
Since it is popularly said that water should not go into the washing station, an ultrasonic cleaner is ideal for water-washable resins. Simply fill it with tap water and a dash of dish soap. This also works very well.
I use the Vevor ultrasonic cleaner.
The bearing of the “stirring propeller” can be easily exchanged with skateboard bearing in some washing stations. Therefore, you can take your chances.
Alcohol should not be poured into an ultrasonic cleaner, especially not into a heated one. For standard resins, the ultrasonic cleaner is therefore out of the question. However, some people make do by placing a glass of Iso in the ultrasonic cleaner filled with water and washing the pressure piece in it.
Why I Don’t Like Flexplates
Maybe I’m in the minority there. Undoubtedly, flexplates make it easy for prints to be released. It may well be that prints adhere better to a flexplate. For me, the print sticks without it.
But…
- The building board and the magnetic foil on it should not be immersed in the alcohol-filled tank of the washing station. Immersing it could damage the magnetic foil or its adhesive in the long term. For my cleaning, I don’t dip the cleaning board inside the Iso tank when I wash it. I don’t want to remove the building plate while wet and then hand wash it. I can see that if you take the flexplate off and then wash the print in the fry basket, you’ll need less alcohol. But I don’t want to get anywhere with wet resin.
- When installing the flexplates, the limit switch usually also has to be lined before it is leveled again. Otherwise something may break. I don’t like tinkering.
Wash Out the Resin Tank

From time to time, you may have to clean your resin tank. When cleaning the tank, I first pour off the resin that is still in the tank using a permanent resin filter (Amazon) . There are also paper paint filters (Amazon). However, somehow handling them was a bit awkward for me.
I never tip used resin back into the resin bottle. I always keep it separate. In the original resin bottle, there is always only unused resin.
I built a rubber spatula from an old rubber wiper/window squeegee (the yellow thing in the photo). This should also work with a rubber wiper blade.
I use this to brush out the tank as best I can, then take a good shot of iso and use a soft brush to brush the tank out completely, especially along the edges. I tip the iso into the tank of the washing station.
I then take the laboratory bottle, hold the resin tank at an angle over the tank of the washing station and rinse.
Depending on how clean it got, I use a soft microfiber cloth (Vileda Allpurpose – Amazon) and wipe the FEP and tank corner of the cloth soaked with Iso, including the back. Then I “polish” it dry. I don’t take Zewa for this, it’s too rough for me for something like that. If it then becomes cloudy, I repeat this until the FEP is nice and clean again.
If you get that completely clean, there is no “cloudy veil” on the FEP. In this way, I’ve gotten the single-use tank in the photo spotless again multiple times.
