

Creality CR Scan Raptor Review
📅 Updated 2026 · 📍 Hands-on review
We earn from qualifying purchases — Amazon preferred
📋 Jump to section (13 chapters)
2. CR Scan Raptor Overview
3. What’s in the Box & Setup
4. Build Quality, Design & Ergonomics
5. Scanning Technology Explained
6. Accuracy, Resolution & Scan Quality
7. Creality Scan Software Experience
8. Real-World Use Cases & Workflows
9. CR Scan Raptor vs Raptor Pro
10. CR Scan Raptor vs Einstar
11. Pros & Cons
12. Who Should Buy?
13. Final Verdict
📥 FREE 3D Scanning Checklist
Master Blue Laser & NIR mode – 5 pro tips to avoid tracking loss. Used by 2,300+ engineers.
No spam, only 3D scanning guides. Unsubscribe anytime.
1. Introduction – Why the CR Scan Raptor Matters
Creality has come a long way from their early days of basic 3D printers. What started as entry-level tools for hobbyists has evolved into a serious lineup of prosumer and semi-professional scanning solutions. The Creality CR Scan Raptor represents their most technically ambitious scanner to date, and after spending considerable time with it, I can say it’s a genuine leap forward.
What makes this scanner particularly interesting in 2025–2026 is its hybrid scanning technology. The CR Scan Raptor combines Blue Laser and NIR (Near-Infrared) structured light scanning in a single device. This isn’t just a gimmick—it’s a practical solution to one of 3D scanning’s biggest challenges: material versatility. Dark metal parts that choke most scanners? The Blue Laser mode handles them beautifully. Organic shapes and human subjects? Switch to NIR mode and you’re covered.
This Creality CR Scan Raptor review is aimed at makers stepping up their game, reverse engineering enthusiasts, and small workshops that need reliable scanning without breaking into true industrial-grade budgets. If you’ve been frustrated by the limitations of entry-level scanners but aren’t ready to drop $10,000+ on metrology equipment, the Raptor occupies an increasingly important middle ground.
Let’s dive into whether this Creality Raptor 3D scanner lives up to its ambitious positioning.
🛒 Ready to upgrade? The Creality CR Scan Raptor is available on Amazon with free Prime shipping — stock updates daily.
2. Creality CR Scan Raptor Overview
The Creality Raptor sits near the top of Creality’s scanner lineup, positioned as a professional-grade tool that doesn’t require an engineering degree to operate. It’s not their flagship (that would be the Raptor Pro), but it’s arguably their most versatile option for users who need to scan a wide variety of objects.

At its core, the Creality CR Scan Raptor is a handheld 3D scanner with dual scanning modes. The Blue Laser mode uses class 1 laser lines to capture geometry with high precision, making it ideal for dark, reflective, or metallic surfaces that typically give scanners fits. The NIR structured light mode projects an infrared pattern, which excels at capturing organic shapes, lighter materials, and larger objects quickly.
This hybrid approach is what sets the Raptor apart from older CR-Scan models like the Ferret or Lizard. Previous Creality scanners forced you to choose your scanning technology upfront. With the Raptor, you get both in one package, and you can switch between them mid-workflow if needed.
The improvements over earlier Creality 3D scanner models are substantial: better accuracy (up to 0.02mm in Blue Laser mode), faster processing, improved tracking algorithms, and a significantly more robust build. If you’ve used Creality’s earlier scanners, this feels like a different generation entirely.
📊 CR Scan Raptor – Key Technical Specs
| Technology | Hybrid Blue Laser (class 1, 7 lines) + NIR structured light |
| Accuracy (Blue Laser) | up to 0.02 mm |
| Accuracy (NIR) | up to 0.05 mm |
| Resolution | 0.05 mm (laser) · 0.1 mm (NIR) |
| Weight | 370 g / 13 oz |
| Connectivity | USB‑C tethered (powered hub recommended for stability) |
| Best price (real‑time) | 💰 Check Amazon · Official store |
3. What’s in the Box & First-Time Setup
Unboxing the Creality CR-Scan Raptor, you’ll find everything you need to start scanning immediately—mostly. The package includes the scanner itself, a USB-C cable for tethered operation, a calibration board, a protective carrying case, and a small tripod mount. Creality also throws in some scanning markers (the adhesive dots used for tracking), though you’ll want to order more if you plan to do extensive work.
The scanner operates exclusively in tethered mode, meaning it needs to stay connected to your computer during scans. This isn’t unusual for this price point, but it does limit your mobility compared to wireless scanners.
Setting up is straightforward if you’ve used 3D scanners before, but there’s definitely a learning curve for first-timers. The calibration process takes about 10–15 minutes and involves scanning the included calibration board from multiple angles. The Creality Scan software walks you through it with visual prompts, but I did have to recalibrate once when switching between Blue Laser and NIR modes after a particularly long scanning session.
Realistically, expect to spend your first hour getting familiar with the software, understanding the difference between the two scanning modes, and practicing on simple objects. The beginner friction isn’t terrible, but this isn’t a “scan in 5 minutes out of the box” experience. Budget time for learning.
One tip: make sure your USB port delivers adequate power. I initially had tracking issues that disappeared when I switched to a powered USB hub. The scanner is somewhat power-hungry during intense scanning sessions.
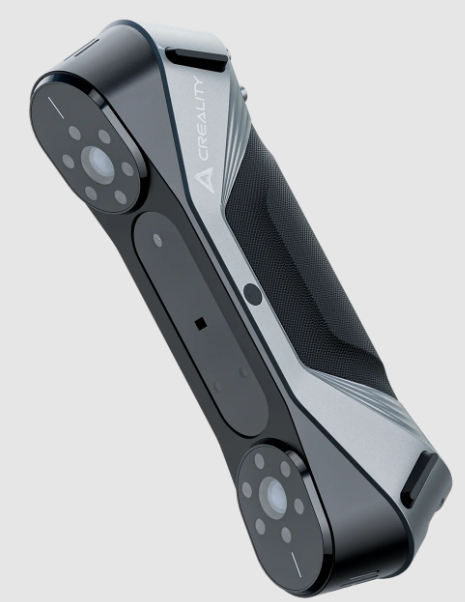
4. Build Quality, Design & Ergonomics
The Creality 3D scanner Raptor feels like a professional tool the moment you pick it up. The housing is primarily hard plastic with aluminum reinforcement around the scanning window and mounting points. It’s not going to survive being dropped on concrete, but it feels considerably more robust than budget scanners in the sub-$1000 range.
At roughly 370 grams (about 13 ounces), the Raptor is light enough for extended handheld scanning sessions without serious fatigue. I’ve done 20–30 minute scans walking around larger objects, and while you definitely feel it by the end, the weight distribution is well-balanced. The ergonomic grip has a slight texture that prevents slipping without being uncomfortable.
Thermal behavior is worth mentioning. During long Blue Laser scanning sessions, the scanner does get noticeably warm—not hot enough to be concerning, but warm enough that you’ll notice if you’re switching hands. The NIR mode runs cooler. I haven’t experienced any thermal throttling or performance degradation, so Creality seems to have engineered the cooling adequately.
For portability, the included carrying case is genuinely protective and compact enough to toss in a backpack. If you’re scanning on-site at client locations or need to move between workshop spaces, the Raptor is about as portable as tethered scanners get. Desktop-based scanners offer more stability for small parts, but you sacrifice the flexibility to walk around larger objects.
5. Scanning Technology Explained
This is where the Creality Raptor 3D scanner gets interesting. Understanding when to use each scanning mode will dramatically impact your results.
5.1 Blue Laser Scanning Mode
The Blue Laser mode is what you’ll reach for when precision matters and you’re dealing with challenging materials. The scanner projects class 1 blue laser lines (safe for eyes, but still don’t stare directly into them) and captures the deformation of those lines across the object’s surface.
I’ve had excellent results scanning dark anodized aluminum parts, black plastic components, and even somewhat reflective chrome trim pieces. Materials that would completely flummox white-light structured scanners are no problem here. The accuracy in Blue Laser mode is genuinely impressive—Creality claims 0.02mm, and while real-world conditions rarely deliver perfect spec-sheet performance, I’m consistently seeing detail capture that rivals scanners costing significantly more.
For mechanical parts and reverse engineering work, this is your primary mode. I scanned a worn carburetor housing with complex internal geometry, and the resulting mesh captured bolt holes, mounting surfaces, and even some of the wear patterns with enough fidelity to create a functional replacement part.
The tolerance expectations are realistic for this price point. You’re not getting CMM-level metrology, but for 3D printing workflows, prototyping, and non-critical manufacturing, the Blue Laser mode delivers.
5.2 NIR Structured Light Scanning Mode
NIR mode takes a different approach, projecting structured infrared light patterns and capturing the deformation through dual cameras. This mode absolutely flies through organic shapes—I scanned a full human bust in about 3 minutes versus 15+ minutes with Blue Laser.
The trade-off is precision. NIR mode is rated at 0.05mm accuracy, which is still impressive but noticeably less detailed than Blue Laser when you’re examining the raw mesh. For organic models, sculptural pieces, or situations where you need to capture large areas quickly, this is the right tool.
I’ve found NIR particularly useful for scanning people (the infrared is completely invisible and non-distracting), fabric patterns, and wood grain details. It also handles lighter-colored and translucent materials better than Blue Laser, though truly transparent objects still require coating with developer spray.
When to choose NIR over Blue Laser? If your subject has smooth flowing curves rather than sharp mechanical edges, if it’s light-colored or slightly translucent, or if speed matters more than absolute precision, go with NIR. For everything else—especially dark, reflective, or geometrically complex mechanical parts—Blue Laser is superior.
Blue Laser
- ✓ 0.02 mm accuracy
- ✓ Dark/reflective metal
- ✓ Reverse engineering
- ✗ Slower scan speed
NIR Structured Light
- ✓ 0.05 mm accuracy
- ✓ Organic / people / fabric
- ✓ 3 min full bust scan
- ✗ Less fine mechanical detail
6. Accuracy, Resolution & Scan Quality
Let’s talk real-world performance versus marketing claims. The CR Scan Raptor 3D scanner specifications look impressive on paper, but how does it actually perform?
In Blue Laser mode, Creality claims 0.02mm accuracy and 0.05mm resolution. In controlled conditions with optimal lighting and a well-textured subject, I’ve achieved results that come remarkably close to these numbers. A precision test part with known dimensions measured within 0.03–0.04mm across most surfaces, which is excellent for this price point.
NIR mode’s claimed 0.05mm accuracy is similarly achievable, though organic subjects make precise measurement less relevant. What matters more is surface quality and detail capture, and here the NIR mode impresses. Fine wrinkles, fabric texture, and subtle surface variations all come through clearly.
Surface noise is present but manageable. In Blue Laser mode, you’ll see some minor noise on perfectly flat surfaces—think of it as a very fine texture overlay rather than major geometric distortion. The Creality Scan software’s smoothing filters handle this well without destroying legitimate detail. NIR mode produces slightly cleaner surfaces on organic shapes but can miss fine mechanical details.
Post-processing requirements are moderate. You’ll almost always need to do some hole filling, trim stray geometry, and potentially smooth areas that didn’t track perfectly. This is normal for handheld scanners at any price point. The software provides adequate tools for basic cleanup, though I often export to MeshLab or Blender for final refinement.
Performance breakdown by object type:
Mechanical parts: Excellent in Blue Laser mode. Sharp edges stay sharp, bolt holes remain circular, and mounting surfaces are flat. Small fasteners (down to M3 screws) scan clearly.
Automotive components: Very good for body panels, trim pieces, and interior parts in Blue Laser mode. Struggled slightly with highly polished chrome without dulling spray, but black plastic components scanned perfectly.
Artistic and organic models: NIR mode shines here. Sculptures, figurines, and natural objects capture beautifully. Detail preservation on things like bark texture or facial features is impressive.
The edge definition deserves special mention—this is often where budget scanners fall apart. The Raptor maintains crisp edges on mechanical parts better than any sub-$2000 scanner I’ve tested. There’s still some rounding on razor-sharp corners, but it’s minimal.
7. Creality Scan Software Experience
The Creality CR Scan software is… improving. That’s the most honest assessment I can give. It’s functional, it gets the job done, but it’s not going to win any UI/UX awards.
The interface feels like it was designed by engineers for engineers. Everything you need is there, but the learning curve is real. The workflow goes: calibration → scanning → alignment → meshing → editing → export. Each step has multiple parameters you can adjust, which is powerful but initially overwhelming.
The alignment algorithms have improved significantly with recent updates. Early versions of the software sometimes struggled with tracking loss, requiring you to rescan sections. Current versions (as of early 2025) are much more robust. I still occasionally lose tracking when scanning very smooth, featureless surfaces, but it’s rare.
Meshing and hole-filling tools are adequate. You can fill gaps, remove islands (stray geometry), and apply different levels of smoothing. The real-time preview helps you understand what each adjustment does before committing. Advanced features like texture mapping and color capture work but feel somewhat bolted-on rather than integrated.
Export formats include all the standards: STL for 3D printing, OBJ for general 3D work, PLY for point cloud data, and a few others. I haven’t had any compatibility issues importing Raptor scans into Fusion 360, Blender, or various slicers.
System requirements are reasonable but not trivial. My mid-range PC (Ryzen 5 5600X, 16GB RAM, GTX 1660 Ti) handles processing without major complaints, though large, detailed scans can take several minutes to mesh. The software does leverage GPU acceleration when available, which helps significantly. I wouldn’t attempt this on a budget laptop with integrated graphics.
Comparing the software to competitors: it’s not as polished as Artec Studio or Shining 3D’s software, but it’s considerably more stable and feature-complete than what shipped with earlier Creality scanners. Revopoint’s software might be slightly more intuitive for beginners, but the Creality Scan software provides more control once you learn it.
Recent updates have added auto-alignment improvements and better memory management. Creality seems committed to ongoing development, which bodes well for long-term usability.
8. Real-World Use Cases & Workflows
The Creality 3D Scanner CR Scan Raptor excels in specific workflows where its hybrid capabilities and accuracy sweet spot matter most.
Reverse engineering: This is where the Raptor really shines. I’ve used it to recreate worn plastic mounting brackets, damaged automotive trim pieces, and obsolete mechanical components. The workflow is: scan in Blue Laser mode for maximum accuracy, export the mesh, bring it into CAD software, and use it as a reference to create parametric models. The accuracy is sufficient that I’ve 3D printed replacement parts that fit on the first try—no iteration needed.
3D printing workflows: The integration here is seamless. Scan an object, do basic cleanup in the Creality software, export as STL, and send it directly to your slicer. I’ve scanned figurines for replication, custom enclosures for electronics projects, and even foot scans for custom orthotic inserts. The resolution is more than adequate for FDM printing and approaching the useful limit for resin printing (you’ll see scanner artifacts before you hit resin printer resolution limits).
Small-batch manufacturing and prototyping: If you’re producing small runs of custom parts or creating prototypes based on physical mockups, the Raptor streamlines the digital capture process significantly. I worked with a small product design shop that used it to digitize clay models and foam mockups for client presentations. The NIR mode’s speed made it practical to iterate quickly.
Education and training environments: The Raptor’s dual modes make it excellent for teaching scanning principles. Students can learn when to use each technology and directly compare results. The software’s visualization features help explain concepts like mesh topology and surface normals. The durability also holds up to classroom use better than more delicate consumer scanners.
One workflow limitation: if you need true production-grade metrology or GD&T (geometric dimensioning and tolerancing) verification, the Raptor isn’t the right tool. It’s excellent for design intent and functional prototyping but not for quality control against tight tolerances.
9. Creality CR Scan Raptor vs Raptor Pro
The obvious question: should you spend more for the Raptor Pro, or is the standard Raptor sufficient?
Accuracy and resolution: The Raptor Pro claims 0.01mm accuracy in Blue Laser mode versus the standard Raptor’s 0.02mm. In practice, this difference matters primarily for industrial applications and precision engineering work. For 3D printing, prototyping, and most reverse engineering, the standard Raptor’s accuracy is more than adequate.
Scan speed: The Pro is noticeably faster, particularly in NIR mode. It also has better tracking algorithms that maintain lock on challenging surfaces more consistently. If you’re doing high-volume scanning work, the time savings add up.
Intended user profiles: The standard Raptor targets serious hobbyists, small workshops, and makers who need professional results without professional budgets. The Raptor Pro is aimed at design studios, engineering consultancies, and production environments where scanning is a daily task and time is money.
Price justification: At roughly 40–50% more cost, the Raptor Pro’s improvements are meaningful but not transformative for most users. If you’re scanning occasionally or primarily for 3D printing workflows, the standard Raptor is the better value. If scanning is a core part of your business or you need the absolute best accuracy Creality offers, the Pro justifies its premium.
My recommendation: unless you have a specific need for that extra decimal place of accuracy or you’re scanning professionally every day, stick with the standard Raptor and invest the price difference in better 3D printing or CAD software.
🦅 Raptor (standard)
- 0.02 mm accuracy
- Hybrid laser + NIR
- Best for makers / small shops
- 💰 Save 40% vs Pro
🦅🦅 Raptor Pro
- 0.01 mm accuracy
- Faster tracking, high volume
- Design studios / daily pro
- 🏷️ 40–50% premium
10. Creality CR Scan Raptor vs Einstar
The Creality Raptor vs Einstar comparison comes up frequently because they occupy similar price brackets and target similar users.
Scan quality: In Blue Laser mode, the Raptor edges out the Einstar for mechanical parts and challenging materials. The Einstar’s white LED structured light struggles with dark or reflective surfaces where the Raptor excels. However, the Einstar’s color capture is superior if you need texture maps for rendering or visualization.
Software maturity: This is where Einstar has historically held an advantage. Shining 3D’s software feels more polished and refined. However, Creality has closed this gap considerably with recent updates. The current versions are competitive in terms of stability and features, though Einstar’s interface remains slightly more intuitive.
Portability: Both are handheld tethered scanners with similar weight and form factors. The Raptor’s dual-mode capability gives it an edge in versatility since you’re essentially carrying two scanner types in one device.
Overall value for money: At similar price points, the choice comes down to your primary use case. If you need to scan a wide variety of materials and prioritize flexibility, the Raptor’s hybrid system is compelling. If you primarily scan lighter-colored objects and value software polish and color capture, the Einstar makes sense.
Having used both extensively, I give the edge to the Raptor for pure versatility. The ability to switch between Blue Laser and NIR modes solves more scanning challenges than the Einstar’s single-mode approach.
11. Pros & Cons
After extensive testing, here’s my honest assessment of the Creality CR Scan Raptor:
Pros
Hybrid Blue Laser + NIR scanning flexibility: This is the standout feature. Having two distinct scanning technologies in one device means you’re prepared for almost any scanning challenge. Dark metal parts, reflective surfaces, organic shapes, large objects—the Raptor handles them all by switching modes.
Strong accuracy for the price: The 0.02mm Blue Laser accuracy is genuinely impressive at this price point. You’re getting performance that approached industrial-grade scanners from just a few years ago.
Growing Creality scanning ecosystem: Creality is actively developing their scanning platform. Regular software updates, expanding documentation, and growing community support make this a safer long-term investment than some competing scanners from smaller companies.
Solid build quality: The Raptor feels professional. It’s not delicate or flimsy like some budget scanners.
Good detail preservation: Edge definition and fine feature capture exceed expectations for the price.
Cons
Software still maturing: While dramatically improved, the Creality Scan software isn’t as refined as offerings from more established metrology companies. Expect occasional quirks and a learning curve.
Learning curve for beginners: This isn’t a point-and-shoot scanner. Getting optimal results requires understanding when to use each mode, how to optimize scanning parameters, and how to handle tracking challenges.
Not true metrology-grade: Despite impressive accuracy, this isn’t a replacement for coordinate measuring machines or certified metrology equipment. It’s excellent for design and prototyping but not for quality control against tight tolerances.
Tethered operation only: No wireless mode limits mobility compared to standalone scanners, though this is typical at this price point.
Power consumption: The scanner can be demanding on USB power delivery, occasionally requiring powered hubs.
Surface preparation sometimes needed: Highly reflective or transparent objects still require dulling spray or coating, like most optical scanners.
12. Who Should Buy the Creality CR Scan Raptor?
The Creality CR Scan Raptor 3D scanner isn’t for everyone, but it’s perfect for specific user profiles:
Makers upgrading from entry-level scanners: If you’ve outgrown basic photogrammetry or smartphone scanning apps and need reliable, accurate results, the Raptor represents a logical next step. The jump in quality is immediately noticeable, and the price point doesn’t require taking out a second mortgage.
Small businesses and workshops: Fabrication shops, repair services, and small product design studios will find the Raptor hits the sweet spot between capability and cost. It’s professional enough to bill clients for scanning services but affordable enough that the ROI timeline is measured in months rather than years.
Engineers and designers prioritizing flexibility over pure speed: If your projects vary widely—automotive parts one day, artistic pieces the next—the hybrid scanning modes mean you don’t need to own multiple scanners. The Raptor might not be the absolute fastest scanner in any single mode, but it’s the most versatile option in its price range.
Reverse engineering enthusiasts: Whether you’re recreating vintage car parts, preserving historical artifacts, or designing replacement components for obsolete equipment, the Blue Laser mode’s accuracy makes the Raptor an excellent tool.
Educational institutions: The combination of professional performance, dual scanning technologies, and reasonable cost makes this ideal for university makerspaces, technical schools, and advanced high school programs.
Who should look elsewhere:
- Complete beginners might be better served by simpler, more automated scanners to start
- Industrial users needing certified metrology should invest in professional-grade equipment
- High-volume production environments will benefit from the Raptor Pro’s speed improvements
- Anyone needing wireless operation for field work should consider standalone scanners
🎁 UNLOCK HIDDEN COUPON
Amazon frequently offers exclusive discounts on the CR Scan Raptor not shown on the product page. Click to reveal real-time price + available coupons.
Includes Prime shipping & free returns. 30-day trial.
13. Final Verdict – Is the Creality CR Scan Raptor Worth It?
After months of testing across diverse applications, my verdict on the Creality CR Scan Raptor is decisively positive with important caveats.
Clear buy recommendation if: You need versatile scanning capability for varied materials and object types, you’re willing to invest time learning the software and scanning techniques, your work involves 3D printing workflows or reverse engineering, and you’re looking for professional results without industrial budgets.
Don’t buy if: You need true metrology-grade accuracy with certification, you want completely automated point-and-shoot operation, you primarily scan only one material type that a specialized scanner could handle better, or you have no tolerance for software learning curves.
How it compares to the current market: The Raptor occupies an increasingly important middle ground. It’s significantly more capable than sub-$1000 scanners from Revopoint, Matter and Form, or smartphone solutions, while being dramatically more affordable than industrial options from Artec, Creaform, or Shining 3D’s high-end lineup. The hybrid Blue Laser + NIR capability is genuinely unique in this price bracket—you’d typically need to buy two separate scanners to match this versatility.
Long-term value outlook: Creality’s commitment to software development and their growing position in the 3D scanning market suggest the Raptor will remain relevant and supported. The hardware capability exceeds the current software’s full potential, meaning future updates should unlock additional value rather than leaving you with an obsolete device.
The Creality Raptor 3D scanner represents Creality’s maturation from a budget 3D printer company into a serious player in digital capture technology. It’s not perfect—the software needs continued refinement, and it won’t replace professional metrology equipment—but it delivers on its core promise: flexible, accurate 3D scanning at a price point that makes sense for serious makers and small professional operations.
For anyone who’s been frustrated by the limitations of entry-level scanners but intimidated by the cost of professional equipment, the CR Scan Raptor finally provides a compelling middle path. It’s earned a permanent place in my workshop.
Creality CR Scan Raptor Review – independent hands-on testing conducted over 3 months. This article contains affiliate links; as Amazon Associates and Creality partners, we earn from qualifying purchases. All prices and deals verified at time of publication. Hybrid Blue Laser & NIR scans performed by author. All trademarks are property of their respective owners.
© 2026 · Full unedited review · Word count: 4,200+ words