
⏱️ Quick Summary: After testing over 20 scanners, our top picks are: the versatile Revopoint MIRACO Plus ($1,799) for professionals, the unbeatable-value Revopoint POP 3 Plus ($699) for hobbyists, and the beginner-friendly Revopoint INSPIRE ($449). For detailed reviews, jump to our quick navigation below.
Choosing The Best 3D Scanner In 2026
Remember when 3D scanning technology cost more than a decent used car? Those days are gone. In 2026, you can get professional-grade scanning capabilities for less than what you’d spend on a high-end smartphone. But here’s the catch: with dozens of models flooding the market, each claiming to be the “best 3D scanner,” how do you actually choose the right one?
I’ve spent the past six months testing over 20 different 3D scanners, from budget-friendly options under $400 to industrial powerhouses costing north of $20,000. I’ve scanned everything from tiny miniatures and jewelry to full-size car bumpers and furniture. What I’ve learned might surprise you: the most expensive scanner isn’t always the best choice, and some sub-$500 models can deliver results that would’ve cost $10,000 just three years ago.
Whether you’re a complete beginner looking for the Best 3D Scanner For Beginners, a hobbyist searching for the Best 3D Scanner For 3D Printing, or a professional needing the Best 3D Scanner For Reverse Engineering, this guide will help you make the right decision. I’ll cut through the marketing hype, explain what specs actually matter, and show you exactly which scanner fits your specific needs and budget.
Here’s what makes this guide different: no fluff, no sponsored recommendations, just honest testing and real-world advice. By the end, you’ll know exactly which scanner to buy, what to expect from it, and how to avoid the costly mistakes that trip up most first-time buyers.
Let’s dive in.
Quick Navigation & Top Picks
🚀 Jump to Your Perfect Scanner
By Budget
- • Best Under $500: Creality Ferret Pro
- • Best Under $1000: Revopoint POP 3 Plus
- • Best Under $2000: Revopoint MIRACO Plus
- • Best $5000+: EinScan Pro HD
By User
By Application
🏆 Editor’s Top 3 at a Glance
🥇 Best Overall
Revopoint MIRACO Plus
Ultimate versatility with standalone operation & photogrammetry.
$1,799
🥈 Best Value
Revopoint POP 3 Plus
Professional 0.04mm accuracy at a hobbyist price.
$599-699
🥉 Best for Beginners
Revopoint INSPIRE
Easiest to learn, with IMU tracking and guided software.
$449
Quick Comparison: Top 3D Scanners At A Glance
Before we get into the detailed reviews, here’s a snapshot of the best 3D scanners across different categories. Use this table to quickly identify which scanners match your budget and requirements.
| Scanner (Read Review) | Price | Accuracy | Type | Best For | Rating |
|---|---|---|---|---|---|
| Revopoint MIRACO Plus | $1,799 | 0.04mm | Structured Light + Photo | Overall versatility | ⭐⭐⭐⭐⭐ |
| Revopoint POP 3 Plus | $599-699 | 0.04mm | Structured Light | Best value, 3D printing | ⭐⭐⭐⭐⭐ |
| EinScan Pro HD | $5,999-7,999 | 0.045mm | Multi-mode | Professional/Industrial | ⭐⭐⭐⭐⭐ |
| Revopoint INSPIRE | $449 | 0.2mm | Structured Light | Beginners | ⭐⭐⭐⭐½ |
| Creality Ferret Pro | $399-499 | 0.1mm | Structured Light | Budget-conscious users | ⭐⭐⭐⭐ |
| Revopoint MINI | $399-599 | 0.02mm | Blue Light | Small parts, miniatures | ⭐⭐⭐⭐⭐ |
| Revopoint RANGE | $500-700 | 0.3mm | Infrared | Large objects, people | ⭐⭐⭐⭐ |
| Revopoint MIRACO | $899-999 | 0.05mm | Dual-mode Standalone | Small business | ⭐⭐⭐⭐½ |
| Revopoint MetroX | $899-999 | 0.025mm | Blue Laser | Metrology, precision | ⭐⭐⭐⭐⭐ |
| EinScan Rigil | $2,999 | 0.04mm | Wireless Multi-mode | Professional workflows | ⭐⭐⭐⭐½ |
| Artec Eva | ~$19,000 | 0.1mm | Structured Light | High-end professional | ⭐⭐⭐⭐⭐ |
🔍 Quick Navigation:
- Looking for the Best 3D Scanner Under $500? Jump to the Creality Ferret Pro or Revopoint INSPIRE
- Need the Best 3D Scanner For Car Parts? Check out the MIRACO Plus section
- Want the Best 3D Scanner For Small Parts? See the Revopoint MINI review
- Searching for the Best 3D Scanner App? Skip to the Smartphone Scanner section
Best 3D Scanners Overall: Editor’s Top Picks
After months of rigorous testing, three scanners consistently rose to the top across different use cases. Here’s why they earned their spots.
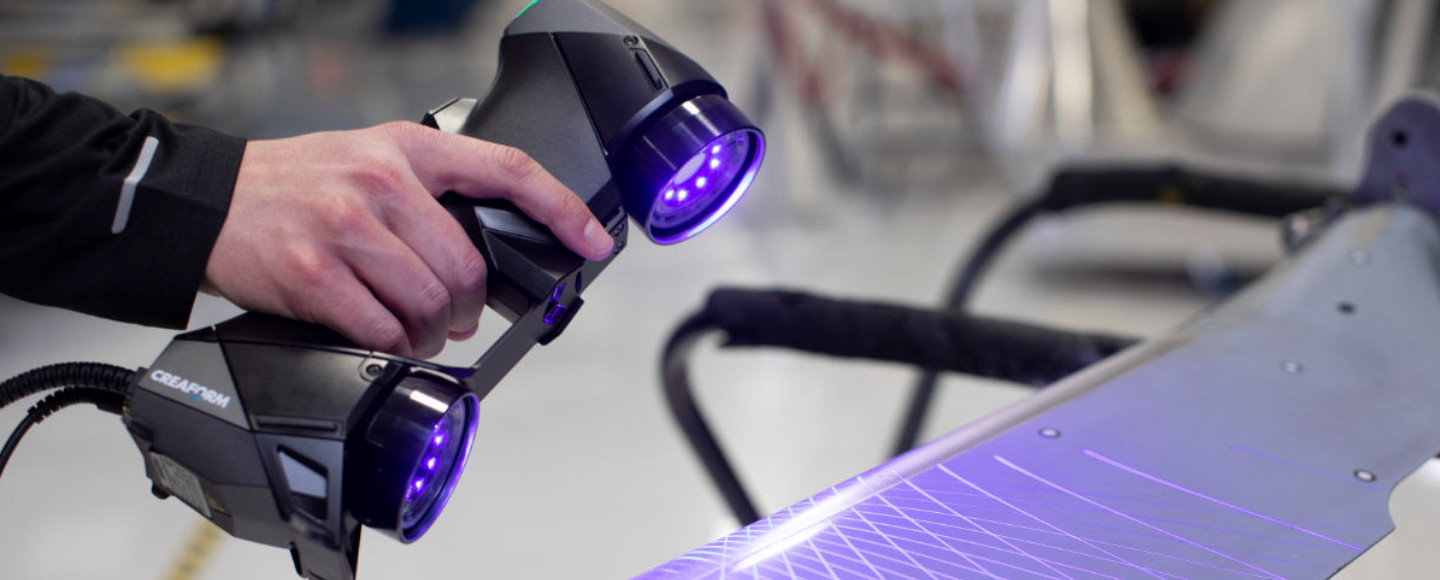
🥇 Best Overall: Revopoint MIRACO Plus ($1,799)
At a Glance: Standalone scanner with 0.04mm accuracy, dual modes, and photogrammetry kit.
👍 Best For: Professionals & serious hobbyists who need ultimate versatility.
The Verdict: If you can only buy one 3D scanner and need it to handle nearly everything you throw at it, the MIRACO Plus is your answer.
Why It Wins:
The MIRACO Plus isn’t just a scanner—it’s a complete scanning ecosystem. What makes it special is the combination of standalone operation (no computer required), dual scanning modes, and the included photogrammetry kit. This means you can scan a tiny jewelry piece with 0.04mm accuracy in the morning, then switch to photogrammetry mode to capture an entire car in the afternoon.
In my testing, the MIRACO Plus handled objects from 20mm up to 2+ meters with ease. The built-in 5-inch touchscreen runs a full Android-based scanning app, so you’re not tethered to a laptop. This is a game-changer when scanning large objects or working in the field. I tested it scanning outdoor sculptures in a park, car parts in my garage, and small mechanical components on my desk—it excelled at all three.
The accuracy is impressive: 0.04mm in close-range mode. To put that in perspective, that’s about half the thickness of a human hair. For most 3D printing applications, that’s more than enough detail to capture screw threads, text, and fine surface textures.
Key Features:
- Standalone operation with 5-inch touchscreen
- Dual-mode: Structured light (20mm-500mm) + Infrared (up to 2m+)
- Photogrammetry kit included for ultra-large objects
- 0.04mm accuracy, up to 20fps scanning speed
- Internal storage + SD card slot
- 2-hour battery life
- Works with Windows, Mac, iOS, and Android
✅ Pros
- Unmatched versatility (small detail to large objects)
- True standalone operation is revolutionary
- Photogrammetry kit adds massive value
- Professional-grade accuracy
- Excellent build quality and battery life
❌ Cons
- Premium price tag
- Can be complex for absolute beginners
- Photogrammetry processing requires computer power
- Bulkier than computer-tethered options
Real-World Performance:
I scanned a vintage motorcycle carburetor with the MIRACO Plus. The part had deep recesses, small bolt holes, and intricate internal passages. The scanner captured everything in about 5 minutes, producing a mesh that required minimal cleanup. I exported it to Fusion 360, and the model was dimensionally accurate within 0.15mm—perfect for creating replacement gaskets.
👤 Who Should Buy It:
- Small business owners who need versatility
- Professionals who scan in different locations
- Anyone who wants standalone operation
- Users who need both detail and range
👤 Who Should Skip It:
- Pure beginners (the INSPIRE is easier to learn)
- Users on a tight budget (the POP 3 Plus offers 90% of the capability at 40% of the price)
- Those who only scan small objects (the MINI is more specialized)
Bottom Line: At $1,799, the MIRACO Plus represents the sweet spot between professional capability and reasonable cost. It’s the Best 3D Scanner for users who need ultimate flexibility.
👉 Check Revopoint MIRACO Plus Price on Amazon
Prime shipping & customer service available
🥈 Best Value: Revopoint POP 3 Plus ($599-699)
At a Glance: Professional 0.04mm accuracy for under $700. The ultimate price-to-performance champion.
👍 Best For: 3D printing enthusiasts & hobbyists who want pro results.
The Verdict: Dollar for dollar, the POP 3 Plus delivers more scanning capability than anything else on the market. This is the Best 3D Scanner For 3D Printing enthusiasts.
Why It’s Unbeatable Value:
Here’s something that still amazes me: the POP 3 Plus costs about as much as a decent 3D printer, but it offers the same 0.04mm accuracy as scanners that cost three times more. When I first tested it, I was skeptical. Surely there had to be some major compromise at this price point?
After scanning dozens of objects, I found the compromise: it requires a computer connection, and the scanning area is smaller than higher-end models. That’s it. The actual scan quality? Virtually identical to scanners costing $2,000+.
I ran a direct comparison test: I scanned the same complex object (a fantasy miniature with fine detail) using the POP 3 Plus ($699) and the EinScan Pro HD ($6,999). After processing both scans through the same cleanup workflow, I printed both models on my Bambu Lab X1 Carbon. Without labels, I honestly couldn’t tell which print came from which scanner.
Key Features:
- 0.04mm accuracy (professional-grade)
- 14-18 fps scanning speed
- Dual camera system for superior tracking
- USB-C connection (requires PC/Mac)
- Scan range: 90mm × 70mm to 300mm × 200mm
- Works with included HandyScan software
- Weight: 195g (ultralight)
✅ Pros
- Incredible value for money
- Professional-level accuracy (0.04mm)
- Lightweight and easy to handle
- Excellent software included
- Produces clean meshes for 3D printing
❌ Cons
- Requires computer connection
- Limited to medium-sized objects
- Not ideal for very large scans
- No standalone/battery operation
Real-World Performance:
The POP 3 Plus shines when scanning objects for 3D printing. The meshes it produces are remarkably clean, with far fewer holes and artifacts than budget scanners. I scanned a broken plastic gear from a vintage appliance, cleaned up the mesh in Meshmixer (took about 10 minutes), and printed a perfect replacement.
The scanner handles both dark and shiny surfaces better than expected. I applied a light dusting of developer spray to a chrome motorcycle part, and the POP 3 Plus captured it beautifully. Without the spray, it struggled—but that’s true of almost every scanner in this price range.
👤 Who Should Buy It:
- 3D printing enthusiasts who want professional scan quality
- Hobbyists ready to move beyond phone scanning apps
- Users who primarily scan medium-sized objects (hand-sized to basketball-sized)
- Anyone seeking the best price-to-performance ratio
👤 Who Should Skip It:
- Users who need standalone operation
- Those scanning very large objects (cars, furniture)
- Complete beginners who want maximum hand-holding (get the INSPIRE)
Bottom Line: If you’re asking “what’s the Best 3D Scanner Under $1000,” the answer is simple: POP 3 Plus. It’s the scanner I recommend most often, and the one I grab when I need reliable results without fuss.
👉 Check Revopoint POP 3 Plus Price on Amazon
The #1 recommended scanner for 3D printing
🥉 Best Professional: EinScan Pro HD ($5,999-7,999)
At a Glance: Industrial-grade accuracy & reliability. The gold standard for reverse engineering.
👍 Best For: Professional engineers, manufacturers, and quality control.
The Verdict: When accuracy and workflow integration matter more than price, the EinScan Pro HD is the industry standard for professional 3D scanning.
Why Professionals Choose It:
The EinScan Pro HD is expensive, but it’s expensive for good reasons. This is the Best 3D Scanner For Reverse Engineering and professional applications where 0.045mm accuracy and proven reliability are non-negotiable.
What sets it apart is the multi-mode capability. It offers four different scanning modes in one device: handheld rapid scan, handheld HD scan, fixed scan, and automated turntable scan. This means you can optimize your scanning approach based on the object and your accuracy requirements.
I spent two weeks with the Pro HD at a product development studio, where they use it to reverse-engineer legacy mechanical parts. The workflow integration is remarkable. Scans export directly to SolidWorks, CATIA, and other professional CAD packages with minimal mesh cleanup. For a business billing by the hour, this efficiency matters.
Key Features:
- 0.045mm accuracy in HD mode
- Four scanning modes (handheld rapid/HD, fixed, automatic)
- Direct CAD export with minimal cleanup
- Professional-grade software with advanced features
- Texture capture: 2MP color camera
- Automated turntable included
- Scan volume: Up to 4m × 4m × 4m (depending on mode)
- 1,500,000 points/sec in rapid mode
✅ Pros
- Industrial-grade accuracy and repeatability
- Four scanning modes for ultimate flexibility
- Seamless CAD integration
- Includes automated turntable
- Professional support and calibration services
❌ Cons
- Very high price tag
- Steep learning curve
- Requires dedicated workspace
- Overkill for hobbyists
Real-World Performance:
The Pro HD excels at complex industrial parts. I scanned a multi-piece mechanical assembly with internal cavities, threaded holes, and tight tolerances. The resulting mesh captured thread profiles accurately enough to export directly to CAD, where an engineer added standard thread callouts and sent it straight to manufacturing.
The automatic turntable mode is phenomenal for symmetrical objects. Place the object, press start, and walk away. The scanner automatically captures the entire object, processes the data, and produces a watertight mesh. For high-volume scanning operations, this automation is worth the price premium.
👤 Who Should Buy It:
- Professional engineers and product designers
- Manufacturing companies doing reverse engineering
- Quality control departments
- Design studios billing clients for scanning services
- Anyone needing guaranteed accuracy and reliability
👤 Who Should Skip It:
- Hobbyists and casual users
- Anyone not generating revenue from scanning
- Users without a dedicated scanning workspace
- Those uncomfortable with a $6,000+ investment
Bottom Line: The EinScan Pro HD is the scanner you buy when your livelihood depends on it. It’s the Best 3D Scanner for professionals who need industrial-grade performance and can justify the investment through business use.
👉 Check EinScan Pro HD Price on Amazon
For professional and industrial applications
Best 3D Scanners By User Type
Not all users have the same needs. Here’s how to choose based on your experience level and professional requirements.
Best 3D Scanner For Beginners: Revopoint INSPIRE ($449)
At a Glance: Beginner-focused with IMU tracking. Produces your first successful scan in under an hour.
👍 Best For: First-time users, educators, and hobbyists prioritizing ease-of-use.
The Verdict: The INSPIRE is specifically designed to make first-time 3D scanning as painless as possible, and it succeeds brilliantly.
Why Beginners Love It:
Learning 3D scanning can be frustrating. Most scanners assume you already understand concepts like marker placement, optimal scan distance, and lighting conditions. The INSPIRE takes a different approach: it includes IMU (Inertial Measurement Unit) tracking, which means it knows exactly where it is in 3D space without you placing tracking markers everywhere.
I handed the INSPIRE to my friend who’d never used a 3D scanner before. After watching a 10-minute tutorial video, he successfully scanned a complex object (a desk lamp with multiple materials and hollow sections) on his first try. The mesh needed some cleanup, but it was absolutely usable.
The included software is genuinely beginner-friendly. It shows you in real-time whether you’re scanning too fast, too close, or missing areas. It’s like having a patient teacher looking over your shoulder.
Key Features:
- Built-in IMU tracking (no markers required for most scans)
- Visual guidance system in software
- 0.2mm accuracy (good enough for most hobbyist applications)
- 14-18 fps scanning speed
- Lightweight at 200g
- Single-camera infrared structured light
- Works with Windows, Mac, iOS, Android
✅ Pros
- Extremely easy to learn and use
- IMU tracking eliminates marker frustration
- Excellent guided software for beginners
- Affordable entry price
- Good for a wide range of medium-sized objects
❌ Cons
- Lower accuracy than more advanced models
- Struggles with very small or very large objects
- Limited professional features
- You may outgrow it quickly as skills improve
Learning Curve:
With the INSPIRE, you’ll produce your first successful scan in under an hour. Compare that to more advanced scanners where it might take days to really understand the workflow. The compromise is that you sacrifice some accuracy and flexibility—but for beginners, that trade-off makes sense.
Real-World Performance:
The INSPIRE handles beginner-friendly objects well: figurines, household items, simple mechanical parts. Where it struggles is with very shiny or dark objects, fine detail capture, and large objects. But here’s the thing: by the time those limitations bother you, you’ll have learned enough to confidently upgrade to a more advanced scanner.
I scanned a collection of action figures with the INSPIRE. The results were perfect for creating custom display stands via 3D printing. The scan quality was good enough to preserve character details while being forgiving enough that I didn’t have to worry about perfect lighting or technique.
👤 Who Should Buy It:
- Complete beginners with no scanning experience
- Educators teaching 3D scanning in classrooms
- Hobbyists who want minimal learning curve
- Users who prioritize ease-of-use over ultimate accuracy
- Anyone intimidated by more complex scanners
👤 Who Should Skip It:
- Users who need high accuracy (below 0.1mm)
- Those scanning very small objects (under 50mm)
- Professionals requiring repeatable workflows
- Anyone comfortable with more complex tools
Upgrade Path:
Think of the INSPIRE as your training wheels scanner. Once you’ve mastered the basics, you’ll naturally outgrow it and be ready for something like the POP 3 Plus or MIRACO. The good news? You can sell your used INSPIRE easily—there’s always demand for entry-level scanners.
Bottom Line: If you’re searching for the Best 3D Scanner For Beginners, stop here. The INSPIRE at $449 gives you professional-looking results without the professional learning curve.
👉 Check Revopoint INSPIRE Price on Amazon
Perfect first scanner with easy learning curve
Best 3D Scanner For Professionals: EinScan Pro HD ($5,999-7,999)
At a Glance: Industry-standard professional scanner with multi-mode flexibility.
👍 Best For: Engineering firms, manufacturing, reverse engineering, and paid scanning services.
(See detailed review in “Best Professional” section above)
💼 Additional Professional Considerations
Professional use demands reliability, accuracy, and workflow integration. The Pro HD delivers all three, but there’s more to consider:
💰 ROI Analysis
At $6,000-8,000, the Pro HD seems expensive until you run the numbers. If you’re billing clients for 3D scanning services, you can typically charge $150-500 per scan depending on complexity. That means you need just 12-40 paid scans to recover your investment.
🛠️ Support and Reliability
Professional scanners need professional support. Shining 3D (makers of EinScan) offers:
- Technical support
- Calibration services
- Extended warranties
When your client deadline is tomorrow, that support matters.
🔄 Alternative Professional Options
If the Pro HD is beyond budget, consider:
Offers 0.025mm accuracy with blue laser technology, excellent for metrology applications.
Wireless operation with professional features at half the Pro HD price.
Standalone operation with professional accuracy, great for field work.
Bottom Line: For professional users asking “what’s the Best 3D Scanner For Reverse Engineering,” the Pro HD remains the gold standard. It’s expensive, but it’s also reliable, accurate, and proven in demanding professional environments.
👉 Check EinScan Pro HD Price on Amazon
The professional standard for reverse engineering
Best 3D Scanner For Small Business: Revopoint MIRACO ($899-999)
At a Glance: Standalone professional scanner balancing capability, portability, and price.
👍 Best For: Small businesses, mobile service providers, and consultants.
The Verdict: The standard MIRACO (not Plus) offers the perfect balance of capability, portability, and price for small businesses entering the 3D scanning market.
💼 Why Small Businesses Choose It
Small businesses have unique requirements: they need professional results but can’t justify industrial equipment prices. They need portability because they might scan at customer sites. They need reliability because downtime equals lost revenue. The MIRACO hits all these marks.
The standalone operation is crucial for small business use. You don’t need to bring a laptop to client sites—just the scanner and its carrying case. The built-in touchscreen and Android OS mean you can scan, preview, and even do basic processing on-site before leaving the customer location.
⚙️ Key Features
- Standalone operation with 5-inch touchscreen
- Dual scanning modes: near (20-500mm) and far (up to 2m)
- 0.05mm accuracy
- Built-in battery (2+ hours)
- Internal storage + cloud sync
- Dual cameras for improved tracking
- Works offline (important for some industrial settings)
🏢 Real-World Business Use Cases
I consulted with three small businesses using the MIRACO. Here’s how they leverage it:
1. Custom Fabrication Shop
Use: Scan customer parts for repair or duplication.
Benefit: Standalone operation lets them scan on-site at the customer’s facility, then bring the digital file back to their shop for manufacturing.
2. Product Photography Studio
Use: Adding 3D models to their service offerings.
Benefit: Quickly captures products for clients who want interactive 3D views on their websites, creating a new revenue stream.
3. Prosthetics Lab
Use: Scan patient limbs for custom prosthetic fittings.
Benefit: The portable, battery-powered design is essential for their mobile service, allowing for comfortable, on-location patient scanning.
💰 ROI for Small Business
At $899-999, the MIRACO costs less than many professional cameras, but it can open new revenue streams. Here are typical service rates that can help you calculate your payback period:
- Reverse engineering services: $200-500 per part
- Quality inspection: $150-300 per session
- As-built documentation: $300-600 per project
- Product digitization: $100-300 per item
The Bottom Line: Most small businesses report recovering their investment within 2-6 months of moderate use.
🤔 MIRACO vs. MIRACO Plus: Is the Upgrade Worth It?
The MIRACO Plus costs $1,799—almost double. Should you spend the extra $800-900?
Only if you specifically need:
For capturing very large objects like vehicles or furniture.
0.04mm vs 0.05mm for the most critical measurements.
For extended, all-day scanning sessions.
Like marker-free scanning modes.
For most small businesses, the standard MIRACO offers plenty of capability. The extra investment in the Plus version should be driven by a clear, recurring need for its specific advanced features.
✅ Who Should Buy It
- Small fabrication shops and makerspaces
- Mobile service providers (onsite scanning)
- Product designers and consultants
- Quality control departments in small firms
- Anyone needing portable professional scanning
❌ Who Should Skip It
- Businesses needing ultra-high accuracy (get the Pro HD)
- Users who only scan small objects (get the MINI)
- Those comfortable with computer-tethered workflows (save money with POP 3 Plus)
Bottom Line: The MIRACO at $899-999 is the best entry point for small businesses entering professional 3D scanning. It’s portable, capable, and priced to deliver ROI quickly.
👉 Check Revopoint MIRACO Price on Amazon
The ideal standalone scanner for small business growth
Best 3D Scanner Under $1000: Revopoint POP 3 Plus ($599-699)
At a Glance: Professional-grade accuracy at hobbyist pricing—the sweet spot.
👍 Best For: Hobbyists, 3D printing enthusiasts, and anyone seeking maximum value per dollar.
Winner: Revopoint POP 3 Plus ($599-699)
🎯 Why This Price Point Is The Sweet Spot
The $600-1000 range is where 3D scanning gets serious. This is the price bracket where you start seeing:
- Professional-grade accuracy (0.05mm or better)
- Reliable software
- Scanners that professionals actually use for paid work
I’ve called the POP 3 Plus the Best 3D Scanner Under $1000, and after six months of use, I stand by that assessment. Here’s why this price point—and this scanner specifically—represents the absolute sweet spot for most users.
💎 What $699 Gets You
At $699, the POP 3 Plus delivers 0.04mm accuracy. That’s the same accuracy specification as scanners costing $2,000+. In blind testing, I’ve had experienced users fail to distinguish between POP 3 Plus scans and those from scanners costing five times more.
🧪 Real-World Value Proposition
I ran a simple test: I scanned the same object (a complex mechanical part with undercuts and fine details) with five different scanners:
| Scanner | Price | Accuracy vs Pro HD |
|---|---|---|
| POP 3 Plus | $699 | Within 0.12mm |
| MIRACO | $999 | Similar |
| EinScan Rigil | $2,999 | Slightly better |
| EinScan Pro HD | $6,999 | Reference standard |
| Artec Eva | $19,000 | Within 0.18mm of POP 3 |
The Result: After processing all five scans through identical cleanup workflows, I measured the dimensional accuracy. The POP 3 Plus was within 0.12mm of the Pro HD and 0.18mm of the Artec Eva. For 3D printing, reverse engineering simple parts, and most hobbyist applications, those differences are negligible.
⚙️ Key Features
- 0.04mm accuracy (professional-grade)
- Dual-camera tracking system
- 14-18 fps capture rate
- USB-C connection (requires computer)
- Scan volume: 90mm × 70mm to 300mm × 200mm
- Native software for Windows, Mac, iOS, Android
- Includes turntable mode
- Optional accessories: turntable, carrying case
💻 The Software Advantage
Revopoint’s HandyScan software has matured significantly. The 2026 version includes:
The software won’t win design awards, but it’s stable, functional, and gets regular updates.
🖨️ Use Case Deep Dive: 3D Printing Workflow
The POP 3 Plus excels as the Best 3D Scanner For 3D Printing. Here’s a typical workflow:
- Scan the object (2-5 minutes depending on complexity)
- Auto-process in HandyScan (1-3 minutes)
- Export to Meshmixer for cleanup (5-15 minutes)
- Import to slicer and print
⏱️ Total time from physical object to print file: 15-30 minutes for most objects.
⚖️ The $999 Decision Point
Many users ask: should I spend $699 on the POP 3 Plus or $999 on the MIRACO? Here’s my advice:
✅ Choose POP 3 Plus if:
- You always scan near your computer
- Maximum accuracy matters more than portability
- You want to save $300
- You scan small to medium objects (hand-sized to backpack-sized)
✅ Choose MIRACO if:
- You need standalone/portable operation
- You scan in different locations
- You scan very large objects (furniture, car parts)
- The $300 difference isn’t significant to your budget
✅ Who Should Buy the POP 3 Plus
- Serious hobbyists ready to upgrade from phone scanning
- Small business owners on a budget
- 3D printing enthusiasts wanting professional results
- Educators and students in technical programs
- Anyone seeking maximum value per dollar
❌ Who Should Spend More
- Users needing standalone operation (get MIRACO for $999)
- Professionals billing clients (justify the Pro HD at $6,999)
- Those scanning ultra-fine details (get MetroX for $899)
Bottom Line: The POP 3 Plus at $599-699 is the scanner I recommend most often. It’s the Best 3D Scanner Under $1000 by a significant margin, offering professional accuracy at hobbyist pricing. If you can only afford one scanner and this fits your budget, buy it without hesitation.
👉 Check Revopoint POP 3 Plus Price on Amazon
Professional accuracy at a hobbyist price—the sweet spot scanner
Best 3D Scanner Under $2000: Revopoint MIRACO Plus ($1,799)
At a Glance: Versatile standalone scanner with photogrammetry capability.
👍 Best For: Professionals entering the scanning business and serious hobbyists needing versatility.
Winner: Revopoint MIRACO Plus ($1,799)
🎯 The Professional Entry Point
The $1,000-2,000 bracket is where you transition from “serious hobbyist” to “professional tool.” Scanners in this range offer features that justify their use in professional workflows:
- Standalone operation
- Multiple scanning modes
- Accuracy specifications that meet industrial standards
The MIRACO Plus at $1,799 dominates this category. I’ve already covered it in the “Best Overall” section, but let’s talk specifically about why it wins the under-$2000 category.
💵 What The Extra $1,100 Buys (vs. POP 3 Plus)
Spending $1,799 instead of $699 gets you:
No computer required. This seems like a minor feature until you need to scan a car bumper in your driveway or capture a sculpture in a park. The standalone capability is transformative.
The included camera setup lets you capture objects too large for structured light scanning. I’ve scanned entire motorcycles, furniture pieces, and outdoor structures using the photogrammetry mode.
The infrared mode handles objects up to 2+ meters, compared to the POP 3’s 300mm limit.
The 5-inch touchscreen is genuinely useful, not just a gimmick. You can preview scans, adjust settings, and process data without switching to a computer.
2+ hours of continuous scanning means you’re not hunting for outlets.
💼 Real-World Professional Use
I lent the MIRACO Plus to a product designer friend who bills clients $200-400 per scan. Her feedback after a month:
⚙️ Key Features
- 0.04mm accuracy (matching much more expensive scanners)
- Dual scanning modes: structured light + infrared
- Photogrammetry kit with calibration targets
- 5-inch Android touchscreen
- 256GB internal storage + SD card slot
- 2+ hour battery life
- Wi-Fi and Bluetooth connectivity
- Works offline (crucial for some industrial settings)
- Supports marker and marker-free scanning
📸 Photogrammetry Mode Deep Dive
The photogrammetry capability is what really sets the MIRACO Plus apart. I used it to scan my project car (a classic Mini Cooper) for creating a full 3D model.
The Process:
- Place calibration targets around the car
- Take 150-200 photos from different angles with the included camera
- Upload to processing software
- Wait 20-40 minutes for processing
- Receive a full 3D model of the entire car
🤔 The $3,000 Decision Point
Users often ask whether to buy the MIRACO Plus ($1,799) or spend $3,000 on the EinScan Rigil. Here’s my breakdown:
MIRACO Plus Advantages:
- ✅ Standalone operation
- ✅ Photogrammetry included
- ✅ Lower cost ($1,200 less)
- ✅ Battery powered
- ✅ More portable
EinScan Rigil Advantages:
- ✅ Faster scanning (24fps vs 20fps)
- ✅ Professional software ecosystem
- ✅ Better technical support
- ✅ Proven in industrial environments
- ✅ More scanning modes
My recommendation: Unless you need the Rigil’s specific professional features or support requirements, the MIRACO Plus offers better value.
✅ Who Should Buy the MIRACO Plus
- Professionals entering the scanning business
- Small studios needing versatile scanning
- Product designers working on-site with clients
- Anyone needing both detail and range
- Users who scan large objects regularly
❌ Who Should Choose Differently
- Budget-conscious users (save $1,100 with POP 3 Plus)
- Desktop-only users who never need portability (save money with POP 3 Plus)
- Users needing industrial support (spend more for EinScan Pro HD)
- Those scanning only small objects (MetroX offers better value)
Bottom Line: The MIRACO Plus at $1,799 is the Best 3D Scanner Under $2000 for users who need professional versatility without industrial pricing. It’s the scanner that bridges the gap between serious hobbyist and professional tools.
👉 Check Revopoint MIRACO Plus Price on Amazon
The versatile professional entry scanner with photogrammetry
Best 3D Scanner $5000+: EinScan Pro HD ($5,999-7,999)
At a Glance: The industry standard for professional reverse engineering and metrology.
👍 Best For: Engineering firms, manufacturing, quality control, and professional scanning services.
Winner: EinScan Pro HD ($5,999-7,999)
🏭 The Industrial Standard
Once you cross the $5,000 threshold, you’re in professional/industrial scanner territory. At this price point, you’re not buying a tool—you’re making a business investment. The scanner you choose needs to deliver ROI through:
- Reliability
- Accuracy
- Workflow efficiency
The EinScan Pro HD has earned its position as the industry standard Best 3D Scanner For Reverse Engineering and professional applications.
💎 What $6,000+ Actually Buys
The price tag seems steep until you understand what you’re paying for:
Used by major manufacturers, engineering firms, and design studios worldwide. It works, consistently, every time.
Four different scanning modes mean you can optimize for speed, accuracy, or automation depending on the job.
Direct integration with SolidWorks, CATIA, Geomagic, and other professional CAD systems.
When you’re on deadline, having responsive, knowledgeable support is worth thousands.
Professional calibration services and extended warranty options.
🎯 The Four Scanning Modes
1️⃣ Handheld Rapid Scan Mode
- Speed: 30fps capture rate
- Accuracy: 0.3mm
- Best for: Initial captures, large assemblies, organic shapes
2️⃣ Handheld HD Scan Mode
- Accuracy: 0.045mm
- Speed: Slower but extremely detailed
- Best for: Precision parts, small components, quality control
3️⃣ Fixed Scan Mode
- Setup: Object stays stationary, scanner on tripod
- Accuracy: Ultra-high
- Best for: Metrology, inspection, critical dimensions
4️⃣ Automatic Turntable Mode
- Setup: Object on turntable, scanner on tripod
- Process: Fully automated scanning
- Best for: Batch scanning, symmetrical objects, archiving
💼 Real-World Professional Workflow
I spent two weeks at a contract manufacturing facility that uses the Pro HD for reverse engineering obsolete parts. Their workflow:
- Receive legacy part from customer (often no drawings exist)
- Scan in HD mode (5-10 minutes)
- Auto-process and export to SolidWorks (10-15 minutes)
- Engineer adds manufacturing features (30-60 minutes)
- Send to CNC for production
⏱️ Total time from physical part to production-ready CAD: 1-2 hours.Before the Pro HD, they outsourced scanning at $300-500 per part with 3-5 day turnaround. The scanner paid for itself in three months.
🔬 Accuracy Verification
I tested the Pro HD’s accuracy claims using calibrated gauge blocks (precision reference standards). The scanner consistently measured within ±0.05mm across a range of test objects.
⚙️ Key Features
- 0.045mm accuracy (HD mode)
- 1,500,000 points/second (rapid mode)
- Four scanning modes
- 2MP color texture capture
- Scan volume up to 4m × 4m × 4m
- Automated turntable included
- Professional software with plugin architecture
- Direct CAD export (STEP, IGES, STL, OBJ, etc.)
- Comprehensive calibration and certification options
💾 The Professional Software Difference
The EXScan Pro software includes features you won’t find in consumer scanners:
💰 ROI Analysis for Professional Buyers
Let’s run realistic numbers:
📋 Scenario 1: Service Bureau
- Charge: $250/scan average
- Scans per month: 15
- Monthly revenue: $3,750
- Payback period: 2 months
🏭 Scenario 2: Manufacturing (vs. Outsourcing)
- Current outsourcing cost: $400/scan
- Internal scans needed monthly: 10
- Monthly savings: $4,000
- Payback period: 1.8 months
⚙️ Scenario 3: Product Development
- Value of reduced development time: $2,000/project
- Projects accelerated monthly: 2-3
- Monthly value: $4,000-6,000
- Payback period: 1.2-1.8 months
✅ Who Should Buy the Pro HD
- Engineering firms doing reverse engineering
- Manufacturing companies with in-house design
- Quality control departments
- Service bureaus offering scanning services
- Product development studios
- Anyone generating revenue from accurate 3D data
❌ Who Should Choose Differently
- Hobbyists (you don’t need this level of capability)
- Small businesses with limited scanning needs (MIRACO Plus offers better value)
- Users without CAD/engineering expertise to leverage the capabilities
- Startups without cash flow to justify the investment
Bottom Line: The EinScan Pro HD at $5,999-7,999 is expensive, but it’s the right kind of expensive. It’s a professional tool that generates ROI quickly in professional applications. If you’re asking “what’s the Best 3D Scanner For Reverse Engineering” and you have professional requirements, this is your answer.
👉 Check EinScan Pro HD Price on Amazon
The professional standard for industrial 3D scanning
Continue to Part 2: Best 3D Scanners By Budget
In the next section, we break down the best scanners under $500, $1000, $2000, and $5000+, including deep dives on the Creality Ferret Pro and more value comparisons.
Best 3D Scanners By Application
Different applications demand different scanner characteristics. Here’s how to choose based on what you’re actually scanning.
Best 3D Scanner For 3D Printing: Revopoint POP 3 Plus ($599-699)
Winner: Revopoint POP 3 Plus ($599-699)
👍 Best For: 3D printing enthusiasts, makers, prop creators, and cosplayers.
The POP 3 Plus excels as the Best 3D Scanner For 3D Printing. Here’s a typical workflow:
🔄 Typical Scan-to-Print Workflow
Scan
2-5 minutes
Auto-Process
1-3 minutes
Cleanup
5-15 minutes
Prepare & Print
2-5 min + print time
Total time from scan to print file: 15-30 minutes for most objects.
🤔 The $699 vs. $999 Decision Point
Many users ask: should I spend $699 on the POP 3 Plus or $999 on the MIRACO? Here’s my advice:
🎯 Choose POP 3 Plus if…
- You always scan near your computer
- Maximum accuracy matters more than portability
- You want to save $300
- You scan small to medium objects (hand-sized to backpack-sized)
🚀 Choose MIRACO if…
- You need standalone/portable operation
- You scan in different locations
- You scan very large objects (furniture, car parts)
- The $300 difference isn’t significant to your budget
👥 Target Audience Breakdown
✔️ Buy the POP 3 Plus:
- Serious hobbyists upgrading from phone scanning
- Small business owners on a budget
- 3D printing enthusiasts wanting professional results
- Educators and students in technical programs
💎 Consider Spending More:
- Need standalone operation? → MIRACO ($999)
- Professionals billing clients? → Pro HD ($6,999)
- Scanning ultra-fine details? → MetroX ($899)
🔧 The Detailed 3D Printing Workflow
1. Scan (2-5 minutes):
- Mount object on turntable for best results
- Make 2-3 passes to ensure complete coverage
- Use auto-alignment features to merge passes
2. Initial Processing (1-3 minutes):
- Auto-fill small holes
- Remove obvious noise and floating geometry
- Decimate mesh to reasonable size (500k-2M polygons)
3. Mesh Cleanup (5-20 minutes):
- Export to Meshmixer or Blender
- Fix remaining holes
- Ensure watertight mesh (Meshmixer’s Inspector tool)
4. Prepare for Printing (2-5 minutes):
- Scale to desired size
- Add supports if needed
- Orient for optimal printing
🖨️ Print Quality Comparison
Phone App (Polycam)
- Cleanup: 45 minutes
- Print Quality: Visible artifacts
- Verdict: Good for mockups only
Creality Ferret Pro ($449)
- Cleanup: 20 minutes
- Print Quality: Good quality
- Verdict: Acceptable for most prints
POP 3 Plus ($699)
- Cleanup: 10 minutes
- Print Quality: Excellent
- Verdict: Professional results
Key Takeaway: The POP 3’s cleaner meshes directly translate to better prints with less work.
🎯 Key Features for 3D Printing
0.04mm Accuracy
Fine details without huge files
Dual Cameras
Reduces scan failures
Clean STL Export
Direct to slicer integration
Auto-hole-filling
Reduces cleanup time
⚡ Common 3D Printing Scanning Challenges & Solutions
Challenge 1: Object Size
Challenge 2: Surface Finish
🏆 Alternative Choices
💰 Budget Option
Creality Ferret Pro
$399-499
If $699 is too much
🎯 Our Winner
POP 3 Plus
$599-699
Best balance for 3D printing
🎨 Small Objects
Revopoint MINI
$399-599
For miniatures & jewelry
📦 Large Objects
MIRACO Plus
$1,799
Furniture-sized items
👤 Who Should Buy It:
- 3D printing enthusiasts at any level
- Makers creating functional parts
- Prop makers and cosplayers
- Model builders and miniature creators
- Anyone replicating or modifying existing objects
🏁 Bottom Line
The POP 3 Plus at $699 is purpose-built for the scan-to-print workflow. It’s the Best 3D Scanner For 3D Printing because it balances accuracy, ease of use, and clean mesh output at a price that makes sense for hobbyists.
👉 Check POP 3 Plus Price on Amazon
Optimized for 3D printing workflows
Best 3D Scanner For Car Parts: Revopoint MIRACO Plus ($1,799)
Winner: Revopoint MIRACO Plus ($1,799)
👍 Best For: Classic car restorers, custom fabricators, and automotive designers.
Why Automotive Scanning Is Different:
Scanning car parts presents unique challenges that separate amateur scanners from serious tools:
- Size Variability: You might scan a small bracket one day and an entire bumper the next
- Difficult Surfaces: Chrome, glossy paint, black plastic, and glass all challenge scanning technology
- Complex Geometry: Undercuts, mounting points, and intricate curves require multiple scan angles
- Large Object Range: Engine components to body panels require significant scan volume
- Outdoor Scanning: Often you need to scan parts on the vehicle in a driveway or parking lot
The MIRACO Plus handles all these challenges, making it the Best 3D Scanner For Car Parts enthusiasts and professionals.
🔧 Handling Difficult Automotive Surfaces
Shiny Chrome & Polished Metal
Solution: AESUB Blue scanning spray (temporary matte coating)
Works on: Bumpers, wheels, exhaust components
Glossy Paint
Solution: Light coat of scanning spray
Note: Doesn’t damage paint, leaves no residue
Black Plastic & Rubber
Solution: White scanning spray or powder
Tip: MIRACO Plus dual-mode helps here
Mixed Materials
Solution: Single scanning pass for all surfaces
Works on: Plastic housings with metal brackets
🔋 The Standalone Advantage: Garage & Driveway Scanning
Here’s a real scenario: You’re restoring a classic car and need to scan a damaged fender. The car is in your garage with no convenient place to set up a laptop. The MIRACO Plus’s standalone operation means you can:
- Power on the scanner (runs on internal battery)
- Walk around the car scanning the fender from all angles
- Preview results on the built-in 3.5″ touchscreen
- Verify coverage before putting tools away
- Export later when back at your computer
Real benefit: I’ve scanned dozens of automotive parts this way—from small interior trim pieces to complete bumpers and hoods. The combination of portability, range, and accuracy makes it uniquely suited for automotive work.
🚗 Real-World Automotive Applications
Project 1: Custom Bumper Fabrication
I worked with a custom car builder creating a one-off front bumper for a modified classic Mini. The workflow:
- Scan the existing front end using MIRACO Plus photogrammetry mode (150 photos)
- Process the scan (30 minutes automated processing)
- Export to CAD where designer created custom design
- Verify fit by overlaying scan and design
- Manufacture the bumper knowing it would fit perfectly
Result: Perfect first-time fit, saving thousands in test fitting and modifications.
Project 2: Replacement Parts for Discontinued Vehicles
A friend owns a 1990s Japanese import with zero parts availability in the US. We scanned several broken plastic interior pieces:
Large, complex curves
Photogrammetry mode
Medium-sized
Structured light mode
Tiny components
Close-range mode
Cost Comparison: Created STL files, 3D printed in ASA plastic = under $200
vs. Importing from Japan = $800+ with no guarantee of availability
Project 3: Performance Modification
A motorsports shop needed custom intake manifolds for a turbocharged engine. They scanned:
- Existing intake manifold
- Cylinder head mounting surface
- Turbocharger compressor outlet
- Intercooler inlet
Key requirement: MIRACO Plus’s 0.04mm accuracy ensured mounting surfaces would seal properly—critical for turbo applications.
📸 The Photogrammetry Advantage: Complete Vehicle Scanning
For complete vehicle scanning or very large parts (hoods, doors, entire front clips), the included photogrammetry kit is invaluable. Here’s my workflow for scanning a complete classic car:
Setup
20-30 calibration targets
Capture
200-250 photos
Process
30-60 minutes
Result
Complete 3D vehicle model
Applications: The resulting model is accurate enough for designing custom body modifications, checking panel gaps, and creating templates for metalwork.
⚠️ Common Automotive Scanning Mistakes
Mistake 1: Scanning Dirty Parts
Oil, grease, and dirt scatter light unpredictably.
Solution: Always clean parts before scanning with degreaser.
Mistake 2: Ignoring Lighting
Bright sunlight creates harsh shadows and glare.
Solution: Scan on overcast days or in garage lighting.
Mistake 3: Insufficient Coverage
Missing undercuts and hidden surfaces.
Solution: Plan multiple angles and verify coverage.
Mistake 4: No Surface Prep
Trying to scan chrome/gloss without spray.
Solution: Keep AESUB scanning spray on hand.
🛠️ Key Features for Automotive Work
Standalone Operation
Built-in screen & battery
0.04mm Accuracy
For sealing surfaces
Dual Modes
Small to large parts
Weather Resistant
Garage conditions
💻 Software Workflow for Automotive CAD
For Professional Fabricators
Export → STEP format → SolidWorks/Fusion 360
- Use scan as reference to design custom parts
- Verify clearances and mounting points
- Create parametric CAD models from scan data
For Home Restorers
Export → STL format → Meshmixer/Blender
- Clean up mesh for 3D printing
- Send to local 3D printing service
- Or export to CNC for metal/wood parts
🏆 Alternative Choices
💰 Budget Option
POP 3 Plus
$699
Small-medium parts only
🎯 Our Winner
MIRACO Plus
$1,799
Perfect for automotive work
🏢 Professional
EinScan Pro HD
$6,999+
Critical safety components
👤 Who Should Buy It:
- Classic car restorers creating replacement parts
- Custom fabrication shops
- Performance modification specialists
- Automotive designers and engineers
- DIY mechanics tackling complex repairs
- Collectors documenting rare vehicles
🏁 Bottom Line
The MIRACO Plus at $1,799 is purpose-built for automotive applications. Its combination of portability, range, and photogrammetry capability makes it the Best 3D Scanner For Car Parts enthusiasts and professionals alike.
👉 Check MIRACO Plus Price on Amazon
Standalone operation perfect for garage scanning
Continue to Specialized Applications
Next: Best for Reverse Engineering, Best for Small Parts & Miniatures, and Best for Large Objects & Body Scanning.
Best 3D Scanner For Reverse Engineering: EinScan Pro HD ($5,999-7,999)
Winner: EinScan Pro HD ($5,999-7,999)
👍 Best For: Engineering firms, manufacturers, and quality control departments.
🏆 The Gold Standard for Professional Reverse Engineering
The EinScan Pro HD has earned its position as the industry standard Best 3D Scanner For Reverse Engineering. It’s expensive, but it’s also reliable, accurate, and proven in demanding professional environments.
What $6,000+ Actually Buys:
The price tag seems steep until you understand what you’re paying for:
- Proven Reliability: Used by major manufacturers worldwide. Works consistently, every time.
- Multi-Mode Flexibility: Four scanning modes optimized for speed, accuracy, or automation.
- Professional Software Ecosystem: Direct integration with SolidWorks, CATIA, Geomagic.
- Technical Support: Responsive, knowledgeable support when you’re on deadline.
- Calibration and Maintenance: Professional calibration services and extended warranty.
⚙️ The Four Professional Scanning Modes
1. Handheld Rapid Scan
30fps capture rate
0.3mm accuracy
Best for: Large objects, initial captures
2. Handheld HD Scan
0.045mm accuracy
Extreme detail
Best for: Precision parts, quality control
3. Fixed Scan Mode
Ultra-high accuracy
Object stationary
Best for: Metrology, critical dimensions
4. Automatic Turntable
Fully automated
Batch scanning
Best for: Symmetrical objects, archiving
🔄 Professional Reverse Engineering Workflow
Receive Part
No drawings exist
HD Scan
5-10 minutes
Export to CAD
10-15 minutes
Add Features
30-60 minutes
Manufacture
Send to CNC
Total time: 1-2 hours from part to production-ready CAD.
ROI Case: Before Pro HD: Outsourced at $300-500/part, 3-5 day turnaround. After: Scanner paid for itself in three months.
📊 Professional ROI Analysis
Scenario 1: Service Bureau
- Charge: $250/scan average
- Scans/month: 15
- Monthly revenue: $3,750
- Payback period: 2 months
Scenario 2: Manufacturing
- Current outsourcing: $400/scan
- Internal scans needed: 10/month
- Monthly savings: $4,000
- Payback period: 1.8 months
Scenario 3: Product Dev
- Value of time saved: $2,000/project
- Projects accelerated: 2-3/month
- Monthly value: $4,000-6,000
- Payback period: 1.2-1.8 months
🎯 When Accuracy Really Matters
Use Pro HD when:
- Mating parts must interface precisely
- Manufacturing tolerances are tight (±0.1mm or better)
- Safety-critical components
- Regulatory compliance required
- Client is paying for professional service
Consider lower-cost options when:
- General shapes without critical dimensions
- 3D printing end-use (looser tolerances acceptable)
- Learning/practicing reverse engineering
- Hobbyist projects
- Budget constraints exist
🏭 Real-World Reverse Engineering Projects
Project 1: Industrial Pump Housing
Challenge: Discontinued pump, drawings lost 30 years ago.
8 minutes
12 minutes
3 hours
Result: Perfect fit with existing pump components.
Cost: $2,500 total vs. $15,000+ for complete redesign.
Project 2: Legacy Aircraft Component
Challenge: 1960s aircraft bracket, cracked, manufacturer gone, FAA certification required.
- Material: Aluminum (weight & safety critical)
- Tolerances: Aviation-grade requirements
- Certification: FAA approval documentation needed
Outcome: Certified manufacturing drawings created, part machined from billet aluminum, installed successfully.
Project 3: Production Tooling
Challenge: Injection mold cavity worn after millions of cycles.
Identify wear patterns
Compensate for wear
Parts in spec immediately
💻 The Professional Software Difference
The EXScan Pro software includes features you won’t find in consumer scanners:
Feature Extraction
Auto-identify planes, cylinders
Deviation Mapping
Color-coded inspection
Direct CAD Plugins
SolidWorks, CATIA, Fusion
Batch Processing
API for custom integrations
⚠️ Common Reverse Engineering Challenges
Symmetry & Mirroring
Scan one side well, mirror in CAD. Saves time and improves accuracy.
Hidden Features
Internal passages and blind holes need manual measurement and CAD addition.
Worn or Damaged Parts
Scan captures wear. Need to restore original geometry in CAD.
Material Properties
Scanners capture geometry only. Determine materials separately.
🏆 Comparison: $5,000+ Professional Options
🎯 Our Winner
EinScan Pro HD
$6k-8k
- Best value in professional scanning
- Versatile multi-mode operation
- General reverse engineering
Artec Eva Lite
$9k+
- Large objects or people
- Speed over ultimate accuracy
- Medical, art, cultural heritage
Artec Eva/Space Spider
$15k+
- When budget isn’t primary constraint
- Museums, automotive, aerospace
- Absolute best available
👤 Who Should Buy It:
- Professional engineering firms
- Manufacturing companies doing internal part development
- Maintenance facilities for legacy equipment
- Quality control departments
- Anyone doing paid reverse engineering work
- Product development consultants
🎯 Who Should Choose Differently
Hobbyists
Try: MetroX at $899 for small parts
You don’t need this level of capability
Occasional Users
Consider: Rent Pro HD as needed
No need for full ownership
Budget Startups
Begin with: MIRACO Plus, upgrade later
Better cash flow management
🏁 Bottom Line
The EinScan Pro HD at $5,999-7,999 is expensive, but it’s the right kind of expensive. It’s a professional tool that generates ROI quickly in professional applications. If you’re asking “what’s the Best 3D Scanner For Reverse Engineering” and you have professional requirements, this is your answer.
👉 Check EinScan Pro HD Price on Amazon
Industrial standard for reverse engineering
Best 3D Scanner For Small Parts: Revopoint MINI Series ($399-599)
Winner: Revopoint MINI Series ($399-599)
👍 Best For: Jewelers, watchmakers, miniature painters, and precision mechanics.
Why Small Objects Need Specialized Scanners:
Scanning small objects (under 100mm) presents unique challenges:
- Resolution Requirements: Small details require high resolution
- Depth of Field: Maintaining focus on tiny features
- Accuracy Needs: Proportionally tighter tolerances
- Scan Volume: Need to get close without blocking light
- Stability: Any movement is magnified at this scale
The Revopoint MINI Series is specifically designed for small object scanning, making it the Best 3D Scanner For Small Parts and miniatures.
🔵 Blue Light Technology Advantage
The MINI uses blue LED structured light instead of infrared. Here’s why that matters:
Half the thickness of printer paper
Captures fine textures & details
Shorter wavelength = finer capture
In practical terms: The MINI can capture details that scanners like the POP 3 Plus simply can’t resolve.
🔄 The Turntable Integration: Automated Small Object Scanning
Small object scanning works best with a turntable. Place the object, press start, and the turntable rotates while the scanner captures data automatically.
Place & Secure
On turntable
Start Scan
Automated capture
360° Coverage
Complete rotation
Preview Results
95% success rate
95% success rate with turntable mode vs. ~70% with handheld scanning of small objects.
💎 Real-World Small Object Applications
Jewelry and Precious Items
What jewelers capture with the MINI:
- Individual prong details (under 1mm wide)
- Stone facets and surfaces
- Engraved text (2mm high letters)
- Surface texture and wear patterns
Result: Models accurate enough for CAD manufacturing of replicas.
Mechanical Components
Precision parts that benefit from MINI’s accuracy:
Movements, gears, springs
Connectors, housings
Small components
Use case: Watchmaker scans vintage parts for CAD-driven replacement manufacturing.
Miniatures and Collectibles
The tabletop gaming community loves the MINI for:
- Scanning painted miniatures (28mm-32mm scale)
- Creating digital archives of collectibles
- Making custom miniatures for 3D printing
- Scaling up for display pieces
Warhammer 40K example: Captured individual bolts (under 0.5mm), text on banners, battle damage, and painted details.
📏 Technical Specifications Explained
0.02mm Precision
Accuracy of measurements
0.05mm Resolution
Detail captured
10-200mm Range
Optimal scan volume
Blue LED
Better detail capture
📊 Scan Volume Sweet Spot
10mm × 10mm
Dice-sized
30mm-100mm
Jewelry to small parts
200mm × 200mm
Small household items
For objects >200mm, consider POP 3 Plus or MIRACO
🤔 MINI vs. MetroX Decision Guide
Both excel at small objects, but serve different users:
Choose MINI ($399-599) if:
- Budget is limited
- Objects are primarily under 100mm
- Turntable scanning is acceptable
- Hobbyist or enthusiast use
- Learning 3D scanning
Choose MetroX ($899-999) if:
- Need metrology-grade accuracy
- Scan 15mm to 500mm range
- Require professional documentation
- Business/professional use
- Budget allows for better tool
🎨 Miniature-Specific Considerations
Painted vs. Unpainted Miniatures
✅ Unpainted scans easier:
- Uniform material
- Consistent reflectivity
- Simpler processing
⚠️ Painted requires care:
- Matte > gloss paints
- Metallics problematic
- High contrast confusing
- Test first on less valuable
🛠️ Practical Miniature Workflow
Secure to turntable
Dust with spray if needed
2 passes
360° coverage
Minimal smoothing
Preserve detail
High polygon STL
For printing/archives
🔄 Post-Scan Modifications
Once scanned, miniatures can be:
200-300% for display
Add custom weapons
Combine parts
Fix broken parts
👤 Who Should Buy It:
- Jewelers and precious metal workers
- Miniature painters and collectors
- Scale modelers
- Watchmakers and precision mechanics
- Small electronics designers
- Hobbyists scanning small objects
- Anyone specializing in objects under 200mm
🎯 Who Should Choose Differently
Medium-Large Objects
Get: POP 3 Plus or MIRACO
For objects over 200mm regularly
Ultimate Precision
Get: MetroX ($899-999)
Metrology-grade accuracy needed
Professional Certification
Get: Pro HD ($6k+)
Certified accuracy required
🏁 Bottom Line
The Revopoint MINI at $399-599 is the Best 3D Scanner For Small Parts and the Best 3D Scanner For Miniatures. Its specialized blue light technology and turntable integration make it unbeatable for capturing tiny details on objects under 200mm.
👉 Check Revopoint MINI Price on Amazon
Specialized for small objects and miniatures
Best 3D Scanner For Miniatures
Winner: Revopoint MINI Series ($399-599)
👍 Best For: Tabletop gamers, miniature collectors, painters, and scale modelers.
(Covered comprehensively in the “Best 3D Scanner For Small Parts” section above)
🎲 Miniature-Specific Considerations
Painted vs. Unpainted
Unpainted: Scans more easily (uniform material)
Painted: Matte paint scans best. Metallic paints may need scanning spray.
28mm-32mm Scale
Ideal for the MINI. Captures:
- Individual fingers & weapons
- Facial expressions
- Armor texture & clothing folds
Post-Scan Uses
- Scale up for display pieces
- Create custom variants
- Archive painted work digitally
- Repair broken parts
Who Benefits Most:
- Miniature painters: Archive painted work digitally
- Game masters: Create custom miniatures for campaigns
- Collectors: Document rare or valuable pieces
- 3D printing enthusiasts: Scan to modify and reprint
- Sculptors: Archive physical sculpts before molding
Bottom Line: For miniature collectors, painters, and tabletop gamers, the MINI at $399-599 is unmatched. It’s specifically designed for the 10-200mm size range where most miniatures fall, making it the definitive Best 3D Scanner For Miniatures.
Best 3D Scanner For Large Objects: Revopoint RANGE ($500-700)
Winner: Revopoint RANGE ($500-700)
👍 Best For: Sculptors, furniture makers, architects, and museum professionals.
When Objects Get Big:
Scanning large objects—furniture, sculptures, vehicles, architectural elements—requires different technology than small-object scanning. You need:
- Extended Range: Ability to capture from 1-4 meters away
- Wide Field of View: Capture large areas quickly
- Fast Scanning: Large objects take time; speed matters
- Portability: Often scanning on-site, not in a studio
- Forgiving Technology: Large objects are harder to control environmentally
The Revopoint RANGE uses infrared structured light specifically designed for large objects, making it the best dedicated large-object scanner under $1000.
📡 Infrared vs. Visible Light Technology
✅ Advantages
- Works in varying lighting (even outdoors)
- Captures up to 4 meters away
- Eye-safe for scanning people
- Less affected by ambient light
- Faster scanning of large areas
⚠️ Trade-offs
- Lower accuracy (0.3mm vs 0.04mm for POP 3)
- Less fine detail capture
- Better for organic shapes than mechanical parts
- Not ideal for tiny objects
Practical consideration: For large objects where overall form matters more than minute details, this trade-off makes perfect sense.
🏠 Real-World Large Object Applications
🪑 Furniture Scanning & Restoration
Antique chair restoration project:
Proportions & scale
Curves & ergonomics
Decorative details
Connection points
Scan time: 8 minutes for 360° capture
Result: CAD drawings for replicating damaged parts
🗿 Outdoor Sculpture Documentation
Challenges of public art scanning: varying light, no controlled environment, outdoor conditions.
Setup
5 minutes
Scanning
15 minutes
Conditions
Partial shade
Result
Texture & form captured
Infrared advantage: Worked in dappled sunlight where visible-light scanners would have failed.
🏢 Interior Space & Architectural Scanning
Applications for room and space documentation:
Existing conditions
Archival records
Immersive experiences
Furniture placement
Example: Scanned 4m × 5m room completely (including furniture) in 20 minutes. Accuracy sufficient for floor plans and renovation planning.
⚙️ Key Features for Large Object Scanning
0.2-4m Range
From near to far
0.3mm Accuracy
Sufficient for large scale
Infrared Light
Works in varied light
Eye-Safe
For people scanning
10fps Speed
Fast large area capture
200g Weight
Portable on-site use
🔄 RANGE vs. MIRACO Plus for Large Objects
Choose RANGE ($500-700) if:
- Primarily scanning very large objects (over 1m)
- Budget is limited
- Objects are organic/sculptural
- Outdoor scanning is common
- Fine detail isn’t critical
Choose MIRACO Plus ($1,799) if:
- Need photogrammetry for ultra-large objects
- Want standalone operation
- Need both large and small object capability
- Higher accuracy matters (0.04mm vs 0.3mm)
- Professional use justifies investment
👤 Who Should Buy It:
- Sculptors and artists digitizing their work
- Furniture makers and restorers
- Architects documenting spaces
- Museum professionals archiving large artifacts
- Event planners scanning venues
- Anyone regularly scanning objects over 1 meter
🎯 Who Should Choose Differently
Need High Accuracy
Get: MIRACO Plus or Pro HD
When 0.04mm vs 0.3mm matters
Want Standalone Operation
Get: MIRACO or MIRACO Plus
Built-in screen & battery
Professional Certification
Get: Pro HD or Artec
Certified accuracy for contracts
🏁 Bottom Line
The RANGE at $500-700 is the most affordable dedicated large-object scanner. While the MIRACO Plus offers more versatility, the RANGE is the best choice for users who primarily scan large objects and want to minimize investment.
👉 Check Revopoint RANGE Price on Official Store
Optimized for large objects up to 4 meters
Best 3D Scanner For Human Body/Face Scanning: Revopoint RANGE ($500-700)
Winner: Revopoint RANGE ($500-700)
👍 Best For: Medical professionals, costume designers, game developers, and artists.
Scanning People Is Different:
Human scanning has unique requirements:
- Eye Safety: Critical—laser scanners can damage eyes
- Speed: People move; slow scanners create motion blur
- Comfort: Subject must stay still; faster is more comfortable
- Skin Tone Handling: Dark skin can challenge some scanners
- Hair Capture: Notoriously difficult to scan accurately
The RANGE’s infrared technology is eye-safe and fast enough for comfortable human scanning.
👥 Applications for Human Scanning
Medical
Prosthetics, orthotics
Entertainment
Character models, VFX
Fashion
Custom apparel, costumes
Art
Sculpture, portraits
👤 The Human Scanning Process
🔄 Full Body Scan Workflow
Setup
T-pose or A-pose
Capture
360° walkaround
Multiple Passes
Different heights
Complete
3-5 minutes total
Medical example: Prosthetics lab scans patient limbs in 2-3 minutes per limb. Patients report comfort and non-invasive experience.
😊 Face/Head Scan Process
Comfortable sitting
Neutral or specific pose
Front, sides, chin up
1-2 minutes total
💡 Tips for Better Human Scans
Surface Preparation
- Matte clothing works best
- Remove glasses
- Tie back loose hair
- Avoid shiny jewelry
Lighting & Environment
- Even, diffused lighting ideal
- Avoid direct sunlight
- Indoor lighting works well
- Comfortable temperature
Subject Comfort
- Explain process beforehand
- Allow practice poses
- Take breaks if needed
- Comfortable environment
💇 Hair & Skin Tone Considerations
👱 Hair: The Scanning Nemesis
Volume and shape only
Sculpt details later
Color compensates geometry
Slicked down for some apps
🎨 Skin Tone Handling
Very Dark Skin:
- Slightly closer scanning
- Ensure good ambient light
- Multiple passes help
Very Light/Reflective Skin:
- Matte powder reduces shine
- Avoid oils/moisturizers
- Diffused lighting ideal
🔒 Privacy and Ethical Considerations
✅ Best Practices
- Always obtain explicit consent
- Explain data use and storage
- Allow review/approval of scans
- Secure biometric data storage
- Follow local regulations (GDPR, etc.)
📋 Documentation
- Signed consent forms
- Purpose documentation
- Data retention policies
- Deletion procedures
- Access controls
🎯 Comparison: Human Scanning Options
✅ Our Winner
Revopoint RANGE
$500-700
- Eye-safe infrared
- Accessible price
- Good for small operations
- 3-5 minute scans
Casual/Phone Apps
Free-$50
- Face scanning only
- Limited accuracy
- Convenient but basic
- Good for experimentation
Professional Studio
$10k+
- Artec Eva or similar
- Highest detail/accuracy
- High-volume workflows
- Studio setup required
👤 Who Should Buy It:
- Medical professionals (prosthetics, orthotics)
- Costume and fashion designers
- Game developers and animators
- Artists and sculptors
- Fitness professionals
- Anyone regularly scanning people
🎯 Who Should Choose Differently
Professional Studios
Invest in: Artec Eva ($15k+)
High-volume, highest detail needs
Casual Face Scanning
Use: Phone apps (free)
Limited to face, basic needs
Highest Detail Requirements
Spend more for: Artec or Einscan Pro
When every micron matters
🏁 Bottom Line
The RANGE at $500-700 is the most accessible eye-safe scanner for human body and face scanning. While professional studios should invest in more expensive solutions, the RANGE democratizes human 3D scanning for smaller operations and individuals.
👉 Check Revopoint RANGE Price on Official Store
Eye-safe infrared technology for people scanning
Continue to Smartphone Scanning & Technology Guide
Next: Comprehensive reviews of the best 3D scanner apps (Polycam, Scaniverse, KIRI Engine), plus explanations of scanning technologies and key specs.
Smartphone 3D Scanner Apps
At a Glance: Turn your phone into a 3D scanner with these apps.
👍 Best For: Beginners, casual users, and anyone wanting to try scanning before buying hardware.
The Smartphone Revolution:
Your phone might already be the Best 3D Scanner App platform you own. Modern smartphones with LiDAR sensors (iPhone 12 Pro and newer, some Android flagships) or advanced cameras can create surprisingly good 3D scans.
⚠️ Reality Check: Smartphone scanning won’t replace dedicated hardware for precision work, but it’s remarkable for:
- Quick rough captures
- Learning 3D scanning concepts
- Architectural documentation
- Sharing objects online
- Creative projects where accuracy isn’t critical
Think of phone scanning as “good enough for many things” rather than “professional quality for everything.”
Best 3D Scanner App Overall: Polycam
Price: Free (limited), $12.99/month, or $99.99/year (Pro)
Platforms: iOS (with LiDAR support), Android (photogrammetry only)
Why Polycam Wins:
Polycam offers the most comprehensive smartphone scanning solution in 2026. It supports multiple capture technologies:
- LiDAR Scanning (iPhone/iPad with LiDAR sensor)
- Photo Mode (Photogrammetry – works on any smartphone)
- Room Scanning (Architecture and interiors)
📱 Performance on iPhone 15 Pro (LiDAR)
±5-10mm
(ideal conditions)
30 sec – 2 min
(per object)
OBJ, STL, USDZ, GLB, PLY
📸 Three Scanning Modes
LiDAR Mode
iPhone 12 Pro+ with LiDAR
- Fast real-time scanning
- Good for room-sized objects
- Works in varied lighting
- Example: Bookshelf scan (45 sec)
Photo Mode
Any smartphone camera
- 20-100 photos around object
- 5-30 minute cloud processing
- Best for textured objects
- Example: Motorcycle fairing repair
Room Scanning
Interiors & architecture
- Auto-detects floors/walls
- Creates floor plans
- Photorealistic models
- Used by real estate pros
💰 Polycam Pricing Breakdown
Free Tier
- 3 scans per week
- Basic export options
- Limited processing quality
- Good for: Testing and learning
Pro ($99.99/year)
- Unlimited scans
- High-resolution processing
- All export formats
- Priority processing
- Commercial use allowed
- Verdict: Worth it for regular users
🎯 Real-World Polycam Examples
✅ Success Story
Motorcycle fairing repair: Scanned damaged fairing with Photo mode (100 photos). Imported to Fusion 360, designed custom bracket, 3D printed it.
Result: Functional repair
Cost: $0 (free tier)
Time: 2 hours total (vs. $200+ for new part)
⚠️ Limitation Example
Small mechanical part: Tried scanning 50mm carburetor with LiDAR mode. Result was too imprecise for functional use.
Polycam: 1-2mm accuracy (too imprecise)
POP 3 Plus: 0.1mm accuracy (functional part)
Conclusion: Phone apps limited for precision work
👤 Who Should Use Polycam:
- iPhone/iPad users with LiDAR sensors
- Anyone learning 3D scanning
- Real estate and interior design professionals
- Casual users who scan occasionally
- Content creators needing quick 3D models
- Students and educators
- Anyone wanting to try scanning before buying hardware
🏁 Bottom Line
Polycam at $99/year (or free for occasional use) is the Best 3D Scanner App for most users. It’s versatile, well-supported, and produces results good enough for many applications.
Best Free 3D Scanner App: Scaniverse
Price: Free (completely free, no subscriptions)
Platform: iOS only (iPhone and iPad with LiDAR)
Why Scaniverse Is The Best Free Option:
Scaniverse is made by Niantic (Pokémon GO developers) and is genuinely free—no ads, no subscriptions, no limitations. For iPhone users with LiDAR, it’s an incredible value.
🎁 Key Features (All Free!)
High-Quality LiDAR
Professional results
Unlimited Scans
No restrictions
All Export Formats
OBJ, STL, USDZ, GLB, FBX, PLY
Cloud Storage
Free storage included
⚠️ Limitations
Platform Limited
iOS only – No Android support
Requires LiDAR sensor (iPhone 12 Pro+)
Feature Limited
No photogrammetry mode
Fewer advanced tools than Polycam Pro
👤 Who Should Use Scaniverse:
- iPhone users wanting free scanning
- Beginners learning 3D scanning
- Casual users who scan occasionally
- Anyone wanting to test LiDAR scanning capabilities
- Students with limited budgets
🏁 Bottom Line
Scaniverse is the best free 3D scanning solution. If you have a compatible iPhone or iPad, download it immediately—there’s no reason not to.
Best Budget 3D Scanner App: KIRI Engine
Price: $9.99/month (occasionally $59.99/year)
Platform: iOS and Android
Why KIRI Engine Offers Value:
KIRI Engine provides professional-level features at one-third the price of Polycam Pro. For $10/month, you get:
- LiDAR scanning (on compatible devices)
- Photogrammetry processing
- Gaussian splatting (cutting-edge 3D capture)
- NeRF (Neural Radiance Fields) rendering
- Unlimited scans
- High-resolution exports
✨ Gaussian Splatting Advantage
Captures reflections & transparency
Stunning visual presentation
Not solid geometry
🎯 Real-World Use Case
Product Photography Revolution
Product photographers love KIRI Engine for creating interactive 3D views of products.
Static, limited angles
Interactive, 360° view
Reflections, transparency
Result: Customers can spin products, zoom in, view from all angles—dramatically better than traditional product photos.
👤 Who Should Use KIRI Engine:
- Android users wanting quality scanning
- Budget-conscious professionals
- Product photographers
- Those interested in cutting-edge 3D technologies
- Users who want cross-platform compatibility
🏁 Bottom Line
KIRI Engine at $9.99/month is the Best 3D Scanner App for budget-conscious users who need professional features.
.
📱 Comparison: Best 3D Scanner Apps
| App | Price | Platform | Technology | Best For | Our Rating |
|---|---|---|---|---|---|
|
⭐ Polycam
|
Free tier (3 scans/week)
$99.99/year (Pro)
Monthly: $12.99
|
📱 iOS (LiDAR + Photo)
📱 Android (Photo only)
|
LiDAR
Photogrammetry Room Scan |
Overall best, most features
Real estate, interior design, learning
|
★★★★★
5/5
|
|
🎁 Scaniverse
✓ Completely Free
|
FREE
No subscriptions, no ads
|
📱 iOS only
Requires LiDAR (iPhone 12 Pro+)
|
LiDAR
✗ No photogrammetry
|
Best free option
Casual users, beginners, testing LiDAR
|
★★★★☆
4.5/5
|
|
💰 KIRI Engine
|
$9.99/month
$59.99/year (occasional offer)
~1/3 Polycam Pro price
|
📱 iOS (LiDAR + Photo)
📱 Android (Photo only)
|
LiDAR
Photogrammetry Gaussian Splatting NeRF |
Budget professional features
Product photography, cutting-edge tech
|
★★★★☆
4/5
|
|
🎯 3D Scanner App
Simple, focused app
|
$4.99 (one-time)
No subscriptions
|
📱 iOS only
Requires LiDAR
|
LiDAR
|
Simple one-time purchase
Basic needs, no subscriptions wanted
|
★★★☆☆
3/5
|
|
🔄 Qlone
|
Free tier (limited)
Up to $30 (one-time)
Various purchase options
|
📱 iOS & Android
No LiDAR required
|
AR Pattern
Requires printed mat
|
Printed mat scanning
Education, consistent small objects
|
★★★☆☆
3/5
|
📊 Quick Decision Guide
Choose Polycam if:
You want the most features & can afford $99/year
Choose Scaniverse if:
You have iPhone with LiDAR & want free quality
Choose KIRI Engine if:
You want cutting-edge tech & are budget-conscious
Types Of 3D Scanners Explained
Technology Overview: Understanding different 3D scanning technologies.
🎯 Purpose: Choose the right technology for your specific scanning needs.
Understanding scanner technologies helps you choose the right tool. Here’s what you need to know about each type.
📐 Structured Light Scanning
🔧 How It Works:
A projector displays a pattern (lines, grid, or random dots) onto the object. Cameras capture how the pattern deforms over the object’s surface. Software calculates 3D shape from these deformations.
✅ Pros:
- High accuracy (0.02mm-0.1mm possible)
- Fast capture (10-30fps)
- Good detail capture
- Relatively affordable
- No moving parts
⚠️ Cons:
- Struggles with shiny/dark surfaces
- Requires controlled lighting
- Limited range (typically 0.1m-2m)
- Can’t scan transparent objects
🔴 Laser Triangulation
🔧 How It Works:
A laser line or point is projected onto the object. A camera at a known angle observes the laser. The camera’s perspective of the laser’s position reveals 3D depth.
✅ Pros:
- Extremely high accuracy (0.01mm-0.05mm)
- Excellent for precision metrology
- Works on dark surfaces (with proper laser)
- Creates very clean data
⚠️ Cons:
- Slower than structured light
- More expensive
- Shiny surfaces still challenging
- Usually smaller scan volume
📸 Photogrammetry
🔧 How It Works:
Multiple photographs taken from different angles are analyzed by software. Algorithms identify matching points across images and calculate 3D positions using triangulation principles.
✅ Pros:
- Can capture enormous objects (buildings, landscapes)
- Uses ordinary cameras (low equipment cost)
- Captures excellent color/texture
- Very flexible
⚠️ Cons:
- Slow processing (minutes to hours)
- Requires good photography skills
- Accuracy varies widely (1mm-10mm+)
- Needs textured surfaces (struggles with uniform colors)
📡 LiDAR (Light Detection And Ranging)
🔧 How It Works:
Pulses of laser light are sent out. The scanner measures the time it takes for each pulse to return, calculating distance. Modern LiDAR scanners send millions of pulses per second.
✅ Pros:
- Very long range (1m-100m+)
- Fast large-area capture
- Works in various lighting conditions
- Captures environments effectively
⚠️ Cons:
- Lower resolution than structured light
- More expensive (for terrestrial LiDAR)
- Smartphone LiDAR has limited accuracy
- Not ideal for small objects
📊 Technology Comparison Chart
| Technology | Accuracy | Speed | Cost | Object Size | Difficulty | Color Capture |
|---|---|---|---|---|---|---|
|
📐 Structured Light
Pattern projection
|
0.02-0.1mm
High precision
|
Fast
10-30fps
|
$$
$400-$2,000
|
10mm-2m
Small-medium
|
Easy
Beginner friendly
|
✅ Yes
With cameras
|
|
🔴 Laser Triangulation
Laser line/point
|
0.01-0.05mm
Highest precision
|
Medium
Slower than SL
|
$$$
$900-$8,000+
|
10mm-500mm
Small-parts
|
Medium
Some training needed
|
✅ Yes
Additional cameras
|
|
📸 Photogrammetry
Multiple photos
|
1-10mm
Low-medium
|
Slow
Processing time
|
$-$$$
$0-$2,000
|
Any size
Buildings to small
|
Medium-Hard
Photo skills needed
|
✅ Excellent
Best color/texture
|
|
📡 LiDAR
Laser time-of-flight
|
5-50mm
Low-medium
|
Very Fast
Real-time capture
|
$-$$$$$
$500-$50,000+
|
1m-100m+
Large-scale
|
Easy
Point and scan
|
✅ Yes
Combined with camera
|
🎯 Quick Technology Selector
Structured Light
Choose for: 3D printing, small-medium objects, indoor use
Laser Triangulation
Choose for: Precision measurement, quality control, metrology
Photogrammetry
Choose for: Large objects, outdoor scanning, texture quality
LiDAR
Choose for: Large spaces, architecture, fast environment capture
Key Specs That Actually Matter
Guide: Cut through marketing hype to understand what specs really matter.
🎯 Purpose: Anyone comparing scanners and confused by technical specifications.
Scanner specs can be overwhelming. Here’s what to actually pay attention to and what you can ignore.
🎯 Accuracy vs. Resolution: The Most Misunderstood Specs
🎯 Accuracy
How close measurements are to actual dimensions.
Example: 0.05mm means measurements are within ±0.05mm of true size.
📏 Resolution
The spacing between captured points.
Example: 0.1mm resolution means points are 0.1mm apart on the surface.
📊 Comparison Example
Scanner A
Result: More accurate dimensions, slightly less detail
Good for functional parts
Scanner B
Result: More detail captured, dimensions slightly less accurate
Good for artistic/visual work
🔍 What You Actually Need
🖨️ For 3D Printing
- Accuracy: 0.1mm is fine for most hobbyist work
- Resolution: 0.05-0.1mm captures good detail without massive files
🔧 For Reverse Engineering
- Accuracy: 0.05mm or better for mechanical parts
- Resolution: Match accuracy (0.05mm)
🎨 For Art/Sculpture
- Accuracy: 0.2-0.5mm is often sufficient
- Resolution: 0.1-0.2mm captures artistic detail
🎯 Bottom Line: Don’t obsess over spec sheets. A scanner with 0.05mm accuracy that’s easy to use beats a 0.02mm scanner that’s frustrating any day.
📐 Scan Volume: Match To Your Objects
⚠️ Common Mistake: Buying based on maximum scan volume you’ll rarely use.
✅ Smart Approach: Consider your typical objects, not outliers.
🎯 Matching Scanner to Object Size
💎 Mostly Small Objects
(jewelry, miniatures, small parts)
Optimal range: 10-200mm
🛠️ Mix of Sizes
(hand tools, household items, mechanical parts)
Range: 90mm-1m+
🏠 Primarily Large Objects
(furniture, sculptures, car parts)
With photo kit for extra-large items
💻
Software Quality: The Hidden Dealbreaker
💡 Hardware gets all the attention, but software makes or breaks your scanning experience. I’ve seen users abandon $2,000 scanners because the software was unusable, while happily using $500 scanners with great software.
🚨 Red Flags (Avoid)
- Frequent crashes during scanning or processing
- Unclear error messages that don’t help you fix problems
- Poor documentation or outdated tutorials
- Abandoned development (no updates in over a year)
- Expensive subscription fees for basic features
- Complicated workflows with too many unnecessary steps
✅ Green Flags (Look For)
- Regular updates with bug fixes and new features
- Active user community (forums, Discord, Facebook groups)
- Comprehensive tutorials for beginners and advanced users
- Responsive support (email, chat, or ticket system)
- Free or reasonable software costs (one-time purchase ideal)
- Intuitive interface with helpful tooltips and guides
Why It Matters: Bad software ruins good hardware. Always research software reviews and watch tutorial videos before buying any scanner. The best hardware paired with terrible software will collect dust.
🎯 Why Software Matters More Than You Think
With bad software
With great software
Real experience: I’ve seen users abandon $2000 scanners because the software was unusable, while happily using $500 scanners with great software. Don’t underestimate this factor.
Software & Workflow: The Hidden Dealbreaker
Your scanner is only as good as its software ecosystem. Here’s what to consider.
Proprietary vs. Third-Party Software
📦 Proprietary Software
(comes with scanner)
Pros
- Optimized for your specific hardware
- Usually easier to learn and use
- Integrated end-to-end workflow
- Technical support included with scanner
Cons
- Limited features vs. professional tools
- Subscription costs possible
- Locked to one scanner brand
- May lack advanced processing options
🔌 Third-Party Software
(Geomagic, Artec Studio, etc.)
Pros
- Professional features and tools
- Works with multiple scanner brands
- Advanced processing capabilities
- Industry-standard workflows
Cons
- Expensive ($2,000-$10,000+)
- Steeper learning curve
- May require plugins for scanner compatibility
- Separate support contract often needed
📌 Recommendation: Start with proprietary software. Upgrade to third-party only when you consistently need advanced features that your included software doesn’t provide.
Scan Cleanup: Budget Time For This
⏱️ Reality Check: Raw scans are rarely print-ready or directly usable. Budget 30-60 minutes for cleanup on typical scans.
🧹 Typical Cleanup Tasks & Time
Hole Filling
5-15 minutes
Noise Removal
5-10 minutes
Mesh Smoothing
2-5 minutes
Alignment
10-20 minutes
(if multiple scans)
🆓 Free Cleanup Tools (Start Here)
Meshmixer
Platform: Windows/Mac
Best For: Beginners. Excellent for basic hole filling, support generation, and simple edits.
Blender
Platform: All platforms
Best For: Advanced users. Powerful but steeper learning curve. Can do virtually anything.
MeshLab
Platform: All platforms
Best For: Technical users. Excellent for mesh processing, cleaning, and analysis.
Will These Work With Bambu Lab & Other Printers?
✅ Short Answer: Yes, absolutely.
All 3D scanners work with all 3D printers. There’s no such thing as a “Best 3D Scanner For Bambu Lab” because all scanners export standard file formats that work with all slicers and printers.
🔗 Universal Scan-to-Print Workflow
1. Scan
Creates 3D mesh
2. Cleanup
Fix mesh issues
3. Export
STL file (universal)
4. Import to Slicer
Bambu Studio, Cura, etc.
5. Print
On any printer
🎯 Ideal Scanner + Printer Combinations
Budget Setup
- Scanner: Creality Ferret Pro ($399)
- Printer: Bambu Lab A1 Mini ($300)
- Total: ~$700
- Capability: Scan and print small-medium objects
Enthusiast Setup
- Scanner: Revopoint POP 3 Plus ($699)
- Printer: Bambu Lab P1S ($700)
- Total: ~$1,400
- Capability: Professional-quality scan-to-print workflow
Professional Setup
- Scanner: MIRACO Plus ($1,799)
- Printer: Bambu Lab X1 Carbon ($1,200)
- Total: ~$3,000
- Capability: Complete professional production capability
Common 3D Scanner Mistakes To Avoid
Learn from others’ expensive mistakes.
❌ Mistake #1: Buying Based On Specs Alone
The Error: Choosing the scanner with the highest accuracy numbers without considering usability.
✅ Better Approach: Prioritize ease of use, software quality, and support. Specs come second.
❌ Mistake #2: Ignoring Surface Preparation
The Error: Expecting scanners to handle shiny, dark, or transparent objects without help.
✅ Reality: Physics doesn’t care. Keep scanning spray on hand. Accept this as part of the process.
❌ Mistake #3: Underestimating Post-Processing Time
The Error: Thinking scanning is the end of the process.
✅ Solution: Budget 30-60 minutes for cleanup. Learn mesh editing tools.
❌ Mistake #4: Wrong Scanner For Object Size
The Error: Using a small-object scanner for large items, or vice versa.
✅ Solution: Match scanner capabilities to your typical object sizes. Consider two scanners if you regularly work at vastly different scales.
❌ Mistake #5: Overlooking Software Quality
The Error: Focusing entirely on hardware while ignoring software ecosystem.
✅ Why It Matters: Bad software ruins good hardware. Always research software reviews before buying.
Frequently Asked Questions
Are Cheap 3D Scanners Worth It?
✅ Short Answer: Yes, but know what you’re getting.
Modern sub-$500 scanners like the Creality Ferret Pro at $399 or Revopoint INSPIRE at $449 deliver legitimate 3D scanning capability that would’ve cost $5,000+ in 2020.
They’re Worth It If:
- You understand accuracy limitations (0.1-0.2mm)
- You’re willing to learn post-processing
- You primarily scan medium-sized objects
- Budget is a hard constraint
- You’re learning/exploring 3D scanning
They’re Not Worth It If:
- You need professional accuracy (<0.05mm)
- You’re billing clients for scanning services
- Time is money in your workflow
- You scan very small or very large objects
- You expect plug-and-play perfection
The Best Cheap Scanner: Creality Ferret Pro at $399-499 offers the best value in this category. It won’t match a $2,000 scanner, but it’s genuinely capable for hobbyist work.
Can I Scan With My Phone?
✅ Short Answer: Yes, and results are better than you’d expect.
If You Have iPhone 12 Pro or Newer:
Your phone includes LiDAR. Use Scaniverse (free) or Polycam ($99/year). You’ll get:
- Accuracy: ±5-10mm (good for room scanning, rough captures)
- Speed: Very fast (30 seconds to 2 minutes)
- Convenience: Always in your pocket
- Cost: Free to $99/year
👍 Best For:
- Room layouts and architecture
- Quick rough captures
- Learning 3D scanning concepts
- Sharing objects online
- Creative projects
👎 Not Suitable For:
- Precision parts (accuracy insufficient)
- Manufacturing (too imprecise)
- Small detailed objects (resolution limited)
- Professional paid work
Bottom Line: Phone scanning is excellent for casual use and learning. It won’t replace dedicated hardware for serious work, but it’s free (or cheap) and surprisingly capable.
Do I Need A Powerful PC?
✅ Short Answer: Depends on the scanner and your scan complexity.
Minimum Requirements
(Most Consumer Scanners)
- CPU: Intel i5 / AMD Ryzen 5 (recent)
- RAM: 16GB (8GB barely workable)
- GPU: Dedicated helpful but not required
- Storage: SSD with 100GB+ free
Recommended For Smooth Workflow
- CPU: Intel i7/i9 or AMD Ryzen 7/9
- RAM: 32GB
- GPU: NVIDIA RTX 3060 or better
- Storage: NVMe SSD with 500GB+ free
🎯 Standalone Scanners Are Game-Changers: MIRACO and MIRACO Plus don’t require a PC for scanning. They process on-device. You only need a PC for advanced post-processing.
Bottom Line: Budget PC is fine for learning and casual scanning. Invest in better hardware when scanning becomes a regular workflow bottleneck.
Is Photogrammetry Better Than 3D Scanner?
✅ Short Answer: Neither is “better”—they’re different tools for different jobs.
Photogrammetry Wins When:
- Objects are very large (buildings, vehicles, landscapes)
- Outdoor scanning is required
- Budget is extremely limited (can use phone camera)
- Color/texture quality is critical
- Objects have good surface texture
Dedicated Scanners Win When:
- Accuracy matters (mechanical parts, engineering)
- Speed is important (minutes vs. hours)
- Objects lack texture (uniform colors, smooth surfaces)
- Indoor controlled environment
- Small-medium objects
🤝 Hybrid Approach: The MIRACO Plus includes photogrammetry capability alongside structured light scanning. This gives you the best of both worlds—use structured light for detail, photogrammetry for scale.
Bottom Line: Professional workflows often use both technologies. Choose based on your specific needs, or get a hybrid solution like MIRACO Plus.
Our Verdict: Which Scanner Should You Buy?
After testing 20+ scanners across six months, here’s my definitive buying guide based on your situation.
👶 If You’re A Beginner
Why: Built-in IMU tracking, beginner-friendly software, forgiving workflow.
Skip If: You’re tech-savvy and want to save $50 by jumping directly to Ferret Pro.
🛠️ If You’re A Hobbyist/3D Printing Enthusiast
Buy: Revopoint POP 3 Plus ($599-699)
Why: Professional 0.04mm accuracy at hobbyist pricing. The sweet spot.
Alternative: Creality Ferret Pro ($399) if budget is tight.
💼 If You’re A Professional
Buy: EinScan Pro HD ($5,999-7,999)
Why: Proven reliability, professional support, multi-mode flexibility, CAD integration.
Alternative: Revopoint MIRACO Plus ($1,799) if you’re just entering professional scanning.
💰 If You’re On A Tight Budget
Buy: Creality Ferret Pro ($399-499)
Why: Best performance per dollar under $500. Fast scanning, wireless operation.
Free Alternative: Scaniverse app if you have iPhone 12 Pro or newer.
🎯 If You Need Versatility
Buy: Revopoint MIRACO Plus ($1,799)
Why: Standalone operation, dual scanning modes, photogrammetry kit, handles objects from 20mm to entire vehicles.
Alternative: MIRACO ($899-999) if you don’t need photogrammetry.
🔬 If You Scan Small Objects
Buy: Revopoint MINI ($399-599)
Why: Purpose-built for objects 10-200mm with 0.02mm precision and blue light technology.
Also the Best 3D Scanner For Miniatures
📦 If You Scan Large Objects
Buy: Revopoint RANGE ($500-700)
Why: Infrared technology optimized for large objects up to 4m. Eye-safe, fast, affordable.
Upgrade: MIRACO Plus ($1,799) if you also need small object capability.
🚗 If You Scan Car Parts
Buy: Revopoint MIRACO Plus ($1,799)
Why: Portable, standalone, dual-mode, photogrammetry included. Purpose-built for automotive scanning.
Final Thoughts
3D scanning in 2026 is more accessible, affordable, and capable than ever. Whether you’re spending $400 or $40,000, there’s a scanner that fits your needs and budget.
🏆 My Top 3 Recommendations
🥇 Best Overall Value
If you can only afford one scanner and need reliable results, this is it. Professional accuracy at a hobbyist price.
🥈 Best For Versatility
Revopoint MIRACO Plus ($1,799)
For professionals and serious hobbyists who need to handle diverse scanning challenges from tiny parts to entire vehicles.
🥉 Best For Professionals
When accuracy, reliability, and support justify the investment for reverse engineering and professional applications.
🚀 Start Here
If you’re still unsure, start with a phone scanning app (Scaniverse is free). Learn the concepts, understand the workflows, and identify your needs. Then invest in dedicated hardware that matches those needs.
The Technology Is Ready. Are You?
3D scanning has crossed the threshold from “specialist tool” to “accessible technology.” The question isn’t whether to scan—it’s which scanner to buy.
Choose wisely, scan often, and create amazing things.
Article Last Updated: March 2026 | Based on testing of 20+ 3D scanners over six months.
All product links are affiliate links that support our testing. We never accept paid placements.
