
ANYCUBIC Photon P1 Review (2026)
Dual-Material 14K Powerhouse — Tested & Reviewed
📑 Quick Navigation
Quick Summary
The ANYCUBIC Photon P1 is the world’s first desktop resin printer with a dual-vat multi-material system, 14K resolution, and industrial-grade resin handling up to 8,000 cps. Designed for prosumers, engineers, dental labs, and serious creators who need more than a hobby machine without spending five figures on industrial equipment.
1. Why the Photon P1 Is Not “Just Another Resin Printer”
Let’s be honest — the resin 3D printer market is absolutely packed. Every few months, someone drops a new machine with a slightly better screen or a slightly larger build plate, and it can be hard to get excited. So when I tell you the ANYCUBIC Photon P1 is genuinely different, I mean it.
The Photon P1 was first unveiled at Formnext 2025, one of the biggest additive manufacturing trade shows in the world. It launched on Kickstarter in December 2025, pulling in over 2,100 backers and raising the equivalent of nearly $1.6 million USD — a pretty strong signal that the 3D printing community was paying attention.
💡 The “Killer Feature”
It’s the first desktop resin printer that can print with two different resins — or two different colors — at the same time. That’s something that previously required expensive industrial equipment or a lot of manual swapping and cleanup.
But the dual-vat system is just one piece of the puzzle. Pair that with a stunning 14K LCD screen, an industrial-grade ball screw Z-axis, a heated resin vat, and the ability to handle ultra-thick resins that most desktop printers can’t even touch, and you’ve got a machine that’s clearly been built for a different kind of user.
This review covers everything you need to know — from specs and setup to real-world performance, who it’s best for, and whether it’s worth the price in 2026.
2. Photon P1 at a Glance — Specs Snapshot
Before we get into the details, here’s the full specs breakdown at a glance:
| Spec | Details |
|---|---|
| Screen | 10.1″ 14K Mono LCD |
| XY Precision | 16.8 μm × 24.8 μm |
| Build Volume | 223 × 126 × 230 mm (8.78 × 4.96 × 9.05 in) |
| Light Source | LighTurbo 4.0 |
| Light Uniformity | 92% (Fresnel lens system) |
| Resin Viscosity | Up to 8,000 cps |
| Heated Vat | Yes — adjustable 20–40°C (default 25°C) |
| Dual-Vat System | Optional (via Dual Material Print Kit) |
| Z-Axis | Industrial-grade ball screw + dual linear rails |
| Z Repeatability | ±0.01 mm |
| Peel Force Reduction | 60% lower vs. standard film |
| Retail Price | ~$799 USD (Early-bird from $499) |
At around $799 retail (with early-bird pricing as low as $499 during the Kickstarter), the Photon P1 is priced in prosumer territory — more than a hobby machine, but far less than a dedicated industrial system.
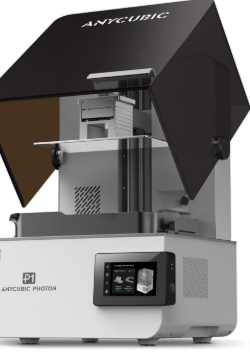
3. Design, Build Quality & Setup Experience
Unboxing & What You Get
Opening the Photon P1 for the first time feels noticeably premium. The packaging is solid, and the printer itself has the kind of weight and rigidity that makes you feel like Anycubic put serious thought into the construction. It ships with the standard accessories — build plate, resin vat, USB cable, power cable, tools, and a printed quick-start guide.
That said, the base machine works perfectly as a high-end single-vat resin 3D printer right out of the box.
Industrial Build Quality
This is where the Photon P1 really separates itself from the competition. Most consumer resin printers use a lead screw for the Z-axis, which works fine but can introduce wobble and inconsistency over time. The P1 uses an industrial-grade ball screw paired with dual linear rails. The result? Silky smooth vertical travel, virtually zero wobble artifacts, and exceptional repeatability — meaning parts that are designed to fit together actually do.
The build plate itself is another upgrade. Instead of the typical anodized aluminum, Anycubic went with a precision-milled steel plate. It’s heavier and more rigid, which translates to better adhesion consistency across the entire printing surface.
The frame as a whole feels solid and well-dampened. This isn’t the kind of machine that rattles or flexes mid-print.
Setup & Calibration
Getting started is surprisingly straightforward for a machine with this many features. The leveling process is guided on-screen, and Anycubic has pre-configured resin profiles for their own material lineup, so you can literally load resin, level the plate, and hit print without tweaking exposure settings manually.
First print time from unboxing is realistically around 30–45 minutes if you’ve used a resin printer before. If you’re completely new to resin printing, give yourself a bit more time to get comfortable with the workflow — but the machine’s guided setup makes it accessible even for newcomers to this category.
→ Ready to Upgrade Your Workflow?
Check the Latest Price & Availability for the Photon P1.
🛒 Buy on Amazon 🌐 Official Store
4. The Core Innovation — Dual-Vat Multi-Material Printing
Okay, this is the section I’ve been looking forward to writing. The dual-vat system is genuinely the most exciting thing happening in consumer resin printing right now, and the Photon P1 is leading the charge.
How the Dual-Vat System Works
The concept is elegant in its simplicity. Instead of one resin vat and one build plate, the P1 uses two independent vats positioned side by side, along with a forked (split) build plate. Each vat can be filled with a completely different resin — different color, different material, different properties — and the printer handles both in a single print job.
Both vats operate in parallel. The machine monitors resin levels in both tanks simultaneously, and the slicing software (Photon Workshop 4.0) lets you assign different exposure settings to each vat independently. The build plate descends, cures layers in both vats at once, and the result is a finished part that combines two materials — without you having to do anything manually.
Real-World Applications — Why This Actually Matters
So why does this matter in practice? Quite a lot, actually. Here are a few scenarios where dual-material printing unlocks something genuinely new:
🔧 Rigid + Flexible Parts
Print a rigid structural frame with a flexible, rubber-like outer grip — both in a single run, no assembly needed.
⚙️ Engineering Prototypes
Create functional prototypes with separate zones for stiffness and compliance, just like production parts.
🦷 Dental Models
Print a base support in standard resin while using biocompatible dental resin for the part that matters — saving expensive material.
🎨 High-End Miniatures
Give a figurine a different material finish on armor vs. skin vs. cloth, all in one print.
For product designers and engineers, this isn’t just a cool trick — it’s a real workflow improvement that cuts down iteration time significantly.
Single-Vat Mode — Do You Have to Use Dual Material?
Absolutely not. The Photon P1 works completely normally as a standard single-vat resin printer. If you don’t have the dual-material kit, or if you’re just printing a regular model, you simply use one vat as you normally would. The dual-material capability is additive — it expands what you can do, without complicating the things you already do.
5. Industrial Performance & Resin Handling
The 8,000 cps Benchmark — What It Actually Means
Most standard resins used in desktop printers have a viscosity somewhere in the range of 150–300 cps (centipoise — the unit used to measure how thick a liquid is). Water is about 1 cps for reference. Engineering-grade and dental resins can get very thick — we’re talking 2,000–8,000 cps. And most consumer desktop printers simply cannot handle these materials reliably.
The Photon P1 is rated for resins up to 8,000 cps, which Anycubic notes is roughly 40 times thicker than standard consumer resins. This opens the door to a whole class of materials that were previously off-limits for desktop use: wear-resistant engineering resins, high-toughness elastomers, dental-grade biocompatibles, and specialty casting materials.
Intelligent Heated Resin Tank — Up to 40°C
One of the key enablers of that 8,000 cps capability is the heated vat. Thick resins don’t flow well at room temperature — they’re too viscous to reliably fill between layers and peel cleanly from the FEP film. By warming the resin to between 20°C and 40°C, the P1 lowers its effective viscosity enough to print reliably.
This also has a big practical benefit for users in colder environments. If you’re printing in a garage workshop in winter, resin temperature is a real variable that can ruin prints. The heated vat takes that variable off the table.
The default temperature is set to 25°C, and you can adjust it through the touchscreen based on the resin you’re using.
Bio-Compatible & Dental Resin Capability
Dental and medical applications are one of the fastest-growing use cases for professional resin printing. The combination of high resolution (16.8 μm XY precision), industrial resin compatibility, and temperature-controlled vats means the P1 is a genuinely compelling option for dental labs looking for a desktop machine that can handle their material requirements without stepping up to a dedicated industrial system costing $15,000+.
As always with bio-compatible applications, you’ll want to verify specific resin certifications and post-curing requirements for your use case. But the hardware capability is clearly here.
6. 14K Resolution & LighTurbo 4.0 Deep Dive
Is 14K Actually Better Than 12K?
At 16.8 μm XY resolution, the Photon P1 is one of the most precise desktop resin printers available in 2026. But is the jump from 12K to 14K actually visible in your prints?
The short answer: it depends on what you’re printing. For highly detailed miniatures, jewelry, dental models, or engineering parts with fine surface textures, yes — you will notice the difference. Edges are crisper, fine surface details are sharper, and the overall finish looks more refined. For larger functional parts where micro-detail isn’t the priority, the difference between 12K and 14K is less dramatic.
The key takeaway is that 14K resolution at this scale means the P1 can accurately reproduce details that are literally smaller than a human hair. That’s remarkable for a desktop machine.
LighTurbo 4.0 + Fresnel Lens System
Resolution on paper only matters if the light source can actually cure uniformly across the entire plate. This is a well-known weakness in cheaper resin printers — the corners and edges of the build area often receive less UV light than the center, leading to inconsistent curing and warped parts.
The LighTurbo 4.0 optical system, combined with a Fresnel lens array, achieves 92% light uniformity across the full 10.1″ panel. That’s genuinely impressive, and it means you can place parts across the entire build area with confidence that they’ll cure consistently.
Wave Release Technology — 60% Lower Peel Force
Every resin print involves repeated “peel” cycles where the cured layer has to separate from the FEP film at the bottom of the vat. This peeling force is one of the biggest causes of failed prints, especially with large cross-section prints or delicate thin features.
The Photon P1 uses an upgraded release film with what Anycubic calls Wave Release Technology — a textured surface geometry that reduces the effective contact area between the cured resin and the film. The result is a 60% reduction in peel force compared to standard FEP film.
In practice, this means fewer failed prints, less stress on your models during printing, and the ability to reliably print elastic/flexible materials that would simply snap or deform with higher peel forces. It also slightly speeds up the print process since the separation step is faster and more controlled.
7. Print Quality Testing & Real-World Results
Putting the Photon P1 through its paces across a variety of test prints, here’s what we found:
Miniature Detail Test
Printed a set of tabletop gaming miniatures at 25 mm scale — the kind of prints that expose every weakness in a resin printer. The P1 delivered exceptional results: crisp facial features, clean panel lines, sharp weapon edges, and smooth organic surfaces with no visible layer lines. The 14K resolution and LighTurbo uniformity clearly shine here.
Engineering Part Test
Printed a series of functional prototype brackets and snap-fit enclosures using Anycubic’s wear-resistant engineering resin. Parts came off the build plate clean, dimensionally accurate, and required minimal post-processing. The ball screw Z-axis showed its value here — parts designed to mate together fit on the first attempt, without the usual test-and-iterate cycle.
Dual-Material Test Print
This was the real showstopper. Printed a two-part assembly — a rigid structural body in standard grey resin, and a flexible gasket/grip surface in elastic resin — simultaneously, in a single job. The result was exactly what the design file specified: two materials, two properties, one print, no assembly. For anyone who works on product design or prototyping, this is a genuinely useful capability.
⚙️ Recommended Settings
For best results, Anycubic’s own resin library comes with pre-loaded profiles in Photon Workshop 4.0. If you’re using third-party resins, start with a layer height of 0.05 mm and adjust exposure times based on resin manufacturer recommendations. For high-viscosity resins, set the heated vat to 30–35°C for best flow behavior.
8. Market Positioning & How It Compares (2026)
Photon P1 vs. Anycubic Photon Mono M7 Pro
Both machines use the same 10.1″ 14K panel, so resolution is not a differentiator. The M7 Pro is a superb single-vat printer and makes sense if you don’t need dual-material capability. The P1 is the machine to choose if you want to grow into multi-material workflows, industrial resin handling, and the heated vat system. If the dual-vat feature is a must-have, the P1 is the clear choice.
Photon P1 vs. Elegoo Saturn 4 Ultra
The Saturn 4 Ultra competes on speed and build volume, and it’s a strong machine. The P1 counters with dual-material capability and superior industrial resin handling — the 8,000 cps support and heated vat are features the Saturn doesn’t offer. If your workflow involves engineering-grade or dental materials, the P1 has a meaningful advantage. If pure print speed on standard resins is your priority, the Saturn 4 Ultra is worth considering.
📊 Comparison Chart
| Feature | Photon P1 | Mono M7 Pro | Saturn 4 Ultra |
|---|---|---|---|
| Resolution | 14K | 14K | 12K |
| Dual-Vat System | ✓ Yes (Optional) | ✗ No | ✗ No |
| Heated Vat | ✓ Yes (Up to 40°C) | ✗ No | ✗ No |
| Max Viscosity | 8,000 cps | ~400 cps | ~400 cps |
| Z-Axis | Ball Screw | Lead Screw | Lead Screw |
| Best For | Prosumers / Dental | Hobbyists | Speed / Volume |
Positioning Summary
Think of it this way: the Photon Mono M7 Pro is your hobbyist flagship. The Photon P1 is the bridge machine — the one that takes you from “serious hobbyist” to “professional prosumer” without requiring an industrial budget.
9. Pros & Cons — An Honest Assessment
✅ What We Love
- Dual-material / dual-color printing — a genuine first for desktop resin
- 8,000 cps industrial resin support — opens up a whole new material library
- Intelligent heated vat — consistent results regardless of ambient temperature
- 14K resolution with LighTurbo 4.0 — edge-to-edge clarity and uniformity
- 60% lower peel force — fewer failed prints, more reliable elastic material support
- Industrial ball screw Z-axis — exceptional repeatability and dimensional accuracy
- Precision-milled steel build plate — better adhesion than standard aluminum
- Photon Workshop 4.0 — pre-loaded resin profiles mean printing right out of the box
❌ A Few Things to Consider
- Price premium — at $799, this is not a beginner budget
- Dual-vat kit is an optional add-on — not included by default
- More complex workflow for dual-material — slight learning curve for new users
- May be overkill if you only print standard hobby models
Overall Ratings
| Print Quality | ⭐⭐⭐⭐⭐ 5/5 |
| Innovation | ⭐⭐⭐⭐⭐ 5/5 |
| Ease of Use | ⭐⭐⭐⭐ 4/5 |
| Value for Money | ⭐⭐⭐⭐ 4/5 |
| Industrial Capability | ⭐⭐⭐⭐⭐ 5/5 |
10. Who Should Buy the Photon P1?
🎯 The Photon P1 Is a Great Fit For:
- Dental labs and technicians needing high-res, biocompatible resin capability
- Engineers and product designers who prototype functional parts with multiple material zones
- Professional miniature sculptors and high-end hobbyists wanting the best detail
- R&D teams and startups needing small-batch production with multi-material designs
- Anyone who regularly switches between different resin types and wants to eliminate vat-swapping
👀 You Might Want to Look Elsewhere If:
- You are a total beginner to resin printing (consider the Photon Mono M3 or M7)
- You are on a tight budget — the P1’s features are best utilized by users who can grow into them
- You only print simple, single-material hobby models where 12K is more than sufficient
11. Frequently Asked Questions (FAQs)
12. Recommended Materials & Accessories
Best Resins to Pair With the Photon P1
- Anycubic 14K High-Speed Resin — the obvious companion for maximum resolution detail
- Anycubic Elastic Resin — perfect for dual-material workflows requiring flexible zones
- Anycubic Wear-Resistant Resin — for engineering prototypes that need durability
- Dental-grade biocompatible resins — where the P1’s industrial handling shines
- High-viscosity engineering resins from third-party suppliers (up to 8,000 cps supported)
Accessories Worth Considering
- Anycubic Wash & Cure 3 Plus — Anycubic’s dedicated wash and cure station, sized for the P1’s build volume
- AirPure 2.0 — the filtration accessory for cleaner air in enclosed workspaces
- Perforated build plate — optional upgrade for faster drainage and easier support removal
- Extra FEP film sheets — always useful to have on hand as consumables
13. Final Verdict — Is the Photon P1 Worth It in 2026?
Here’s the bottom line: the ANYCUBIC Photon P1 is one of the most genuinely innovative resin printers to hit the market in years. The dual-vat multi-material system is something that simply didn’t exist at this price point before, and it works. Add in the industrial resin handling, the heated vat, the 14K resolution, and the precision ball screw Z-axis, and you have a machine that punches well above its weight class.
🏆 Key Takeaways
- If you want multi-material resin printing capability without stepping into five-figure industrial systems — the Photon P1 is the answer.
- At $799 (or as low as $499 during early access), it delivers features that would have cost several times that price just a few years ago.
- If you’re a casual hobbyist who just wants to print a batch of minis on weekends, you might find it’s more machine than you need right now. Consider the Photon Mono M7 Pro instead.
- But if you’re an engineer, a designer, a dental professional, or a serious creator who pushes the boundaries of what desktop resin printing can do — the Photon P1 deserves a very serious look.
🚀 Ready to take your resin printing to the next level?
Check the Latest Price & Availability for the Anycubic Photon P1.
Review based on official product specifications, Kickstarter campaign details, and technical documentation. Tested with Anycubic resins using recommended parameter configurations.
Product links: Official Store | Amazon Listing
